
Building a CRUD-based Spring Boot application with an H2 database is easy and efficient. This article shows you step-by-step how to set up and use H2 for your CRUD operations, making your development process faster and smoother.
Introduction
H2 database is a lightweight and open-source relational database management system that can be used with Java applications. It’s designed to be fast, reliable, and easy to use, making it a popular choice for developers who need a simple database solution. H2 database can be used in various scenarios, including small projects, testing, and development. It supports a wide range of SQL features, including transactions, indexes, and stored procedures. Additionally, the H2 database can be used in-memory or in a file-based mode, giving developers the flexibility to choose the best option for their specific use case.
H2 Database Features
Before we dive into the details, let’s take a look at why you might want to choose the H2 database with Spring Boot.
- Very fast, open source, JDBC API – H2 is a fast, lightweight, and open-source database with a JDBC API that allows easy integration with Java applications.
- Embedded and server modes; disk-based or in-memory databases – H2 can be used in either embedded or server mode, and supports both disk-based and in-memory databases.
- Transaction support, multi-version concurrency – H2 provides support for transactions and multi-version concurrency control (MVCC), which ensures that multiple transactions can be processed concurrently without conflicts.
- Browser-based Console application – H2 comes with a browser-based Console application that allows users to easily manage and interact with their databases.
- Encrypted databases – H2 supports database encryption, which can be used to protect sensitive data.
- Pure Java with a small footprint – H2 is written in pure Java and has a small footprint.
H2 Database Modes
H2 can operate in various modes, including in-memory and persistent modes.
- In-memory mode stores data in RAM and is useful for temporary or short-lived data storage.
- Persistent mode stores data in files on disk, making it useful for long-term storage of data.
H2 Database With Spring Boot
Spring Boot provides seamless integration with the H2 database. Create a new Spring Boot application using Spring Initializr, add Spring Web, Spring Data JPA, and H2 Database dependencies.

Next, you need to configure the database connection properties in the application.properties file:
spring.datasource.url=jdbc:h2:mem:testdb
spring.datasource.driverClassName=org.h2.Driver
spring.datasource.username=sa
spring.datasource.password=
spring.h2.console.enabled=true
spring.h2.console.path=/h2-console
H2 properties:
spring.datasource.url: The JDBC URL for connecting to the database. By default, H2 uses an in-memory database, but you can use a file-based database by specifying a file path in the URL (e.g.jdbc:h2:/data/mydb).spring.datasource.driver-class-name: The fully qualified name of the JDBC driver class to use. For H2, this is typicallyorg.h2.Driver.spring.datasource.usernameandspring.datasource.password: The username and password to use when connecting to the database. By default, H2 uses the usernamesaand an empty password.spring.h2.console.enabled: Whether to enable the H2 web-based console. Set this totrueto enable the console, orfalseto disable it.spring.h2.console.path: The URL path for the H2 console. By default, the console is available athttp://localhost:8080/h2-console, but you can change this path by setting this property.spring.h2.console.settings.trace: Whether to enable tracing in the H2 console. Set this totrueto enable tracing, orfalseto disable it.
Now, let’s create a User entity:
@Entity
@Table(name = "users")
public class User {
    @Id
    @GeneratedValue(strategy = GenerationType.AUTO)
    private Long id;
    private String name;
    private String email;

    // getters and setters
}We also need a UserRepository interface that extends JpaRepository<User, Long>:
@Repository
public interface UserRepository extends JpaRepository<User, Long> {
}
The UserRepository is used for managing User entities in a Spring Boot application. The @Repository annotation is used to indicate that this interface is a Spring Data repository.
By extending the JpaRepository interface, the UserRepository inherits methods for performing common CRUD (Create, Read, Update, Delete) operations on User entities, such as save(), findById(), findAll(), and delete(). These methods are provided by Spring Data JPA and can be customized as per the requirements of the application.
Next, we’ll create a UserController that handles HTTP requests to our API endpoints:
import com.bootcamptoprod.h2.entity.User;
import com.bootcamptoprod.h2.repository.UserRepository;
import org.springframework.beans.factory.annotation.Autowired;
import org.springframework.web.bind.annotation.*;
import org.springframework.http.ResponseEntity;

import java.util.List;

@RestController
@RequestMapping("/api")
public class UserController {

    @Autowired
    private UserRepository userRepository;

    @GetMapping("/users")
    public List<User> getUsers() {
        return userRepository.findAll();
    }

    @PostMapping("/user")
    public User createUser(@RequestBody User user) {
        return userRepository.save(user);
    }

    @GetMapping("/user/{id}")
    public User getUser(@PathVariable Long id) {
        return userRepository.findById(id)
                .orElseThrow(() -> new RuntimeException("User not found"));
    }

    @PutMapping("/user/{id}")
    public User updateUser(@PathVariable Long id, @RequestBody User user) {
        User existingUser = userRepository.findById(id)
                .orElseThrow(() -> new RuntimeException("User not found"));
        existingUser.setName(user.getName());
        existingUser.setEmail(user.getEmail());
        return userRepository.save(existingUser);
    }

    @DeleteMapping("/user/{id}")
    public ResponseEntity<?> deleteUser(@PathVariable Long id) {
        userRepository.deleteById(id);
        return ResponseEntity.ok().build();
    }
}The UserController provides CRUD (Create, Read, Update, Delete) functionality for User entities in the Spring Boot application via the HTTP endpoints it exposes.
Endpoints:
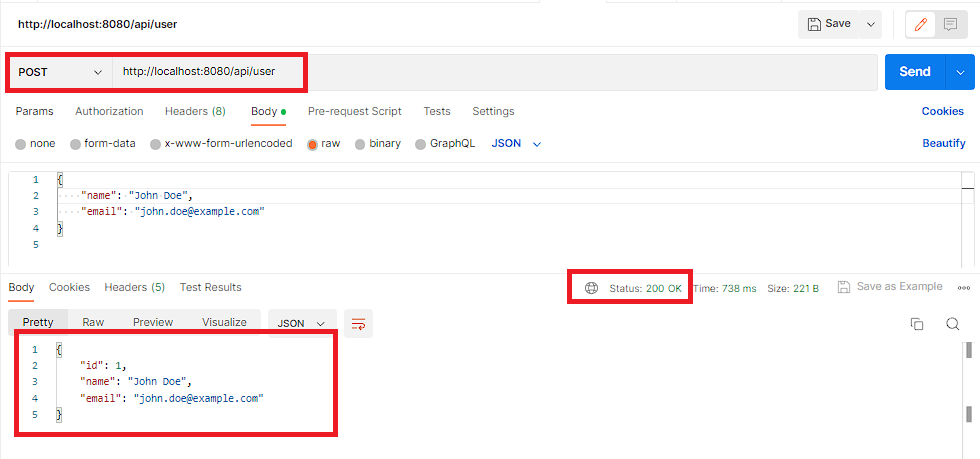
POST /api/user – This endpoint is used to create a new user in the database. We can send a POST request to http://localhost:8080/api/user with a JSON body containing the user’s name and email. The endpoint will return the newly created user object with its generated ID.
curl 'http://localhost:8080/api/user' \
--header 'Content-Type: application/json' \
--data-raw '{
    "name": "John Doe",
    "email": "john.doe@example.com"
}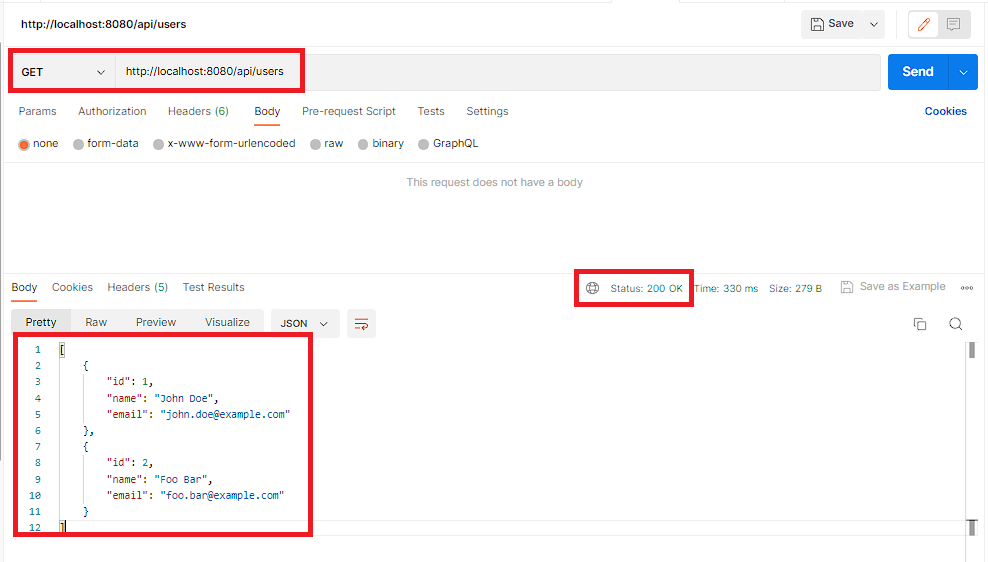
'GET /api/users – This endpoint returns a list of all users in the database as a JSON array. We can test this endpoint by sending a GET request to http://localhost:8080/api/users.
curl 'http://localhost:8080/api/users'
GET /api/user/{id} – This endpoint returns a single user object with the specified ID as a JSON object. We can test this endpoint by sending a GET request to http://localhost:8080/api/user/{id}, where {id} is replaced with the ID of the user we want to retrieve.
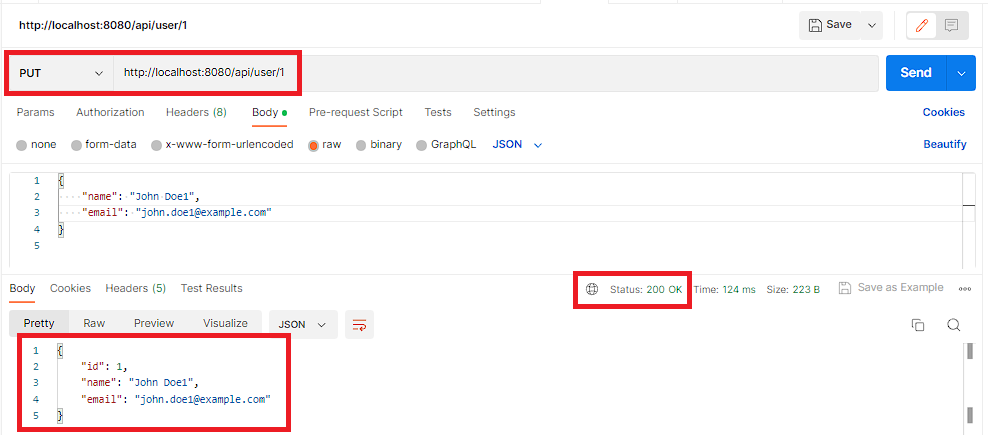
curl 'http://localhost:8080/api/user/1'PUT /api/user/{id} – This endpoint is used to update an existing user in the database. We can send a PUT request to http://localhost:8080/api/user/{id} with a JSON body containing the updated name and email values for the user. The endpoint will return the updated user object.
curl --request PUT 'http://localhost:8080/api/user/1' \
--header 'Content-Type: application/json' \
--data-raw '{
    "name": "John Doe1",
    "email": "john.doe1@example.com"
}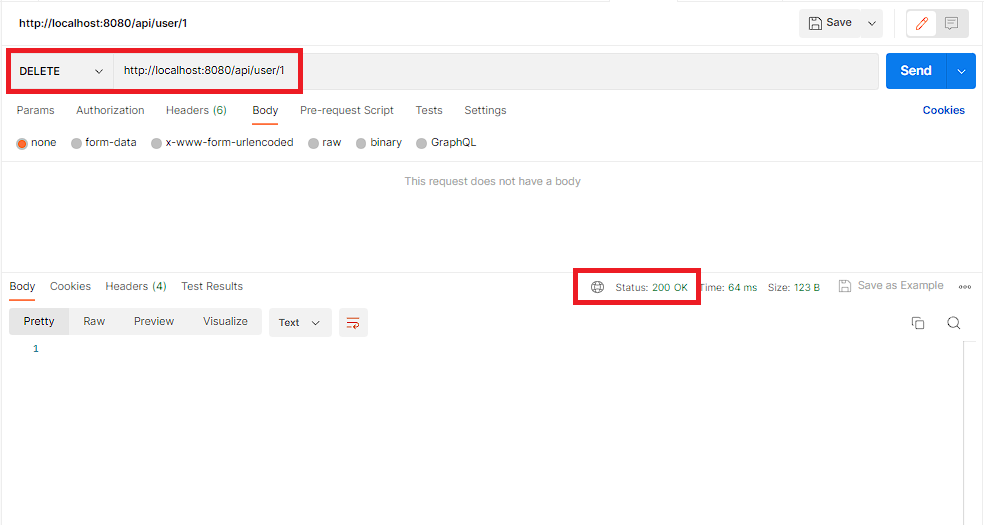
'DELETE /api/user/{id} – This endpoint is used to delete an existing user from the database. We can send a DELETE request to http://localhost:8080/api/user/{id}, where {id} is replaced with the ID of the user we want to delete. The endpoint will return a 200 OK response if the deletion was successful.
curl --request PUT 'http://localhost:8080/api/user/1' \
--header 'Content-Type: application/json' \
--data-raw '{
    "name": "John Doe1",
    "email": "john.doe1@example.com"
}
'Finally, we can start our application and test our API endpoints using a tool like Postman.

Create Schema on Application Startup
In Spring Boot, you can use a schema.sql file to define the database schema that should be used by your H2 database. This file is executed during application startup.
Here are the steps to create and use a schema.sql file to create a schema in H2:
- Create a
schema.sqlfile in thesrc/main/resourcesdirectory of your Spring Boot project. - Add the SQL statements that define the schema you want to create.
- Save the
schema.sqlfile.
CREATE TABLE IF NOT EXISTS admin (
    id BIGINT PRIMARY KEY AUTO_INCREMENT,
    name VARCHAR(255) NOT NULL,
    email VARCHAR(255) NOT NULL
);
This SQL statement creates a table called admin with three columns: id, name, and email. The id column is the primary key and is set to auto-increment.
With the schema.sql file in place, the SQL statements in the file will be executed during application startup and the schema will be created inside the H2 database.
Note that if you have an existing schema in your H2 database, the schema.sql file will be used to update the schema to match the statements in the file. If you want to start with a fresh schema, you can drop the existing schema using the DROP SCHEMA statement at the beginning of the schema.sql file.
Insert Data on Application Startup
In Spring Boot, we can insert data into a database during the application startup process using a file named data.sql. This file needs to be placed in the src/main/resources directory of the project.
Here’s an example of how we can create a data.sql file to insert data for the Admin entity that we created above:
INSERT INTO admin (name, email) VALUES
('John Doe', 'johndoe@example.com'),
('Jane Doe', 'janedoe@example.com');
The above SQL statement inserts two rows of data into the admin table. The id field is auto-generated and the name and email fields are populated with the provided values.
During application startup, Spring Boot will automatically execute the SQL statements in the data.sql file and insert the data into the database. We can then use this data in our application.
It’s important to note that Spring Boot will execute the SQL statements in data.sql before it creates the database schema. Therefore, we need to make sure that the admin table is already created before we try to insert data into it. We can do this by creating the schema in a separate schema.sql file, as shown in the previous example.
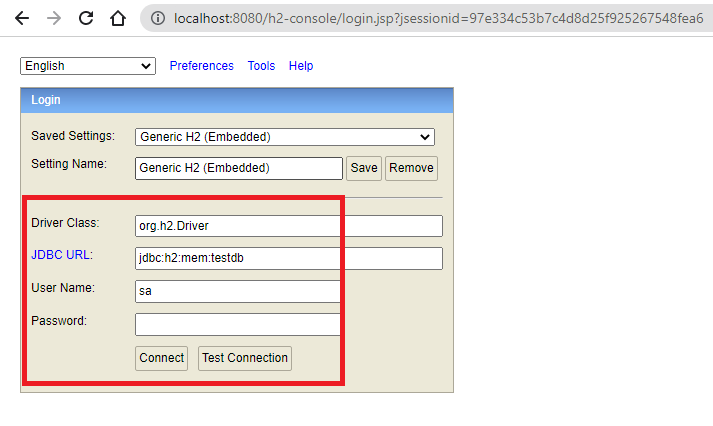
H2 Console
H2 Console is a browser-based database management tool that comes with the H2 database engine. It allows developers to easily view and manage their H2 databases in a user-friendly interface. The H2 Console provides a graphical user interface (GUI) for administering H2 databases, and it supports a wide range of database management tasks, including creating and dropping tables, executing SQL queries, and importing and exporting data. The H2 Console is an excellent tool for developers who want to quickly view the contents of their H2 databases or perform basic database administration tasks without having to use the command line.
In order to access the h2 console we need to add two properties inside our application.properties which we already did.
spring.h2.console.enabled=true
spring.h2.console.path=/h2-console
The spring.h2.console.enabled property enables the console, and spring.h2.console.path sets the path for the console. By default, the console is available at http://localhost:8080/h2-console.
While accessing the H2 console we need to provide the same connection string and properties that we provided inside our application.properties file.
However, we should be careful when using the H2 Console in production environments since it can expose sensitive information and allow unauthorized access to the database. It’s recommended to disable the console in production by setting spring.h2.console.enabled to false.
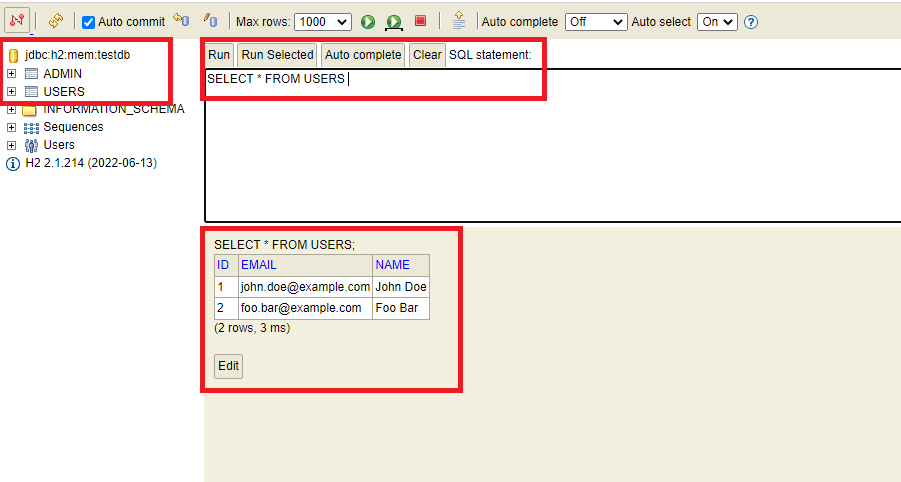
H2 Console and Query Execution Example:
H2 Store Data in a File
By default, the H2 database stores all the data in memory, which means that once the application is stopped, all the data will be lost. However, it is possible to configure H2 to save the data to a file instead of a memory. To do this in a Spring Boot application, we can specify the file path in the application.properties file:
spring.datasource.url=jdbc:h2:file:/path/to/db/fileThe jdbc:h2:file:/path/to/db/file URL tells H2 to store the data in a file instead of memory. We can replace /path/to/db/file with the actual path where we want to store the data.
Once we have set up H2 to store the data in a file, we can start the application and it will create the file and store all the data in it. If we stop the application and start it again, it will automatically restore the data from the file. This is useful in production environments where we want to persist the data even if the application is restarted or redeployed.
Example:
spring.datasource.url=jdbc:h2:file:C:\\testdb;DB_CLOSE_ON_EXIT=FALSE;IFEXISTS=TRUE;DB_CLOSE_DELAY=-1;
spring.datasource.driverClassName=org.h2.Driver

spring.datasource.username=sa
spring.datasource.password=
spring.h2.console.enabled=true
spring.h2.console.path=/h2-console

# Below property at line 10 is required to create / update a schema
spring.jpa.hibernate.ddl-auto=update

# Below property at line 13 is required to execute sql scripts on startup
spring.sql.init.mode=always
Properties:
spring.datasource.url: This property specifies the URL of the H2 database. In this example, the database is being stored in a file named “testdb” on the C drive, and the other options specified are:
DB_CLOSE_ON_EXIT=FALSE: This option specifies that the database connection should not be closed when the last connection is closed, allowing the database to persist beyond the application’s lifetime.IFEXISTS=TRUE: This option tells H2 to not create a new database if it does not exist already.DB_CLOSE_DELAY=-1: This option specifies that the database should remain open until the JVM is terminated, allowing it to be reused if the application is restarted.
spring.jpa.hibernate.ddl-auto: This property specifies how Hibernate should handle database schema changes. In this case, the value is set to “update”, which tells Hibernate to automatically update the schema if it has changed since the last time the application was run.spring.sql.init.mode: This property specifies how SQL scripts should be executed at application startup. In this case, the value is set to “always”, which tells Spring to always execute any SQL scripts found in the “schema.sql” and “data.sql” files, even if the database has already been initialized.
Note
Use each of these properties very carefully by properly considering the usecase you are trying to achieve. Initializing the same sql scripts on application startup will result into duplicate data. Also, if there is primary key constraint defined for your table then inserting the same data with same key will lead to an error during the application startup.
Source Code
The complete source code of the above example with the in-memory database can be found here.
FAQs
What is an in-memory database
An in-memory database is a database that is created and stored entirely in memory, rather than on disk. This can provide fast performance and is often used for testing and development purposes.
What is the difference between in-memory and persistent databases?
In-memory databases store data entirely in RAM, while persistent databases store data on disk.
Can H2 database be used in production?
While the H2 database is an excellent option for lightweight, in-memory databases, it may not be the best choice for large-scale applications requiring complex queries or data relationships. If you need to use H2 in production, consider using a file-based database instead.
How can I store and restore H2 database data in a file?
To store H2 database data in a file, you need to change the JDBC URL to specify a file path. For example, jdbc:h2:/data/mydb would create a database file in the /data directory with the name mydb. To restore data from a file, you simply need to point the JDBC URL to the file.
Things to Consider
- While the H2 database is excellent for small projects, it may not be the best choice for large-scale applications that require high scalability.
- When using an in-memory database, be aware of the limitations of storing data entirely in RAM. This may not be suitable for large amounts of data or long-term storage.
- H2 is an in-process database engine, meaning it runs within the same JVM as your application. This can lead to memory issues if not managed properly.
- In persistent mode, H2 writes to the disk periodically to ensure data durability. However, it is still recommended to back up your data regularly.
- If you’re using the H2 database in a production environment, you may want to consider using file-based persistence instead of in-memory persistence to ensure data durability.
Conclusion
In conclusion, using the H2 database with Spring Boot is a powerful and flexible way to build applications that require a lightweight and fast database engine. With its seamless integration with Spring Boot, H2 allows developers to quickly and easily develop and test applications with minimal setup time.
Learn More
Interested in learning more?
Check out our blog on how we can prevent concurrent scheduled job execution using Shedlock
Add a Comment