
Discover the power of embedded MongoDB with Spring Boot. Learn how to simplify your development and testing process. Learn how to insert data on application startup, how to persist data to disk, and streamline your workflow.
Introduction
MongoDB is a popular NoSQL database that is frequently used in web applications. Spring Boot is a popular framework that makes it easier to build web applications. Together, they can be a powerful combination. One way to use MongoDB with Spring Boot is through embedded MongoDB. In this article, we will explore how to use embedded MongoDB with Spring Boot using Flapdoodle’s library.
What is embedded MongoDB
Embedded MongoDB is an instance of MongoDB that is started and run within the same process as your application. This means that you don’t need to have a separate MongoDB server running to use MongoDB in your application. Embedded MongoDB can be useful for testing or development purposes, as well as for applications with low traffic.
Why use an embedded MongoDB with Spring Boot?
An embedded MongoDB can be used for development testing purposes. It can help developers to test their applications without setting up a separate MongoDB instance. It also allows developers to write integration tests that can be run in a CI/CD pipeline.
Using embedded MongoDB with Spring Boot
Let’s create a simple CRUD-based application using Spring Boot and embedded MongoDB.
Spring Boot provides seamless integration with Embedded MongoDB. Create a new Spring Boot application using Spring Initializr, add Spring Web, and Spring Data MongoDB dependencies.

Next, you need to add Flapdoodle’s dependency in pom.xml:
<dependency>
  <groupId>de.flapdoodle.embed</groupId>
  <artifactId>de.flapdoodle.embed.mongo.spring30x</artifactId>
  <version>{embed-mongo-version}</version>
</dependency>
For Spring Boot 3.x, the latest version of the dependency can be found here.
For Spring Boot 2.x, appropriate dependency can be obtained from Flapdoodle’s official GitHub page.
Note:
If embedded MongoDB is only required for testing purose then you can add the scope test inside the dependency.
Application Properties:
To configure your application to use embedded MongoDB, you need to add a few configuration properties to your Spring Boot application. These properties tell Spring Boot to use the embedded MongoDB instance instead of a separate MongoDB server.
de.flapdoodle.mongodb.embedded.version=5.0.5
spring.data.mongodb.database=test
spring.data.mongodb.port=27018
de.flapdoodle.mongodb.embedded.version: This property sets the version of the embedded MongoDB instance. In this case, it sets it to version 5.0.5.spring.data.mongodb.database: This property sets the name of the MongoDB database to be used. In this case, it sets it to “test”.spring.data.mongodb.port: This property sets the port number for the MongoDB instance to be used. In this case, it sets it to 27018.
Overall, these properties configure the embedded MongoDB instance to use a specific version, connect to a specific database, and use a specific port number.
Note:
Ifspring.data.mongodb.portis not set then MongoDB will start on a random port which will be visible in logs during the application startup.
Now, let’s create an User entity:
import org.springframework.data.annotation.Id;
import org.springframework.data.mongodb.core.mapping.Document;

@Document(collection = "user")
public class User {
    @Id
    private String id;
    private String name;
    private String email;

    // getters and setters
}@Document(collection = "user"): This annotation is used to indicate that a class is a MongoDB document and specifies the name of the collection where the documents will be stored. In this case, the collection name is “user”. By default, if the collection attribute is not specified, the collection name will be the same as the class name but in lowercase.@Id: This annotation is used to indicate that a field should be used as the primary key for the document. In MongoDB, the primary key field is named_idby default. The@Idannotation can be applied to a field of any type, but typically aStringorObjectIdtype is used. When a document is saved to the database, the value of the@Id-annotated field will be used as the_idvalue for the document.
Together, these annotations allow you to define a class that represents a MongoDB document, and specify the collection name and primary key field. This allows you to easily map Java objects to MongoDB documents and perform CRUD operations on them.
We also need a UserRepository interface that extends JpaRepository<User, Long>:
import org.springframework.data.mongodb.repository.MongoRepository;
import org.springframework.stereotype.Repository;

import java.util.Optional;

@Repository
public interface UserRepository extends MongoRepository<User, Long> {

    void deleteById(String id);
    Optional<User> findById(String id);
    Boolean existsById(String id);
}
- The
@Repositoryannotation on the interface is used to indicate to Spring that this interface is a repository component and should be automatically detected and instantiated by Spring’s component scanning. - The
UserRepositoryinterface extendsMongoRepository<User, Long>, which is a generic interface provided by Spring Data MongoDB. This interface provides many common CRUD operations for working with a MongoDB database. - The
void deleteById(String id)method is a custom method added to the repository interface. This method takes aStringparameteridand deletes theUserentity with the given ID from the database. - The
Optional<User> findById(String id)method is another custom method added to the repository interface. This method takes aStringparameteridand retrieves theUserentity with the given ID from the database. Note that the return type is anOptionalto indicate that the result may benullif no matching entity is found. - The
Boolean existsById(String id)method is yet another custom method added to the repository interface. This method takes aStringparameteridand returnstrueif an entity with the given ID exists in the database, andfalseotherwise.
Overall, this code defines a simple MongoDB repository for managing User entities, with a few custom methods added to provide additional functionality beyond the standard CRUD operations.
Next, we’ll create a UserController that handles HTTP requests to our API endpoints:
import com.bootcamptoprod.embedded.mongo.entity.User;
import com.bootcamptoprod.embedded.mongo.repository.UserRepository;
import org.springframework.beans.factory.annotation.Autowired;
import org.springframework.http.ResponseEntity;
import org.springframework.web.bind.annotation.*;

import java.util.List;

@RestController
@RequestMapping("/api")
public class UserController {
    @Autowired
    private UserRepository userRepository;

    @GetMapping("/users")
    public List<User> getUsers() {
        return userRepository.findAll();
    }

    @PostMapping("/user")
    public User createUser(@RequestBody User user) {
        return userRepository.save(user);
    }

    @GetMapping("/user/{id}")
    public User getUser(@PathVariable String id) {
        return userRepository.findById(id)
                .orElseThrow(() -> new RuntimeException("User not found"));
    }

    @PutMapping("/user/{id}")
    public User updateUser(@PathVariable String id, @RequestBody User user) {
        User existingUser = userRepository.findById(id)
                .orElseThrow(() -> new RuntimeException("User not found"));
        existingUser.setName(user.getName());
        existingUser.setEmail(user.getEmail());
        return userRepository.save(existingUser);
    }

    @DeleteMapping("/user/{id}")
    public ResponseEntity<?> deleteUser(@PathVariable String id) {
        userRepository.deleteById(id);
        return ResponseEntity.ok().build();
    }
}
The UserController provides CRUD (Create, Read, Update, Delete) functionality for User entities in the Spring Boot application via the HTTP endpoints it exposes.
Endpoints:
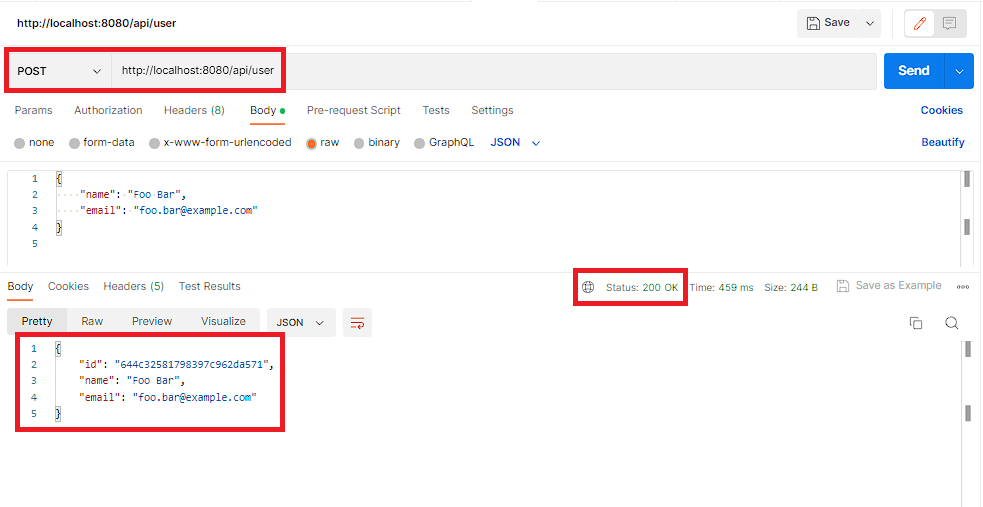
POST /api/user – This endpoint is used to create a new user in the database. We can send a POST request to http://localhost:8080/api/user with a JSON body containing the user’s name and email. The endpoint will return the newly created user object with its generated ID.
curl 'http://localhost:8080/api/user' \
--header 'Content-Type: application/json' \
--data-raw '{
    "name": "John Doe",
    "email": "john.doe@example.com"
}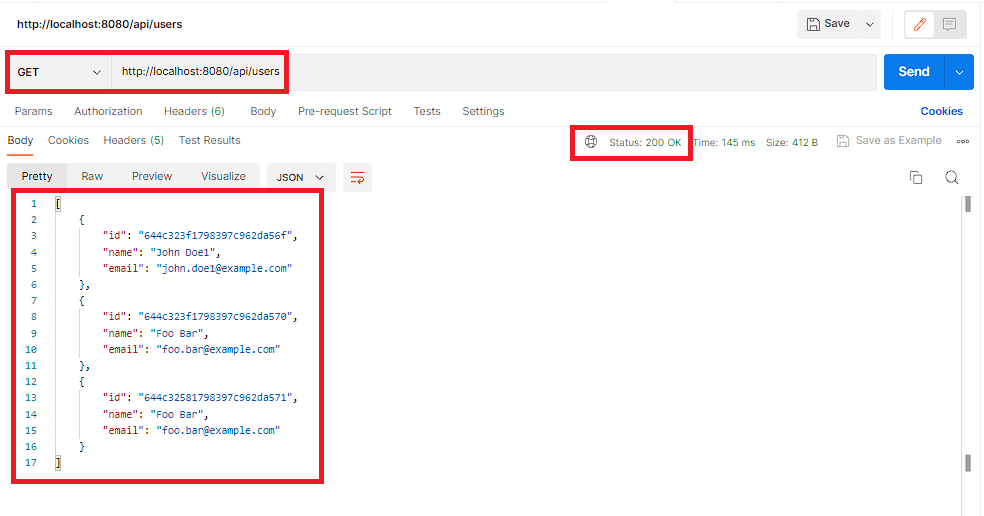
'GET /api/users – This endpoint returns a list of all users in the database as a JSON array. We can test this endpoint by sending a GET request to http://localhost:8080/api/users.
curl 'http://localhost:8080/api/users'
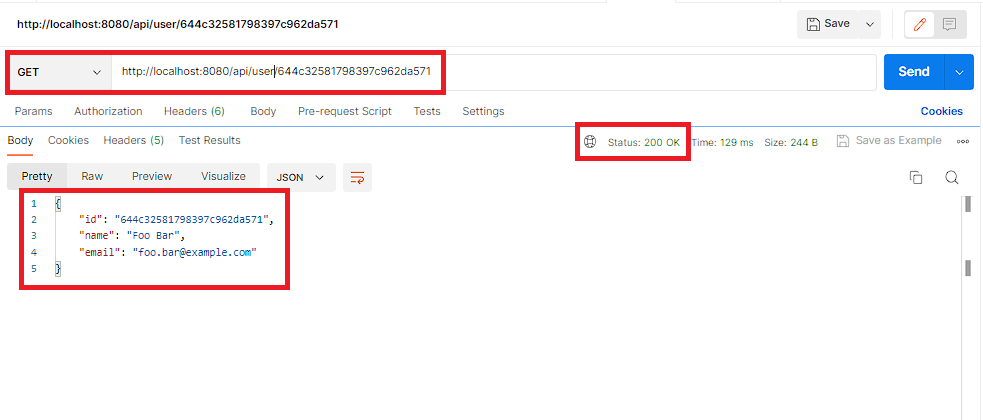
GET /api/user/{id} – This endpoint returns a single user object with the specified ID as a JSON object. We can test this endpoint by sending a GET request to http://localhost:8080/api/user/{id}, where {id} is replaced with the ID of the user we want to retrieve.
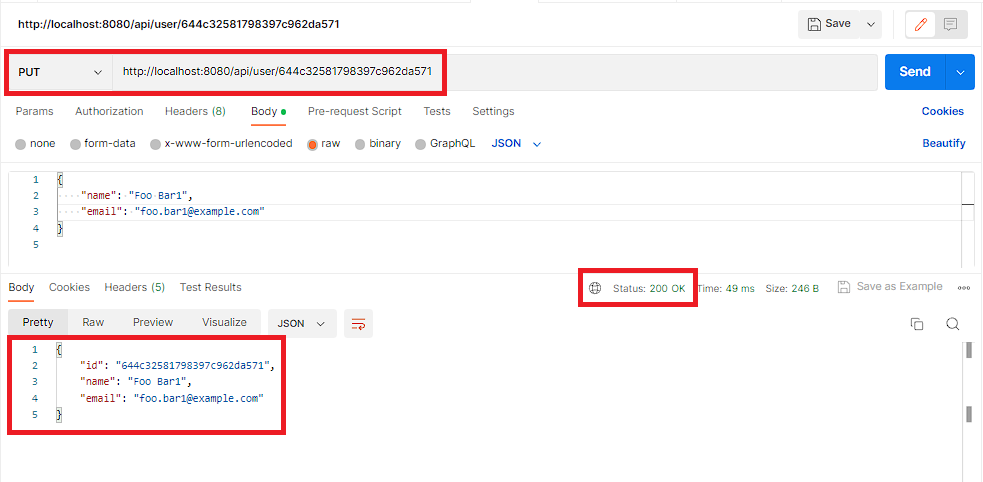
curl 'http://localhost:8080/api/user/1'PUT /api/user/{id} – This endpoint is used to update an existing user in the database. We can send a PUT request to http://localhost:8080/api/user/{id} with a JSON body containing the updated name and email values for the user. The endpoint will return the updated user object.
curl --request PUT 'http://localhost:8080/api/user/1' \
--header 'Content-Type: application/json' \
--data-raw '{
    "name": "John Doe1",
    "email": "john.doe1@example.com"
}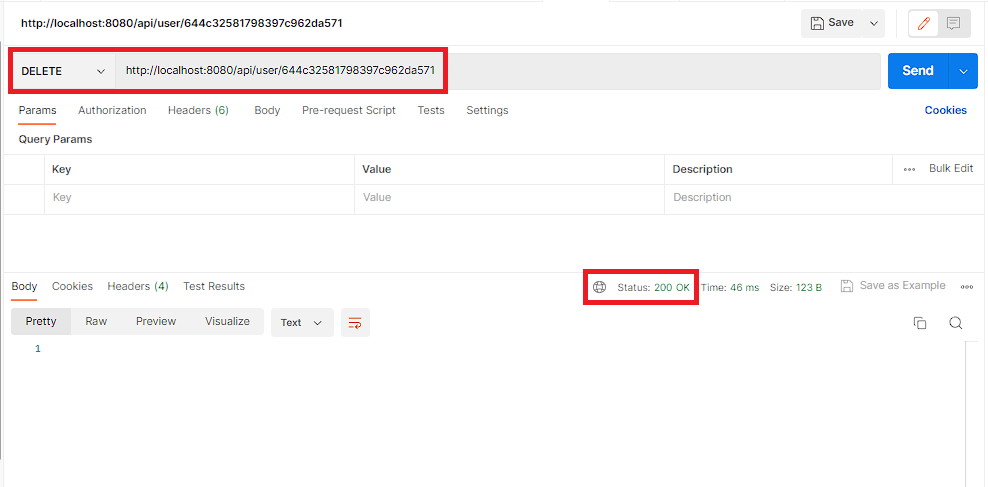
'DELETE /api/user/{id} – This endpoint is used to delete an existing user from the database. We can send a DELETE request to http://localhost:8080/api/user/{id}, where {id} is replaced with the ID of the user we want to delete. The endpoint will return a 200 OK response if the deletion was successful.
curl --request PUT 'http://localhost:8080/api/user/1' \
--header 'Content-Type: application/json' \
--data-raw '{
    "name": "John Doe1",
    "email": "john.doe1@example.com"
}
'Finally, we can start our application and test our API endpoints using a tool like Postman.
Insert Data on Application Startup
We can insert the data into a database during the application startup. There are multiple ways to execute code during the application startup. Here, we are going to use the @PostConstruct annotation for the same.
import com.fasterxml.jackson.core.type.TypeReference;
import com.fasterxml.jackson.databind.ObjectMapper;
import jakarta.annotation.PostConstruct;
import org.springframework.beans.factory.annotation.Autowired;
import org.springframework.core.io.ClassPathResource;
import org.springframework.data.mongodb.core.MongoTemplate;
import org.springframework.stereotype.Component;

import java.io.IOException;
import java.util.List;

@Component
public class InitializeData {

    @Autowired
    private MongoTemplate mongoTemplate;

    @PostConstruct
    public void init() throws IOException {
        System.out.println("Initializing data");

        ObjectMapper objectMapper = new ObjectMapper();

        // users.json file should be present inside resources > data folder
        List<User> persons = objectMapper.readValue(
                new ClassPathResource("/data/users.json").getFile(),
                new TypeReference<List<User>>() {
                });

        // Insert the data into the database
        mongoTemplate.insertAll(persons);

        System.out.println("Data initialization completed successfully");
    }
}
[
  {
    "name": "John Doe1",
    "email": "john.doe1@example.com"
  },
  {
    "name": "Foo Bar",
    "email": "foo.bar@example.com"
  }
]This code initializes data into a MongoDB database using an embedded MongoDB instance. The InitializeData class is annotated with @Component, making it a Spring-managed bean, and it also has a @Autowired annotation on the MongoTemplate field to inject a MongoDB template bean.
The @PostConstruct annotation on the init() method specifies that this method should be executed after the bean is created and its dependencies have been injected. Inside the init() method, first, an ObjectMapper instance is created to deserialize the data from a JSON file. The JSON data is read from the /data/users.json file using the ClassPathResource class. The TypeReference<List<User>> is used to specify that the deserialized data should be converted to a list of User objects.
After deserializing the data, it is inserted into the database using the insertAll() method of the MongoTemplate bean. Finally, a message is printed to the console to indicate that the data initialization process has been completed successfully.
Overall, this code demonstrates how to use the @PostConstruct annotation in conjunction with Spring’s dependency injection and an embedded MongoDB instance to initialize data into a MongoDB database on application startup.
Alternative way:
If you don’t want to read the data from JSON file then you can directly create the Users objects, set the required data using setters or constructors and add them into the List. The rest of the code will remain the same.
Persists Data to Disk
Every time you restart the application the data is lost. However, you can persist the data to disk so that even if the application is restarted, data will not be lost.
The property de.flapdoodle.mongodb.embedded.databaseDir specifies the directory path where the embedded MongoDB server should store its data files. By default, the embedded MongoDB server stores data in a temporary directory that is created at runtime. However, by setting this property, you can specify a custom directory path where the data files will be persisted.
For example, in the code snippet below, the “de.flapdoodle.mongodb.embedded.databaseDir” property is set to “c:/embedded”:
de.flapdoodle.mongodb.embedded.databaseDir=c:/embeddedThis means that the embedded MongoDB server will use the directory “c:/embedded” to persist its data files. This can be useful in situations where you want to reuse the same data between runs of your application, or when you want to examine the data files outside of the application.
Using Embedded MongoDB for Testing
By using an embedded MongoDB instance, developers can run tests in isolation, without requiring a separate MongoDB instance running on a server.
Using an embedded MongoDB instance has several advantages for testing purposes:
- Speed: Running tests with an embedded MongoDB instance is generally faster than running tests with an external database. This is because there is no need to establish a network connection to a remote server.
- Isolation: By running tests on an embedded MongoDB instance, developers can ensure that tests are not affected by external factors such as network issues or the availability of a remote server.
- Control: Embedded MongoDB instances can be easily set up and torn down as part of the test suite, providing developers with greater control over the testing environment.
- Reproducibility: Using an embedded MongoDB instance ensures that tests are run on a consistent environment every time, which helps ensure the reproducibility of test results.
Overall, using an embedded MongoDB instance for testing can simplify the testing process and improve the reliability and consistency of test results.
Example:
For the UserRepository that we created earlier, we will write test cases that will interact with Embedded MongoDB and ensure that database operations and our custom methods are working as expected.
import com.bootcamptoprod.embedded.mongo.entity.User;
import org.assertj.core.api.Assertions;
import org.junit.jupiter.api.Order;
import org.junit.jupiter.api.Test;
import org.junit.jupiter.api.extension.ExtendWith;
import org.springframework.beans.factory.annotation.Autowired;
import org.springframework.boot.test.autoconfigure.data.mongo.DataMongoTest;
import org.springframework.data.mongodb.core.MongoTemplate;
import org.springframework.test.context.junit.jupiter.SpringExtension;

import java.util.Optional;

import static org.junit.jupiter.api.Assertions.*;

@DataMongoTest()
@ExtendWith(SpringExtension.class)
public class UserRepositoryTest {

    @Autowired
    MongoTemplate mongoTemplate;

    @Autowired
    UserRepository userRepository;

    @Order(1)
    @Test
    void testDb() {
        Assertions.assertThat(mongoTemplate.getDb()).isNotNull();
    }

    @Order(2)
    @Test
    void testSave() {
        User user = new User();
        user.setId("1");
        user.setName("Foo Bar");
        user.setEmail("foo.bar@gmail.com");

        User user2 = new User();
        user2.setId("2");
        user2.setName("Foo Bar");
        user2.setEmail("foo.bar@gmail.com");


        userRepository.save(user);
        userRepository.save(user2);

        User result = mongoTemplate.findById("1", User.class);

        assertEquals(result.getId(), user.getId());
        assertEquals(result.getEmail(), user.getEmail());
        assertEquals(result.getName(), user.getName());
    }

    @Order(3)
    @Test
    void testFindById() {
        Optional<User> userOptional = userRepository.findById("1");
        assertTrue(userOptional.isPresent());
        User result = userOptional.get();
        assertEquals("1", result.getId());
        assertEquals("Foo Bar", result.getName());
        assertEquals("foo.bar@gmail.com", result.getEmail());
    }

    @Order(4)
    @Test
    void testDeleteById() {
        userRepository.deleteById("1");
        assertFalse(userRepository.existsById("1"));
    }
}This code is a test class for the UserRepository, which uses embedded MongoDB to perform integration tests.
@DataMongoTest is an annotation that provides a configuration for testing with MongoDB. It sets up an embedded MongoDB server, configures a connection to the embedded database, and creates a MongoTemplate and an instance of the repository under test.
@ExtendWith(SpringExtension.class) is a JUnit 5 annotation that is used to load the Spring context.
The class defines four test methods, each annotated with @Test and @Order to specify the order in which they should be run.
The testSave() method creates two User objects, saves them to the repository, and then verifies that the data was saved correctly by retrieving one of the users from the database and comparing the values.
The testFindById() method retrieves a user by ID from the repository and checks that the data is correct.
The testDeleteById() method deletes a user from the repository and checks that it was deleted successfully.
The testDb() method tests that the MongoTemplate object is not null.
Note:
By default there will be one instance of Embedded MongoDB running during the tests. If you want to achieve the isolation then you can make use of @DirtiesContext annotation. For more information, kindly refer to this official guide: Embedded MongoDB Test Isolation
Source Code
The complete source code of the above example can be found here.
FAQs
What is the difference between an embedded MongoDB instance and a standalone MongoDB instance?
The main difference is that an embedded MongoDB instance runs within the same JVM as the application, while a standalone MongoDB instance runs as a separate process. Embedded MongoDB is often used for testing and development purposes, while standalone MongoDB is typically used in production environments.
Can we use an embedded MongoDB in production environments?
Yes, we can use an embedded MongoDB in production environments, but it is not recommended. It is better to use a separate MongoDB instance in production.
What are the advantages of using Embedded MongoDB in Spring Boot?
One of the key advantages of using Embedded MongoDB in Spring Boot is that it allows you to test your application without needing to connect to an external MongoDB server. This helps simplify the testing process and allows for faster feedback.
How do I test my MongoDB repository using Embedded MongoDB?
To test your MongoDB repository using Embedded MongoDB, you can use the @DataMongoTest annotation in your test class. This will load the necessary Spring components for testing MongoDB repositories and set up an embedded MongoDB instance.
Things to Consider
Here are some things to consider when working with embedded MongoDB in Spring Boot:
- Disk space: When using an embedded MongoDB database, data is stored on a disk. This means that you need to ensure that you have enough disk space available for your application’s needs.
- Version compatibility: Ensure that the version of embedded MongoDB that you are using is compatible with the version of MongoDB that your application requires.
- Testing: While embedded MongoDB can be great for testing, it’s important to keep in mind that testing against an embedded database may not always accurately reflect real-world usage.
- Performance: While embedded MongoDB can simplify development and testing, it may not provide the same level of performance as a dedicated MongoDB instance.
- Configuration: Ensure that you have properly configured your embedded MongoDB instance with the appropriate properties and settings.
- Scalability: While embedded MongoDB can be great for development and testing, it may not be the best option for a production application that requires scalability and high availability.
Conclusion
In conclusion, Embedded MongoDB is very useful for developers to simplify their development process and testing. With its easy integration and ability to persist data to disk, it offers many advantages over traditional testing methods. By following some basic best practices and keeping certain considerations in mind, developers can easily leverage the benefits of Embedded MongoDB for their projects.
Learn More
Interested in learning more?
Check out our blog on how to use H2 in-memory database for building simple CRUD based applications.
Add a Comment