Take your application to the next level with Spring Scheduler. Learn how to schedule tasks, use cron expressions, set up fixed delay and rate, and monitor and optimize your scheduled tasks for maximum efficiency.
Introduction to Spring Scheduler
Spring Scheduler is used for scheduling tasks in a Spring Boot application. It is useful for running repetitive tasks in your application. It allows developers to automate tasks that need to run at specific times or intervals, such as sending emails, generating reports, or updating a database. In this comprehensive guide, we will cover everything you need to know about Spring Scheduler – its attributes, annotations, examples, FAQs, and things to consider.
How does Spring Scheduler work?
Spring Scheduler uses a thread pool to execute tasks. When a task is scheduled, it is added to the thread pool, which then executes the task at the specified time. Once the task is complete, the thread is returned to the thread pool, ready for the next scheduled task.
Key Concepts in Spring Scheduler
- Task: A task is a unit of work that needs to be executed.
- Schedule: A schedule specifies when a task should be executed.
- Trigger: A trigger is a mechanism that starts a task according to a specific schedule.
Spring Scheduler Annotations Explained
Spring Scheduler provides a few annotations that you can use to schedule tasks in your application:
@Scheduled: This annotation is used to define the schedule for a task. You can specify the delay, fixed rate, or cron expression for a task using this annotation.@EnableScheduling: This annotation is used to enable Spring Scheduler in your application. Without this annotation, Spring Scheduler will not be enabled.
Spring Scheduler Attributes Demystified
Spring Scheduler provides several attributes that you can use to define the schedule for a task:
fixedDelay: This attribute specifies the amount of time (in milliseconds) to wait after the completion of one scheduled task before starting the next task. For example, iffixedDelay = 5000, the task will run every 5 seconds, starting 5 seconds after the previous task completes.fixedRate: This attribute specifies the interval (in milliseconds) between the start times of two consecutive tasks, regardless of whether the previous task has been completed. For example, iffixedRate = 5000, the task will run every 5 seconds, regardless of how long the previous task took to complete.initialDelay: This attribute specifies the amount of time (in milliseconds) to wait before running the first task. For example, ifinitialDelay = 10000andfixedRate = 5000, the first task will run 10 seconds after the application starts up, and subsequent tasks will run every 5 seconds.cron: This attribute allows for more complex scheduling using a cron expression. A cron expression consists of six fields that specify different components of the schedule (second, minute, hour, day of month, month, day of the week). For example,0 0 8-10 * * MON-FRIwould run the task at 8 am, 9 am, and 10 am every weekday.zone: This attribute specifies the time zone to use for the cron expression. By default, the time zone is the server’s time zone, but this can be overridden with thezoneattribute.timeUnit: This attribute is used to specify the time unit for thefixedDelayandfixedRateattributes in the@Scheduledannotation. By default, the values offixedDelayandfixedRateare specified in milliseconds. However, thetimeUnitattribute allows developers to specify a different unit of time, such as seconds, minutes, or hours.
These attributes can be used in combination to create a wide range of scheduling options for tasks in a Spring application. It’s important to choose the appropriate attribute(s) depending on the requirements of the task and the desired scheduling behavior.
Attributes Examples
Example 1: Using fixed delay
@Scheduled(fixedDelay = 5000)
public void runTask() {
    // Code to execute task
}
This example runs the runTask() method every 5 seconds.
Example 2: Using cron expression
@Scheduled(cron = "0 0 12 * * ?")
public void runTask() {
    // Code to execute task
}
This example runs the runTask() method every day at 12:00 PM.
Example 3: Using fixed delay and fixed rate
@Scheduled(fixedDelay = 5000, fixedRate = 10000)
public void runTask() {
    // Code to execute task
}
This example runs the runTask() method every 10 seconds after a 5-second delay.
Example 4: Using initial delay, fixed delay, time unit and zone
@Scheduled(initialDelay = 5, fixedDelay = 10, timeUnit = TimeUnit.SECONDS, zone = "America/New_York")
public void runTask() {
    // Code to execute task
}
This example runs the runTask() method every 10 seconds after a 5-second delay, in the “America/New_York” time zone.
Spring Boot Scheduler Example
Now, we will see one example of a scheduler in the Spring Boot application.
Step 1: Create a simple boot application using start.spring.io.
For detailed instructions on how to create a simple Boot application, you can refer to this blog.
Step 2: Add Sring Boot Actuator Dependency in pom.xml.
This is optional. This is required only when you want to get some additional information about your scheduled tasks like the total number of tasks that have been completed.
<dependency>
  <groupId>org.springframework.boot</groupId>
  <artifactId>spring-boot-starter-actuator</artifactId>
</dependency>Also, include the below property in the application.properties file which will allow us to see the scheduler information via actuator endpoints.
management.endpoints.web.exposure.include=*
Step 3: Define your task using @Scheduled and @EnableScheduling annotation.
import org.springframework.boot.SpringApplication;
import org.springframework.boot.autoconfigure.SpringBootApplication;
import org.springframework.scheduling.annotation.EnableScheduling;
import org.springframework.scheduling.annotation.Scheduled;

import java.time.ZonedDateTime;
import java.util.concurrent.TimeUnit;

@SpringBootApplication
@EnableScheduling
public class SpringSchedulerApplication {

    public static void main(String[] args) {
        SpringApplication.run(HelloWorldApplication.class, args);
    }

    @Scheduled(initialDelay = 5, fixedDelay = 10, timeUnit = TimeUnit.SECONDS, zone = "Asia/Kolkata")
    public void scheduledTask() {
        ZonedDateTime now = ZonedDateTime.now();
        System.out.println("Scheduled task executed at " + now);
    }

}Here we have defined our scheduled task using @Scheduled annotation and we have enabled the scheduler in our application using @EnableScheduling annotation.
The scheduled task will be executed every 10 seconds after a 5-second delay, in the “Asia/Kolkata” time zone.
Note:
For simplicity, we have defined the scheduled task inside the application main class. While developing the production grade applications, it is recommended to define the scheduled tasks in a separate class.
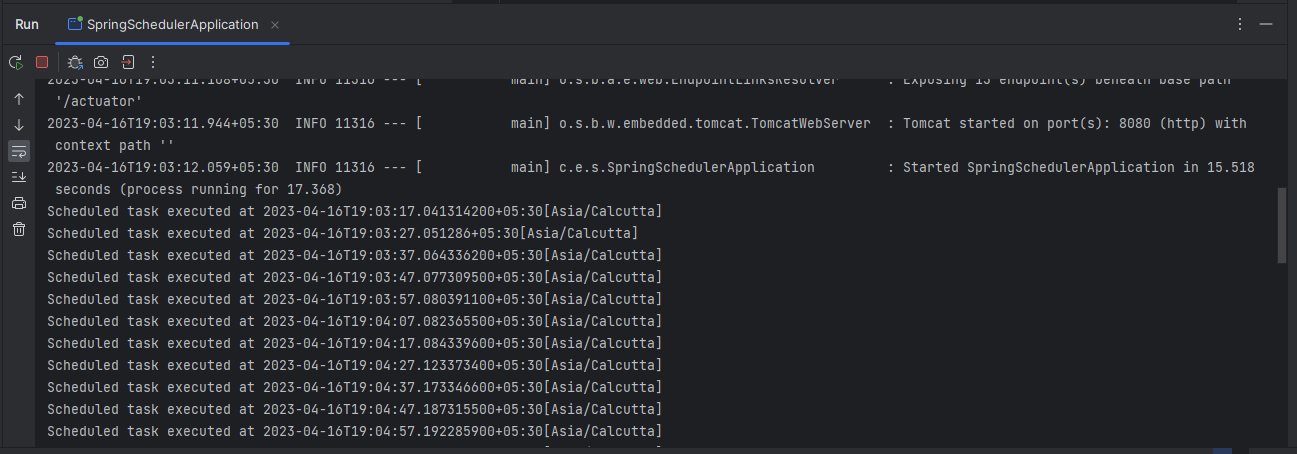
Output:
Here you can see, the first instance of the scheduled task is triggered after a 5-second delay post the application is started and the next instances are triggered every 10 seconds.
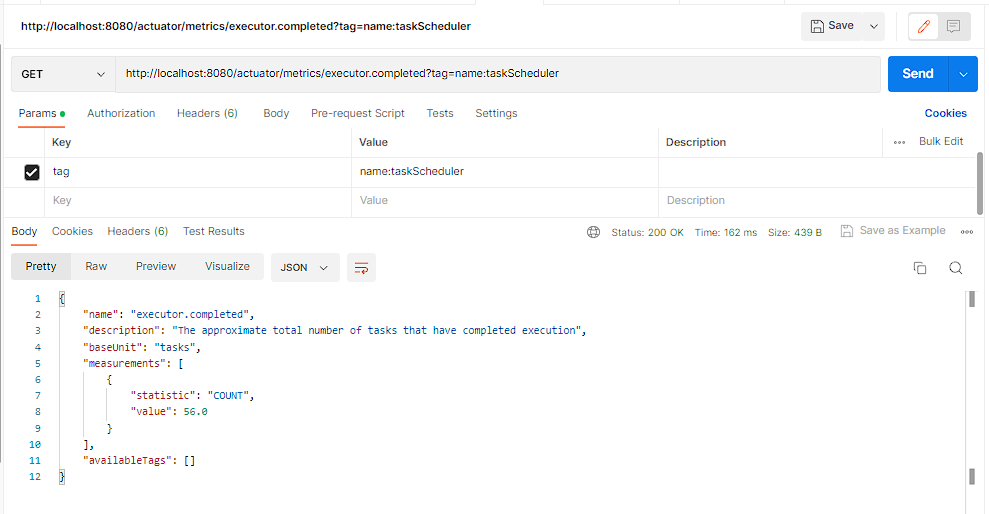
In order to get information about scheduled tasks, we can hit the actuator scheduled tasks endpoint and actuator metrics endpoint.
curl 'http://localhost:8080/actuator/scheduledtasks'

curl 'http://localhost:8080/actuator/metrics/executor.completed?tag=name%3AtaskScheduler'

FAQs
What is the difference between fixed delay and fixed rate scheduling in Spring Scheduler?
Fixed delay scheduling executes a task at a fixed interval after the previous task completes. Fixed rate scheduling, on the other hand, executes a task at a fixed rate, regardless of whether the previous task has been completed or not.
What happens if a scheduled task throws an exception?
If any exception is encountered during the scheduled task execution and if it is not handled gracefully using a try-catch block then the Spring Logging Error Handler will handle the exception and log the error details. The next instances of that task will continue to execute as per the schedule.
Can I schedule multiple tasks using Spring Scheduler?
Yes, you can schedule multiple tasks in your application. In this case, you need to have multiple methods annotated with @Scheduled annotation and you need to configure the task execution strategy as per your needs using the attributes that are present inside the annotation.
What happens if a scheduled task takes longer than its scheduled interval?
In case of a fixed rate, if a scheduled task takes longer than its scheduled interval, Spring Scheduler will start the next execution of the task immediately after the previous one completes. This can cause tasks to overlap, which may impact performance.
Things to Consider
Before using Spring Scheduler in your application, here are a few things to consider:
- Understand the scheduling requirements of your application and choose the appropriate scheduling method (cron, fixedDelay, fixedRate).
- Keep the tasks simple and small to avoid blocking the thread pool.
- Be mindful of the performance impact of running scheduled tasks and ensure that they do not overload the system.
- Be aware of the time zone settings in your application and how they affect the scheduling of tasks. Spring Scheduler provides support for specifying time zones in cron expressions, so you can ensure that tasks are scheduled to run at the appropriate time for your users.
- Handle errors and exceptions gracefully in your scheduled tasks. You may want to log errors and send notifications to developers or system administrators when a task fails.
- Test your scheduled tasks and cron expressions thoroughly to ensure that they work as expected. You can refer to our blog on how to validate Spring Cron Expression and print the next execution instances.
- Design your scheduled tasks with scalability in mind. If your application needs to scale horizontally, you may need to configure your task scheduling infrastructure accordingly. Consider using a distributed job scheduler like Quartz or Spring Cloud Task to manage scheduled tasks across multiple nodes.
Conclusion
In this blog post, we have covered the basics of Spring Scheduler, including the annotations, attributes, and examples of using Spring Scheduler in your application. We have also addressed some frequently asked questions and provided some tips to consider before using Spring Scheduler. By using Spring Scheduler, you can easily automate recurring tasks in your application and improve its efficiency.
Add a Comment