Dive deep into Spring Cloud Load Balancer! Learn how to distribute traffic efficiently for improved performance.
Introduction
In today’s distributed computing landscape, where applications are often deployed across multiple instances and servers, ensuring optimal performance and reliability is paramount. Load balancing plays a crucial role in achieving these goals by distributing incoming traffic across multiple servers or resources. In this beginner-friendly guide, we’ll explore Spring Cloud Load Balancer, a powerful tool that simplifies load balancing within Spring Cloud applications.
What is Load Balancing?
Load balancing is the process of distributing incoming network traffic across multiple servers or resources to ensure optimal utilization and prevent overload on any single server. This helps improve the scalability, reliability, and performance of applications.
Why is Load Balancing Important?
Load balancing is essential for various reasons:
- Scalability: It allows applications to handle increased traffic by distributing it evenly across multiple servers.
- High Availability: Load balancers ensure that if one server fails, the traffic can be redirected to other healthy servers, minimizing downtime.
- Optimized Performance: By distributing traffic based on various algorithms, load balancers optimize the performance of the application.
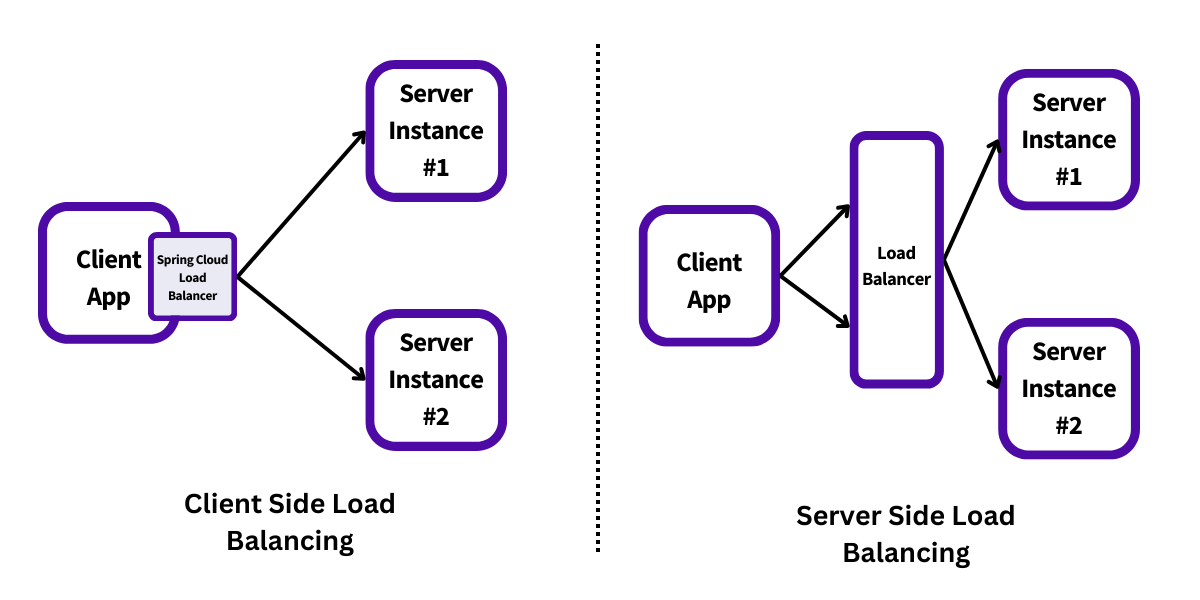
Types of Load Balancing
1. Client Side Load Balancing
In client side load balancing, the client or service consumer determines which instance of the service provider to send the request to. This approach delegates the decision-making process to the client, allowing it to select the appropriate server for each request.
2. Server Side Load Balancing
Server side load balancing utilizes a dedicated load balancer or proxy to receive requests from clients. The load balancer then analyzes factors such as server health, capacity, and current load to route requests to the most suitable service instances. This centralized approach offloads the decision-making process from the client to the load balancer, ensuring efficient distribution of incoming traffic.
Understanding Load Balancing Algorithms
Load balancing algorithms play a crucial role in efficiently distributing incoming requests across servers, ensuring optimal performance and resource utilization. Let’s dive into a brief overview of these load balancing algorithms.
- Round Robin: Requests are distributed across servers in a circular order. Each server takes its turn handling requests, ensuring a fair distribution. However, it doesn’t consider each server’s current workload.
- Least Connections: Requests are sent to the server with the fewest active connections. This aims to balance the load evenly among servers. Yet, it may overlook the complexity or duration of each request.
- Least Time: Requests are directed to the server with the fastest response time and the fewest active connections. This algorithm prioritizes efficiency and responsiveness, exclusive to certain load balancers.
- Hash: Requests are distributed based on a unique code derived from the request, like the client’s IP address or the request’s URL. This ensures consistency, useful for maintaining session persistence or caching.
- Random: Requests are randomly assigned to available servers. While simple, this method may lead to uneven distribution in certain scenarios.
- Random with Two Choices: Requests are randomly assigned to two servers, and then the less loaded one is selected. This reduces the risk of overloading a single server, improving system reliability.
What is Spring Cloud Load Balancer?
Spring Cloud Load Balancer is a library provided by the Spring Cloud framework, designed to offer client-side load balancing for Spring Boot applications. This library allows developers to distribute incoming requests among multiple instances of a service, improving availability, scalability, and performance in microservice architectures.
Spring Cloud Load Balancer supports various load balancing algorithms, including round-robin, weighted, random, and custom strategies. It integrates seamlessly with service discovery mechanisms such as Eureka, Consul, and Zookeeper to obtain a list of available service instances.
Overall, Spring Cloud Load Balancer simplifies the implementation of load balancing within Spring Boot applications, making it easier for developers to create resilient and scalable microservices.
Spring Cloud Load Balancer Example
We will learn how to use Spring Cloud Load Balancer to create load-balanced microservices. We will use two example applications: a user service and a say-hello service.
- The user service will call the say-hello service using Spring Cloud Load Balancer.
- The say-hello service will have multiple instances running on different ports.
We will see how the user service can load balance the requests among the say-hello instances.
The Say-Hello Service
The say-hello service is a simple Spring Boot application that has a single HTTP endpoint. It returns a greeting message with the instance ID. The instance ID is a configurable property that allows us to differentiate between multiple instances of the same service.
The code for the say-hello service is as follows:
package com.example.helloworld;

import org.springframework.beans.factory.annotation.Value;
import org.springframework.boot.SpringApplication;
import org.springframework.boot.autoconfigure.SpringBootApplication;
import org.springframework.web.bind.annotation.GetMapping;
import org.springframework.web.bind.annotation.RestController;

@SpringBootApplication
@RestController
public class SayHelloApplication {

    public static void main(String[] args) {
        SpringApplication.run(SayHelloApplication.class, args);
    }

    @Value("${server.instance.id}")
    String instanceId;

    @GetMapping("/hello")
    public String hello() {
        return String.format("Hello from instance %s", instanceId);
    }
}
To run a first instance, we need to add the following program arguments:
mvn spring-boot:run -Dspring-boot.run.jvmArguments='-Dserver.port=8081 -Dserver.instance.id=1'To run a second instance, we need to add the following program arguments:
mvn spring-boot:run -Dspring-boot.run.jvmArguments='-Dserver.port=8082 -Dserver.instance.id=2'We can test the say-hello service by sending HTTP requests to the /hello endpoint. For example, using curl:
curl http://localhost:8081/hello
Hello from instance 1

curl http://localhost:8082/hello
Hello from instance 2
The User Service
The user service is another Spring Boot application that uses Spring Cloud Load Balancer to call the say-hello service. It has a single HTTP endpoint that returns the greeting message from the say-hello service.
To use Spring Cloud LoadBalancer, you need to perform the following steps:
1. Add the Spring Cloud dependencies management to your project’s Maven or Gradle configuration, specifying the desired Spring Cloud version.
<dependencyManagement>
		<dependencies>
			<dependency>
				<groupId>org.springframework.cloud</groupId>
				<artifactId>spring-cloud-dependencies</artifactId>
				<version>${spring-cloud.version}</version>
				<type>pom</type>
				<scope>import</scope>
			</dependency>
		</dependencies>
</dependencyManagement>2. Define the version of Spring Cloud Load Balancer you intend to use.
	<properties>
	  <!-- For the latest version, refer to: https://mvnrepository.com/artifact/org.springframework.cloud/spring-cloud-dependencies -->
		<spring-cloud.version>2023.0.0</spring-cloud.version>
</properties>3. Add the spring-cloud-starter-loadbalancer dependency to your pom.xml file:
<dependency>
  <groupId>org.springframework.cloud</groupId>
	<artifactId>spring-cloud-starter-loadbalancer</artifactId>
</dependency>
UserController
The UserController class is a controller that contains the /user endpoint. It uses the SayHelloServiceLoadBalancedClient component to get a greeting from the say-hello service and returns it. Here is the code for this class:
import org.springframework.web.bind.annotation.GetMapping;
import org.springframework.web.bind.annotation.RestController;

@RestController
public class UserController {

    private final SayHelloServiceLoadBalancedClient sayHelloServiceLoadBalancedClient;

    public UserController(SayHelloServiceLoadBalancedClient sayHelloServiceLoadBalancedClient) {
        this.sayHelloServiceLoadBalancedClient = sayHelloServiceLoadBalancedClient;
    }

    @GetMapping("/user")
    public String user() {
        return sayHelloServiceLoadBalancedClient.greetings();
    }

}SayHelloServiceLoadBalancedClient
The SayHelloServiceLoadBalancedClient class is a component that uses the RestTemplate bean to make HTTP requests to the say-hello service and returns the response as a string. It is annotated with @LoadBalancerClient to specify the service name and the custom load balancing configuration class for the say-hello service. Here is the code for this class:
import org.springframework.beans.factory.annotation.Autowired;
import org.springframework.cloud.loadbalancer.annotation.LoadBalancerClient;
import org.springframework.stereotype.Component;
import org.springframework.web.client.RestTemplate;

@Component
@LoadBalancerClient(value = "say-hello", configuration = SayHelloServiceConfiguration.class)
public class SayHelloServiceLoadBalancedClient {

    @Autowired
    RestTemplate restTemplate;

    public String greetings() {
        return restTemplate.getForObject("http://say-hello/hello", String.class);
    }
}The @LoadBalancerClient annotation indicates that this class will use the load balancing configuration defined in the SayHelloServiceConfiguration class when calling the say-hello service. The configuration attribute specifies the custom load balancing configuration class, which provides the ServiceInstanceListSupplier bean and other load balancing properties.
The service name used in the RestTemplate request should match the service name used in the @LoadBalancerClient annotation. For example, if the @LoadBalancerClient annotation has the value say-hello, the RestTemplate request should use the URL http://say-hello/hello.
ApplicationConfiguration
The ApplicationConfiguration class is used to configure the RestTemplate bean, which is a Spring class for making HTTP requests to other services. It is annotated with @LoadBalanced to indicate that it will use Spring Cloud Load Balancer to choose an instance of the service to call, based on some load balancing algorithm. Here is the code for this class:
import org.springframework.boot.web.client.RestTemplateBuilder;
import org.springframework.cloud.client.loadbalancer.LoadBalanced;
import org.springframework.context.annotation.Bean;
import org.springframework.context.annotation.Configuration;
import org.springframework.web.client.RestTemplate;

@Configuration
public class ApplicationConfiguration {

    @LoadBalanced
    @Bean
    public RestTemplate restTemplate(RestTemplateBuilder builder) {
        return builder.build();
    }
}SayHelloServiceConfiguration
The SayHelloServiceConfiguration class is used to define a custom load balancing configuration for the say-hello service, which has two instances running on different ports. It defines a ServiceInstanceListSupplier bean, which provides a list of available service instances to the load balancer. Here is the code for this class:
import org.springframework.cloud.client.DefaultServiceInstance;
import org.springframework.cloud.loadbalancer.core.ServiceInstanceListSupplier;
import org.springframework.cloud.loadbalancer.support.ServiceInstanceListSuppliers;
import org.springframework.context.ConfigurableApplicationContext;
import org.springframework.context.annotation.Bean;
import org.springframework.context.annotation.Configuration;

@Configuration
public class SayHelloServiceConfiguration {

    @Bean
    public ServiceInstanceListSupplier serviceInstanceListSupplier(ConfigurableApplicationContext context) {
        ServiceInstanceListSupplier serviceInstanceListSupplier = ServiceInstanceListSuppliers.from("say-hello",
                new DefaultServiceInstance("myservice1", "say-hello", "localhost", 8081, false),
                new DefaultServiceInstance("myservice2", "say-hello", "localhost", 8082, false)
        );

        return ServiceInstanceListSupplier.builder()
                .withBase(serviceInstanceListSupplier)
                .build(context);

    }
}In the SayHelloServiceConfiguration class, the ServiceInstanceListSuppliers.from method is used to manually specify the available service instances for the “say-hello” service. Two DefaultServiceInstance objects are created to represent service instances running on different ports.
The SayHelloServiceConfiguration class is used inside the @LoadBalancerClient annotation to customize the load balancing configuration for the say-hello service and provide a list of service instances to the load balancer.
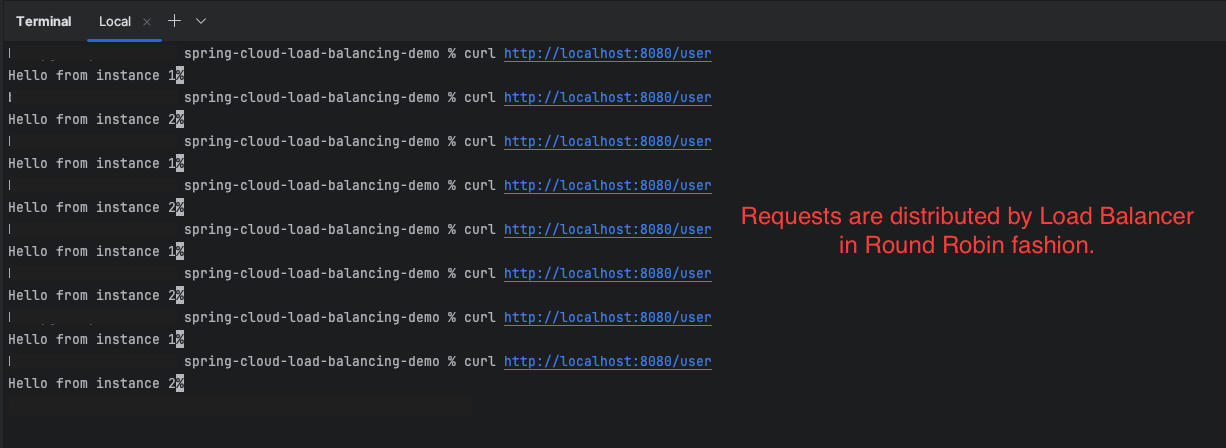
Output
When the UserController makes a call to the say-hello service, which has two instances running on port 8081 and 8082, the load balancer will distribute the load in a round robin fashion, which is the default algorithm used by Spring Cloud Load Balancer. This means that the load balancer will alternate between the two instances for each request, ensuring a fair and balanced distribution of the load.
Using Different Load Balancing Algorithms
Spring Cloud Load Balancer supports various load balancing algorithms, such as round-robin, random, weighted, and custom. By default, it uses a round-robin algorithm, which means it chooses the service instances in the same order each time. However, we can change the load balancing algorithm by using different components of Spring Cloud Load Balancer.
1. Using a Random Algorithm
To use a random algorithm, which means choosing a service instance randomly, we need to use the RandomLoadBalancer class. This class implements the ReactorLoadBalancer interface, which is the core interface for load balancing in Spring Cloud Load Balancer. The RandomLoadBalancer class takes a ServiceInstanceListSupplier as a constructor argument, which is a component that provides the list of available service instances.
To use the RandomLoadBalancer class, we need to create a bean of type ReactorLoadBalancer. For example, in the user service, we can update the SayHelloServiceConfiguration class:
import org.springframework.beans.factory.ObjectProvider;
import org.springframework.cloud.client.DefaultServiceInstance;
import org.springframework.cloud.client.ServiceInstance;
import org.springframework.cloud.loadbalancer.core.RandomLoadBalancer;
import org.springframework.cloud.loadbalancer.core.ReactorLoadBalancer;
import org.springframework.cloud.loadbalancer.core.ServiceInstanceListSupplier;
import org.springframework.cloud.loadbalancer.support.ServiceInstanceListSuppliers;
import org.springframework.context.ConfigurableApplicationContext;
import org.springframework.context.annotation.Bean;
import org.springframework.context.annotation.Configuration;

@Configuration
public class SayHelloServiceConfiguration {

    @Bean
    public ServiceInstanceListSupplier serviceInstanceListSupplier(ConfigurableApplicationContext context) {

        ServiceInstanceListSupplier serviceInstanceListSupplier = ServiceInstanceListSuppliers.from("say-hello",
                new DefaultServiceInstance("myservice1", "say-hello", "localhost", 8081, false),
                new DefaultServiceInstance("myservice2", "say-hello", "localhost", 8082, false)
        );

        return ServiceInstanceListSupplier.builder()
                .withBase(serviceInstanceListSupplier)
                .build(context);

    }

    @Bean
    public ReactorLoadBalancer<ServiceInstance> randomLoadBalancer(ObjectProvider<ServiceInstanceListSupplier> serviceInstanceListSupplier) {
        return new RandomLoadBalancer(serviceInstanceListSupplier, "say-hello");

    }
}This will override the default round-robin algorithm and use the random algorithm instead. We can test the user service again and see that the requests are distributed randomly among the say-hello instances.

To use RoundRobinLoadBalancer for the say-hello service, we just need to replace the RandomLoadBalancer with the RoundRobinLoadBalancer in the bean definition inside SayHelloServiceConfiguration class.
2. Using a Weighted Algorithm
The purpose of the weighted load balancing algorithm is to distribute incoming requests to service instances based on assigned weights. The weights represent the relative capacity or importance of each service instance. In other words, instances with higher weights receive a larger portion of the traffic compared to those with lower weights.
To use a weighted algorithm, we need to define a weight function that will assign different weights to different service instances.
import org.springframework.cloud.client.DefaultServiceInstance;
import org.springframework.cloud.loadbalancer.core.ServiceInstanceListSupplier;
import org.springframework.cloud.loadbalancer.core.WeightFunction;
import org.springframework.cloud.loadbalancer.support.ServiceInstanceListSuppliers;
import org.springframework.context.ConfigurableApplicationContext;
import org.springframework.context.annotation.Bean;
import org.springframework.context.annotation.Configuration;

@Configuration
public class SayHelloServiceConfiguration {

    @Bean
    public ServiceInstanceListSupplier serviceInstanceListSupplier(ConfigurableApplicationContext context) {

        WeightFunction weightFunction = instance -> {
            if (instance.getPort() == 8081) {
                return 4;
            } else if (instance.getPort() == 8082) {
                return 1;
            } else {
                return 0;
            }
        };

        ServiceInstanceListSupplier serviceInstanceListSupplier = ServiceInstanceListSuppliers.from("say-hello",
                new DefaultServiceInstance("myservice1", "say-hello", "localhost", 8081, false),
                new DefaultServiceInstance("myservice2", "say-hello", "localhost", 8082, false)
        );

        return ServiceInstanceListSupplier.builder()
                .withBase(serviceInstanceListSupplier)
                .withWeighted(weightFunction)
                .build(context);

    }
}A WeightFunction is defined to assign weights to service instances based on their ports. In above example, if the instance’s port is 8081, it is assigned a weight of 4. If the port is 8082, it is assigned a weight of 1. Other instances receive a weight of 0. In simple terms, 4 requests will go to the service running on port 8081 and 1 request will go to the service instance running on port 8082.
The withWeighted method is used to specify the weighted load balancing algorithm, with the defined WeightFunction.

3. Same Instance Preference
Same instance preference for load balancing means that when your system needs to pick a server to handle a request, it will try to choose the same server it used previously, as long as that server is still available. This helps in keeping the system stable and consistent.
To use same instance preference load balancing with Spring Cloud Load Balancer, you need to use the SameInstancePreferenceServiceInstanceListSupplier class. We can create a SameInstancePreferenceServiceInstanceListSupplier bean by using the ServiceInstanceListSupplier.builder() method and calling the .withSameInstancePreference() method. For example:
import org.springframework.cloud.client.DefaultServiceInstance;
import org.springframework.cloud.loadbalancer.core.ServiceInstanceListSupplier;
import org.springframework.cloud.loadbalancer.support.ServiceInstanceListSuppliers;
import org.springframework.context.ConfigurableApplicationContext;
import org.springframework.context.annotation.Bean;
import org.springframework.context.annotation.Configuration;

@Configuration
public class SayHelloServiceConfiguration {

    @Bean
    public ServiceInstanceListSupplier serviceInstanceListSupplier(ConfigurableApplicationContext context) {

        ServiceInstanceListSupplier serviceInstanceListSupplier = ServiceInstanceListSuppliers.from("say-hello",
                new DefaultServiceInstance("myservice1", "say-hello", "localhost", 8081, false),
                new DefaultServiceInstance("myservice2", "say-hello", "localhost", 8082, false)
        );

        return ServiceInstanceListSupplier.builder()
                .withBase(serviceInstanceListSupplier)
                .withSameInstancePreference()
                .build(context);

    }
}You’ll observe a consistent preference for the same instances as long as they remain available.

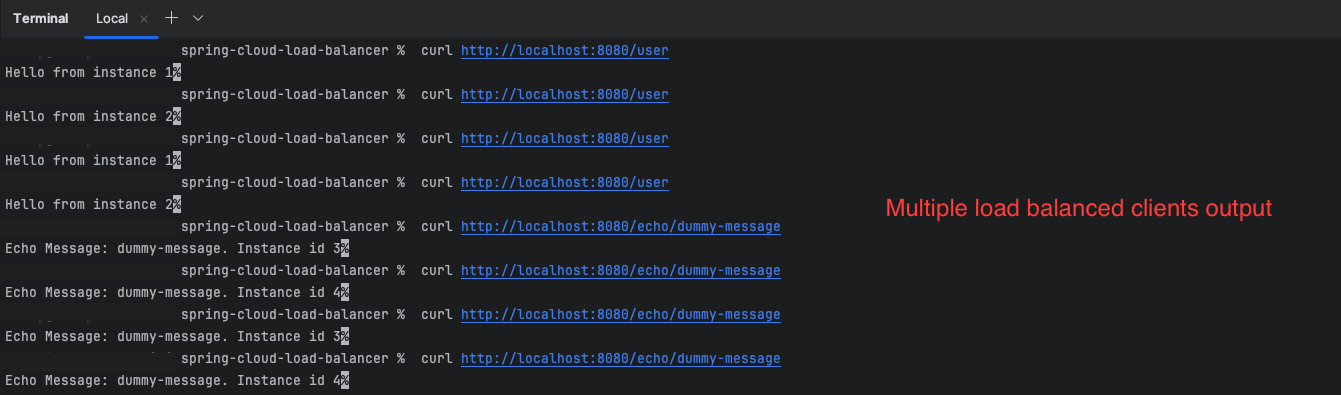
Multiple Load Balanced Clients Configuration
To configure multiple Load Balanced clients in Spring Cloud, annotate a class with @LoadBalancerClients, specifying an array of @LoadBalancerClient annotations, each with a unique name and configuration class.
import com.bootcamptoprod.springcloudloadbalancer.config.EchoServiceConfiguration;
import com.bootcamptoprod.springcloudloadbalancer.config.SayHelloServiceConfiguration;
import org.springframework.beans.factory.annotation.Autowired;
import org.springframework.cloud.loadbalancer.annotation.LoadBalancerClient;
import org.springframework.cloud.loadbalancer.annotation.LoadBalancerClients;
import org.springframework.stereotype.Component;
import org.springframework.web.client.RestTemplate;

@Component
@LoadBalancerClients({
        @LoadBalancerClient(name = "echo-service", configuration = EchoServiceConfiguration.class),
        @LoadBalancerClient(name = "say-hello", configuration = SayHelloServiceConfiguration.class)
})
public class LoadBalancedClient {

    @Autowired
    RestTemplate restTemplate;

    public String echo(String message) {
        return restTemplate.getForObject("http://echo-service/echo/" + message, String.class);
    }

    public String greetings() {
        return restTemplate.getForObject("http://say-hello/hello", String.class);
    }
}import org.springframework.cloud.client.DefaultServiceInstance;
import org.springframework.cloud.loadbalancer.core.ServiceInstanceListSupplier;
import org.springframework.cloud.loadbalancer.support.ServiceInstanceListSuppliers;
import org.springframework.context.ConfigurableApplicationContext;
import org.springframework.context.annotation.Bean;
import org.springframework.context.annotation.Configuration;
@Configuration
public class EchoServiceConfiguration {
@Bean
public static ServiceInstanceListSupplier echoServiceInstanceListSupplier(ConfigurableApplicationContext context) {
ServiceInstanceListSupplier from = ServiceInstanceListSuppliers.from("echo",
new DefaultServiceInstance("myservice3", "echo", "localhost", 8083, false),
new DefaultServiceInstance("myservice4", "echo", "localhost", 8084, false)
);
return ServiceInstanceListSupplier.builder()
.withBase(from)
.build(context);
}
}import org.springframework.cloud.client.DefaultServiceInstance;
import org.springframework.cloud.loadbalancer.core.ServiceInstanceListSupplier;
import org.springframework.cloud.loadbalancer.support.ServiceInstanceListSuppliers;
import org.springframework.context.ConfigurableApplicationContext;
import org.springframework.context.annotation.Bean;
import org.springframework.context.annotation.Configuration;
@Configuration
public class SayHelloServiceConfiguration {
@Bean
public static ServiceInstanceListSupplier serviceInstanceListSupplier(ConfigurableApplicationContext context) {
ServiceInstanceListSupplier serviceInstanceListSupplier = ServiceInstanceListSuppliers.from("say-hello",
new DefaultServiceInstance("myservice1", "say-hello", "localhost", 8081, false),
new DefaultServiceInstance("myservice2", "say-hello", "localhost", 8082, false)
);
return ServiceInstanceListSupplier.builder()
.withBase(serviceInstanceListSupplier)
.build(context);
}
}In the above example, LoadBalancedClient class interacts with two Load Balanced services: echo-service and say-hello. Each service has its own configuration class specified in @LoadBalancerClient annotation.
Other Supported Features
Spring Cloud Load Balancer offers a range of features, making it a powerful tool for managing load distribution in microservices environments. In addition to the key features that we learnt, Spring Cloud Load Balancer supports various other functionalities:
- Integration with
RestClient,WebClient, andWebFluxfor seamless load balancing. - Request-based sticky sessions.
- Zone-based load balancing.
- Instance health check for the load balancer.
- Retries and Caching.
For more details, refer to the Spring Cloud Load Balancer documentation.
Disabling Spring Cloud LoadBalancer
By setting the below property to false, you can effectively disable Spring Cloud LoadBalancer, preventing it from distributing requests across multiple instances.
spring.cloud.loadbalancer.enabled=false
Spring Cloud Load Balancer Metrics
The Load Balancer Metrics Endpoint provides comprehensive insights into the performance and behavior of the load balancing mechanism within your application.
Metrics
- loadbalancer.requests.active: This metric indicates the current number of active requests being processed by the load balancer. An active request is one that is currently being routed to a service instance or waiting to be routed.
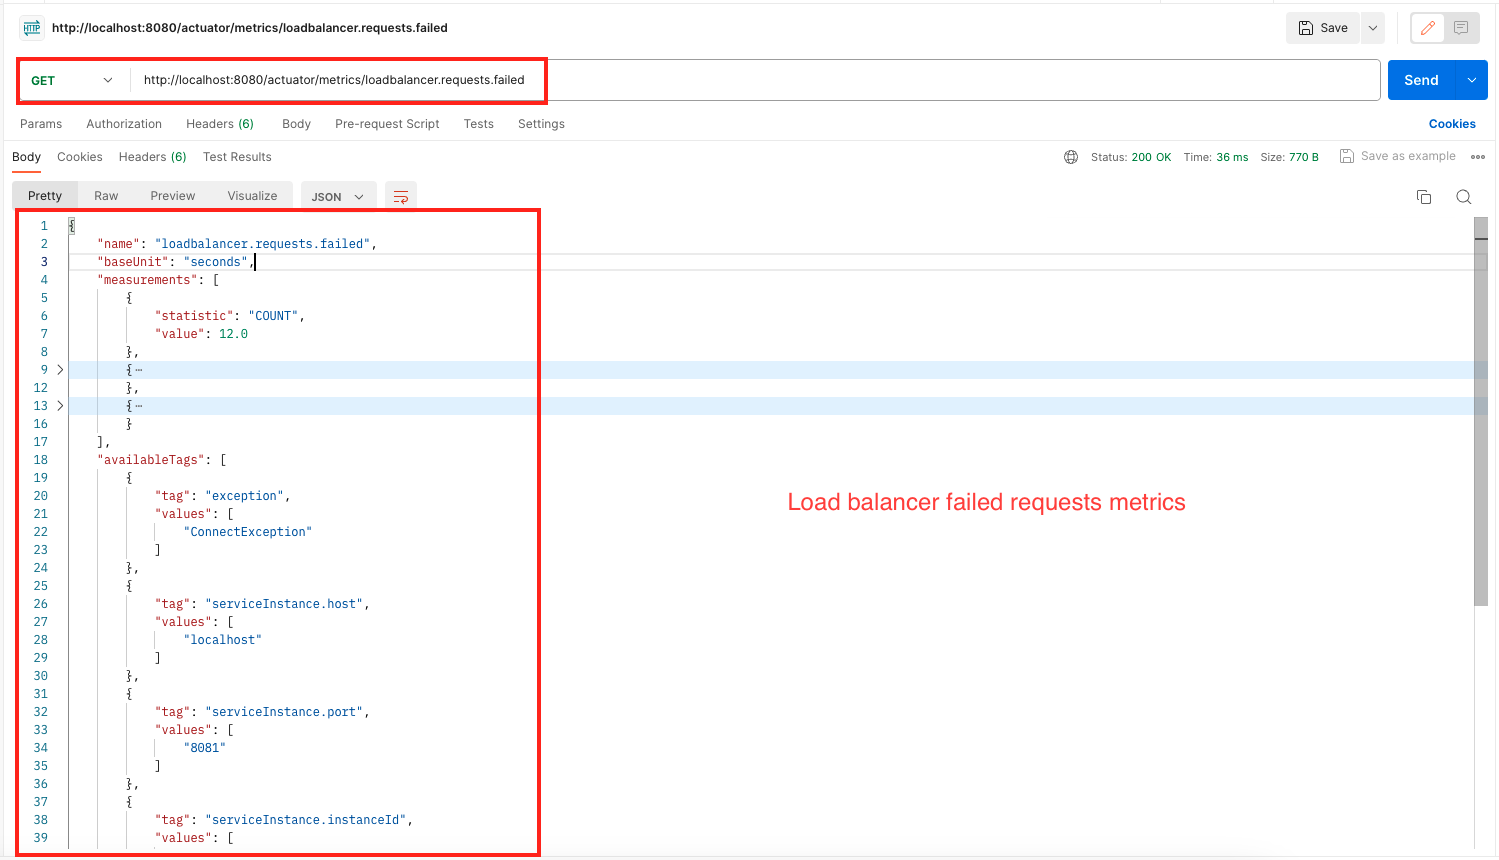
- loadbalancer.requests.failed: This metric represents the total number of requests that have failed during the load balancing process. A request may fail due to various reasons such as service instances being unavailable, timeouts, or other errors.
- loadbalancer.requests.success: This metric denotes the total number of successful requests that have been processed by the load balancer. A successful request is one that has been routed to a service instance and received a valid response without encountering any errors.
- loadbalancer.requests.discard: A counter that measures the number of discarded load-balanced requests, i.e. requests where a service instance to run the request on has not been retrieved by the LoadBalancer.


Source Code
The complete source code of the Spring Cloud Load Balancer demo application can be found here.
Things to Consider
When working with Spring Cloud Load Balancer, consider the following key points:
- Service Architecture: Evaluate the architecture of your application. If it’s composed of microservices deployed across multiple instances, client-side load balancing can help distribute traffic efficiently among these instances.
- Load Balancing Algorithms: Understand the available load balancing algorithms such as weighted, round-robin, or same-instance preference, and choose the one that best fits your application’s requirements.
- Control and Customization: Determine whether you need fine-grained control over load balancing algorithms and configurations. Client-side load balancing gives you more control over how requests are distributed and enables customization based on application-specific requirements.
- Service Discovery: Consider how service discovery is managed in your application. Client-side load balancers often integrate seamlessly with service discovery mechanisms, simplifying the process of locating and connecting to services.
- Complexity and Overhead: Assess the trade-offs in terms of complexity and overhead. While client-side load balancing offers benefits in terms of flexibility and resilience, it may require additional configuration and management compared to server-side load balancing solutions.
- Retry Mechanisms: Implement retry mechanisms to handle transient failures and improve the resilience of your applications. Spring Cloud Load Balancer integrates seamlessly with Spring Retry for this purpose.
- Health Checking: Implement health checks for your services to ensure that only healthy instances receive traffic. Spring Cloud Load Balancer can use this information to make informed load balancing decisions.
- Monitoring and Metrics: Monitor the performance of your load-balanced services using metrics provided by Spring Boot Actuator. This helps in identifying bottlenecks and optimizing the load balancing configuration.
- Testing: Thoroughly test your load-balanced applications under various scenarios to ensure that the load balancing behavior meets your expectations and performance requirements.
FAQs
What is Spring Cloud Load Balancer?
Spring Cloud Load Balancer is a client-side load balancing component in the Spring Cloud ecosystem. It provides built-in support for load balancing across multiple instances of a service, improving the availability, scalability, and resilience of microservices-based applications.
How does Spring Cloud Load Balancer work?
Spring Cloud Load Balancer works by intercepting client requests to a service and dynamically selecting an instance to route the request based on configured load balancing algorithms. It integrates seamlessly with service discovery mechanisms to discover available instances and distribute traffic effectively.
How does Spring Cloud Load Balancer handle service discovery?
Spring Cloud Load Balancer integrates with service discovery mechanisms, such as Netflix Eureka or Spring Cloud Discovery Client, to discover available instances of a service dynamically. It retrieves service information from the registry and uses it to distribute traffic across instances effectively.
Can I customize load balancing algorithms with Spring Cloud Load Balancer?
Yes, Spring Cloud Load Balancer provides flexibility in customizing load balancing algorithms to suit specific application requirements. You can choose from a variety of built-in algorithms or implement custom algorithms to distribute traffic based on factors like instance health, availability, or geographic proximity.
How does Spring Cloud Load Balancer compare to server-side load balancing solutions?
Unlike server-side load balancing solutions where the load balancer resides on the server-side infrastructure, Spring Cloud Load Balancer operates on the client-side, providing more flexibility and control over load balancing. It allows applications to adapt dynamically to changes in the service topology and provides better resilience and fault tolerance.
What is the purpose of the @LoadBalanced annotation in Spring Cloud?
The @LoadBalanced annotation is used to mark a RestTemplate bean for client-side load balancing. When applied to a RestTemplate bean, it enables client-side load balancing for HTTP requests made by that RestTemplate. Spring Cloud Load Balancer intercepts these requests and dynamically selects an available instance of the target service.
What is the purpose of the @LoadBalancerClient annotation in Spring Cloud?
The @LoadBalancerClient annotation provides fine-grained control over load-balanced clients, allowing developers to customize load balancing behavior and configurations for specific services.
Conclusion
In summary, Spring Cloud Load Balancer is a handy tool for evenly distributing traffic across multiple instances of a service. It helps ensure that no single instance gets overloaded, keeping your application running smoothly. With its easy-to-use configuration options and support for client-side load balancing, it’s a valuable addition to any microservices architecture, helping developers manage traffic effectively and maintain system reliability.
Add a Comment