
Learn how to use Google Open Source Vulnerability Scanner (OSV). This post explains the CLI commands for the OSV scanner and how to use it to secure your Maven project.
Introduction
Application security is a critical aspect of software development that requires attention throughout the development lifecycle. Threats to application security can range from low-level coding errors to sophisticated cyberattacks and can have significant consequences if not addressed proactively. One way to mitigate these threats is to use vulnerability scanners such as Google Open Source Vulnerability Scanner (OSV), which helps detect potential security vulnerabilities in project dependencies or libraries. By identifying and fixing security issues early in the development process, you can improve the overall security of your application and better protect your users’ data.
What is Google Open Source Vulnerability Scanner (OSV)?
Google Open Source Vulnerability Scanner (OSV) is a security tool developed by Google that helps detect potential vulnerabilities in your software projects. It scans the dependencies to identify any known security issues and generates reports to help developers understand and address these issues. By using the OSV Scanner, developers can proactively identify and address potential security issues in their software projects. This can help improve the overall security of the application and protect against potential cyberattacks.
How does Google OSV collect vulnerability data?
Google Open Source Vulnerability (OSV) is an ongoing project that aims to provide comprehensive and accurate vulnerability information. To achieve this goal, OSV collects vulnerability data from a variety of sources and formats, including the OpenSSF Vulnerability format.
Currently, OSV collects vulnerability data from several ecosystems, including:
GitHub Advisory Database: OSV collects vulnerability data for open-source projects hosted on GitHub using the GitHub Advisory Database.PyPI Advisory Database: OSV collects vulnerability data for Python packages from the PyPI Advisory Database.Go Vulnerability Database: OSV collects vulnerability data for Go packages from the Go Vulnerability Database.Rust Advisory Database: OSV collects vulnerability data for Rust packages from the Rust Advisory Database.Global Security Database: OSV collects vulnerability data from multiple sources and formats, including NVD, CVSS, CWE, and CAPEC.OSS-Fuzz: OSV collects vulnerability data from OSS-Fuzz, which is a continuous fuzzing service for open-source software.
In addition to these data sources, OSV also maintains a conversion pipeline for Debian Security Advisories and Alpine SecDB.
Overall, OSV leverages a wide range of data sources and formats to provide comprehensive and up-to-date vulnerability information for open-source projects.
Ecosystems Covered by Google OSV
Here are the ecosystems that are currently covered by Google Open Source Vulnerability (OSV):
| No. | Ecosystem | Description |
|---|---|---|
| 1 | AlmaLinux | A community-driven Linux distribution that provides a stable, secure, and reliable operating system for enterprise users. |
| 2 | Alpine | A security-oriented Linux distribution that is designed for resource efficiency and security. |
| 3 | Android | An open-source mobile operating system that is used by millions of devices worldwide. |
| 4 | Crates.io | A package registry for Rust programming language that enables developers to easily share and use Rust code. |
| 5 | Debian GNU/Linux | A popular Linux distribution that is known for its stability and security. |
| 6 | GitHub Actions | A platform that enables developers to automate their workflows, including testing, building, and deploying their code. |
| 7 | Go | A programming language developed by Google that is designed for building reliable and efficient software. |
| 8 | Hex | A package manager for the Elixir programming language that enables developers to easily manage their Elixir dependencies. |
| 9 | Linux kernel | The core component of the Linux operating system that manages system resources and provides basic services for other software. |
| 10 | Maven | A build automation tool for Java projects that enables developers to manage their project dependencies and build processes. |
| 11 | npm | A package manager for the Node.js JavaScript runtime that enables developers to easily manage their Node.js dependencies. |
| 12 | NuGet | A package manager for the Microsoft .NET platform that enables developers to easily manage their .NET dependencies. |
| 13 | OSS-Fuzz | A continuous fuzzing service for open-source software that is maintained by Google. |
| 14 | Packagist | A package repository for PHP that enables developers to easily manage their PHP dependencies. |
| 15 | Pub | A package manager for the Dart programming language that enables developers to easily manage their Dart dependencies. |
| 16 | PyPI | The official package repository for the Python programming language that enables developers to easily manage their Python dependencies. |
| 17 | Rocky Linux | A community-driven Linux distribution that is designed as a replacement for CentOS Linux. |
| 18 | RubyGems | A package manager for the Ruby programming language that enables developers to easily manage their Ruby dependencies. |
Overall, OSV covers a wide range of ecosystems and programming languages, which makes it a valuable resource for developers who want to ensure the security and reliability of their software projects.
Google OSV CLI
Google OSV CLI is the command-line interface for the Google Open Vulnerability Scanner (OSV). It is used to scan your project dependencies for security vulnerabilities.
Installing Google OSV Scanner
Google OSV scanner is written in Go. To install the OSV scanner, you need to have Go programming language installed on your system. Once you have Go installed, open the terminal or command prompt and enter the below command. This will download and install the OSV scanner binary on your system.
go install github.com/google/osv-scanner/cmd/osv-scanner@v1
To verify the installation of the OSV scanner you can execute the below command in the command prompt or terminal. If the installation was successful, you should see the version of the OSV scanner displayed in the terminal. If you receive an error message, it could indicate that the OSV scanner is not installed correctly. In that case, you can try to reinstall the OSV scanner and try again.
osv-scanner --version Output:


How to Use Google OSV Scanner?
The OSV scanner provides several command-line interface (CLI) commands that can be used to scan various types of projects for security vulnerabilities. Here is a brief explanation of each command along with an example:
1. Scanning Lockfiles
Lockfiles are files that contain a list of all the packages and dependencies used in a project along with their specific versions.
To use the OSV Scanner to scan specific lockfiles, developers can use the --lockfile flag followed by the path to the lockfile(s) they want to check.
osv-scanner --lockfile=/path/to/your/pom.xmlIt is also possible to specify multiple lockfiles inside a single command.
# Syntax-1
osv-scanner --lockfile=/path/to/your/pom.xml --lockfile=/path/to/another/pom.xml

# Syntax-2
osv-scanner --lockfile 'pom.xml:/path/to/your/extra-pom.xml'
List of Supported Lockfiles
OSV Scanner supports wide range of lockfiles. Here is list of supported lockfiles:
| S.No. | Lockfile | Description |
|---|---|---|
| 1 | buildscript-gradle.lockfile | A lockfile used by Gradle build scripts |
| 2 | Cargo.lock | A lockfile used by Rust package manager (Cargo) |
| 3 | composer.lock | A lockfile used by PHP package manager (Composer) |
| 4 | conan.lock | A lockfile used by C++ package manager (Conan) |
| 5 | Gemfile.lock | A lockfile used by Ruby package manager (Bundler) |
| 6 | go.mod | A lockfile used by Go package manager (Go Modules) |
| 7 | gradle.lockfile | A lockfile used by Gradle build tool |
| 8 | mix.lock | A lockfile used by Elixir package manager (Mix) |
| 9 | package-lock.json | A lockfile used by npm package manager |
| 10 | packages.lock.json | A lockfile used by Microsoft Visual Studio package manager |
| 11 | Pipfile.lock | A lockfile used by Python package manager (Pipenv) |
| 12 | pnpm-lock.yaml | A lockfile used by pnpm package manager |
| 13 | poetry.lock | A lockfile used by Python package manager (Poetry) |
| 14 | pom.xml | A lockfile used by Apache Maven build tool |
| 15 | pubspec.lock | A lockfile used by Dart package manager (Pub) |
| 16 | requirements.txt | A lockfile used by Python package manager (pip) |
| 17 | yarn.lock | A lockfile used by Yarn package manager |
Supported Installed/Status Files:
| S.No. | File | Description |
|---|---|---|
| 1 | apk-installed:/lib/apk/db/installed | Installed files used by the Alpine Package Keeper (apk) |
| 2 | dpkg-status:/var/lib/dpkg/status | Status files used by the Debian Package manager (dpkg) |
osv-scanner --lockfile 'apk-installed:/lib/apk/db/installed'

osv-scanner --lockfile 'dpkg-status:/var/lib/dpkg/status'Note: When scanning a file located in a directory with a colon in its name, use a colon prefix in the path to explicitly signal the scanner to infer the parser based on the filename.
For example:
osv-scanner --lockfile ':/path/to/my:projects/spring-boot-hello-world/pom.xml'Example: Scanning Maven Project Lockfile
The below command scans the Maven project using the pom.xml file. It checks the project’s dependencies for any known security vulnerabilities. To execute this command, navigate to the project directory in the terminal and type the command followed by the path to the pom.xml file.
osv-scanner --lockfile pom.xmlOutput:

2. Scanning a Directory
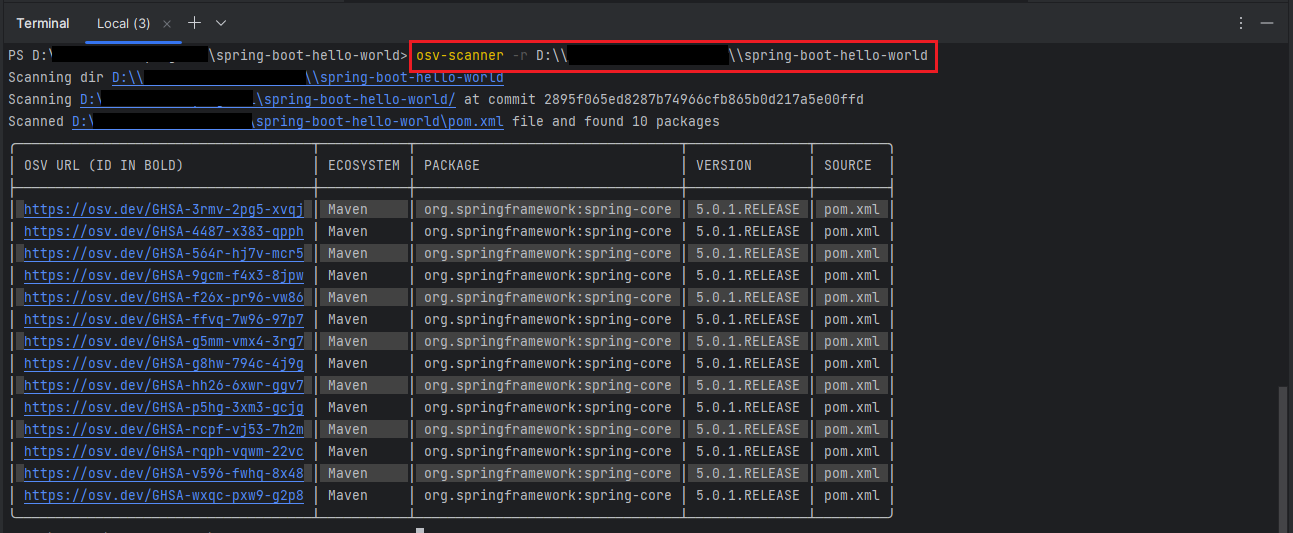
The OSV-Scanner can scan your project for vulnerabilities by searching for lockfiles, Software Bill of Materials (SBOMs), and git directories in your specified target directory. You can use the -r or --recursive flag to instruct the scanner to search for all subdirectories, which can help find additional dependencies, vulnerabilities, and lockfiles. However, note that a recursive search may take a long time, especially if your project has deeply nested subdirectories.
osv-scanner -r /path/to/your/dirOutput:
3. Scanning Debian Based Docker Images
The OSV scanner can be used to scan Debian based docker images for vulnerabilities by scraping the list of installed packages and querying them against the OSV database. It requires Docker to be installed and proper permissions to run. However, it should be noted that currently, only Debian based docker image scanning is supported. The tool does not scan the filesystem of the Docker container.
osv-scanner --docker image_name:latestNote: This feature is in the preview stage only
Changing OSV Scanner Output Format
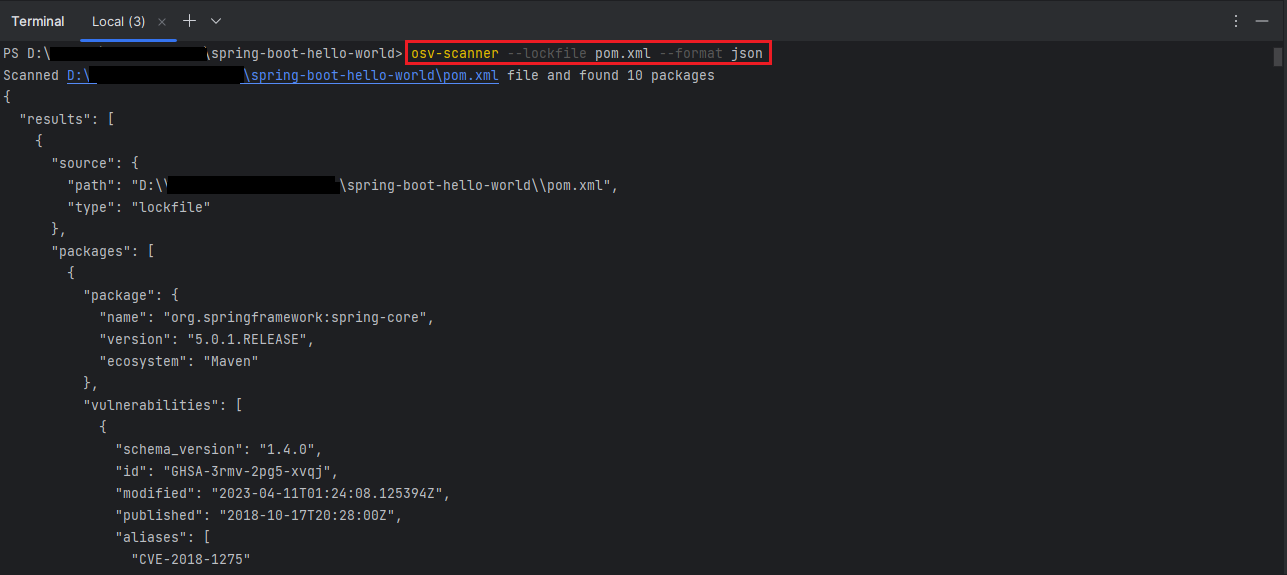
If you want to customize the output format of the OSV scanner, you can use the --format flag. By default, the scanner outputs the results in a human-readable table format, but you can change it to JSON format.
For example, to output the results in JSON format, you can use the following command:
osv-scanner --lockfile pom.xml --format jsonThis command scans a Maven project using the pom.xml file and outputs the results in JSON format. The JSON format can be useful if you want to integrate the scanner with other tools or services.
Writing JSON Output to a File
To write the JSON output to a file, you can use the > symbol followed by the name of the file you want to write the output to. For example, to write the JSON output to a file called results.json, you can use the following command:
osv-scanner --lockfile pom.xml --format json > results.jsonThis will scan the Maven project using the pom.xml file and write the results in JSON format to a file called results.json.
Suppressing Vulnerabilities
To suppress or whitelist vulnerabilities, you can create a toml config file in which you can specify the vulnerability ID. You can optionally add an expiry date or reason for ignoring the vulnerability. In order to to use this config, you need to pass the --config=/path/to/config.toml flag with the path to the configuration you want to use.
osv-scanner --lockfile pom.xml --config config.tomlSample config.toml file in which you can specify one or more vulnerabilities to whitelist:
[[IgnoredVulns]]
id = "GHSA-3rmv-2pg5-xvqj"
reason = "Ignoring vulnerability. Dependent on third party"

[[IgnoredVulns]]
id = "GHSA-4487-x383-qpph"
ignoreUntil = 2023-11-09 # Optional exception expiry date
reason = "Ignoring vulnerability until 09-Nov-2023"Output:

Fixing Vulnerabilities
If any vulnerabilities are found during the scanning phase, you can check the details of individual vulnerabilities by directly clicking on the URL which is printed in tabular output or you can go to https://osv.dev/list and enter the ID in the search bar and see the details of that vulnerability. You can also see if any fix is available for the vulnerability.
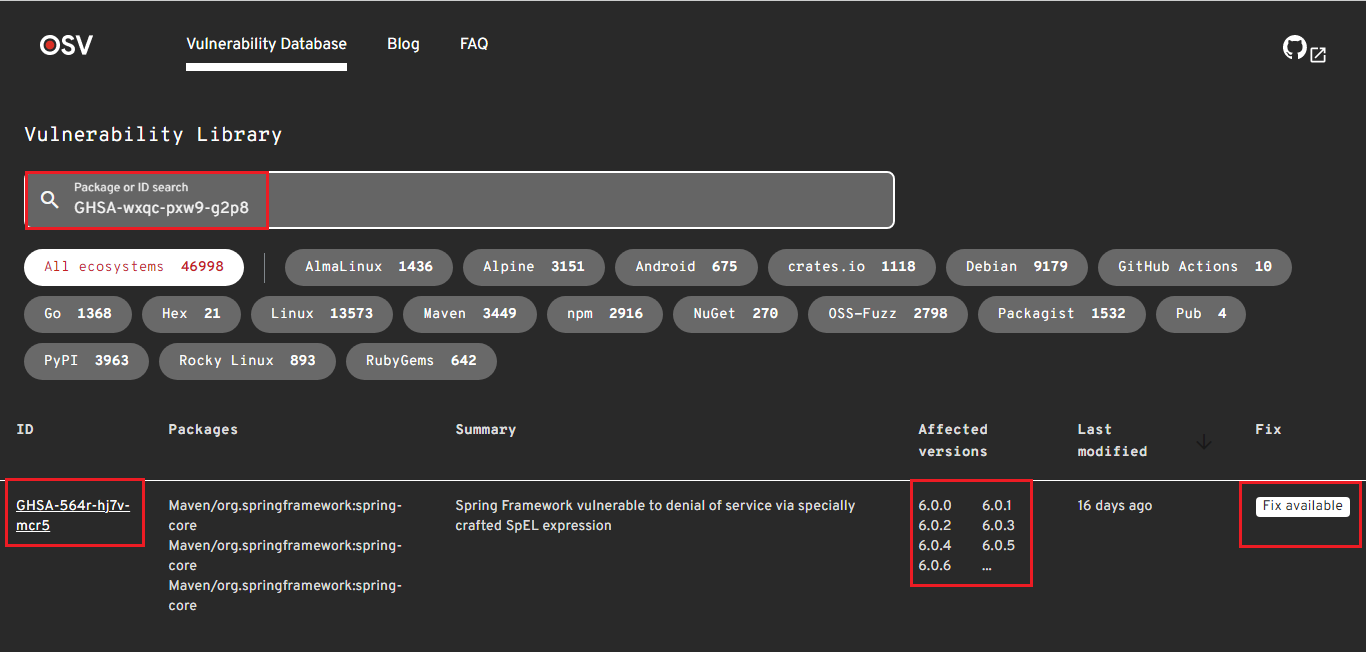

Note: These details are also present inside the JSON output if you have specified the scanner to generate the output in JSON format.
Integrating OSV Scanner With Maven Project
Unfortunately, there is no official Maven plugin available for the OSV scanner at the moment. However, you can use the Maven exec plugin to run the OSV scanner command from within your Maven project.
Here’s how to do it:
Step 1: Add the Maven exec plugin to your project
In your pom.xml file, add the following plugin definition.
<build>
  <plugins>
    <plugin>
      <groupId>org.codehaus.mojo</groupId>
      <artifactId>exec-maven-plugin</artifactId>
      <version>3.1.0</version>
    </plugin>
  </plugins>
</build>This will allow you to run arbitrary shell commands from within your Maven project.
Step 2: Create a Maven exec command for the OSV scanner
In your pom.xml file, add the following exec-maven-plugin configuration:
<plugin>
  <groupId>org.codehaus.mojo</groupId>
  <artifactId>exec-maven-plugin</artifactId>
  <version>3.1.0</version>
  <executions>
    <execution>
      <id>osv-scan</id>
      <phase>validate</phase>
      <goals>
        <goal>exec</goal>
      </goals>
      <configuration>
        <executable>osv-scanner</executable>
        <arguments>
          <argument>--lockfile</argument>
          <argument>pom.xml</argument>
          <argument>--config</argument>
          <argument>config.toml</argument>
        </arguments>
      </configuration>
    </execution>
  </executions>
</plugin>
This Maven plugin configuration executes the OSV scanner during the validate phase of the build process. It uses the “exec-maven-plugin” to run the osv-scanner executable with arguments --lockfile pom.xml to specify the Maven project’s lockfile and --config config.toml to provide configuration information for the scanner.
Step 3: Run the OSV scanner from within your Maven project
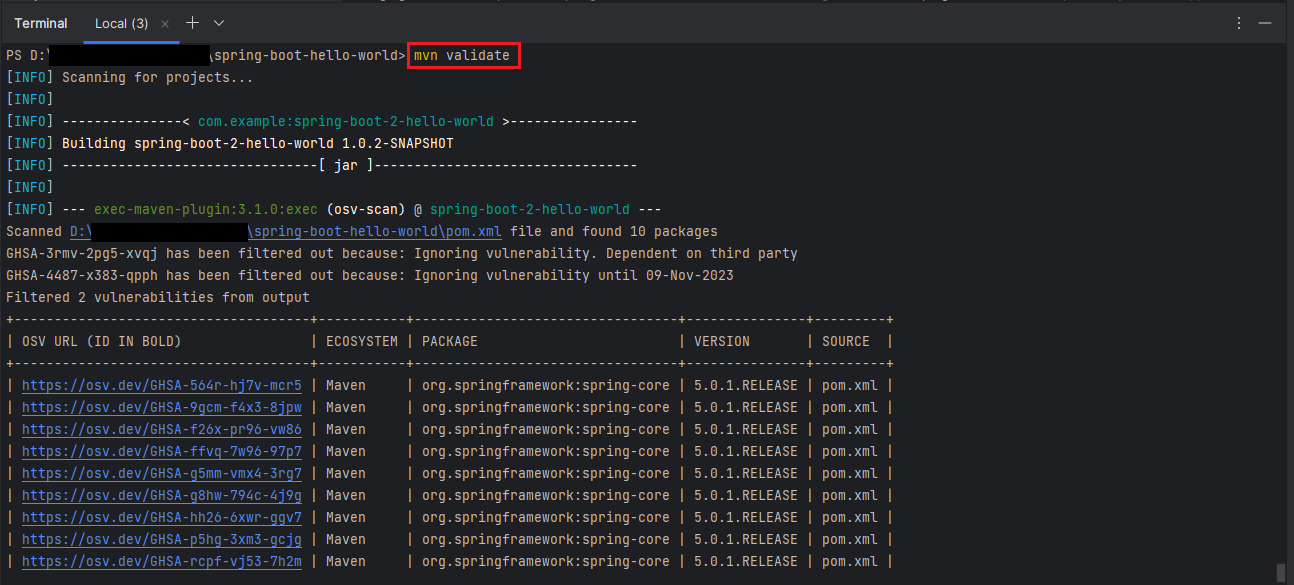
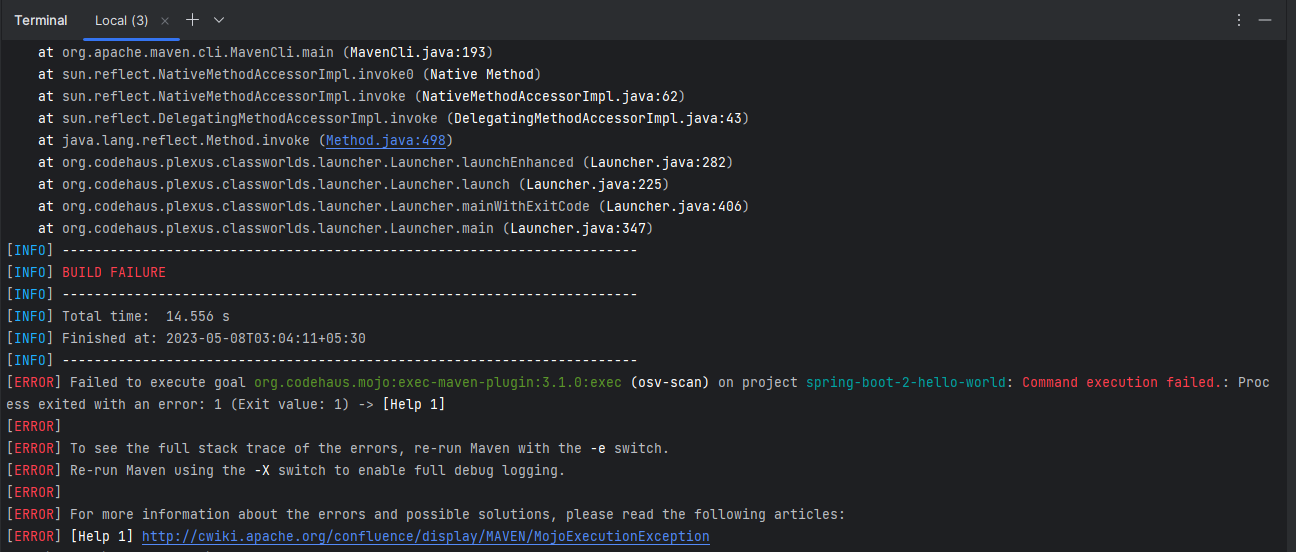
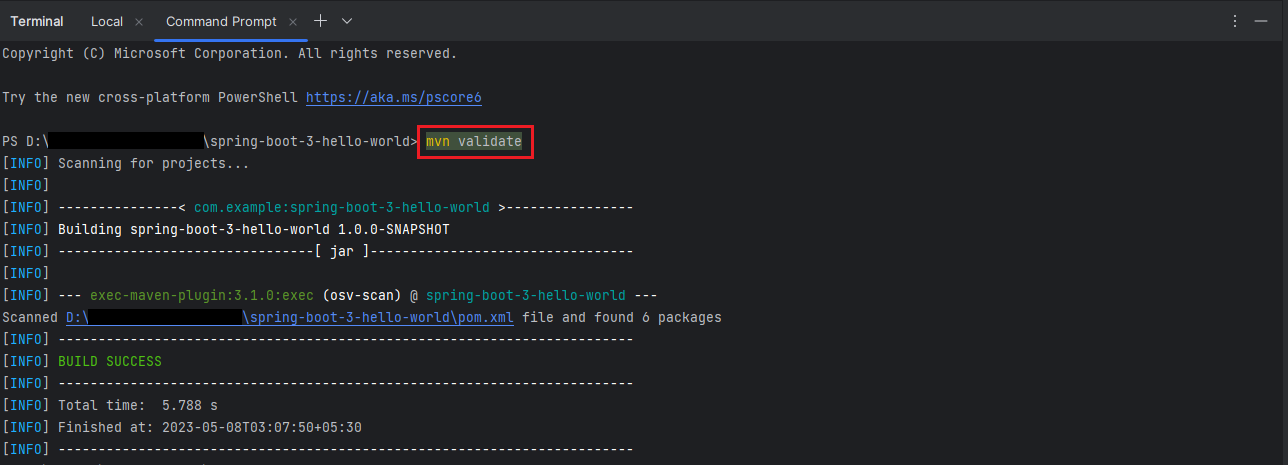
In your terminal, navigate to your Maven project directory and run the following command:
mvn validateThis will run the OSV scanner and output the results to the terminal.
Note: you can customize the osv-scanner command by adding additional arguments to the configuration section of the exec-maven-plugin.
Output:
If there are any vulnerabilities found during the scan phase then the maven build will fail. If there are no vulnerabilities found then the maven build will succeed.
We tried running the Google OSV Scanner on two projects, one of them contains the vulnerabilities and the other project does not contain any vulnerabilities. Maven build for the project with vulnerabilities failed and maven build for the project without vulnerabilities succeeded as expected.
FAQs
Is Google OSV free to use?
Yes, the OSV scanner is free to use and available as an open source tool under the Apache 2.0 license.
Can I use the OSV scanner with non-Maven projects?
Yes, you can use the OSV scanner with non-Maven projects as long as you provide the path to the lockfile of the package manager used in the project.
Things to Consider
Here are some things to consider when using the Google OSV:
- While Google OSV is a valuable tool for identifying known vulnerabilities, it should not be relied on as the sole source of security information. Developers should also take a proactive approach to security and implement measures such as code reviews, penetration testing, and vulnerability scanning tools.
- When using Google OSV, it is important to remember that the platform may not detect all vulnerabilities in your software. It is always a good practice to stay updated with the latest security advisories and best practices for secure coding.
- Google OSV is a community-driven platform, which means that the accuracy and completeness of the data are dependent on the contributions of the community. While Google provides a robust infrastructure and tools for managing the database, it is up to the community to report and validate vulnerabilities.
- Finally, it is important to note that while Google OSV provides valuable information about known vulnerabilities, it is not a substitute for a comprehensive security program. Developers should always take a holistic approach to security, including measures such as secure coding practices, vulnerability scanning tools, and incident response plans.
Conclusion
In conclusion, Google’s Open Source Vulnerability Scanner is a valuable resource for developers and organizations looking to identify and mitigate security issues in their software applications. The OSV scanner tool, combined with best practices like regularly updating dependencies and following secure coding practices, can help reduce the risk of vulnerabilities in your code. By taking advantage of OSV, you can stay ahead of potential security threats and protect your applications and users.
Learn More
Interested in learning more?
Check out our blog on how to use OWASP Dependency Check Maven Plugin to protect your code from vulnerabilities.
Add a Comment