
Ensure that your code is free of security flaws and vulnerabilities with the OWASP Dependency Check Maven plugin. Follow this practical guide to learn how to use it and configure it for your projects.
Introduction
As software developers, one of our key priorities is to ensure the security of the applications we develop. In today’s world, where cyber-attacks are becoming more frequent and sophisticated, it’s essential to take security measures to protect our applications from vulnerabilities. One such tool that can help us in this regard is the OWASP Vulnerability Checker, also known as the OWASP Vulnerability Scanner. When it comes to Java Maven projects, we have one plugin that is called OWASP Dependency-check-maven which we can use to identify vulnerabilities in our application.
In this blog post, we’ll discuss what OWASP is and what Dependency-check-maven is, and how we can use it with Maven to scan our applications for vulnerabilities. We’ll also cover different configurations we can use for this plugin, how we can exclude certain vulnerabilities, change the directory of the vulnerability database, and other possible use cases for developers.
What is OWASP?
OWASP stands for Open Web Application Security Project. It is a non-profit organization that provides information and tools for application security. OWASP has developed a list of the top 10 web application security risks that developers need to be aware of when developing applications. The OWASP Top 10 is a standard reference for application security and is widely used by security professionals and developers.
What is OWASP Vulnerability Scanner?
OWASP vulnerability scanner is a tool designed to scan and identify known security vulnerabilities in third-party software libraries and components used by a project. This tool is used to analyze the dependencies of an application and generate a report that shows the presence of any known vulnerabilities.
The tool uses a database of known vulnerabilities to compare against the versions of third-party libraries used in the application. It then generates a report that highlights any identified vulnerabilities. This helps developers to identify and remediate security risks in their software dependencies, which can help to prevent security breaches and protect sensitive information.
OWASP vulnerability scanner can be integrated with various build tools and CI/CD pipelines, making it easy to automate security scanning and ensure that applications are free from vulnerabilities before deployment.
What is OWASP Dependency-check-maven?
OWASP dependency-check-maven is a plugin that can be used with Maven to scan your application’s dependencies for vulnerabilities. It uses the National Vulnerability Database (NVD) provided by NIST to check for known vulnerabilities in your application’s dependencies. The plugin generates a report that lists all the vulnerabilities found in your application’s dependencies, along with the severity of each vulnerability and recommendations for fixing them.
How to use OWASP Dependency-check-maven?
Using OWASP dependency-check-maven with Maven is straightforward. Here are the steps:
Step 1: Add the Dependency-check-maven Plugin
Add the dependency-check-maven plugin to your project’s pom.xml file. Here’s an example:
<build>
  <plugins>
    <plugin>
      <groupId>org.owasp</groupId>
      <artifactId>dependency-check-maven</artifactId>
      <version>{dependency-check-maven}</version>
      <executions>
        <execution>
          <goals>
            <goal>check</goal>
          </goals>
        </execution>
      </executions>
    </plugin>
  </plugins>
</build>
The latest version of the plugin can be found here.
Step 2: Run the Scan
Run the check goal of the plugin using the following command:
mvn dependency-check:check
This command will run the OWASP Dependency-check-maven plugin, which will scan your application’s dependencies for vulnerabilities.
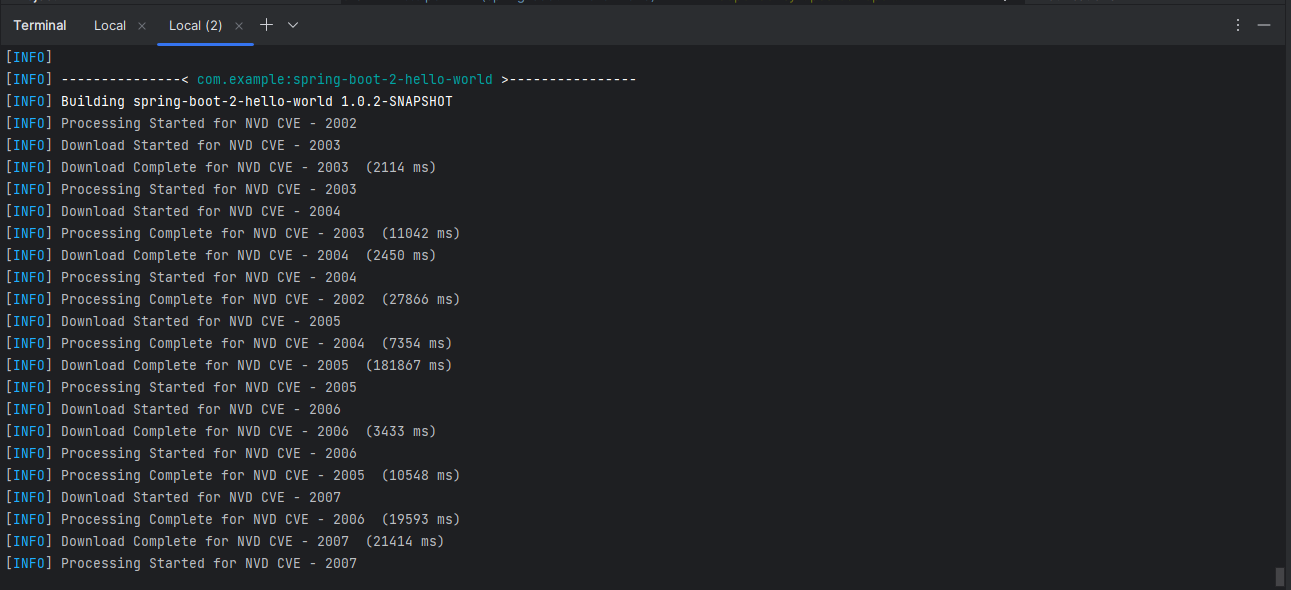
When you run the OWASP Dependency-check-maven plugin for the first time, it needs to download a database that contains information about known vulnerabilities in software dependencies. This process might take anywhere from 5 to 15 minutes, depending on how fast your internet connection is. After the initial download, the database will be stored on your local computer, so you won’t need to download it again unless there are significant updates.
When you run the plugin again, it will compare the dependencies in your project with the information in the vulnerability database to check if there are any known vulnerabilities that you should be aware of. Since the database is already on your computer, this check should be much faster than the initial download.
It’s important to note that the database is regularly updated with new vulnerabilities, so it’s a good idea to run the plugin periodically to ensure that your project is not affected by any new security issues.
Step 3: Review the Report
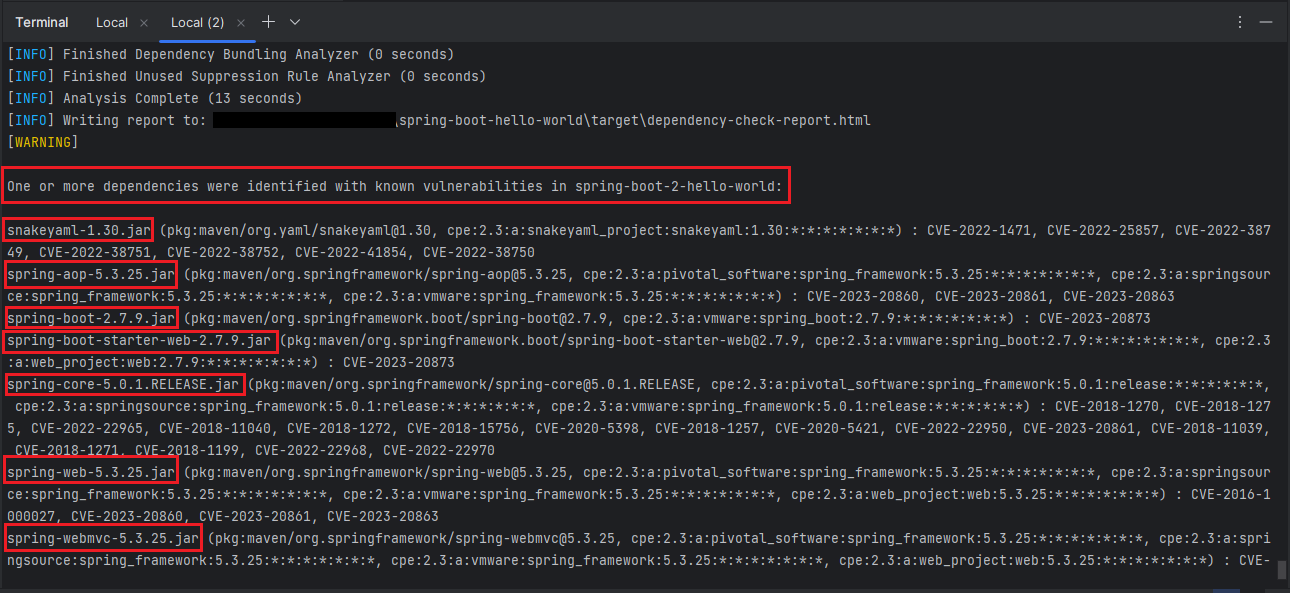
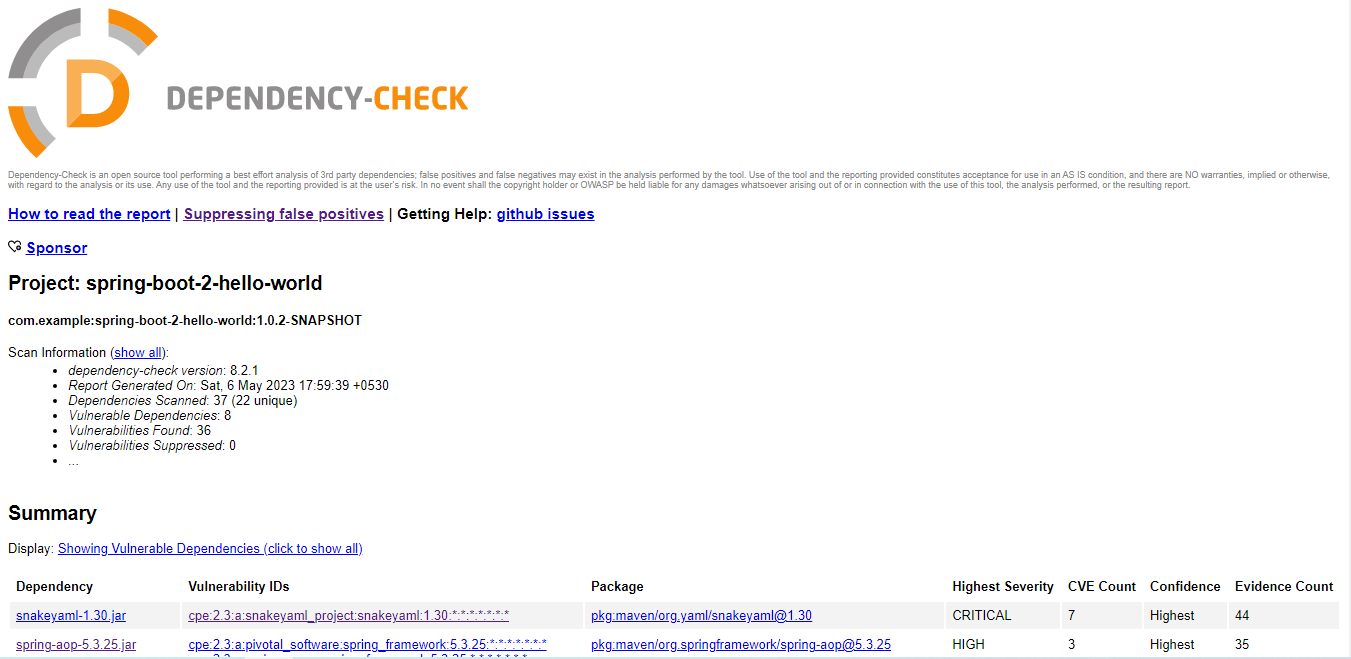
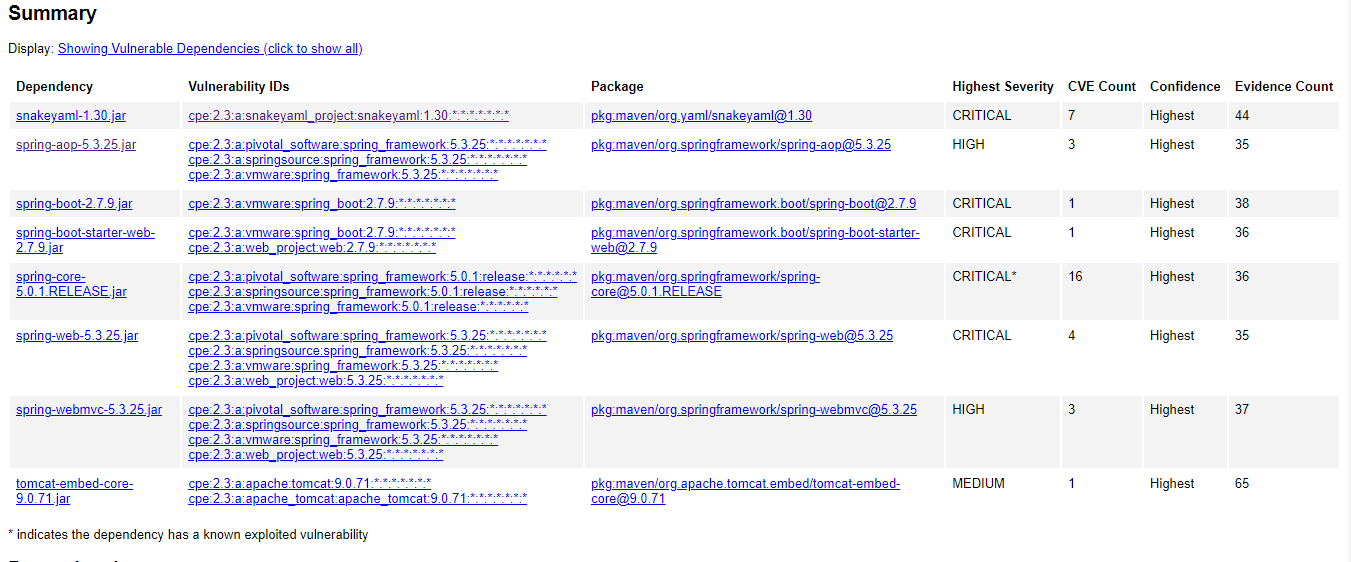
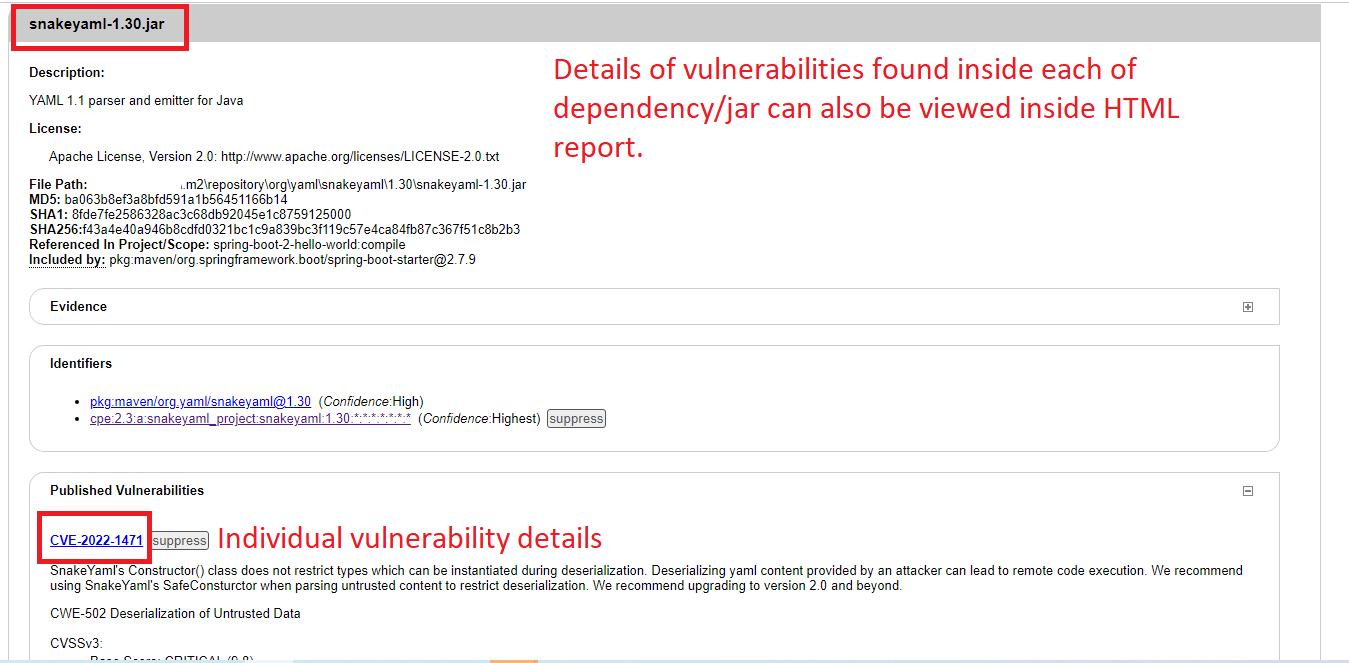
After the OWASP Dependency-check-maven plugin completes its scan, it generates a report in HTML format that shows the results of the scan, including any vulnerabilities found in your application’s dependencies. The report is saved in the “target” folder of your project. To view the report, open the file “target/dependency-check-report.html” in your web browser.
OWASP Dependency Check Maven Plugin Goals
The maven-dependency-check plugin has four goals:
aggregate: Runs dependency-check on all child projects and generates a single report.check: Runs dependency-check on the project and generates a report.update-only: Updates the local cache of the National Vulnerability Database (NVD) from NIST.purge: Deletes the local copy of the NVD, forcing a refresh of the data.
Here are examples of commands to use the maven-dependency-check plugin:
mvn dependency-check:check: This will run thecheckgoal and generate a report for the current project.mvn dependency-check:aggregate: This will run theaggregategoal and generate a single report for all child projects.mvn dependency-check:update-only: This will update the local cache of the NVD from NIST.mvn dependency-check:purge: This will delete the local copy of the NVD, forcing a refresh of the data.
Configurations for OWASP Dependency Check Maven
There are several configurations that we can use with the OWASP dependency-check-maven plugin. Here are some of the most useful ones:
Excluding Dependencies from Vulnerability Checks
To exclude one or more dependencies from the OWASP dependency-check-maven plugin scan, you can use the excludes configuration. This configuration allows you to specify a list of artifacts to exclude from the scan.
Here is an example code snippet that shows how to exclude the “snakeyaml” library from the scan:
<build>
  <plugins>
    <plugin>
      <groupId>org.owasp</groupId>
      <artifactId>dependency-check-maven</artifactId>
      <version>{dependency-check-maven}</version>
      <executions>
        <execution>
          <goals>
            <goal>check</goal>
          </goals>
        </execution>
      </executions>
      <configuration>
        <excludes>
          <exclude>org.yaml:snakeyaml</exclude>
        </excludes>
      </configuration>
    </plugin>
  </plugins>
</build>
In this example, the org.yaml:snakeyaml library will be excluded from the scan. You can add additional exclude tags to exclude more libraries as needed. by specifying artifact group id, artifact id and even you can specify the specific version if required.
Format: groupId:artifactId:version
Note:
There is one more way to exclude or suppress the dependencies from scan i.e. using the suppression file. Refer to “Suppressing False Positives” section for more details on this.
Failing the Maven Build When a Vulnerability Is Found
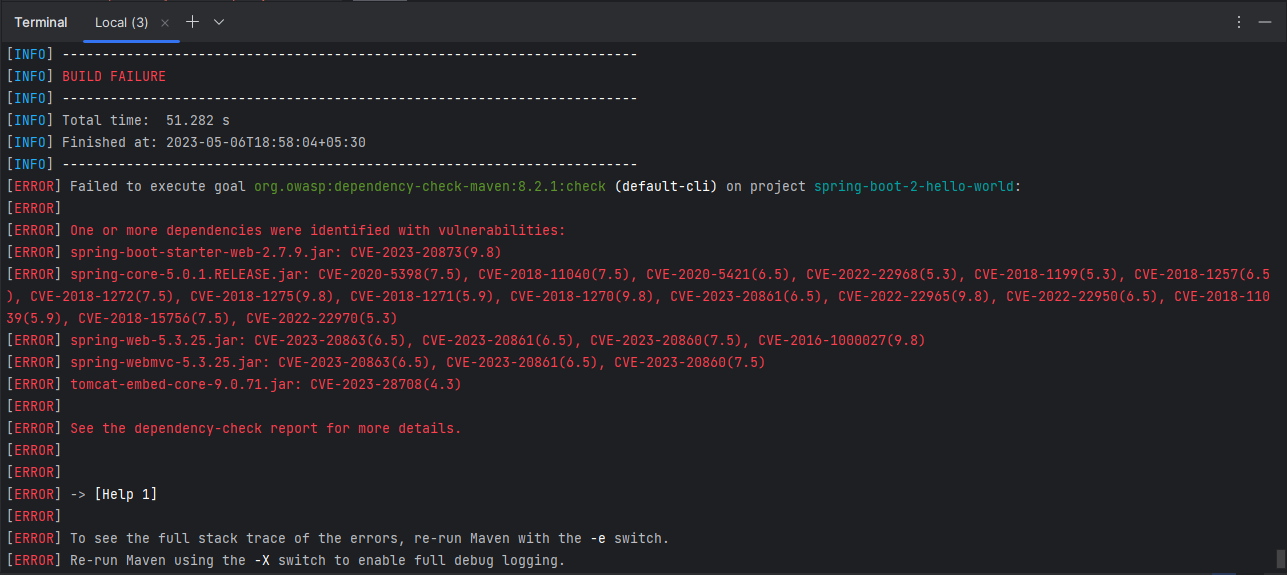
By default, the plugin generates a report on vulnerabilities found, but it does not fail the Maven build. However, we can configure the plugin to fail the build if any vulnerabilities are found. We can use the failBuildOnAnyVulnerability configuration parameter to enable this behavior. Here’s an example:
<build>
  <plugins>
    <plugin>
      <groupId>org.owasp</groupId>
      <artifactId>dependency-check-maven</artifactId>
      <version>{dependency-check-maven}</version>
      <executions>
        <execution>
          <goals>
            <goal>check</goal>
          </goals>
        </execution>
      </executions>
      <configuration>
        <failBuildOnAnyVulnerability>true</failBuildOnAnyVulnerability>
      </configuration>
    </plugin>
  </plugins>
</build>
Failing the Maven Build When the Vulnerability Level Exceeds a Threshold
You can configure the OWASP dependency-check-maven plugin to fail the Maven build if the level of vulnerability in the dependencies exceeds a certain threshold. This can help ensure that the application is not deployed with vulnerable dependencies. Here’s an example:
<build>
  <plugins>
    <plugin>
      <groupId>org.owasp</groupId>
      <artifactId>dependency-check-maven</artifactId>
      <version>{dependency-check-maven}</version>
      <executions>
        <execution>
          <goals>
            <goal>check</goal>
          </goals>
        </execution>
      </executions>
      <configuration>
        <failBuildOnCVSS>7</failBuildOnCVSS>
      </configuration>
    </plugin>
  </plugins>
</build>
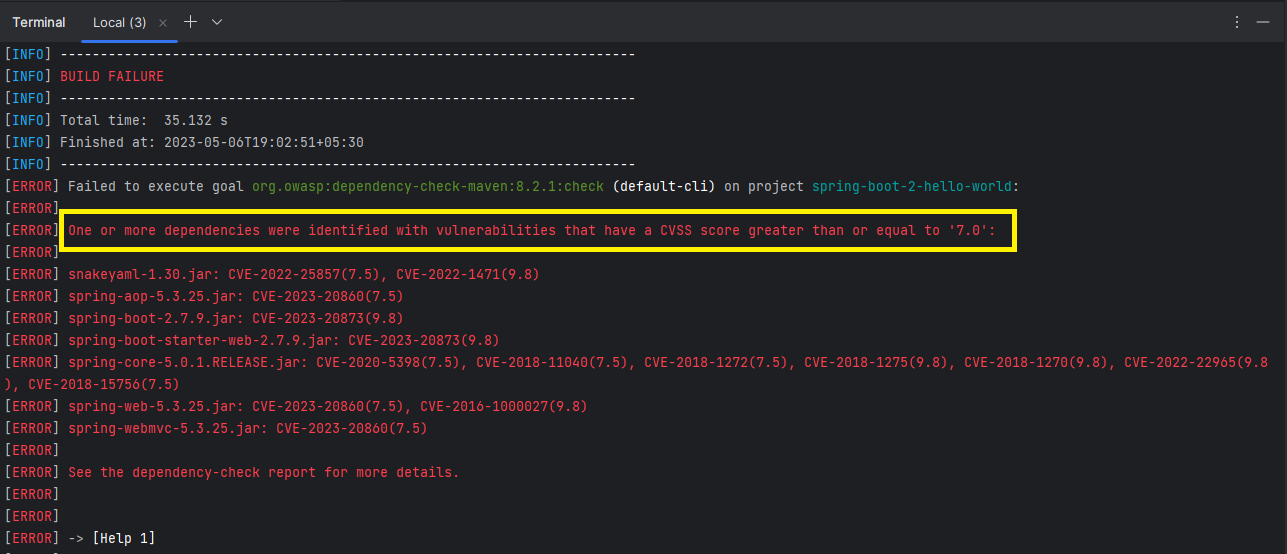
In the above code snippet, the failBuildOnCVSS configuration parameter is set to 7, which means that the build will fail if the CVSS score of a vulnerability is 7 or higher. You can adjust this value to suit your specific requirements.
Customizing the Report Format
The Dependency-Check plugin provides the option to customize the format of the generated report by using the format and formats configuration options. This allows developers to choose the format that best suits their needs, whether it be HTML, XML, CSV, JSON, JUNIT, SARIF, ALL.
The prettyPrint option can also be used to format the XML and JSON reports in a more human-readable way. When set to true, the generated reports will include indentation and line breaks to improve readability.
<build>
  <plugins>
    <plugin>
      <groupId>org.owasp</groupId>
      <artifactId>dependency-check-maven</artifactId>
      <version>{dependency-check-maven}</version>
      <executions>
        <execution>
          <goals>
            <goal>check</goal>
          </goals>
        </execution>
      </executions>
      <configuration>
        <format>HTML</format>
        <formats>
            <format>CSV</format>
            <format>JSON</format>
        </formats>
        <prettyPrint>true</prettyPrint>
      </configuration>
    </plugin>
  </plugins>
</build>
In the above code snippet, the format option is set to HTML, which specifies the format of the main report. Additionally, the formats option is used to specify other formats in which the report should be generated, such as CSV and JSON. By default, the report is generated in HTML format.
Configuring the Directory for the NVD Database
By default, the OWASP dependency-check-maven plugin downloads and stores the NVD database in the ${user.home}/.m2/repository/org/owasp/dependency-check-data directory. We can change this directory by setting the dataDirectory configuration parameter.
For example, to store the database in a directory named dependency-check-data in the project root directory, we can add the following to the plugin configuration:
<build>
  <plugins>
    <plugin>
      <groupId>org.owasp</groupId>
      <artifactId>dependency-check-maven</artifactId>
      <version>{dependency-check-maven}</version>
      <executions>
        <execution>
          <goals>
            <goal>check</goal>
          </goals>
        </execution>
      </executions>
      <configuration>
        <dataDirectory>${project.basedir}/dependency-check-data</dataDirectory>
      </configuration>
    </plugin>
  </plugins>
</build>
Configuring the Output Directory for Reports
By default, the OWASP dependency-check-maven plugin generates reports in the target directory. We can customize this directory using the outputDirectory configuration parameter. For example, to generate reports in a directory named “reports” in the project root directory, we can add the following to the plugin configuration:
<build>
  <plugins>
    <plugin>
      <groupId>org.owasp</groupId>
      <artifactId>dependency-check-maven</artifactId>
      <version>{dependency-check-maven}</version>
      <executions>
        <execution>
          <goals>
            <goal>check</goal>
          </goals>
        </execution>
      </executions>
      <configuration>
        <outputDirectory>${project.basedir}/reports</outputDirectory>
      </configuration>
    </plugin>
  </plugins>
</build>
Configuring Additional Directories for Scanning
The scanSet is a configuration parameter that allows users to specify additional directories to be included in the scanning process, in addition to the standard Maven conventions. It is used to scan external JARs in projects outside of Maven.
It is important to note that the file sets specified in the scanSet parameter should be relative to the base directory, and should not use Maven project variable substitution (e.g. ${project.basedir}/src/webpack), which can cause directories to be missed, especially when using an aggregate build.
Below is an example of a scanSet parameter configuration that includes additional directories for scanning:
<build>
  <plugins>
    <plugin>
      <groupId>org.owasp</groupId>
      <artifactId>dependency-check-maven</artifactId>
      <version>{dependency-check-maven}</version>
      <executions>
        <execution>
          <goals>
            <goal>check</goal>
          </goals>
        </execution>
      </executions>
      <configuration>
        <scanSet>
          <fileSet>
            <directory>otel</directory>
          </fileSet>
          <fileSet>
            <directory>signalfx</directory>
          </fileSet>
        </scanSet>
      </configuration>
    </plugin>
  </plugins>
</build>
In this example, two directories, otel and signalfx, are included in the scanSet. These two directories are present at the root level of the maven project.
Additional Configuration Options
- Scan Dependencies: Sets whether the dependencies should be scanned. Default value is
true.
Example:<scanDependencies>true</scanDependencies> - Scan Plugins: Sets whether the plugins and their dependencies should be scanned. Default value is
false.
Example:<scanPlugins>false</scanPlugins> - Skip Analysis: Skips the dependency-check analysis. Default value is
false.
Example:<skip>true</skip> - Skip Provided Scope: Skip analysis for artifacts with Provided Scope. Default value is
false.
Example:<skipProvidedScope>true</skipProvidedScope> - Skip Runtime Scope: Skip analysis for artifacts with Runtime Scope. Default value is
false.
Example:<skipRuntimeScope>true</skipRuntimeScope> - Skip System Scope: Skip analysis for artifacts with System Scope. Default value is
false.
Example:<skipSystemScope>true</skipSystemScope> - Skip Test Scope: Skip analysis for artifacts with Test Scope. Default value is
true.
Example:<skipTestScope>true</skipTestScope> - Skip Dependency Management: Skip analysis for dependencyManagement sections. Default value is
true.
Example:<skipDependencyManagement>true</skipDependencyManagement> - Skip Artifact Type: A regular expression used to filter/skip artifact types. This filters on the type of dependency as defined in the dependency section: jar, pom, test-jar, etc.
Example:<skipArtifactType>test-jar</skipArtifactType>
Suppressing False Positives
When using a vulnerability scanner like OWASP dependency-check, false positives may occur. False positives are identified as vulnerabilities that are reported as being present, but are not actually present or are not exploitable. In such cases, false positives can be suppressed by using suppression files. This is also known as whitelisting the vulnerability.
Suppression files contain rules to suppress certain vulnerabilities or warnings from appearing in the scan report. These rules can be based on various factors such as the package URL, the library name, the vulnerability ID, or the CVSS score.
Here is an example of how to suppress a specific vulnerability based on its ID:
<?xml version="1.0" encoding="UTF-8"?>
<suppressions
	xmlns="https://jeremylong.github.io/DependencyCheck/dependency-suppression.1.3.xsd">
	<suppress>
		<notes>
			<![CDATA[
   file name: snakeyaml-1.30.jar
   ]]>
		</notes>
		<packageUrl regex="true">^pkg:maven/org\.yaml/snakeyaml@.*$</packageUrl>
		<vulnerabilityName>CVE-2022-1471</vulnerabilityName>
	</suppress>
</suppressions>The file contains a single suppression rule which is used to suppress a specific vulnerability in the snakeyaml-1.30.jar file. The packageUrl element specifies a regular expression that matches the dependency that should be suppressed, and the vulnerabilityName element specifies the name of the vulnerability that should be suppressed. The notes element is used to add additional information about the suppression rule, such as the file name or any other relevant information.
The suppression file can be referenced in the pom.xml configuration for the OWASP dependency-check plugin, like this:
<build>
  <plugins>
    <plugin>
      <groupId>org.owasp</groupId>
      <artifactId>dependency-check-maven</artifactId>
      <version>{dependency-check-maven}</version>
      <executions>
        <execution>
          <goals>
            <goal>check</goal>
          </goals>
        </execution>
      </executions>
      <configuration>
        <suppressionFiles>
          <suppressionFile>src/main/resources/dependency-check-suppression.xml</suppressionFile>
        </suppressionFiles>
      </configuration>
    </plugin>
  </plugins>
</build>
Advanced Examples of Suppression Files
<?xml version="1.0" encoding="UTF-8"?>
<suppressions
	xmlns="https://jeremylong.github.io/DependencyCheck/dependency-suppression.1.3.xsd">
	<suppress>
		<notes>
			<![CDATA[This suppresses a CVE identified by OSS Index using the vulnerability name and packageUrl.]]>
		</notes>
		<packageUrl regex="true">^pkg:maven/org\.eclipse\.jetty/jetty-server@.*$</packageUrl>
		<vulnerabilityName>CVE-2017-7656</vulnerabilityName>
	</suppress>
	<suppress>
		<notes>
			<![CDATA[This suppresses cpe:/a:csv:csv:1.0 for some.jar in the "c:\path\to" directory.]]>
		</notes>
		<filePath>c:\path\to\some.jar</filePath>
		<cpe>cpe:/a:csv:csv:1.0</cpe>
	</suppress>
	<suppress>
		<notes>
			<![CDATA[This suppresses any jboss:jboss cpe for any test.jar in any directory.]]>
		</notes>
		<filePath regex="true">.*\btest\.jar</filePath>
		<cpe>cpe:/a:jboss:jboss</cpe>
	</suppress>
	<suppress>
		<notes>
			<![CDATA[This suppresses a specific cve for any test.jar in any directory.]]>
		</notes>
		<filePath regex="true">.*\btest\.jar</filePath>
		<cve>CVE-2013-1337</cve>
	</suppress>
	<suppress>
		<notes>
			<![CDATA[This suppresses all CVE entries that have a score below CVSS 7.]]>
		</notes>
		<cvssBelow>7</cvssBelow>
	</suppress>
	<suppress>
		<notes>
			<![CDATA[This suppresses false positives identified on spring security.]]>
		</notes>
		<gav regex="true">org\.springframework\.security:spring.*</gav>
		<cpe>cpe:/a:vmware:springsource_spring_framework</cpe>
		<cpe>cpe:/a:springsource:spring_framework</cpe>
		<cpe>cpe:/a:mod_security:mod_security</cpe>
	</suppress>
	<suppress>
		<notes>
			<![CDATA[This suppresses false positives identified on spring security.]]>
		</notes>
		<gav regex="true">org\.springframework\.security:spring.*</gav>
		<vulnerabilityName regex="true">.*</vulnerabilityName>
	</suppress>
	<suppress>
		<notes>
			<![CDATA[This suppresses false positives identified on snakeyaml. Using GAV format]]>
		</notes>
		<gav regex="true">org\.yaml:snakeyaml.*</gav>
		<vulnerabilityName regex="true">.*</vulnerabilityName>
	</suppress>
	<suppress>
		<notes>
			<![CDATA[This suppresses false positives identified on snakeyaml. Using package URL format]]>
		</notes>
		<packageUrl regex="true">^pkg:maven/org\.yaml/snakeyaml@.*$</packageUrl>
		<vulnerabilityName regex="true">.*</vulnerabilityName>
	</suppress>
</suppressions>Each “suppress” element in the XML represents a rule to suppress a specific vulnerability or false positive. Here’s a brief summary of what each rule does:
- Suppresses a vulnerability identified by OSS Index using the vulnerability name and package URL for the Jetty server library.
- Suppresses a specific version of the CSV library for a JAR file in a specific directory.
- Suppresses any version of the JBoss library for any JAR file with “test” in its name, in any directory.
- Suppresses a specific CVE for any JAR file with “test” in its name, in any directory.
- Suppresses all CVE entries that have a score below CVSS 7.
- Suppresses false positives identified on Spring Security for specific versions of the library using a regular expression.
- Suppresses false positives identified on Spring Security for any version of the library, regardless of the vulnerability name.
- Suppresses false positives identified on Snakeyaml for any version of the library using GAV format, regardless of the vulnerability name.
- Suppresses false positives identified on Snakeyaml for any version of the library using Package URL format, regardless of the vulnerability name.
Specifying End Date for Vulnerability Suppression using ‘until’
The until attribute in a suppression block is used to specify a date until which a vulnerability should be suppressed. This is useful when a vulnerability is expected to be fixed by a certain date, after which the suppression should be automatically lifted.
Here’s an example of a suppression block with an until attribute:
<?xml version="1.0" encoding="UTF-8"?>
<suppressions
	xmlns="https://jeremylong.github.io/DependencyCheck/dependency-suppression.1.3.xsd">
	<suppress until="2020-01-01Z">
		<notes>
			<![CDATA[
        This suppresses a CVE identified by OSS Index using the vulnerability name and packageUrl.
        ]]>
		</notes>
		<packageUrl regex="true">^pkg:maven/org\.eclipse\.jetty/jetty-server@.*$</packageUrl>
		<vulnerabilityName>CVE-2017-7656</vulnerabilityName>
	</suppress>
</suppressions>This example shows a suppression entry for a CVE with the “until” attribute set to “2020-01-01Z”, which means the suppression is valid until January 1, 2020 at midnight UTC. After this date, the vulnerability will no longer be suppressed and will appear in scan results.
FAQs
Can we use OWASP dependency-check with other build tools?
Yes, OWASP dependency-check can be used with build tools such as Ant Task, Command Line Tool, Gradle Plugin, Jenkins Plugin, Maven Plugin and SBT Plugin.
What types of vulnerabilities does OWASP dependency-check-maven check for?
OWASP dependency-check-maven checks for known vulnerabilities in your application’s dependencies. It uses the NVD (National Vulnerability Database) provided by NIST to check for known vulnerabilities.
Can we use OWASP dependency-check-maven to scan our custom libraries?
Yes, we can use OWASP dependency-check-maven to scan our custom libraries. We just need to add our custom libraries as dependencies in our Maven project.
Can we scan a Docker image with the OWASP Dependency Check Maven plugin?
The OWASP Dependency Check Maven plugin is designed to scan dependencies of a project, including both direct and transitive dependencies. It is not designed to scan Docker images directly. However, you can use other tools such as Clair to scan Docker images for vulnerabilities.
Things to Consider
Here are some things to consider when using the OWASP dependency-check-maven plugin:
- OWASP dependency-check-maven scans only for known vulnerabilities in your application’s dependencies. It does not check for unknown vulnerabilities or security weaknesses in your application code.
- The plugin relies on the accuracy and completeness of the NVD database. We should keep the database up-to-date and consider supplementing it with other sources of vulnerability information.
- We should carefully review the findings and take appropriate actions to address any vulnerabilities found. False positives and false negatives are possible, so we should use our judgment and additional tools as needed.
- We should consider integrating the plugin into our development and testing processes to catch vulnerabilities early in the lifecycle.
Conclusion
In conclusion, OWASP dependency-check-maven is a useful tool for scanning our application’s dependencies for vulnerabilities. We can use it with Maven to generate reports that highlight vulnerabilities in our dependencies. By taking advantage of the different configurations and options available, we can tailor the scan to our specific needs. However, it’s essential to remember that this tool is just one part of a comprehensive approach to application security. We need to use multiple tools and approaches to ensure the security of our applications.
Learn More
Interested in learning more?
Check out our blog on how to update Maven dependencies effortlessly.
Add a Comment