Embark on your journey to mastering Spring Boot email with this detailed guide. From setting up dependencies to understanding key classes and interfaces, and implementing various email scenarios including plain text, attachments, HTML content, and more, this tutorial covers everything you need to know!
Introduction
Email communication is a cornerstone of modern applications, facilitating crucial interactions with users. One of the features that Spring Boot provides is the ability to send emails with very minimal configuration. In this article, we will learn how to use Spring Boot to send various types of emails, such as plain text, HTML, attachments, inline images, tables, and more. We will also cover how to configure different mail servers, and how to enable logging.
Dependency to Include in Project
To use the email functionality of Spring Boot, you need to add the spring-boot-starter-mail dependency to your project. This dependency will automatically import the JavaMail API and the Spring Framework support for sending emails. You can add this dependency using Maven or Gradle.
Maven
If you are using Maven, you can add the following dependency to our pom.xml file:
<dependency>
  <groupId>org.springframework.boot</groupId>
  <artifactId>spring-boot-starter-mail</artifactId>
</dependency>
Gradle
If we are using Gradle, we can add the following dependency to our build.gradle file:
dependencies {
  implementation 'org.springframework.boot:spring-boot-starter-mail'
}
Important Classes and Interfaces
The Spring Framework provides several classes and interfaces that help us create and send emails using the JavaMail API. Here are some of the most important ones:
-
MailSender interface: the top-level interface that provides basic functionality for sending simple emails.
-
JavaMailSender interface: the subinterface of the
MailSenderinterface that supports MIME messages and is mostly used in conjunction with theMimeMessageHelperclass for the creation of aMimeMessage. It also provides methods for sending emails using aMimeMessagePreparatoror aMimeMessageCallback -
JavaMailSenderImpl class: the implementation of the
JavaMailSenderinterface that supports bothSimpleMailMessageandMimeMessage. It also allows us to configure the mail server properties using aPropertiesobject or aMailPropertiesobject. -
SimpleMailMessage class: a simple representation of an email message that includes the from, to, cc, bcc, subject, and text fields. It can be used to send plain text emails using the
MailSenderinterface. -
MimeMessage interface: a representation of a MIME message that can contain multiple parts, such as text, attachments, images, etc. It can be used to send complex emails using the
JavaMailSenderinterface. -
MimeMessageHelper class: a helper class for the creation of a
MimeMessagethat offers support for images, typical mail attachments, and text content in an HTML layout. It also provides methods for setting the from, to, cc, bcc, subject, and reply-to fields of the email message. -
MimeMessagePreparator interface: a callback interface for the preparation of a
MimeMessage. It can be used to create aMimeMessageprogrammatically and pass it to theJavaMailSenderinterface for sending.interface: a callback interface for performing operations on aMimeMessage. It can be used to modify or inspect aMimeMessagebefore or after sending. -
MimeMessageCallback interface: a callback interface for performing operations on a
MimeMessage. It can be used to modify or inspect aMimeMessagebefore or after sending.
Mail Server Configuration
To send emails using Spring Boot, we need to configure the mail server properties, such as the host, port, username, password, protocol, etc. These properties can be specified in the application.properties file, the application.yml file, or the JavaMailSenderImpl class. The exact values of these properties depend on the mail server we are using. In this section, we will show how to configure the mail server properties for three popular mail services: Gmail, Outlook, and AWS SES.
Format:
application.properties
spring.mail.host={smtp-server-address-for-sending-emails}
spring.mail.port={port-number-for-the-smtp-server}
spring.mail.username={username-for-authenticating-with-the-smtp-server}
spring.mail.password={password-for-authenticating-with-the-smtp-server}
spring.mail.properties.mail.transport.protocol={email-transport-protocol} #smtp
spring.mail.properties.mail.smtp.auth={enables-smtp-authentication} #true or false
spring.mail.properties.mail.smtp.starttls.enable={enables-the-use-of-tls-encryption-for-secure-communication-with-the-smtp-server} #true or false
spring.mail.properties.mail.smtp.starttls.required={specifies-whether-tls-is-required-for-smtp-communication} # true or false
JavaMailSenderImpl
@Bean
public JavaMailSender javaMailSender() {
  JavaMailSenderImpl mailSender = new JavaMailSenderImpl();
  mailSender.setHost("smtp-server-address-for-sending-emails");
  mailSender.setPort(port-number-for-the-smtp-server); // Integer value
  mailSender.setUsername("username-for-authenticating-with-the-smtp-server");
  mailSender.setPassword("password-for-authenticating-with-the-smtp-server");

  Properties props = mailSender.getJavaMailProperties();
  props.put("mail.transport.protocol", "email-transport-protocol"); // smtp or pop3
  props.put("mail.smtp.auth", "smtp-authentication-for-secure-access-to-the-mail-server"); // true or false
  props.put("mail.smtp.starttls.enable", "enables-the-use-of-tls-encryption-for-secure-communication-with-the-smtp-server"); // true or false
  props.put("mail.debug", "enables-debugging-mode-to-show-detailed-email-sending-information"); // true or false

  return mailSender;
}
If you’re considering secure methods for including passwords in your application properties, delve into our blogs on Jasypt and HashiCorp Vault for comprehensive solutions.
1. Gmail
To use Gmail as the mail server, we need to enable the less secure app access option in our Gmail account settings. The steps for the same are as follows:
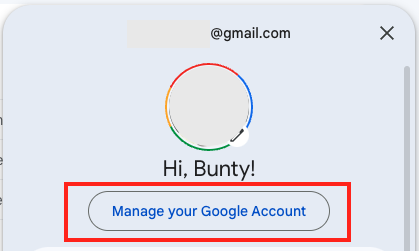
- Go to Gmail, click on your profile, and click “Manage your Google Account”.
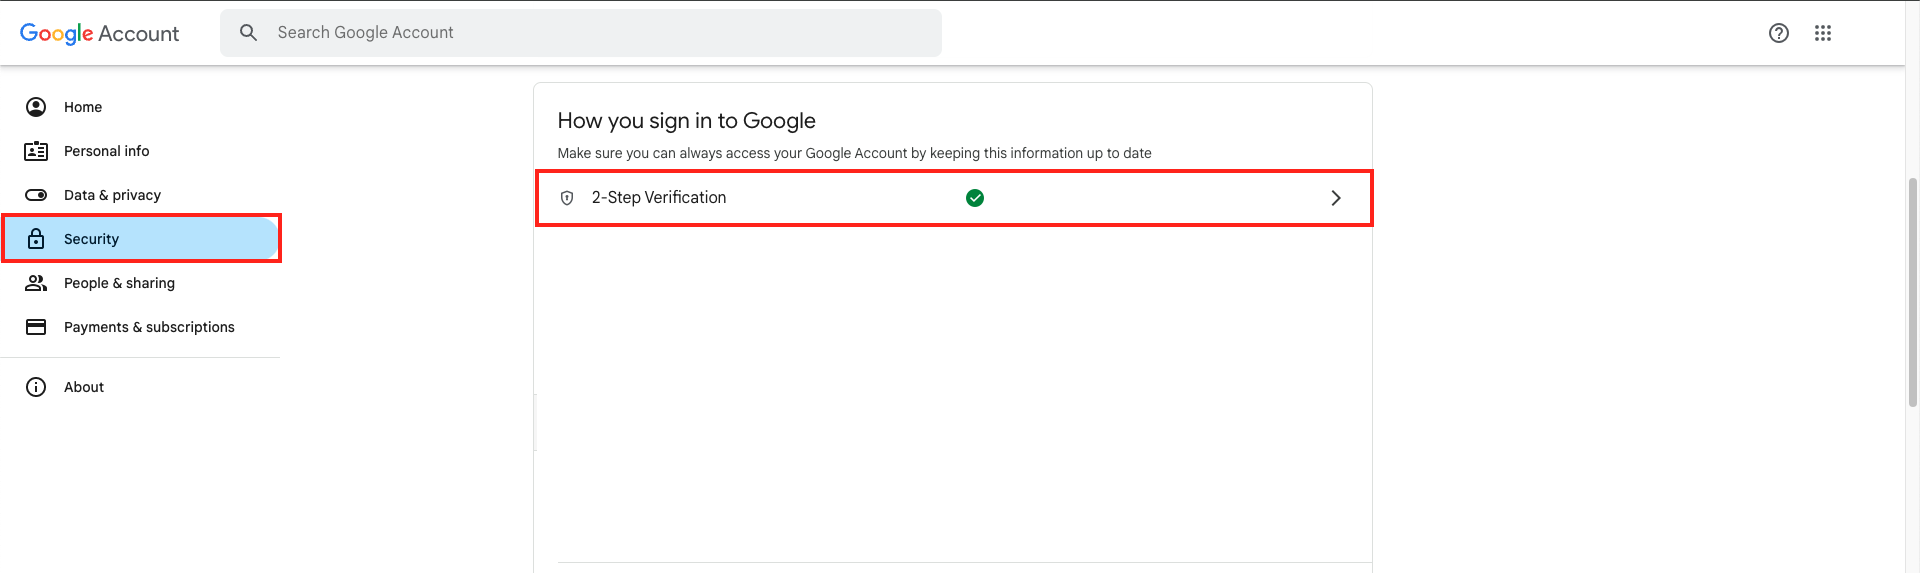
- Go to “Security” and click on “2-Step Verification”. Enter your Gmail password if required.
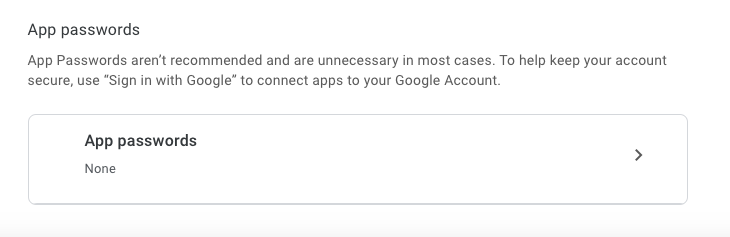
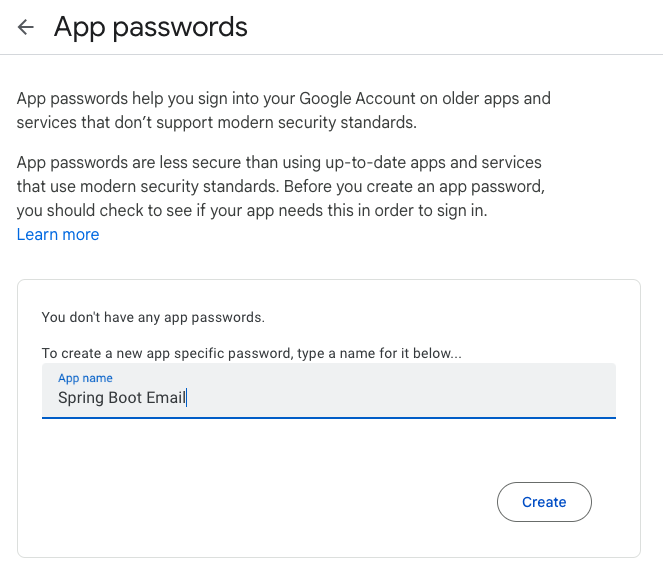
- At the bottom of the page, click on “App passwords”.
- Write your app name to generate the password. A 16-character password will be generated and displayed inside a popup.
App name example: Spring Boot Email - Use this password inside the
spring.mail.passwordproperty without any space.
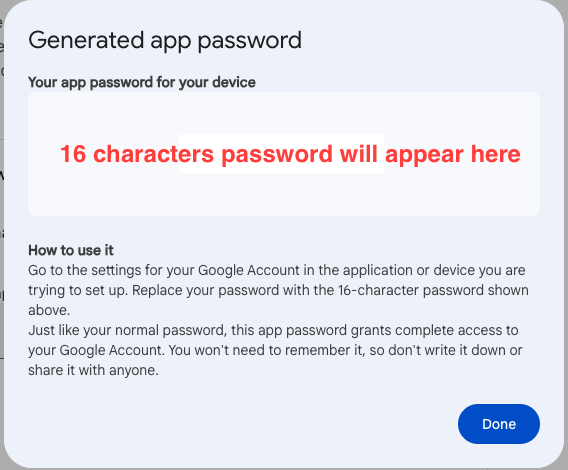
Once the app password is generated, we can configure the mail server properties as follows:
spring.mail.host=smtp.gmail.com
spring.mail.port=587
spring.mail.username=<your-gmail-address@gmail.com>
spring.mail.password=<app-password-obtained-from-your-google-account>
spring.mail.properties.mail.smtp.auth=true
spring.mail.properties.mail.transport.protocol=smtp
spring.mail.properties.mail.smtp.starttls.enable=true
spring.mail.properties.mail.smtp.starttls.required=true2. Outlook
Get this information from your administrator if you are using a corporate server.
spring.mail.host=smtp-mail.outlook.com
spring.mail.port=587
spring.mail.username=outlookuserid@outlook.com
spring.mail.password=xxxxxx
spring.mail.properties.mail.protocol=smtp
spring.mail.properties.mail.tls=true
spring.mail.properties.mail.smtp.auth=true
spring.mail.properties.mail.smtp.starttls.enable=true
spring.mail.properties.mail.smtp.ssl.trust=smtp-mail.outlook.com3. AWS SES
To use AWS SES as the mail server, we need to create an IAM user with the AmazonSESFullAccess policy and verify the email address we want to use for sending emails. Then, we can configure the mail server properties as follows:
spring.mail.host=email-smtp.us-west-2.amazonaws.com
spring.mail.username=username
spring.mail.password=password
spring.mail.properties.mail.transport.protocol=smtp
spring.mail.properties.mail.smtp.port=25
spring.mail.properties.mail.smtp.auth=true
spring.mail.properties.mail.smtp.starttls.enable=true
spring.mail.properties.mail.smtp.starttls.required=trueKindly note that Amazon mandates verification of credentials prior to usage. Please visit the provided link to verify your username and password.
Sending Emails
Let’s dive into various examples demonstrating how to send emails using Spring Boot. All examples are based on a Spring Boot application structure, consisting of three main classes:
- Controller Class (EmailController): Accepts data from users and sends emails using the service class. It handles HTTP requests and orchestrates the email sending process.
- Service Class (EmailSenderService): Responsible for sending emails. It handles the logic for composing and sending emails.
- Request POJO Class (EmailRequest): Represents the input data structure for controller methods. It encapsulates the necessary information for sending emails, such as recipients, subject, body, attachments, etc.
import java.util.List;

public class EmailRequest {

    private String from;
    private String to;
    private String cc;
    private String bcc;
    private String subject;
    private String text;
    private String attachmentPath;
    private List<String> inlineImagesPath;
    private List<List<String>> tableData;

    // Getters and setters
}1. Sending Plain Text Email
To send a plain text email using Spring Boot, we can use the SimpleMailMessage class and the MailSender interface. The SimpleMailMessage class allows us to set the from, to, cc, bcc, subject, and text fields of the email message. The MailSender interface provides a send method that takes a SimpleMailMessage object as an argument and sends it to the specified recipients. Here is an example of how to send a plain text email using Spring Boot:
import com.bootcamptoprod.springbootemail.model.EmailRequest;
import com.bootcamptoprod.springbootemail.service.EmailSenderService;
import org.springframework.http.HttpStatus;
import org.springframework.http.ResponseEntity;
import org.springframework.web.bind.annotation.PostMapping;
import org.springframework.web.bind.annotation.RequestBody;
import org.springframework.web.bind.annotation.RestController;

@RestController
public class EmailController {

    private final EmailSenderService emailService;

    public EmailController(EmailSenderService emailService) {
        this.emailService = emailService;
    }

    @PostMapping("/sendPlainTextEmail")
    public ResponseEntity<String> sendPlainTextEmail(@RequestBody EmailRequest emailRequest) {
        try {
            emailService.sendPlainTextEmail(emailRequest);
            return ResponseEntity.ok("Email sent successfully");
        } catch (Exception e) {
            return ResponseEntity.status(HttpStatus.INTERNAL_SERVER_ERROR).body("Email failed to send: " + e.getMessage());
        }
    }
}
import com.bootcamptoprod.springbootemail.model.EmailRequest;
import org.springframework.mail.SimpleMailMessage;
import org.springframework.mail.javamail.JavaMailSender;
import org.springframework.stereotype.Service;

@Service
public class EmailSenderService {

    private final JavaMailSender mailSender;

    public EmailSenderService(JavaMailSender mailSender) {
        this.mailSender = mailSender;
    }

    public void sendPlainTextEmail(EmailRequest emailRequest) {
        SimpleMailMessage message = new SimpleMailMessage();
        message.setFrom(emailRequest.getFrom());
        message.setTo(emailRequest.getTo());
        message.setCc(emailRequest.getCc());
        message.setBcc(emailRequest.getBcc());
        message.setSubject(emailRequest.getSubject());
        message.setText(emailRequest.getText());

        mailSender.send(message);
    }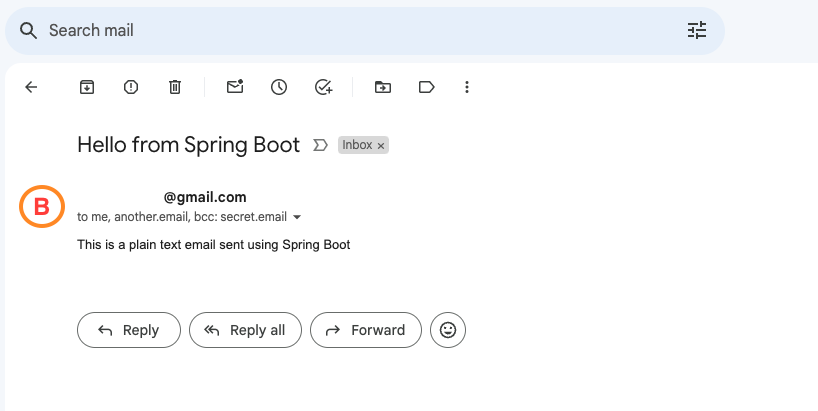
}To test this endpoint, we can use a tool like Postman or curl and send a POST request to /sendPlainTextEmail with the following JSON body:
{
  "from": "my.email@gmail.com",
  "to": "your.email@gmail.com",
  "cc": "another.email@gmail.com",
  "bcc": "secret.email@gmail.com",
  "subject": "Hello from Spring Boot",
  "text": "This is a plain text email sent using Spring Boot"
}Output:
2. Sending Email with Attachment
To send an email with an attachment using Spring Boot, we can use the MimeMessage interface and the JavaMailSender interface. The MimeMessage interface allows us to create a complex email message that can contain multiple parts, such as text, attachments, images, etc. The JavaMailSender interface provides a send method that takes a MimeMessage object as an argument and sends it to the specified recipients. Here is an example of how to send an email with an attachment using Spring Boot:
import com.bootcamptoprod.springbootemail.model.EmailRequest;
import com.bootcamptoprod.springbootemail.service.EmailSenderService;
import org.springframework.http.HttpStatus;
import org.springframework.http.ResponseEntity;
import org.springframework.web.bind.annotation.PostMapping;
import org.springframework.web.bind.annotation.RequestBody;
import org.springframework.web.bind.annotation.RestController;

@RestController
public class EmailController {

    private final EmailSenderService emailService;

    public EmailController(EmailSenderService emailService) {
        this.emailService = emailService;
    }

    @PostMapping("/sendEmailWithAttachment")
    public ResponseEntity<String> sendEmailWithAttachment(@RequestBody EmailRequest emailRequest) {
        try {
            emailService.sendEmailWithAttachment(emailRequest);
            return ResponseEntity.ok("Email sent successfully");
        } catch (Exception e) {
            return ResponseEntity.status(HttpStatus.INTERNAL_SERVER_ERROR).body("Email failed to send: " + e.getMessage());
        }
    }
}
import com.bootcamptoprod.springbootemail.model.EmailRequest;
import jakarta.mail.MessagingException;
import jakarta.mail.internet.MimeMessage;
import org.springframework.core.io.FileSystemResource;
import org.springframework.mail.SimpleMailMessage;
import org.springframework.mail.javamail.JavaMailSender;
import org.springframework.mail.javamail.MimeMessageHelper;
import org.springframework.stereotype.Service;

import java.io.File;

@Service
public class EmailSenderService {

    private final JavaMailSender mailSender;

    public EmailSenderService(JavaMailSender mailSender) {
        this.mailSender = mailSender;
    }

    public void sendEmailWithAttachment(EmailRequest emailRequest) throws MessagingException {
        MimeMessage message = mailSender.createMimeMessage();

        MimeMessageHelper mimeMessageHelper = new MimeMessageHelper(message, true);
        mimeMessageHelper.setFrom(emailRequest.getFrom());
        mimeMessageHelper.setTo(emailRequest.getTo());
        mimeMessageHelper.setCc(emailRequest.getCc());
        mimeMessageHelper.setBcc(emailRequest.getBcc());
        mimeMessageHelper.setSubject(emailRequest.getSubject());
        mimeMessageHelper.setText(emailRequest.getText());

        FileSystemResource file = new FileSystemResource(new File(emailRequest.getAttachmentPath()));
        mimeMessageHelper.addAttachment(file.getFilename(), file);

        mailSender.send(message);
    }
}Inside EmailSenderService class, we have defined a method called sendEmailWithAttachment that takes the emailRequest object and creates a MimeMessage object with required values. We use the MimeMessageHelper class to help us create the MimeMessage object and set the from, to, cc, bcc, subject, and text fields of the email message. We also use the FileSystemResource class to load the attachment file from the given path and add it to the MimeMessage object using the addAttachment method of the MimeMessageHelper class. Then, we call the send method of the JavaMailSender interface and pass the MimeMessage object as an argument. This will send the email with the attachment to the specified recipients.
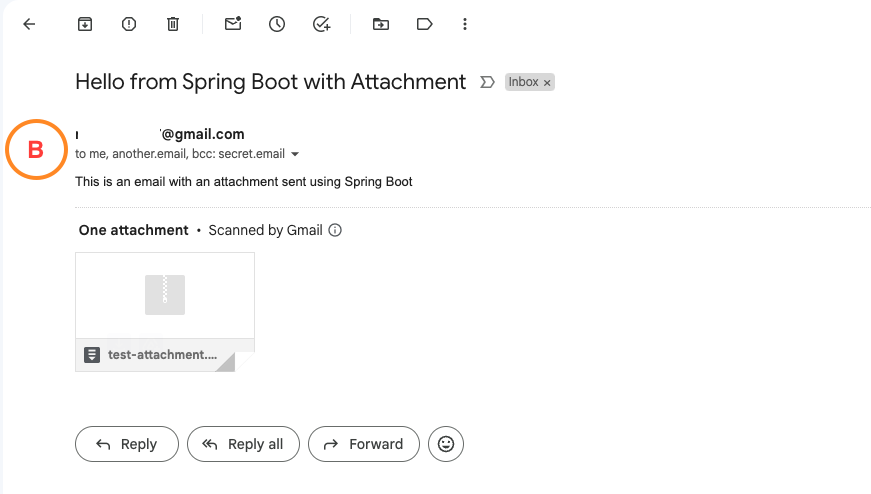
To test this endpoint, we can use a tool like Postman or curl and send a POST request to /sendEmailWithAttachment with the following JSON body:
{
  "from": "my.email@gmail.com",
  "to": "your.email@gmail.com",
  "cc": "another.email@gmail.com",
  "bcc": "secret.email@gmail.com",
  "subject": "Hello from Spring Boot with Attachment",
  "text": "This is an email with an attachment sent using Spring Boot",
  "attachmentPath": "src/main/resources/test-attachment.zip"
}Output:
3. Sending Email with HTML
To send an email with HTML content using Spring Boot, we can use the MimeMessage interface and the JavaMailSender interface. The MimeMessage interface allows us to create a complex email message that can contain multiple parts, such as text, attachments, images, etc. The JavaMailSender interface provides a send method that takes a MimeMessage object as an argument and sends it to the specified recipients. Here is an example of how to send an email with HTML content using Spring Boot:
import com.bootcamptoprod.springbootemail.model.EmailRequest;
import com.bootcamptoprod.springbootemail.service.EmailSenderService;
import org.springframework.http.HttpStatus;
import org.springframework.http.ResponseEntity;
import org.springframework.web.bind.annotation.PostMapping;
import org.springframework.web.bind.annotation.RequestBody;
import org.springframework.web.bind.annotation.RestController;

@RestController
public class EmailController {

    private final EmailSenderService emailService;

    public EmailController(EmailSenderService emailService) {
        this.emailService = emailService;
    }

    @PostMapping("/sendEmailWithHtml")
    public ResponseEntity<String> sendEmailWithHtml(@RequestBody EmailRequest emailRequest) {
        try {
            emailService.sendEmailWithHtml(emailRequest);
            return ResponseEntity.ok("Email sent successfully");
        } catch (Exception e) {
            return ResponseEntity.status(HttpStatus.INTERNAL_SERVER_ERROR).body("Email failed to send: " + e.getMessage());
        }
    }
}
import com.bootcamptoprod.springbootemail.model.EmailRequest;
import jakarta.mail.MessagingException;
import jakarta.mail.internet.MimeMessage;
import org.springframework.core.io.FileSystemResource;
import org.springframework.mail.SimpleMailMessage;
import org.springframework.mail.javamail.JavaMailSender;
import org.springframework.mail.javamail.MimeMessageHelper;
import org.springframework.stereotype.Service;

import java.io.File;

@Service
public class EmailSenderService {

    private final JavaMailSender mailSender;

    public EmailSenderService(JavaMailSender mailSender) {
        this.mailSender = mailSender;
    }

    public void sendEmailWithHtml(EmailRequest emailRequest) throws MessagingException {
        MimeMessage message = mailSender.createMimeMessage();

        MimeMessageHelper mimeMessageHelper = new MimeMessageHelper(message, true);
        mimeMessageHelper.setFrom(emailRequest.getFrom());
        mimeMessageHelper.setTo(emailRequest.getTo());
        mimeMessageHelper.setCc(emailRequest.getCc());
        mimeMessageHelper.setBcc(emailRequest.getBcc());
        mimeMessageHelper.setSubject(emailRequest.getSubject());
        mimeMessageHelper.setText(emailRequest.getText(), true);

        mailSender.send(message);
    }
}Inside EmailSenderService class, we have defined a method called sendEmailWithHtml that takes the emailRequest object and creates a MimeMessage object with required values. We use the MimeMessageHelper class to help us create the MimeMessage object and set the from, to, cc, bcc, subject, and text fields of the email message. We also set the HTML content as the text of the email message using the setText method of the MimeMessageHelper class. We set the second argument of the setText method to true to indicate that the text is HTML. Then, we call the send method of the JavaMailSender interface and pass the MimeMessage object as an argument. This will send the email with the HTML content to the specified recipients.
To test this endpoint, we can use a tool like Postman or curl and send a POST request to /sendEmailWithHtml with the following JSON body:
{
"from": "my.email@gmail.com",
"to": "your.email@gmail.com",
"cc": "another.email@gmail.com",
"bcc": "secret.email@gmail.com",
"subject": "Hello from Spring Boot with HTML",
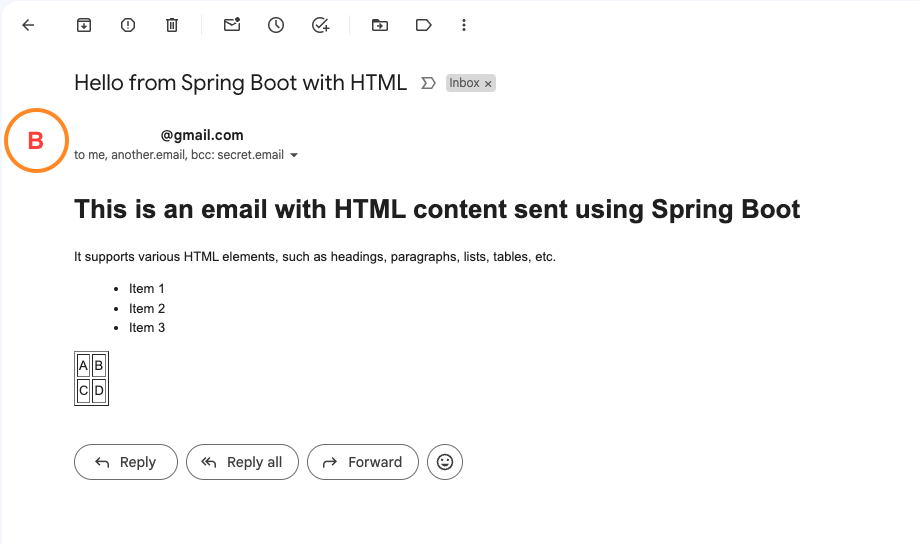
"text": "<h1>This is an email with HTML content sent using Spring Boot</h1><p>It supports various HTML elements, such as headings, paragraphs, lists, tables, etc.</p><ul><li>Item 1</li><li>Item 2</li><li>Item 3</li></ul><table border='1'><tr><td>A</td><td>B</td></tr><tr><td>C</td><td>D</td></tr></table>"
}
Output:
4. Sending Email with Inline Images
To send an email with an inline image using Spring Boot, we can use the MimeMessage interface and the JavaMailSender interface. The MimeMessage interface allows us to create a complex email message that can contain multiple parts, such as text, attachments, images, etc. The JavaMailSender interface provides a send method that takes a MimeMessage object as an argument and sends it to the specified recipients. Here is an example of how to send an email with an inline image using Spring Boot:
import com.bootcamptoprod.springbootemail.model.EmailRequest;
import com.bootcamptoprod.springbootemail.service.EmailSenderService;
import org.springframework.http.HttpStatus;
import org.springframework.http.ResponseEntity;
import org.springframework.web.bind.annotation.PostMapping;
import org.springframework.web.bind.annotation.RequestBody;
import org.springframework.web.bind.annotation.RestController;

@RestController
public class EmailController {

    private final EmailSenderService emailService;

    public EmailController(EmailSenderService emailService) {
        this.emailService = emailService;
    }

        @PostMapping("/sendEmailWithInlineImages")
    public ResponseEntity<String> sendEmailWithInlineImages(@RequestBody EmailRequest emailRequest) {
        try {
            emailService.sendEmailWithInlineImages(emailRequest);
            return ResponseEntity.ok("Email sent successfully");
        } catch (Exception e) {
            return ResponseEntity.status(HttpStatus.INTERNAL_SERVER_ERROR).body("Email failed to send: " + e.getMessage());
        }
    }
}
import com.bootcamptoprod.springbootemail.model.EmailRequest;
import jakarta.mail.MessagingException;
import jakarta.mail.internet.MimeMessage;
import org.springframework.core.io.FileSystemResource;
import org.springframework.mail.SimpleMailMessage;
import org.springframework.mail.javamail.JavaMailSender;
import org.springframework.mail.javamail.MimeMessageHelper;
import org.springframework.stereotype.Service;

import java.io.File;

@Service
public class EmailSenderService {

    private final JavaMailSender mailSender;

    public EmailSenderService(JavaMailSender mailSender) {
        this.mailSender = mailSender;
    }

    public void sendEmailWithInlineImages(EmailRequest emailRequest) throws MessagingException {
        MimeMessage message = mailSender.createMimeMessage();

        MimeMessageHelper mimeMessageHelper = new MimeMessageHelper(message, true);
        mimeMessageHelper.setFrom(emailRequest.getFrom());
        mimeMessageHelper.setTo(emailRequest.getTo());
        mimeMessageHelper.setCc(emailRequest.getCc());
        mimeMessageHelper.setBcc(emailRequest.getBcc());
        mimeMessageHelper.setSubject(emailRequest.getSubject());
        mimeMessageHelper.setText(emailRequest.getText(), true);

        FileSystemResource inlineImage1 = new FileSystemResource(new File(emailRequest.getInlineImagePath().get(0)));
        mimeMessageHelper.addInline("inlineImage1", inlineImage1);

        FileSystemResource inlineImage2 = new FileSystemResource(new File(emailRequest.getInlineImagePath().get(1)));
        mimeMessageHelper.addInline("inlineImage2", inlineImage2);

        mailSender.send(message);
    }
}Inside EmailSenderService class, we have defined a method called sendEmailWithInlineImages that takes the emailRequest object and creates a MimeMessage object with required values. We use the MimeMessageHelper class to help us create the MimeMessage object and set the from, to, cc, bcc, subject, and text fields of the email message. We also use the FileSystemResource class to load the image files from the given path and add it to the MimeMessage object using the addInline method of the MimeMessageHelper class. We pass a content ID as the first argument and the file resource as the second argument. The content ID is used to reference the image in the HTML text of the email message. We also set the second argument of the setText method to true to indicate that the text is HTML. Then, we call the send method of the JavaMailSender interface and pass the MimeMessage object as an argument. This will send the email with the inline image to the specified recipients.
To test this endpoint, we can use a tool like Postman or curl and send a POST request to /sendEmailWithInlineImages with the following JSON body:
{
  "from": "my.email@gmail.com",
  "to": "your.email@gmail.com",
  "cc": "another.email@gmail.com",
  "bcc": "secret.email@gmail.com",
  "subject": "Hello from Spring Boot with Inline Images",
  "text": "<p>This is an email with an inline images sent using Spring Boot</p><img src='cid:inlineImage1'/><p>Some content after first inline image</p><img src='cid:inlineImage2'/>",
  "inlineImagesPath": [
        "src/main/resources/image-1.png",
        "src/main/resources/image-2.png"
    ]
}Output:

5. Sending Email with Table
To send an email with a table using Spring Boot, we can use the MimeMessage interface and the JavaMailSender interface. The MimeMessage interface allows us to create a complex email message that can contain multiple parts, such as text, attachments, images, etc. The JavaMailSender interface provides a send method that takes a MimeMessage object as an argument and sends it to the specified recipients. We can also use HTML tags to create a table in the email text. Here is an example of how to send an email with a table using Spring Boot:
import com.bootcamptoprod.springbootemail.model.EmailRequest;
import com.bootcamptoprod.springbootemail.service.EmailSenderService;
import org.springframework.http.HttpStatus;
import org.springframework.http.ResponseEntity;
import org.springframework.web.bind.annotation.PostMapping;
import org.springframework.web.bind.annotation.RequestBody;
import org.springframework.web.bind.annotation.RestController;

@RestController
public class EmailController {

    private final EmailSenderService emailService;

    public EmailController(EmailSenderService emailService) {
        this.emailService = emailService;
    }

    @PostMapping("/sendEmailWithTable")
    public ResponseEntity<String> sendEmailWithTable(@RequestBody EmailRequest emailRequest) {
        try {
            emailService.sendEmailWithTable(emailRequest);
            return ResponseEntity.ok("Email sent successfully");
        } catch (Exception e) {
            return ResponseEntity.status(HttpStatus.INTERNAL_SERVER_ERROR).body("Email failed to send: " + e.getMessage());
        }
    }
}
import com.bootcamptoprod.springbootemail.model.EmailRequest;
import jakarta.mail.MessagingException;
import jakarta.mail.internet.MimeMessage;
import org.springframework.core.io.FileSystemResource;
import org.springframework.mail.SimpleMailMessage;
import org.springframework.mail.javamail.JavaMailSender;
import org.springframework.mail.javamail.MimeMessageHelper;
import org.springframework.stereotype.Service;

import java.io.File;
import java.util.List;

@Service
public class EmailSenderService {

    private final JavaMailSender mailSender;

    public EmailSenderService(JavaMailSender mailSender) {
        this.mailSender = mailSender;
    }

    public void sendEmailWithTable(EmailRequest emailRequest) throws MessagingException {
        MimeMessage message = mailSender.createMimeMessage();

        MimeMessageHelper mimeMessageHelper = new MimeMessageHelper(message, true);
        mimeMessageHelper.setFrom(emailRequest.getFrom());
        mimeMessageHelper.setTo(emailRequest.getTo());
        mimeMessageHelper.setCc(emailRequest.getCc());
        mimeMessageHelper.setBcc(emailRequest.getBcc());
        mimeMessageHelper.setSubject(emailRequest.getSubject());

        StringBuilder html = new StringBuilder();
        html.append("<p>").append(emailRequest.getText()).append("</p>");
        html.append("<table border='1'>");
        for (List<String> row : emailRequest.getTableData()) {
            html.append("<tr>");
            for (String cell : row) {
                html.append("<td>").append(cell).append("</td>");
            }
            html.append("</tr>");
        }
        html.append("</table>");

        mimeMessageHelper.setText(html.toString(), true);

        mailSender.send(message);
    }
}Inside EmailSenderService class, we have defined a method called sendEmailWithTable that takes the emailRequest object and creates a MimeMessage object with required values. We use the MimeMessageHelper class to help us create the MimeMessage object and set the from, to, cc, bcc, subject, text, and tableData fields of the email message. We also use a StringBuilder object to append the text and the table HTML tags to the email text. The tableData parameter is a list of lists of strings that represents the rows and columns of the table. We iterate over the tableData and append the <tr> and <td> tags for each row and cell, respectively. We also set the border attribute of the <table> tag to 1 to make the table borders visible. We set the HTML content as the text of the email message using the setText method of the MimeMessageHelper class. We set the second argument of the setText method to true to indicate that the text is HTML. Then, we call the send method of the JavaMailSender interface and pass the MimeMessage object as an argument. This will send the email with the table to the specified recipients.
To test this endpoint, we can use a tool like Postman or curl and send a POST request to /sendEmailWithTable with the following JSON body:
{
  "from": "my.email@gmail.com",
  "to": "your.email@gmail.com",
  "cc": "another.email@gmail.com",
  "bcc": "secret.email@gmail.com",
  "subject": "Hello from Spring Boot with Table",
  "text": "This is an email with a table sent using Spring Boot",
  "tableData": [
    ["Name", "Age", "Gender"],
    ["Alice", "25", "Female"],
    ["Bob", "30", "Male"],
    ["Charlie", "35", "Male"]
  ]
}Output:

Enabling Debug Logs
We can use the mail.debug property to enable the debug output for the JavaMail API only. The debug output will show the details of the email sending process, such as the SMTP commands, the MIME headers, the message content, the exceptions, etc.
spring.mail.properties.mail.debug=true
Source Code
The complete source code of the Spring Boot Email demo application can be found here.
Things to Consider
Here are some important considerations related to Spring Boot Email:
- Configuration: Ensure correct configuration of SMTP server details, including host, port, username, and password.
- Security: Implement proper authentication mechanisms to secure SMTP credentials, especially when using sensitive information like passwords.
- TLS Encryption: Enable TLS encryption to secure email communication between your Spring Boot application and the SMTP server.
- Error Handling: Implement robust error handling mechanisms to gracefully handle exceptions and errors that may occur during email sending.
- Testing: Thoroughly test email functionality in different environments to ensure reliability and compatibility with various SMTP servers.
- Distributed Systems: Consider the implications of sending emails in distributed systems and implement strategies to handle retries, timeouts, and failures gracefully.
FAQs
what is Spring Mail?
Spring Mail is a module in the Spring Framework that simplifies sending and receiving emails in Java applications, offering a high-level abstraction over the JavaMail API.
What is JavaMail API?
The JavaMail API is a set of classes and interfaces provided by Java for handling email communication in Java applications. It allows developers to create, send, receive, and manage emails programmatically, supporting various email protocols such as SMTP, IMAP, and POP3.
what is SMTP?
SMTP (Simple Mail Transfer Protocol) is a standard protocol used for sending email messages between servers. It defines the rules and conventions for how email messages should be transferred and delivered over the Internet. SMTP is responsible for routing emails from the sender’s email client or server to the recipient’s email server, where they can then be retrieved by the recipient.
what is POP3?
POP3 (Post Office Protocol version 3) is a standard protocol for retrieving email messages from an email server to a client device or email client software, typically downloading and deleting emails from the server after retrieval.
What is IMAP?
IMAP (Internet Message Access Protocol) is a standard protocol used for retrieving email messages from an email server to a client device or email client software while leaving the messages stored on the server. It allows for more advanced email management capabilities, such as organizing emails into folders and synchronizing changes across multiple devices.
What is the purpose of the spring.mail.properties.mail.debug property?
Setting spring.mail.properties.mail.debug=true enables debug logs for the email sending process, providing detailed information for troubleshooting and debugging email-related issues.
How can I handle email attachments in Spring Boot?
Use the MimeMessageHelper class to add attachments to your email. Set the attachment file using the addAttachment() method.
Conclusion
In conclusion, Spring Boot provides a seamless solution for integrating email functionality into Java applications. With its robust features and easy configuration, developers can effortlessly send various types of emails, from simple text messages to complex HTML templates and attachments.
Learn More
Interested in learning more?
Check out our blog on Spring Cloud Load Balancer: Traffic Distribution Made Simple
Add a Comment