Gain mastery over the Resilience4j rate limiter for Spring Boot. This comprehensive guide equips you with the knowledge and techniques to efficiently control API rate limits and optimize application resilience.
Introduction
In today’s fast-paced digital world, ensuring system resilience and managing request traffic efficiently are crucial factors for maintaining stable and reliable applications. Resilience4j, a powerful library, offers a wide range of resilience patterns and utilities for building robust applications. In our previous blog post, Resilience4j Retry, we explored how to perform retries using Resilience4j. In this article, we will focus on Resilience4j’s Rate Limiter module and how it can be integrated with Spring Boot to achieve effective request throttling.
What is Rate Limiting?
Rate limiting is a technique used to control the flow of requests to a system or API. Imagine you have a popular website or web service that receives a large number of requests. Without rate limiting, your system may become overwhelmed, leading to slow response times, increased server load, and even crashes. Rate limiting sets restrictions on the number of requests that can be made within a specific time frame, ensuring that the system remains stable and available. It helps prevent abuse, protects against DDoS attacks, and allows for fair usage of resources. By implementing rate limiting, you can effectively manage your system’s traffic, maintain performance, and provide a better experience for your users.
Understanding Different Types of Rate Limiting
There are two primary approaches to rate limiting: client-side and server-side rate limiting. In client-side rate limiting, the client controls how many requests it makes to external services. On the other hand, server-side rate limiting sets restrictions on incoming requests. Knowing the difference between these approaches helps maintain system stability and optimize performance.
Client-Side Rate Limiting
Client-side rate limiting is a technique where the client application controls the rate at which it makes requests to external APIs or services. By implementing rate limits on the client side, developers can prevent overwhelming external services, conserve resources, and ensure reliable and efficient communication between the client and server.
Server-Side Rate Limiting
Server-side rate limiting involves setting restrictions on the server to control the rate of incoming requests. By enforcing rate limits at the server level, developers can protect the server from excessive traffic, prevent system overload, and maintain stability and responsiveness. Server-side rate limiting is often used to protect against abusive or malicious behavior, distribute resources fairly, and optimize the overall performance of the server.
Does Resilience4j fall under client-side or server-side rate limiting?
Resilience4j falls under the category of client-side rate limiting. It provides a comprehensive solution for implementing rate limiting on the client side, allowing developers to control the rate at which their applications make requests to external APIs or services.
What is Resilience4j Rate Limiter?
Resilience4j Rate Limiter is a powerful component provided by the Resilience4j library, specifically designed to enable rate-limiting functionality in applications. It offers a straightforward and efficient way to control the rate at which requests are made to external services or APIs. Resilience4j Rate Limiter allows developers to set limits on the number of requests that can be made within a specific time period. By implementing Resilience4j Rate Limiter, developers can effectively manage traffic, prevent service overload, and ensure the stability and reliability of their applications. It provides seamless integration with Spring Boot, making it easier to incorporate rate-limiting capabilities into Spring Boot applications and enhance their resilience.
Key Features of Resilience4j Rate Limiter
Resilience4j Rate Limiter offers several key features that make it a valuable tool for managing request traffic and enhancing application resilience:
- Rate Limiting: Resilience4j Rate Limiter allows developers to set limits on the number of requests that can be made within a specific time frame. This helps prevent excessive traffic and protects services from being overwhelmed.
- Smooth Integration: Resilience4j Rate Limiter seamlessly integrates with Spring Boot applications, making it easier to incorporate rate-limiting functionality without significant code changes.
- Configurable Properties: Developers can customize various properties of the rate limiter, such as the number of allowed requests, the duration of the rate limit window, and any additional behavior customization options, according to their specific requirements.
- Lightweight and Efficient: Resilience4j Rate Limiter is designed to be lightweight and efficient, minimizing the performance impact on applications while providing reliable rate-limiting capabilities.
- Fault Tolerance: Resilience4j Rate Limiter works in conjunction with other resilience patterns provided by the Resilience4j library, allowing developers to build fault-tolerant applications that can handle high request traffic and recover from failures gracefully.
- Monitoring and Metrics: Resilience4j Rate Limiter provides built-in monitoring and metrics capabilities, enabling developers to track the rate-limiting behavior, monitor traffic patterns, and gain insights into the application’s performance.
Setting Up Resilience4j Rate Limiter in Spring Boot
To use Resilience4j Rate Limiter in your Spring Boot application, follow these steps:
Step 1: Add Resilience4j Dependency
Include the Resilience4j dependency in your Spring Boot project.
For Spring Boot 3, add resilience4j-spring-boot3 dependency in pom.xml of your application. The latest version of dependency can be obtained from here.
<dependency>
    <groupId>io.github.resilience4j</groupId>
    <artifactId>resilience4j-spring-boot3</artifactId>
    <version>{resilience4j-spring-boot3-version}</version>
</dependency>For Spring Boot 2, add resilience4j-spring-boot2 dependency in pom.xml of your application. The latest version of dependency can be obtained from here.
<dependency>
    <groupId>io.github.resilience4j</groupId>
    <artifactId>resilience4j-spring-boot2</artifactId>
    <version>{resilience4j-spring-boot2-version}</version>
</dependency>Also, add Spring Boot Actuator and Spring Boot AOP dependencies. Spring Boot Actuator dependency is optional but it can be useful for viewing the rate limiter metrics and Spring Boot AOP dependency is mandatory or else rate limiting will not work.
<dependency>
	<groupId>org.springframework.boot</groupId>
	<artifactId>spring-boot-starter-actuator</artifactId>
</dependency>
<dependency>
	<groupId>org.springframework.boot</groupId>
	<artifactId>spring-boot-starter-aop</artifactId>
</dependency>Step 2: Configure Rate Limiter Instances
Define rate limiter instances with specific configurations.
Example Configuration:
resilience4j.ratelimiter:
    instances:
        backendA:
            limitForPeriod: 10
            limitRefreshPeriod: 5s
            timeoutDuration: 33s
            registerHealthIndicator: true
eventConsumerBufferSize: 100Let’s understand these configuration options:
limitForPeriod: This option specifies the maximum number of requests allowed within a specific time period. For example, if you set it to 10, it means that only 10 requests are allowed within that period.limitRefreshPeriod: This option defines the duration of the time period mentioned above. It determines how frequently the rate limit will be reset. For instance, if you set it to 1 second, the rate limit will be reset every second, allowing the specified number of requests again.timeoutDuration: This option sets the timeout duration for requests. If a request exceeds this duration, it will be considered as taking too long and might trigger fallback behavior or an exception. Setting it to 3s means request will fail after three seconds if it did’t get a chance to execute.registerHealthIndicator: When set totrue, this option enables the registration of a health indicator for the rate limiter. The health indicator provides information about the rate limiter’s current status, allowing you to monitor its health in your application.eventConsumerBufferSize: This option determines the size of the buffer for storing rate limiter events. Rate limiter events include information such as successful or rejected requests. The buffer size should be large enough to avoid losing events during periods of high traffic.
Step 3: Annotate Methods with @RateLimiter Annotation
Annotate the methods that require rate-limiting logic with the @RateLimter annotation and specify the rate-limiter instance name created in Step 2.
@RateLimiter(name = "backendA")
public Movie getMovieDetails(String movieId) {
  return movieApiClient.getMovieDetails(movieId);
}
Spring Boot Resilience4j Rate Limiter Example
Imagine building a movie service website where customers can search for and discover movies. To ensure reliable and responsive movie searches, we’ll explore the various configuration options and a practical example related to the Resilience4j Rate Limiter module.
We’ll leverage the following configuration as an example:
resilience4j.ratelimiter:
instances:
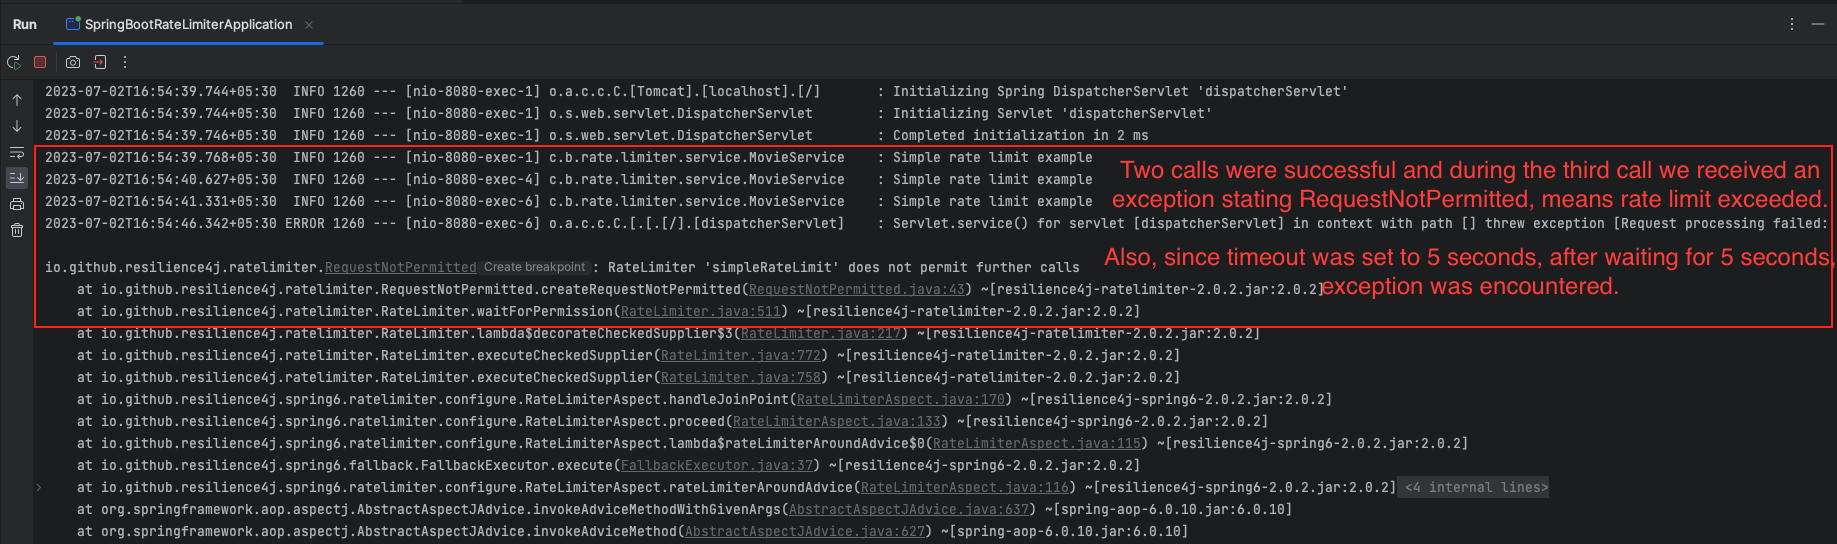
simpleRateLimit:
limitForPeriod: 2
limitRefreshPeriod: 15s
timeoutDuration: 5s
registerHealthIndicator: true
eventConsumerBufferSize: 100 @RateLimiter(name="simpleRateLimit")
public Movie getMovieDetails(String movieId) {
return fetchMovieDetails(movieId);
}
The provided rate limit configuration in the application.yml file for Resilience4j Rate Limiter has the following properties:
instances: This section defines the instances of rate limiters that will be configured.simpleRateLimit: The name of the rate limiter instance. It can be any name, you need to provide the exact same name inside the@RateLimiterannotation.limitForPeriod: Specifies the maximum number of requests allowed within a specific time period. In this example, the limit is set to 2 requests.limitRefreshPeriod: Defines the duration after which the limit will be reset. In this case, the limit will refresh every 15 seconds.timeoutDuration: ThetimeoutDurationproperty determines how long we are willing to wait for the rate limiter to allow us to proceed with a request. If the rate limit is exceeded and we don’t receive permission within the specified timeout duration, the request will be stopped and an error will be returned. This property helps control the maximum waiting time before timing out a request. Here, the timeout duration is set to 5 seconds.registerHealthIndicator: Indicates whether to register a health indicator for the rate limiter. If set to true, a health indicator will be registered.eventConsumerBufferSize: Sets the size of the event consumer buffer, which determines how many rate limiter events can be buffered. In this case, the buffer size is set to 100.
Overall, this configuration sets up a rate limiter instance named simpleRateLimit with a limit of 2 requests per 15 seconds period. It also includes additional options such as timeout duration, health indicator registration, and event consumer buffer size.
Creating and Reusing Default Rate Limiter Configurations
You can simplify rate limiter configuration by creating a default template that can be easily reused across multiple rate limiter instances for consistent and efficient resilience.
Example:
resilience4j.ratelimiter:
  configs:
    default:
      limitForPeriod: 2
      limitRefreshPeriod: 15s
      timeoutDuration: 5s
      registerHealthIndicator: true
      eventConsumerBufferSize: 100
  instances:
    backendA:
      baseConfig: default
    backendB:
      baseConfig: default
limitForPeriod: 3The rate limiter configuration provided above uses a default template that can be reused for multiple instances with the ability to override specific properties. Here’s a breakdown of the configuration:
default: The name of the default rate limiter configuration template.instances: This section defines the rate limiter instances.backendAandbackendB: The names of the rate limiter instances that will be configured.baseConfig: Specifies the base configuration template to inherit from. In this case, bothbackendAandbackendBuse thedefaulttemplate.limitForPeriod: Overrides thelimitForPeriodproperty for thebackendBinstance, setting it to 3 requests.
This configuration allows you to define a default template with common rate limiter settings and reuse it for multiple instances. You can also customize specific properties for individual instances as needed, such as overriding the request limit for the backendB instance to 3.
Resilience4j Rate Limiter Fallback Method
Resilience4j Rate Limiter enables the definition of a fallback method that executes when requests are throttled. This fallback method allows us to gracefully handle rate-limited scenarios by providing a default action or retrieving data from a local cache. It ensures that even when requests are restricted due to rate limits, the application can still respond effectively and deliver a satisfactory user experience.
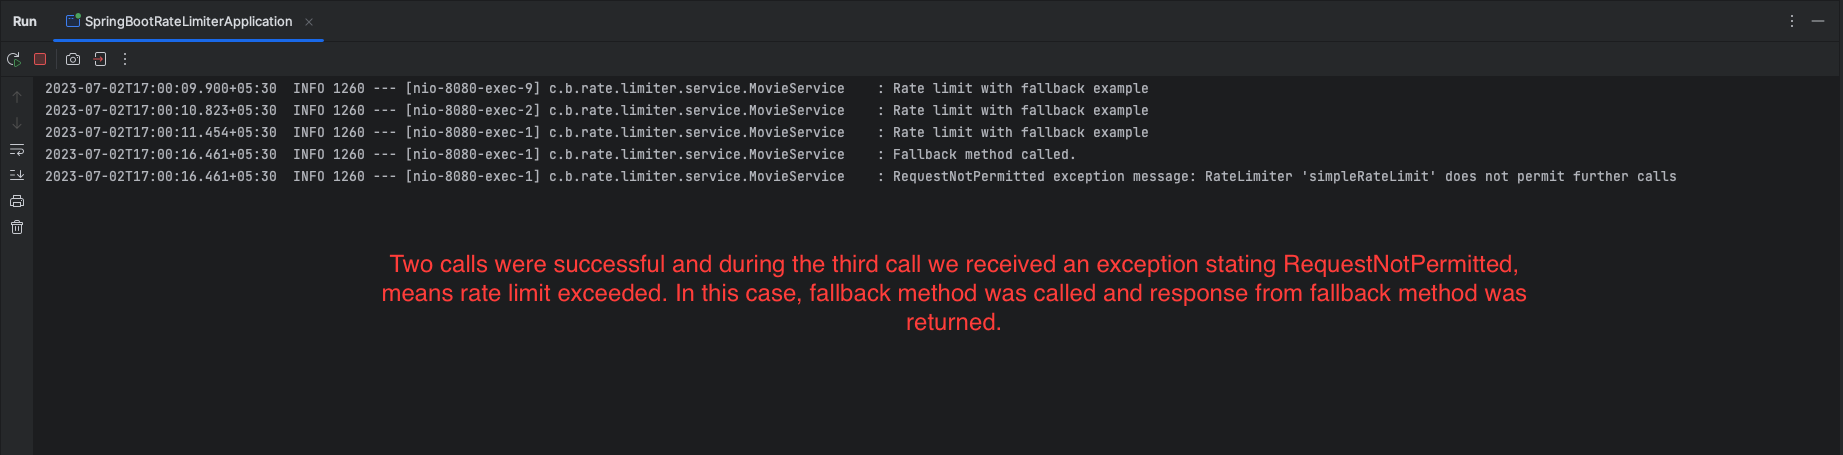
@RateLimiter(name = "simpleRateLimit", fallbackMethod = "getMovieDetailsFallbackMethod")
public Movie getMovieDetailsWithFallback(String movieId) {
    return fetchMovieDetails(movieId);
}

private Movie getMovieDetailsFallbackMethod(String movieId, RequestNotPermitted requestNotPermitted) {
    log.info("Fallback method called.");
    log.info("RequestNotPermitted exception message: {}", requestNotPermitted.getMessage());
    return new Movie("Default", "N/A", "N/A", 0.0);
}In this Resilience4j fallback example, the @RateLimiter annotation is used to apply rate limiting to the getMovieDetailsWithFallback method. If the rate limit is exceeded and a RequestNotPermitted exception occurs, the fallback method getMovieDetailsFallbackMethod is invoked.
The getMovieDetailsFallbackMethod is a separate method defined in the same class as the rate-limited method. It takes the same parameters as the original method, along with the RequestNotPermitted exception that caused the rate limit to trigger.
Inside the fallback method, you can define custom logic to handle the rate-limited scenario. In this example, the fallback method logs a message indicating that the fallback has been triggered and logs the exception message. It then returns a default Movie object to provide a fallback response.
This way, when the rate limit is exceeded, the application gracefully handles the situation by executing the fallback method, allowing you to customize the behavior and provide an appropriate response to the user.
Event Listeners for Resilience4j Rate Limiter
Now, we will understand how to register event listeners for the Resilience4j Rate Limiter in a Spring application. The event listeners capture different events that occur during the rate limiting process and perform specific actions, such as logging or handling the events accordingly.
Example:
@Autowired
private RateLimiterRegistry registry;
....
@RateLimiter(name = "rateLimiterEventsExample")
public Movie getMovieDetailsWithRateLimiterEventDetails(String movieId) {
return fetchMovieDetails(movieId);
}
....
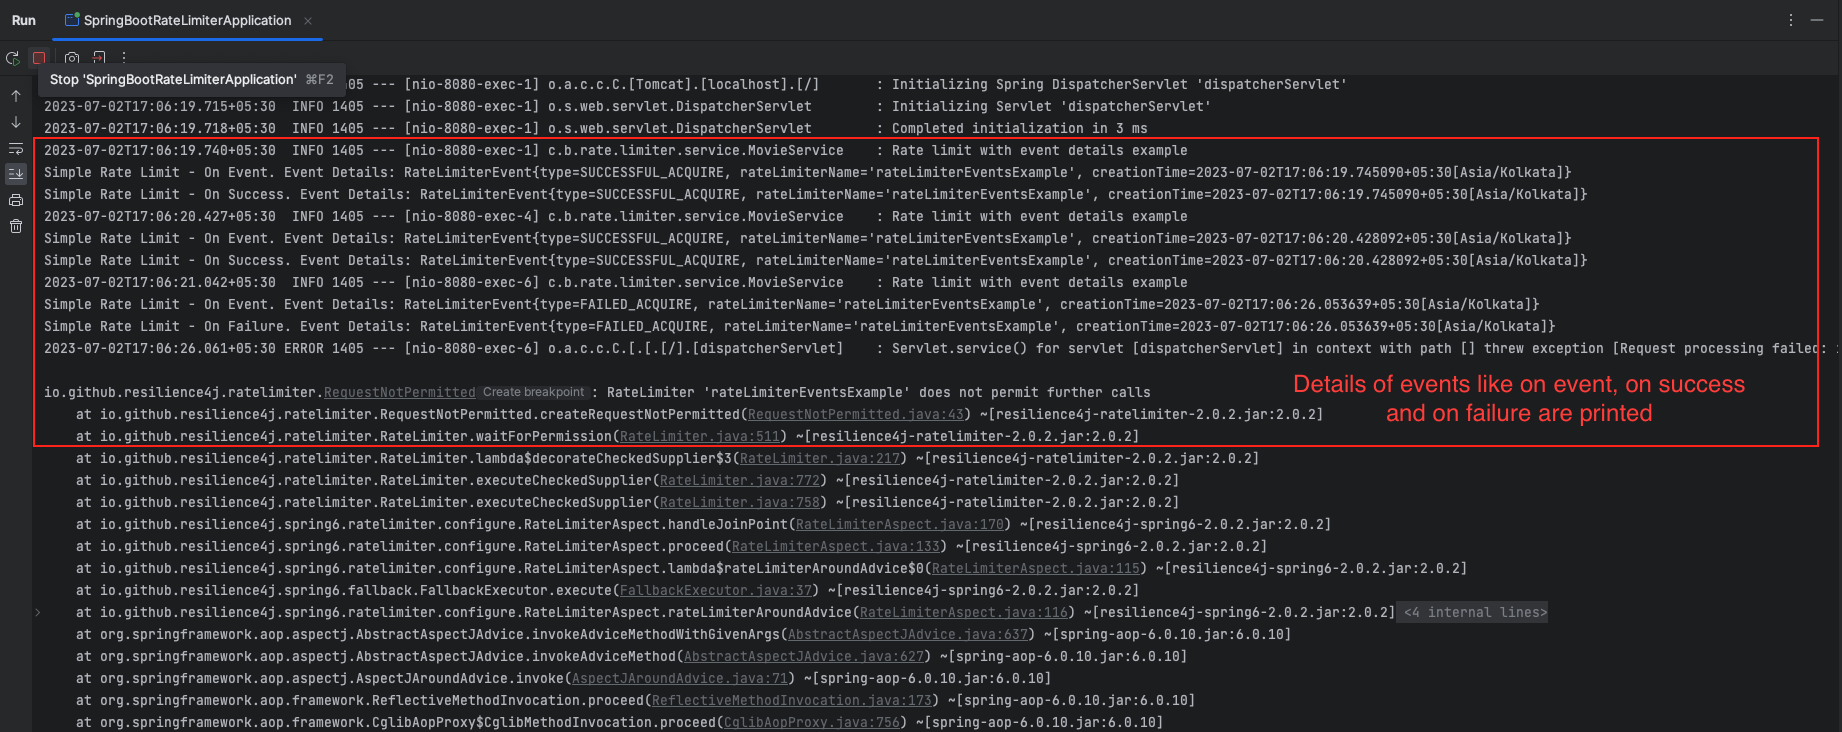
@PostConstruct
public void postConstruct() {
io.github.resilience4j.ratelimiter.RateLimiter.EventPublisher eventPublisher = registry.rateLimiter("rateLimiterEventsExample").getEventPublisher();
eventPublisher.onEvent(event - > System.out.println("Simple Rate Limit - On Event. Event Details: " + event));
eventPublisher.onSuccess(event - > System.out.println("Simple Rate Limit - On Success. Event Details: " + event));
eventPublisher.onFailure(event - > System.out.println("Simple Rate Limit - On Failure. Event Details: " + event));
}Within postConstruct method, the eventPublisher is obtained from the rateLimiterRegistry for the “rateLimiterEventsExample” rate limiter instance.
Next, event listeners are registered using the onEvent(), onSuccess()onFailure()methods of the eventPublisher. Each event listener takes a lambda expression that defines the action to be performed when the corresponding event occurs.
onEvent()is triggered whenever any event occurs within the rate limiter. It provides details about the event that occurred.onSuccess()is called when a request successfully passes through the rate limiter without being limited. It provides details about the successful event.onFailure()is invoked when a request is rejected or limited by the rate limiter due to exceeding the configured limits. It provides details about the failed event.
For each event, a message is printed to the console, including the event details obtained from the event parameter.
By registering these event listeners, you can customize the behavior of your rate-limiting operations and gain visibility into the rate-limiting process by capturing and handling different events.
Programmatically Creating Rate Limiter Instances
In Resilience4j, you have the flexibility to create rate limiter instances programmatically. This means you can dynamically configure and customize rate limiters based on your application’s requirements, giving you fine-grained control over how requests are managed and throttled.
Example:
@Configuration
public class RateLimiterConfiguration {

    @Autowired
    private RateLimiterRegistry rateLimiterRegistry;

    @Bean
    public RateLimiter rateLimitWithCustomConfig() {
        RateLimiterConfig customConfig = RateLimiterConfig.custom()
                .limitForPeriod(2)
                .limitRefreshPeriod(Duration.of(10, ChronoUnit.SECONDS))
                .timeoutDuration(Duration.of(5, ChronoUnit.SECONDS))
                .build();

        return rateLimiterRegistry.rateLimiter("customRateLimiterConfig", customConfig);
    }
}@RateLimiter(name = "customRateLimiterConfig")
public Movie getMovieDetailsWithCustomRateLimiterConfig(String movieId) {
return fetchMovieDetails(movieId);
}In this code snippet, a rate limiter instance is programmatically created with a custom configuration for fetching movie details. By defining the rate limiter configuration using specific parameters such as the maximum number of requests allowed and timeouts, you have the flexibility to fine-tune the rate-limiting behavior according to your application’s requirements.
This approach enables you to dynamically create and configure rate limiters at runtime, giving you greater control over how requests are managed and throttled. It allows you to adapt the rate limiter behavior based on factors like the nature of the movie details fetching operation and the desired rate at which it should be processed.

Dynamically Modifying Rate Limiter Configuration
You can update the configuration of an existing rate limiter instance in Resilience4j by modifying the properties dynamically.
@Autowired
private RateLimiterRegistry rateLimiterRegistry;

......

void updateRateLimiterConfiguration(String name, int limitForPeriod, Duration timeoutDuration) {
    RateLimiter limiter = rateLimiterRegistry.rateLimiter(name);
    limiter.changeLimitForPeriod(limitForPeriod);
    limiter.changeTimeoutDuration(timeoutDuration);
}The updateRateLimiterConfiguration custom method allows you to change the limit for the rate limiter’s period and adjust the timeout duration. By providing the rate limiter’s name, along with the desired new limit and timeout values, you can easily adapt the rate limiting behavior to better suit your application’s needs. This flexibility enables you to fine-tune the rate limiter on-the-fly, ensuring efficient request handling and optimal performance.
Actuator Monitoring and Management Endpoints
The actuator endpoints provide valuable information and metrics that can help you monitor and analyze the behavior and performance of your Resilience4j rate limiters.
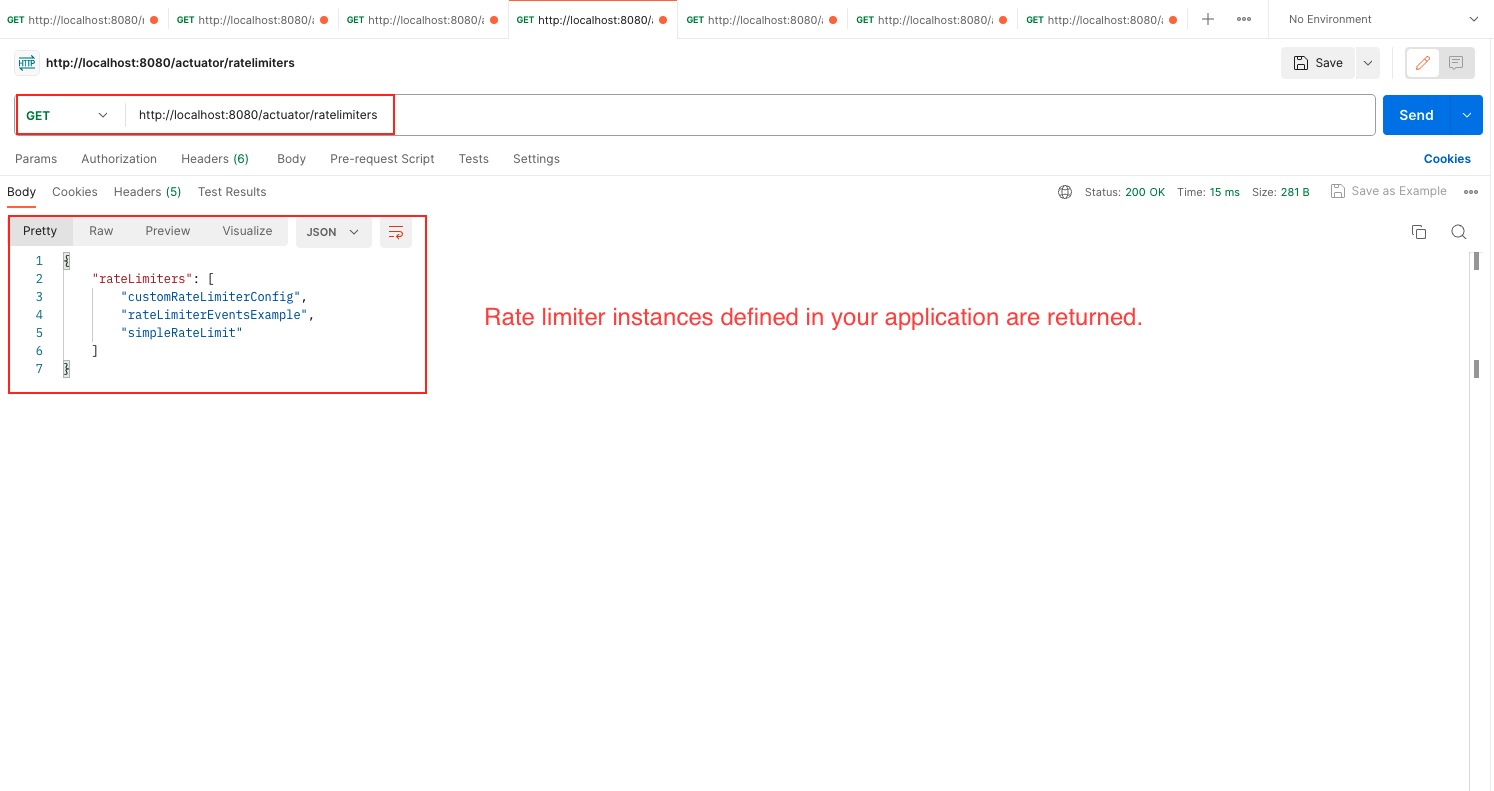
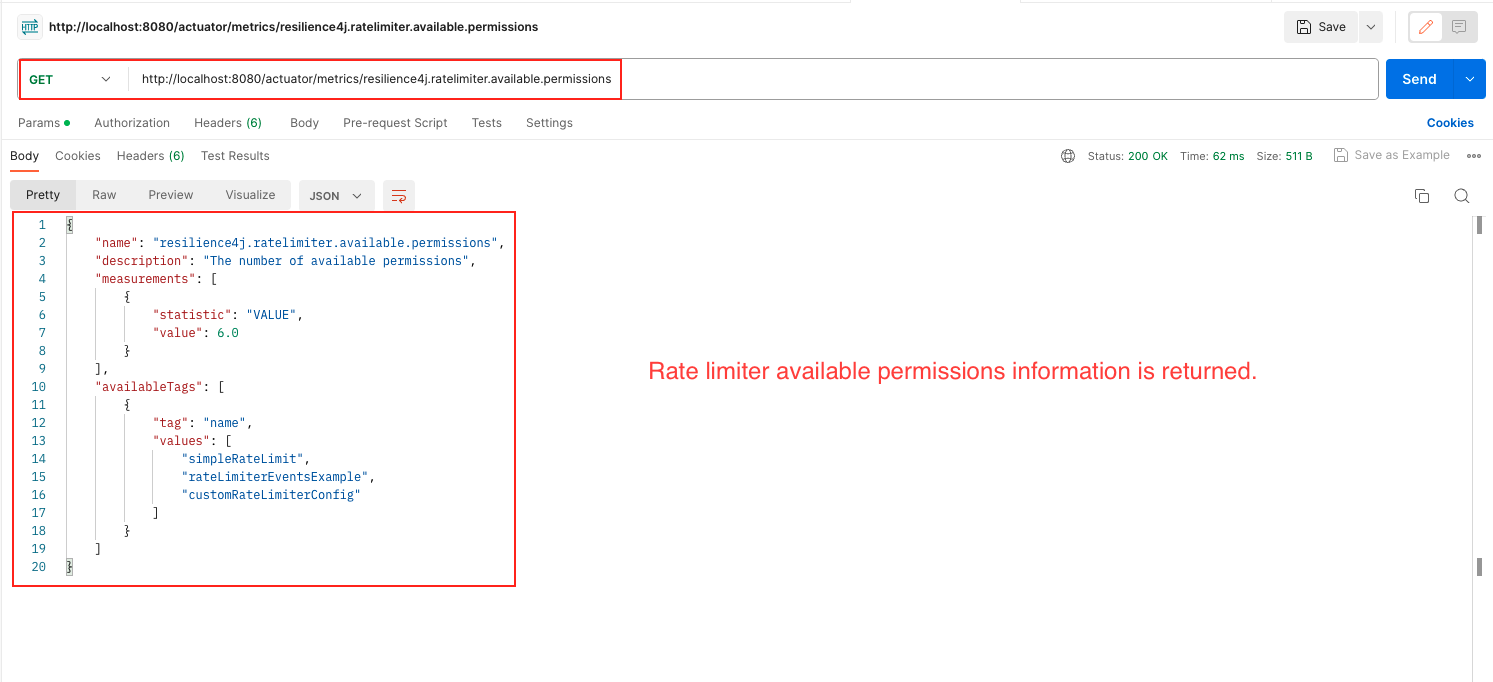
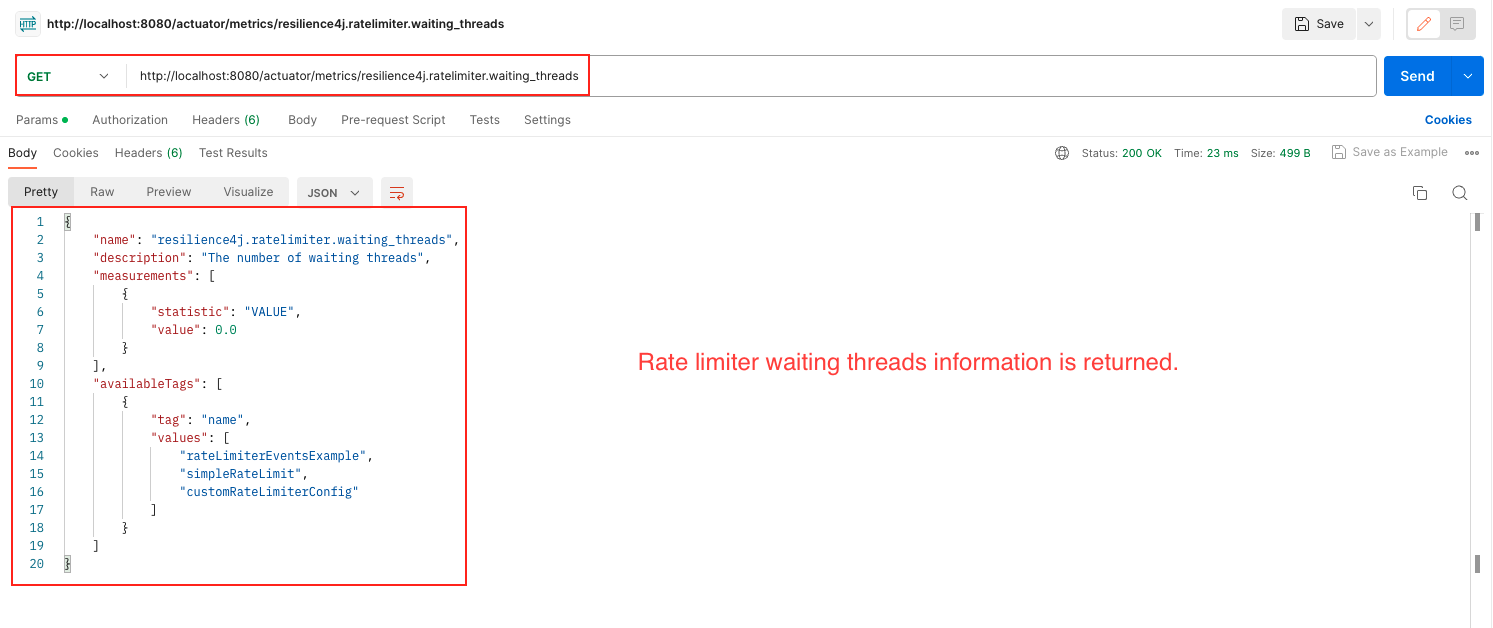
/actuator/health: endpoint in Resilience4j provides information about the health status of rate limiters in your application. This endpoint gives an overview of the health status of all registered rate limiters, indicating whether they are functioning correctly or experiencing any issues./actuator/ratelimiterevents: This endpoint provides information about rate limiter events. It gives insights into the occurrences of events such as successful requests, rejected requests, or other rate limiter-related events. Monitoring these events can help you understand the rate limiter’s behavior and performance./actuator/ratelimiters: This endpoint provides details about the registered rate limiters in your application. It gives information such as the rate limiter’s name./actuator/metrics/resilience4j.ratelimiter.available.permissions: This endpoint presents metrics related to the available permissions in the rate limiter. It provides insights into the number of remaining permissions or slots available for accepting new requests within the defined rate limit./actuator/metrics/resilience4j.ratelimiter.waiting_threads: This endpoint offers metrics related to waiting threads in the rate limiter. It gives information about the number of threads that are currently waiting to acquire permissions or slots from the rate limiter due to reaching the rate limit.
For rate limiter health and events information to be displayed properly in actuator endpoints consider adding the below-mentioned properties in application.yml file.
management:
  endpoint:
    health:
      show-details: ALWAYS
  health:
    ratelimiters:
      enabled: true
  endpoints:
    web:
      exposure:
        include: "*"

resilience4j.ratelimiter:
  instances:
    simpleRateLimit:
      limitForPeriod: 2
      limitRefreshPeriod: 15s
      timeoutDuration: 5s
      registerHealthIndicator: true
      subscribeForEvents: true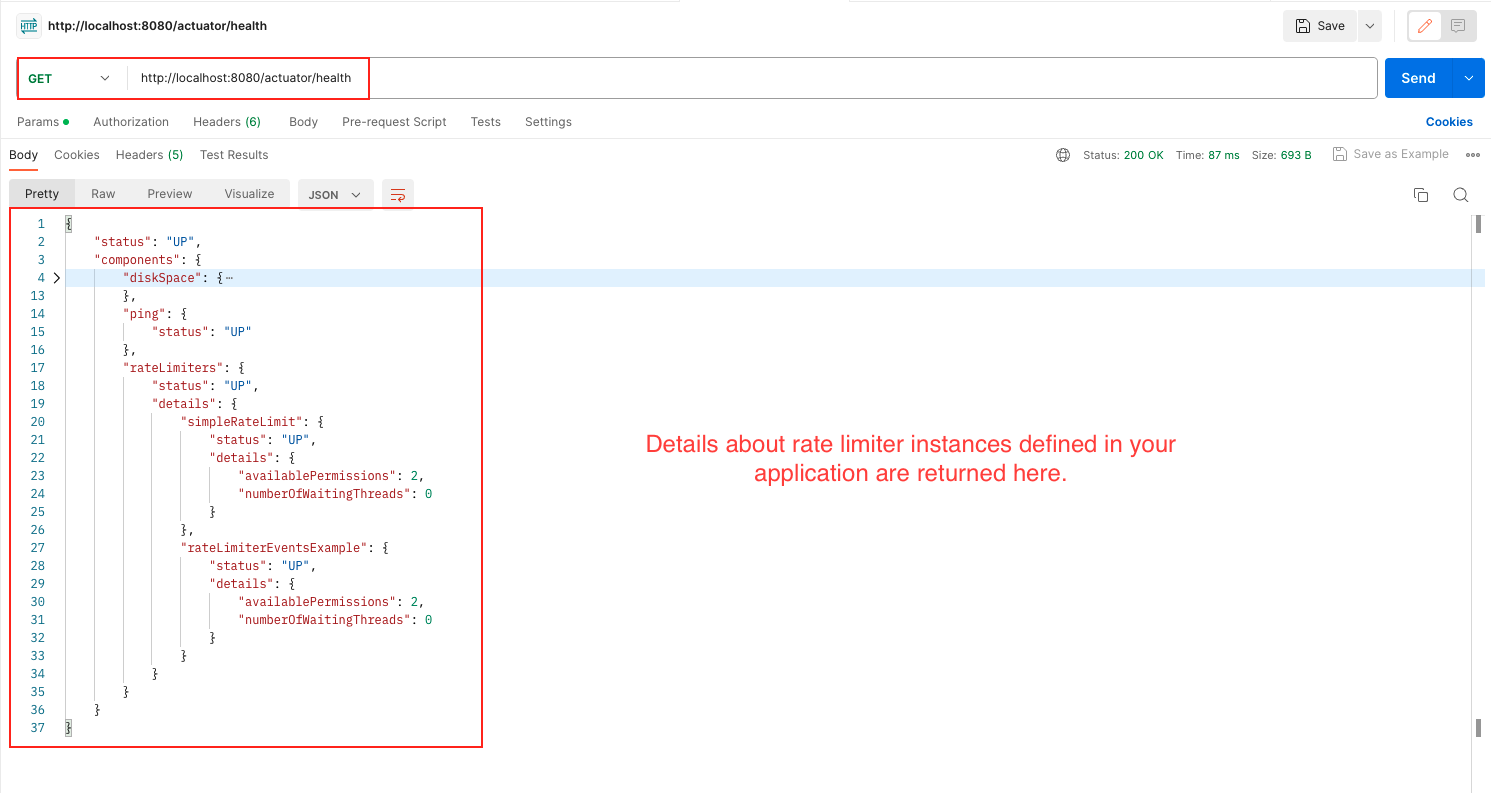

Source Code
The complete source code of the above example can be found here.
FAQs
Can I apply multiple rate limiters in my application?
Yes, you can define multiple rate limiters by providing distinct names and configurations.
How can I handle requests that exceed the rate limit?
Resilience4j Rate Limiter provides options to define fallback behavior when the rate limit is exceeded. You can configure a custom fallback method to gracefully handle the failed request in case the rate limit is exceeded.
How can I dynamically adjust the rate limits during runtime?
Resilience4j Rate Limiter allows you to update the rate limits dynamically by modifying the configuration. You can change the limits based on factors such as current load, system conditions, or specific business requirements.
Is it possible to integrate Resilience4j Rate Limiter with other frameworks or libraries?
Yes, Resilience4j Rate Limiter can be easily integrated with various frameworks and libraries, including Spring Boot, Micronaut, and Quarkus. It provides seamless integration options to incorporate rate limiting capabilities into your application stack.
Things to Consider
Here are some important considerations to keep in mind while working with Resilience4j rate limiter:
- Define appropriate rate limits: Determine the optimal rate limits that balance resource utilization and request responsiveness. Consider the capacity of the underlying resources and the expected traffic patterns.
- Use fallback mechanisms: Implement fallback logic to handle cases when requests are rejected or rate limits are exceeded. This ensures graceful degradation and provides alternative actions, such as returning default values or leveraging cached data.
- Monitor and analyze metrics: Regularly monitor the rate limiter’s metrics and events to gain insights into its behavior and performance. Use these metrics to fine-tune the configuration and identify potential issues or bottlenecks.
- Test with realistic scenarios: Simulate real-world scenarios and test your application with different rates of incoming requests. This helps verify the effectiveness of the rate limiter and ensures it behaves as expected under various load conditions.
- Consider integration with other resilience patterns: Resilience4j offers a range of resilience patterns, such as retry and circuit breaker. Consider integrating rate limiting with other patterns to create a comprehensive resilience strategy for your application.
Conclusion
Implementing Resilience4j Rate Limiter with Spring Boot empowers developers to manage request traffic efficiently, enhance system resilience, and provide a better user experience. By leveraging the flexibility and simplicity of Resilience4j, you can control the rate of incoming requests, protect downstream services, and prevent system overload. With the comprehensive example and configuration options provided in this guide, you can easily integrate Resilience4j Rate Limiter into your Spring Boot applications.
Learn More
Interested in learning more?
Check out our blog on Spring Boot 3 Observability: Unleashing Performance Monitoring & Insights.
Add a Comment