
Empower your application with cross-domain capabilities using Spring Boot CORS. Learn how to enable Cross-Origin Resource Sharing (CORS) in your Spring Boot applications to securely access resources from other domains.
Introduction
Cross-Origin Resource Sharing (CORS) is a security mechanism that allows web applications running on one domain to access resources from another domain. In this blog post, we will discuss what CORS is, how it works, and how to configure it in Spring Boot applications.
To fully comprehend CORS, it is crucial to understand the concepts of “same origin” and “cross-origin.”
Understanding Same Origin Communication
Same origin refers to the condition where a web application can only make requests to the same domain, protocol, and port from which it was loaded.
Understanding Cross-Origin Communication
Cross-origin refers to the condition where a web application can make requests to a different domain, protocol, or port than the one it was loaded from.
What is CORS?
CORS is a security feature implemented by web browsers that allow web applications to make requests to a different domain than the one that served the page. The same-origin policy enforced by web browsers restricts web pages from making requests to a different domain than the one that served the page. CORS provides a way for servers to tell browsers which origins are allowed to make requests to the server’s resources.
How does CORS work?
By default, Spring Boot does not allow cross-origin resource sharing (CORS). This means that if your frontend application is running on a different domain or port than your Spring Boot backend application, you will need to explicitly allow CORS requests in your Spring Boot application.
Cross-origin requests can be initiated by the XMLHttpRequest (XHR) API, which is commonly used by frontend frameworks like Angular, React, and Vue to make HTTP requests from the browser. An XHR request is considered a cross-origin request if it is made from a different domain, port, or protocol than the server hosting the API.
When an XHR request is made to a server with CORS enabled, the browser will first send a preflight request (also known as an “OPTIONS” request) to check if the server allows the specific HTTP method, headers, and other properties required for the actual request. The preflight request includes an “Access-Control-Request-Method” header that specifies the HTTP method of the actual request, and an “Access-Control-Request-Headers” header that lists the custom headers that the actual request may send.
If the server responds with the appropriate CORS headers (e.g. “Access-Control-Allow-Origin”, “Access-Control-Allow-Methods”, “Access-Control-Allow-Headers”), the browser will then send the actual XHR request with the desired HTTP method, headers, and payload.
The preflight request is an important aspect of CORS because it allows servers to control which cross-origin requests are allowed, and provides a mechanism for browsers to enforce this policy. Without the preflight request, a malicious website could potentially make cross-origin requests to sensitive resources without the user’s knowledge or consent.
Exploring Spring Boot CORS Configuration
Understanding the various CORS configuration options in Spring Boot enables fine-grained control over cross-origin resource sharing. Let’s explore each of these options in detail and learn how they influence the behavior of your application’s CORS handling.
1. Allowed Origins
The allowed origins option specifies the origins (domains) that are allowed to access the resources from your Spring Boot application. It defines which domains are permitted to make CORS requests to your server. You can either specify specific origins or use the wildcard “*” to allow requests from any origin.
Example: Let’s say your frontend application is hosted at https://www.example.com, and you want to allow only this domain to access your API. By setting allowed origins to "https://www.example.com", the server restricts CORS requests to only this specific domain, ensuring that requests from other domains are rejected.
2. Allowed Methods
The allowed methods option specifies the HTTP methods that are allowed for CORS requests. It defines which methods the server permits for accessing its resources. For example, if you set allowed methods to "GET" and "POST", it means the server allows only GET and POST requests, and other methods like PUT, DELETE, etc., will be rejected.
3. Allowed Headers
The allowed headers option specifies the headers that are allowed in CORS requests. It defines which headers the server permits to be included in the requests. You can specify multiple headers or use the wildcard “*” to allow any headers.
Example: Suppose your API requires custom headers like “X-Auth-Token” and “Content-Type” for authentication and specifying the request’s content type. By setting allowed headers to "X-Auth-Token" and "Content-Type", the server allows these custom headers to be included in the CORS requests. Other headers will be rejected.
4. Max Age
The max age option sets the maximum time (in seconds) that the browser should cache the CORS preflight response. It helps in reducing the number of preflight requests sent by the browser for subsequent requests to the same resource. By caching the preflight response, the browser can reuse it for a specified duration without sending additional preflight requests.
Example: Let’s assume your API requires frequent requests from a frontend application, and you want to cache the preflight response for 60 seconds. By setting max age to 60, the browser will cache the preflight response for 60 seconds. Within this duration, subsequent requests to the same resource will not trigger another preflight request, reducing network overhead.
5. Allow Credentials
The allow credentials option in CORS configuration determines whether the server allows the inclusion of credentials, such as cookies or authorization headers, in CORS requests. When set to true, the server permits the inclusion of credentials in the requests. However, if set to false (the default value), the server does not include credentials in the CORS requests.
Example: Suppose you have a web application where users need to log in and their session information is stored in cookies. By enabling the “allowCredentials” option and setting it to true, the server allows the inclusion of cookies in CORS requests. This ensures that the logged-in user’s session information is sent along with the requests, allowing the server to authenticate and authorize the requests based on the user’s credentials.
6. Exposed Headers
The exposed headers option in CORS configuration specifies the additional headers that the server allows the browser to access in the response. By default, the browser only exposes certain headers from the response to the JavaScript code running on the page. The exposed headers option allows you to explicitly expose custom headers that you want the browser to access.
Example: Let’s say you have an API that returns a custom header named “X-Custom-Header” in the response. By adding the exposed headers option and specifying “X-Custom-Header”, you are instructing the server to allow the browser to access this custom header in the response. Without exposing the header explicitly, the browser would not make it accessible to JavaScript code running on the page.
How to Configure CORS in Spring Boot?
There are multiple ways to configure CORS in Spring Boot applications. We will discuss a few of them.
Approach 1: Using the @CrossOrigin Annotation
The easiest way to enable CORS for a specific endpoint in a Spring Boot application is to use the @CrossOrigin annotation. You can add the @CrossOrigin annotation to a controller method or to the entire controller class to enable CORS for all endpoints in the class.
import org.springframework.web.bind.annotation.CrossOrigin;
import org.springframework.web.bind.annotation.GetMapping;
import org.springframework.web.bind.annotation.RequestMethod;
import org.springframework.web.bind.annotation.RestController;

@RestController
public class HelloWorldController {

    @GetMapping("/hello")
    @CrossOrigin(origins = {"https://mvnrepository.com/"}, allowCredentials = "true", methods = {RequestMethod.GET}, allowedHeaders = {"X-Request-Id"}, maxAge = 60L, exposedHeaders = {"X-Some-Header"})
    public String sendGreetings() {
        return "Hello, World!";
    }
}In the given example, the HelloWorldController class has a sendGreetings() method mapped to the /hello endpoint.
- The
@CrossOriginannotation is applied to enable Cross-Origin Resource Sharing (CORS) for this endpoint. - The
originsoption specifies that cross-origin requests are allowed only from the domainhttps://mvnrepository.com/. - The
allowCredentialsoption is set totrue, allowing the server to include credentials (such as cookies or authorization headers) in cross-origin requests. - The
methodsoption restricts the allowed HTTP method to GET. - The
allowedHeadersoption permits the custom headerX-Request-Idin cross-origin requests. ThemaxAgeoption sets the browser’s caching time for the preflight response to 60 seconds, reducing subsequent preflight requests. - The
exposedHeadersoption exposes the custom headerX-Some-Headerin the response.
Approach 2: Using a WebMvcConfigurer Bean
Enabling CORS (Cross-Origin Resource Sharing) in a Spring MVC application using WebMvcConfigurer provides a straightforward approach to allow cross-origin requests. By implementing the WebMvcConfigurer interface and overriding the addCorsMappings() method, you can define CORS configurations for specific endpoints.
Inside the addCorsMappings() method, you can use the CorsRegistry object to specify allowed origins, methods, headers, and other options for each mapping. This enables you to have fine-grained control over cross-origin access in your application.
import org.springframework.context.annotation.Configuration;
import org.springframework.web.servlet.config.annotation.CorsRegistry;
import org.springframework.web.servlet.config.annotation.EnableWebMvc;
import org.springframework.web.servlet.config.annotation.WebMvcConfigurer;

@Configuration
@EnableWebMvc
public class WebConfiguration implements WebMvcConfigurer {

    @Override
    public void addCorsMappings(CorsRegistry registry) {
        registry.addMapping("/hello")
                .allowedMethods("GET", "POST", "PUT", "DELETE", "OPTIONS")
                .allowedOrigins("https://mvnrepository.com")
                .allowedHeaders("Content_Type", "Authorization")
                .allowCredentials(true)
                .exposedHeaders("abc")
                .maxAge(36L);

        registry.addMapping("/hello2")
                .allowedMethods("GET")
                .allowedOrigins("https://stackoverflow.com")
                .allowedHeaders("X-Request-Id", "Authorization")
                .allowCredentials(false)
                .exposedHeaders("abc")
                .maxAge(36L);

    }
}In this example, two mappings are configured: /hello and /hello2. For the /hello mapping, the CORS configuration allows HTTP methods GET, POST, PUT, DELETE, and OPTIONS. The allowed origin is set to https://mvnrepository.com, and the permitted headers are Content_Type and Authorization. The allowCredentials option is enabled, allowing credentials in cross-origin requests. The exposedHeaders option exposes the header abc, and the maxAge option sets the caching time to 36 seconds.
Similarly, for the /hello2 mapping, only the GET method is allowed. The allowed origin is https://stackoverflow.com, and the permitted headers are X-Request-Id and Authorization. The allowCredentials option is disabled, disallowing credentials in cross-origin requests. The exposedHeaders and maxAge options are set similarly to the previous mapping.
If you want to apply CORS configurations globally to all endpoints in your application, you can specify the path pattern as /** inside the addMapping() method.
  @Override
  public void addCorsMappings(CorsRegistry registry) {
    registry.addMapping("/**")
            .allowedOrigins("http://example.com")
            .allowedMethods("GET", "POST", "PUT", "DELETE")
            .allowedHeaders("*");
}By using the CorsRegistry and addCorsMappings() method, specific CORS configurations can be applied to different endpoints, allowing fine-grained control over allowed methods, origins, headers, and caching settings for cross-origin requests in a Spring MVC application.
Approach 3: Using Custom CorsConfigurationSource
The CorsConfigurationSource interface enables customizing CORS configuration programmatically. By implementing this interface, you can dynamically determine the allowed origins, methods, headers, and other CORS properties based on your application’s requirements.
To demonstrate this, let’s consider an example:
import org.springframework.context.annotation.Bean;
import org.springframework.context.annotation.Configuration;
import org.springframework.web.cors.CorsConfiguration;
import org.springframework.web.cors.CorsConfigurationSource;
import org.springframework.web.cors.UrlBasedCorsConfigurationSource;
import org.springframework.web.filter.CorsFilter;

import java.util.Arrays;

@Configuration
public class AppConfig {

    @Bean
    public CorsConfigurationSource corsConfiguration() {
        CorsConfiguration corsConfig = new CorsConfiguration();
        corsConfig.setAllowedOrigins(Arrays.asList("https://example.com"));
        corsConfig.setAllowedMethods(Arrays.asList("GET", "POST", "PUT", "DELETE"));
        corsConfig.setAllowedHeaders(Arrays.asList("Content-Type", "Authorization"));
        corsConfig.setExposedHeaders(Arrays.asList("X-Custom-Header"));
        corsConfig.setAllowCredentials(true);

        UrlBasedCorsConfigurationSource source = new UrlBasedCorsConfigurationSource();
        source.registerCorsConfiguration("/**", corsConfig);
        return source;
    }

    @Bean
    public CorsFilter corsFilter() {
        return new CorsFilter(corsConfiguration());
    }
}CorsConfigurationSource is responsible for providing the CORS configuration, CorsConfiguration represents the configuration properties, UrlBasedCorsConfigurationSource registers and manages the CORS configurations based on URL patterns, and CorsFilter applies the CORS configuration to incoming requests, ensuring proper handling of CORS headers in the response. Together, they enable the customization and enforcement of CORS policy in a Spring Boot application.
Approach 4: Using a Custom Filter
To enable CORS using a filter in a Spring Boot application, you can create a custom filter class that implements the javax.servlet.Filter interface and inside a doFilter method you can specify the CORS configuration.
import jakarta.servlet.*;
import jakarta.servlet.http.HttpServletRequest;
import jakarta.servlet.http.HttpServletResponse;
import org.springframework.core.Ordered;
import org.springframework.core.annotation.Order;
import org.springframework.stereotype.Component;

import java.io.IOException;

@Component
@Order(Ordered.HIGHEST_PRECEDENCE)
public class CorsFilter implements Filter {

    @Override
    public void doFilter(ServletRequest req, ServletResponse res, FilterChain chain) throws ServletException, IOException {
        HttpServletResponse response = (HttpServletResponse) res;
        HttpServletRequest request = (HttpServletRequest) req;

        response.setHeader("Access-Control-Allow-Origin", "https://stackoverflow.com");
        response.setHeader("Access-Control-Allow-Methods", "POST, GET, PUT, OPTIONS, DELETE");
        response.setHeader("Access-Control-Max-Age", "3600");
        response.setHeader("Access-Control-Allow-Headers", "Content-Type, Authorization, X-Requested-With");

        if ("OPTIONS".equalsIgnoreCase(request.getMethod())) {
            response.setStatus(HttpServletResponse.SC_OK);
        } else {
            chain.doFilter(req, res);
        }
    }
}
By setting the appropriate CORS headers in the doFilter method, you enable CORS support for your Spring Boot application. Requests from the specified origin (https://stackoverflow.com in this example) will be allowed, and the allowed methods, maximum age, and allowed headers will be configured accordingly. The OPTIONS request method is explicitly handled to respond with a successful status code.
Remember to set the @Order annotation (with Ordered.HIGHEST_PRECEDENCE) on the filter class to ensure it is executed before other filters in the chain.
This filter intercepts incoming requests, adds the CORS headers to the response, and handles the preflight request, if applicable.
Enabling CORS Support for Actuator Endpoints
By default, CORS (Cross-Origin Resource Sharing) support is disabled in Spring Boot Actuator endpoints. This means that if you try to access Actuator endpoints from a different domain or port, the browser will block the requests due to the same-origin policy. In this case, you will get a CORS error.
To resolve CORS errors and to enable CORS support for Actuator endpoints, you need to explicitly configure the necessary CORS properties. In the absence of these configurations, requests to Actuator endpoints will not be allowed from cross-origin sources.
CORS Properties:
management.endpoints.web.cors.allowed-origins=https://www.stackoverflow.com
management.endpoints.web.cors.allowed-methods=GET,POST
management.endpoints.web.cors.allowed-headers=X-Request-Id
management.endpoints.web.cors.allow-credentials=false
management.endpoints.web.cors.exposed-headers=abc
management.endpoints.web.cors.max-age=65By setting the appropriate CORS properties, you can specify the allowed origins, methods, headers, and other CORS-related configurations for Actuator endpoints.
Testing CORS using XHR in the Browser Console
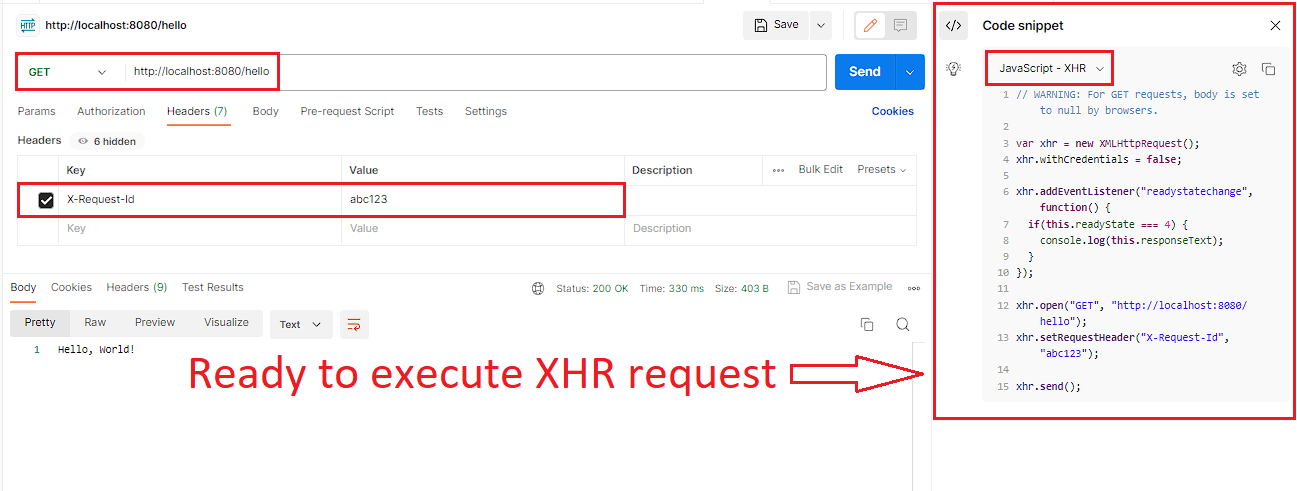
You can prepare the XHR request very easily using the Postman tool. Simply add all the required details in Postman to call your API endpoint including URL, request body, and request headers then click on Code Snippet and select the JavaScript - XHR option in the dropdown, it will give you the code that you can execute in the browser console.
To Test CORS using XHR in the Browser Console:
- Open the webpage from which you want to test CORS.
- Open the browser’s developer tools:
- In Google Chrome, you can right-click on the webpage, select “Inspect” and then navigate to the “Console” tab.
- In Mozilla Firefox, you can right-click on the webpage, select “Inspect Element,” and then navigate to the “Console” tab.
- In the browser console, enter the XHR request code obtained from Postman.
- Send the XHR request by pressing the Enter key.
- Monitor the console for any error messages or logs related to CORS.
- If the request is successful, you should see the response status and data in the console.
- If the request is blocked by CORS, you may encounter an error message indicating that the request was rejected due to CORS restrictions.
- Analyze the response and headers returned by the server to verify if CORS is correctly configured and applied.
By testing the XHR request using the browser console, you can interactively examine CORS behavior and validate the configuration of your server’s CORS settings.
Output:
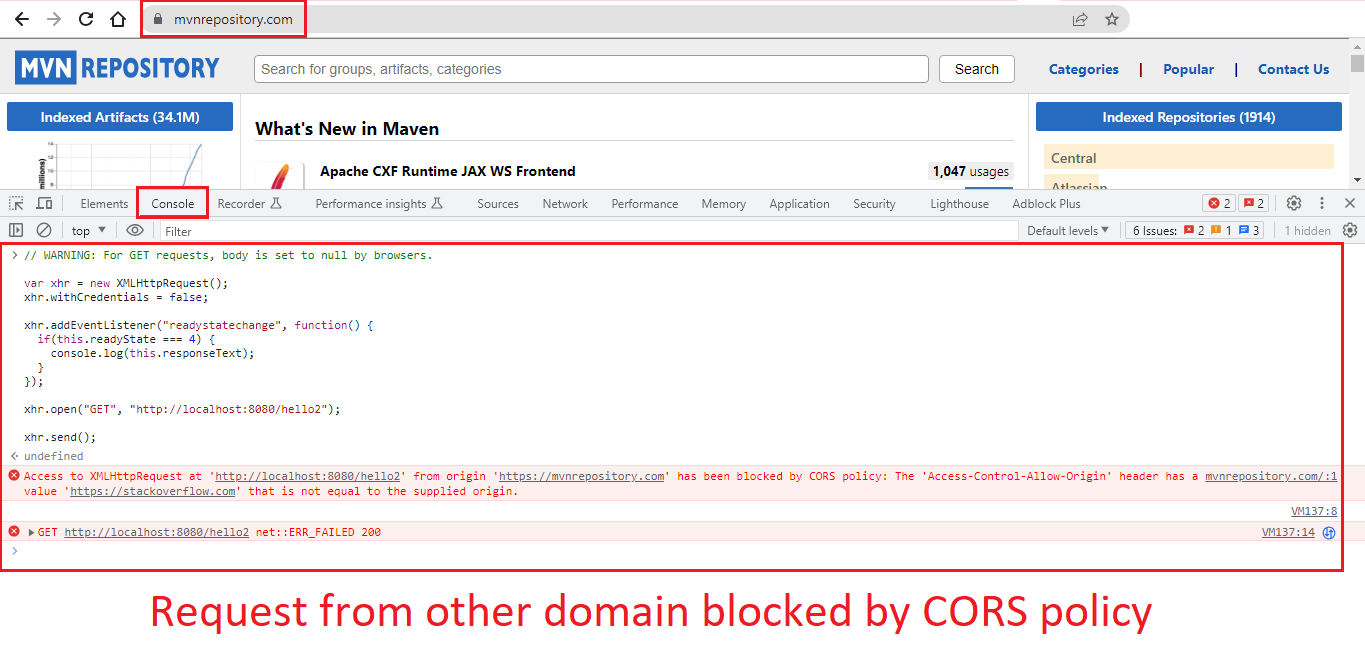
Refer to the below images highlighting three different scenarios wherein:
- XHR request from the allowed domain executed successfully without any error.
- XHR request from a different domain (which was not configured in allowed origins) blocked by CORS policy.
- XHR request from the same origin (on which the Spring Boot application was running) executed successfully without any error.


FAQs
What is the same-origin policy?
The same-origin policy is a security feature implemented by web browsers that restricts web pages from making requests to a different domain than the one that served the page.
Why is CORS important?
CORS is important because it allows web applications to securely access resources from other domains.
What is a preflight request?
A preflight request is an OPTIONS request that is sent by the browser to the server before making a non-simple request to ensure that the server is willing to accept the actual request and to prevent Cross-Site Request Forgery (CSRF) attacks.
What is the default CORS configuration in Spring Boot?
By default, Spring Boot does not enable CORS. This means that cross-origin requests are blocked unless explicitly configured to allow them. The default behavior is to deny cross-origin requests for security reasons.
Is CORS configuration necessary for Spring Boot APIs?
CORS configuration is necessary for Spring Boot APIs if you want to allow cross-origin requests. If your frontend application needs to make requests to the Spring Boot backend from a different domain or port, CORS must be enabled to avoid the browser blocking the requests due to security restrictions.
Does CORS configuration affect only AJAX requests?
No, CORS configuration affects not only AJAX requests made through the XMLHttpRequest (XHR) API but also other types of cross-origin requests such as Fetch API requests, fonts, images, and any other resources requested from a different domain. CORS is a mechanism that applies to various types of cross-origin requests in web applications.
Things to Consider
When configuring CORS in your Spring Boot application, you should consider the following:
- Security: Carefully consider the security implications of enabling CORS. Make sure to restrict the allowed origins, methods, and headers to trusted sources to prevent unauthorized access to your APIs.
- Configuration: Understand the available CORS configuration options in Spring Boot and choose the appropriate settings based on your application’s requirements. Consider specifying allowed origins, methods, headers, and other properties to ensure secure and controlled cross-origin communication.
- Granularity: Determine the level of granularity for your CORS configuration. You can configure CORS globally for all endpoints or selectively for specific endpoints or URL patterns, depending on your application’s needs.
- Testing: Thoroughly test your CORS configuration to ensure it works as expected. Test cross-origin requests from different domains and verify that the appropriate CORS headers are being sent in the responses. Use tools like Postman or browser developer tools to simulate and inspect the CORS behavior.
- Cross-Origin Cookies: If your application requires sending cookies across different origins, consider enabling the
allowCredentialsoption in your CORS configuration and ensure that the server-side and client-side settings are aligned to handle cross-origin cookies correctly. - Performance Impact: Be mindful of the potential performance impact of CORS. The preflight requests sent by the browser for certain cross-origin requests can add overhead. Consider caching the CORS response headers (
max-age) to reduce the number of preflight requests.
Conclusion
In this blog post, we discussed what CORS is, how it works, and how to configure it in Spring Boot applications. We also discussed the preflight request concept and various configuration options for CORS in Spring Boot. By following the best practices for CORS configuration, you can ensure that your Spring Boot application seamlessly interacts with cross-origin resources while maintaining the necessary security measures.
Add a Comment