Understand how we can override tags in rest template metrics using the rest template exchange tags provider interface available in Spring Boot 2. This will override the default tags that are provided by the framework.

Context
When we add Spring Boot Starter Actuator dependency in our Spring Boot application, we can access the metrics for our application endpoints via the actuator metrics endpoint. Similarly, if we want to access the metrics for external calls that are performed by our application then we need to send the GET request specifying the name of metrics we are interested in i.e. in our case client requests metrics.
curl --request GET 'http://localhost:8080/actuator/metrics/http.client.requests'By default, metrics are available with the name ‘http.client.requests’. This name can be customized by setting one property in the application.properties file.
When we send the request to the above endpoint, by default, we get the following tags in the output:
-
method: HTTP method.
-
uri: endpoints for which we received the requests
-
outcome: whether the request was processed successfully or not
-
status: HTTP status code
-
clientName: hostname of the URL that we are trying to call
Note:
The client metrics will available only if we have created the RestTemplate bean using the RestTemplateBuilder. If we have created the RestTemplate object using the new RestTemplate(), in that case, client metrics will not be available.
Advantages
Once the custom tags are added, we can utilize this information to create charts and dashboards displaying information at a more granular level.
Example: Consider we have an external service that provides information about the user whether the user is a freemium user or user is a premium user. Based on the output received from this service, we can add our custom tags highlighting the user type. We can utilize this information to create graphs and charts and see the ratio of requests that we are receiving from different types of users.
Adding Custom Tags
Note:
Below mentioned steps works only in case of Spring Boot 2.x. For Spring Boot 3.x, kindly refer to article Spring Boot 3: Override Tags in Rest Template Metrics.
If we want to override the tags that are provided by Spring Framework then we can do it with the help of Custom Rest Template Exchange Tags Provider.
Steps:
- Create a class that implements the RestTemplateExchangeTagsProvider interface.
- Provide the implementation for the getTags method wherein we can add our custom tags.
- Register this class as Spring Bean using @Component annotation.
import io.micrometer.core.instrument.Tag;
import io.micrometer.core.instrument.Tags;
import org.springframework.boot.actuate.metrics.web.client.RestTemplateExchangeTags;
import org.springframework.boot.actuate.metrics.web.client.RestTemplateExchangeTagsProvider;
import org.springframework.http.HttpRequest;
import org.springframework.http.client.ClientHttpResponse;
import org.springframework.stereotype.Component;
import org.springframework.util.MultiValueMap;
import org.springframework.util.StringUtils;
import org.springframework.web.util.UriComponentsBuilder;

/**
 * The type Bootcamp to prod custom rest template exchange tags provider.
 * Useful for adding our own tags in rest template metrics. This will override the default tags that are provided by the framework.
 */
@Component
public class BootcampToProdCustomRestTemplateExchangeTagsProvider implements RestTemplateExchangeTagsProvider {
    @Override
    public Iterable<Tag> getTags(String urlTemplate, HttpRequest request, ClientHttpResponse response) {
        Tag uriTag = StringUtils.hasText(urlTemplate) ? RestTemplateExchangeTags.uri(urlTemplate) : RestTemplateExchangeTags.uri(request);

        // Here we are adding the tags related to HTTP method, HTTP status, client name and outcome
        var tags = Tags.of(RestTemplateExchangeTags.method(request), uriTag, RestTemplateExchangeTags.status(response), RestTemplateExchangeTags.clientName(request), RestTemplateExchangeTags.outcome(response));

        // Extracting query parameters from URI
        String uri = request.getURI().toString();
        MultiValueMap<String, String> parameters = UriComponentsBuilder.fromUriString(uri).build().getQueryParams();

        // Optional tag which will be present in metrics only when the condition is evaluated to true
        if (parameters.containsKey("id")) {
            tags = tags.and(Tag.of("userId", parameters.get("id").get(0)));
        }

        // Custom tag which will be present in all the controller metrics
        tags = tags.and(Tag.of("tag", "value"));

        return tags;
    }

}
We have control over a request and response. Based on this, we can add our tags.
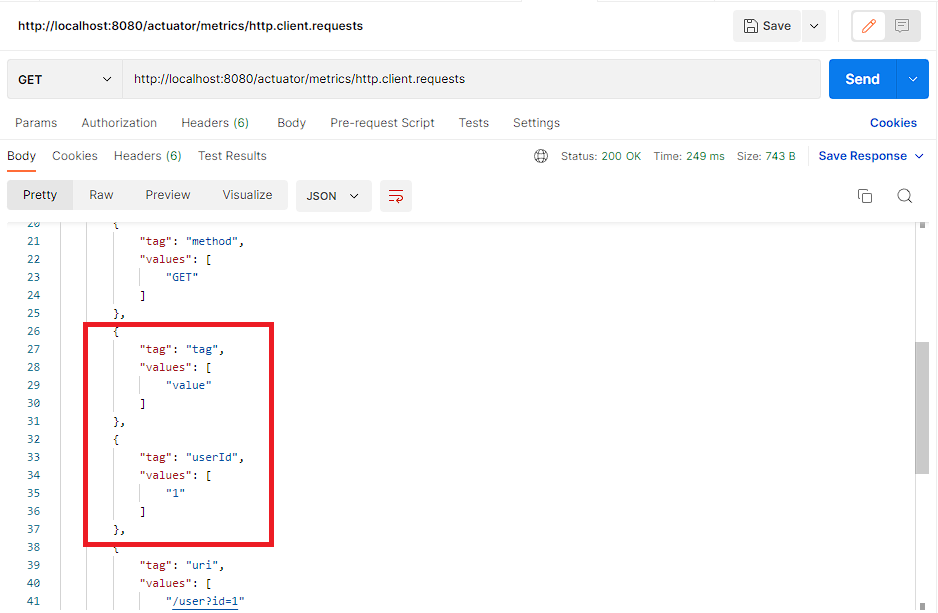
In the above example, we have added two tags “userId” and “tag” wherein the “userId” tag is optional. It will be added to metrics only if the URL contains the query parameter “id” whereas the “tag” tag will be added to metrics for all the requests that we have sent using the rest template.
Output:

Source Code
The source code for this example can be found on GitHub. Link: click here


Add a Comment