
Learn how to build responsive, real-time AI applications with Spring AI. This step-by-step guide explains streaming responses, SSE, and provides a simple code example for beginners. Stop making your users wait!
1. Introduction
Imagine you’re building a simple customer support chat widget on your company’s website. As users type questions, responses from your AI assistant should appear word by word rather than waiting for the entire answer. This streaming effect feels more interactive and “live,” just like messaging apps. In this comprehensive guide, we’ll learn how to implement streaming responses in Spring AI applications, making your AI-powered apps feel more responsive and interactive.
2. What is Streaming Response?
Before we dive into what a streaming response is, let’s first walk through the problem that traditional “all‑or‑nothing” APIs present.
💬 The Problem: The All‑or‑Nothing Response
In a traditional API call—let’s say you ask an AI to write a 500‑word blog post—your application:
- Sends the request.
- Waits for the AI model to generate all 500 words.
- Receives the full text in one big chunk.
While this works for short replies, longer responses force users to stare at a blank screen or spinner until everything arrives. That “all‑or‑nothing” approach feels slow, unresponsive, and clunky.
✅ The Solution: Streaming Responses
Streaming breaks the response into small, continuous pieces (or “chunks”) and sends each one as soon as it’s ready. It’s like starting a Netflix movie instantly—while the rest of the video downloads in the background—rather than waiting for the entire file to download before you hit Play.
In AI-driven apps, as the model generates text token by token (or word by word), it pushes each chunk to your application immediately. Your client can then render each piece to the user in real time.
📌 Putting It All Together
- All‑or‑Nothing: Wait → Receive full payload → Display
- Streaming Response: Request → Render chunks as they arrive → User sees a live, unfolding response
3. Why Streaming Response Matters?
- Immediate Feedback: Users see the first bits of content right away.
- Enhanced UX: Feels like a live conversation—perfect for chatbots, code assistants, or live analytics.
- Reduced Perceived Latency: Even if total response time is the same, partial results eliminate the frustrating “waiting in the dark.”
4. How Streaming is Achieved: The Two Levels of Communication
To understand streaming, it’s best to think of it as a partnership between a delivery method and a data format.
➤ Level 1: The Delivery Method (Chunked Transfer Encoding)
This is the low-level engine of HTTP streaming. Its one and only job is to allow a server to send a response without knowing the total size beforehand.
✔ Key Characteristics:
- It’s a transport mechanism, not a data format. It simply breaks the response into pieces (“chunks”) and sends them one by one.
- The raw data itself has no special formatting. It’s just parts of a whole.
- This is what allows the connection to stay open while data is being sent incrementally.
Think of Chunked Response as the delivery truck. It’s responsible for moving packages from the server to the client, but it doesn’t care what’s inside the packages.
➤ Level 2: The Data Format (Server-Sent Events – SSE)
This is a higher-level protocol that defines the structure of the data being sent. It rides on top of the chunked delivery method to provide a clear, easy-to-use format for the client.
✔ Key Characteristics:
- One-way communication (server to client), perfect for pushing updates.
- It uses a specific
Content-Type: text/event-stream. - Each message is formatted in a standard way, typically prefixed with
data:. This makes it easy for the client to parse. - Web browsers have a built-in JavaScript client (EventSource) that understands this format perfectly, making it incredibly easy to use for web UIs.
Think of SSE as the labeled boxes inside the delivery truck. Each box is clearly marked (“this is a data packet”), so the recipient knows exactly what it is and how to open it.
In our AI application, we use both: Chunked Encoding is the truck that keeps the road open, and SSE is the stream of organized, labeled boxes carrying our recipe text.
5. Building Real-World Example: AI-Powered Recipe Generator
Let’s build a practical application – an AI-powered recipe generator that streams cooking instructions in real-time. Users can request recipes, and instead of waiting for the complete recipe, they’ll see ingredients and steps appearing as they’re generated.
⚙️ Project Structure & Setup
Below is the folder structure of our Spring Boot application:
spring-ai-streaming-response
├── src
│   └── main
│       ├── java
│       │   └── com
│       │       └──bootcamptoprod
│       │               ├── controller
│       │               │   └── RecipeController.java
│       │               ├── service
│       │               │   └── RecipeService.java
│       │               ├── SpringAiStreamingResponseApplication.java
│       └── resources
│           └── application.yml
└── pom.xml
Explanation:
SpringAiStreamingResponseApplication.java: The main entry point that starts the Spring Boot application.RecipeController.java: Exposes REST endpoints,/api/recipes/generatefor streaming recipe content and/api/recipes/generate-with-metafor streaming responses with metadata.RecipeService.java: Contains the core logic for interacting with the Spring AI ChatClient to generate recipe content from a given prompt, with and without metadata.application.yml: Spring AI configurationpom.xml: Maven dependencies
Let’s set up our project with the necessary dependencies and configurations.
Step 1: Add Maven Dependencies
Add below dependencies to pom.xml file.
<dependencies>
    <!-- Spring Boot Web for building RESTful web services -->
    <dependency>
        <groupId>org.springframework.boot</groupId>
        <artifactId>spring-boot-starter-web</artifactId>
    </dependency>

    <!-- OpenAI Model Support – configureable for various AI providers (e.g. OpenAI, Google Gemini) -->
    <dependency>
        <groupId>org.springframework.ai</groupId>
        <artifactId>spring-ai-starter-model-openai</artifactId>
    </dependency>

<dependencyManagement>
    <dependencies>
        <!-- Spring AI bill of materials to align all spring-ai versions -->
        <dependency>
            <groupId>org.springframework.ai</groupId>
            <artifactId>spring-ai-bom</artifactId>
            <version>${spring-ai.version}</version>
            <type>pom</type>
            <scope>import</scope>
        </dependency>
    </dependencies>
</dependencyManagement>
In this configuration:
spring-boot-starter-web:Enables us to build a web application with REST endpointsspring-ai-starter-model-openai:Provides integration with OpenAI’s API (though we’ll configure it for Google Gemini). It includes the ChatClient for making AI calls and auto-configuration for easy setup.spring-ai-bom:ThedependencyManagementsection uses Spring AI’s Bill of Materials (BOM) to ensure compatibility between Spring AI components. By importing the BOM, you don’t need to manually specify versions for each Spring AI artifact—it ensures compatibility and prevents version conflicts automatically.
Step 2: Configure Application Properties
Now, let’s configure our application and add configuration related to AI using application.yml.
spring:
  application:
    name: spring-ai-streaming-response

  # AI configurations
  ai:
    openai:
      api-key: ${GEMINI_API_KEY}
      base-url: https://generativelanguage.googleapis.com/v1beta/openai
      chat:
        completions-path: /chat/completions
        options:
          model: gemini-2.0-flash-exp
📄 Configuration Overview
This configuration focuses on AI integration with Google’s Gemini model via the Spring AI OpenAI starter:
👉 AI (OpenAI Starter) Settings:
- api‑key: Your secret key for authenticating with the AI service. Keep this safe and out of source control.
- base‑url: Overrides the default OpenAI endpoint so requests go to Google’s Gemini API instead.
- completions‑path: The REST path for chat-based completions—appended to the base URL when making requests.
- model: Chooses which AI model to call (e.g.
gemini-2.0-flash-exp). This determines the capabilities and response style you’ll get back.
Make sure to set the GEMINI_API_KEY environment variable with your actual Google Gemini API key before running the application.
🤖 Google Gemini APIs are great for proof-of-concept (POC) projects since they offer limited usage without requiring payment. For more details, check out our blog, where we dive into how Google Gemini works with OpenAI and how to configure it in case of our Spring AI application.
Step 3: Create Service Class
The service layer is the engine of our application. It takes the user’s request from the controller and orchestrates the interaction with the AI model to generate the recipe.
package com.bootcamptoprod.service;

import org.springframework.ai.chat.client.ChatClient;
import org.springframework.ai.chat.client.ChatClientResponse;
import org.springframework.stereotype.Service;
import reactor.core.publisher.Flux;

@Service
public class RecipeService {

    private final ChatClient chatClient;

    // Constructor injection - Spring automatically provides ChatClient
    public RecipeService(ChatClient.Builder chatClientBuilder) {
        this.chatClient = chatClientBuilder.build();
    }

    /**
     * Generates a recipe using streaming response
     * @param dishName - Name of the dish to generate recipe for
     * @param servings - Number of servings
     * @return Flux<String> - Stream of recipe content
     */
    public Flux<String> generateRecipeStream(String dishName, int servings) {
        // Create a detailed prompt for better recipe generation
        String prompt = String.format(
                "Generate a detailed recipe for %s that serves %d people. " +
                        "Include ingredients list, step-by-step cooking instructions, " +
                        "cooking time, and helpful tips. Format it nicely with clear sections.",
                dishName, servings
        );

        return chatClient.prompt()
                .user(prompt)  // Set user input
                .stream()      // Enable streaming
                .content();    // Return only content (not metadata)
    }

    /**
     * Generates recipe with metadata logging
     * This method shows how to access AI model usage statistics
     */
    public Flux<ChatClientResponse> generateRecipeWithMetadata(String dishName, int servings) {
        String prompt = String.format(
                "Create a recipe for %s serving %d people with ingredients and instructions.",
                dishName, servings
        );

        return chatClient.prompt()
                .user(prompt)
                .stream()
                .chatClientResponse();
    }
}
Explanation:
- AI Interaction: The primary role of this class is to communicate with the AI model using Spring AI’s
ChatClient. It takes user inputs and translates them into a detailed prompt for the AI. - Streaming Logic: It uses the
.stream()method on theChatClientto request a streaming response. It offers two distinct streaming methods:generateRecipeStream: Returns aFlux<String>using.content()for a simple stream of the recipe text, perfect for displaying directly in a UI.generateRecipeWithMetadata: Returns aFlux<ChatClientResponse>using.chatClientResponse()for a stream that includes both the content and valuable metadata (like token usage), which is ideal for monitoring and analytics.
Step 4: Create Controller
Finally, the controller acts as the public face of our application. It exposes our recipe generation service to the world via REST API endpoints, handling web traffic and connecting it to the service layer.
package com.bootcamptoprod.controller;

import com.bootcamptoprod.service.RecipeService;
import org.springframework.ai.chat.client.ChatClientResponse;
import org.springframework.web.bind.annotation.GetMapping;
import org.springframework.web.bind.annotation.RequestMapping;
import org.springframework.web.bind.annotation.RequestParam;
import org.springframework.web.bind.annotation.RestController;
import reactor.core.publisher.Flux;

@RestController
@RequestMapping("/api/recipes")
public class RecipeController {

    private final RecipeService recipeService;

    public RecipeController(RecipeService recipeService) {
        this.recipeService = recipeService;
    }

    /**
     * Streams recipe generation in real-time
     *
     * @param dishName - Name of dish (e.g., "Chicken Biryani")
     * @param servings - Number of servings (default: 4)
     * @return Streaming response of recipe content
     */
    @GetMapping(value = "/generate")
    public Flux<String> generateRecipe(@RequestParam String dishName, @RequestParam(defaultValue = "4") int servings) {
        // Call service to generate streaming recipe
        return recipeService.generateRecipeStream(dishName, servings);
    }

    /**
     * Endpoint with metadata
     */
    @GetMapping(value = "/generate-with-meta")
    public Flux<ChatClientResponse> generateRecipeWithMetadata(@RequestParam String dishName, @RequestParam(defaultValue = "4") int servings) {
        return recipeService.generateRecipeWithMetadata(dishName, servings);
    }
}
Explanation:
- Purpose: The
RecipeControlleris our application’s “front door.” It handles incoming web requests and connects them to ourRecipeService. - Its job is to:
- Expose API Endpoints: It defines two GET endpoints:
/api/recipes/generateand/api/recipes/generate-with-meta. - Receive User Input: It uses
@RequestParamto capture thedishNameandservingsfrom the URL’s query parameters. - Delegate to Service: It calls the corresponding method in the
RecipeServiceto do the actual work of generating the recipe and simply returns the Flux that the service provides. Spring WebFlux then automatically handles streaming the Flux’s content back to the client.
- Expose API Endpoints: It defines two GET endpoints:
Step 5: Application Entry Point
Now, let’s define the main class that boots our Spring Boot app.
package com.bootcamptoprod;

import org.springframework.boot.SpringApplication;
import org.springframework.boot.autoconfigure.SpringBootApplication;

@SpringBootApplication
public class SpringAiStreamingResponseApplication {
    public static void main(String[] args) {
        SpringApplication.run(SpringAiStreamingResponseApplication.class, args);
    }
}
Explanation:
- Main Class to Run the Application:
SpringAiStreamingResponseApplicationis the starting point of our application. When you run this class, Spring Boot initializes all components and starts the embedded server.
6. Testing the Streaming Response
Once your application is running, you can test both of your streaming endpoints. Here’s a simple guide on how to do it with popular tools like cURL and Postman.
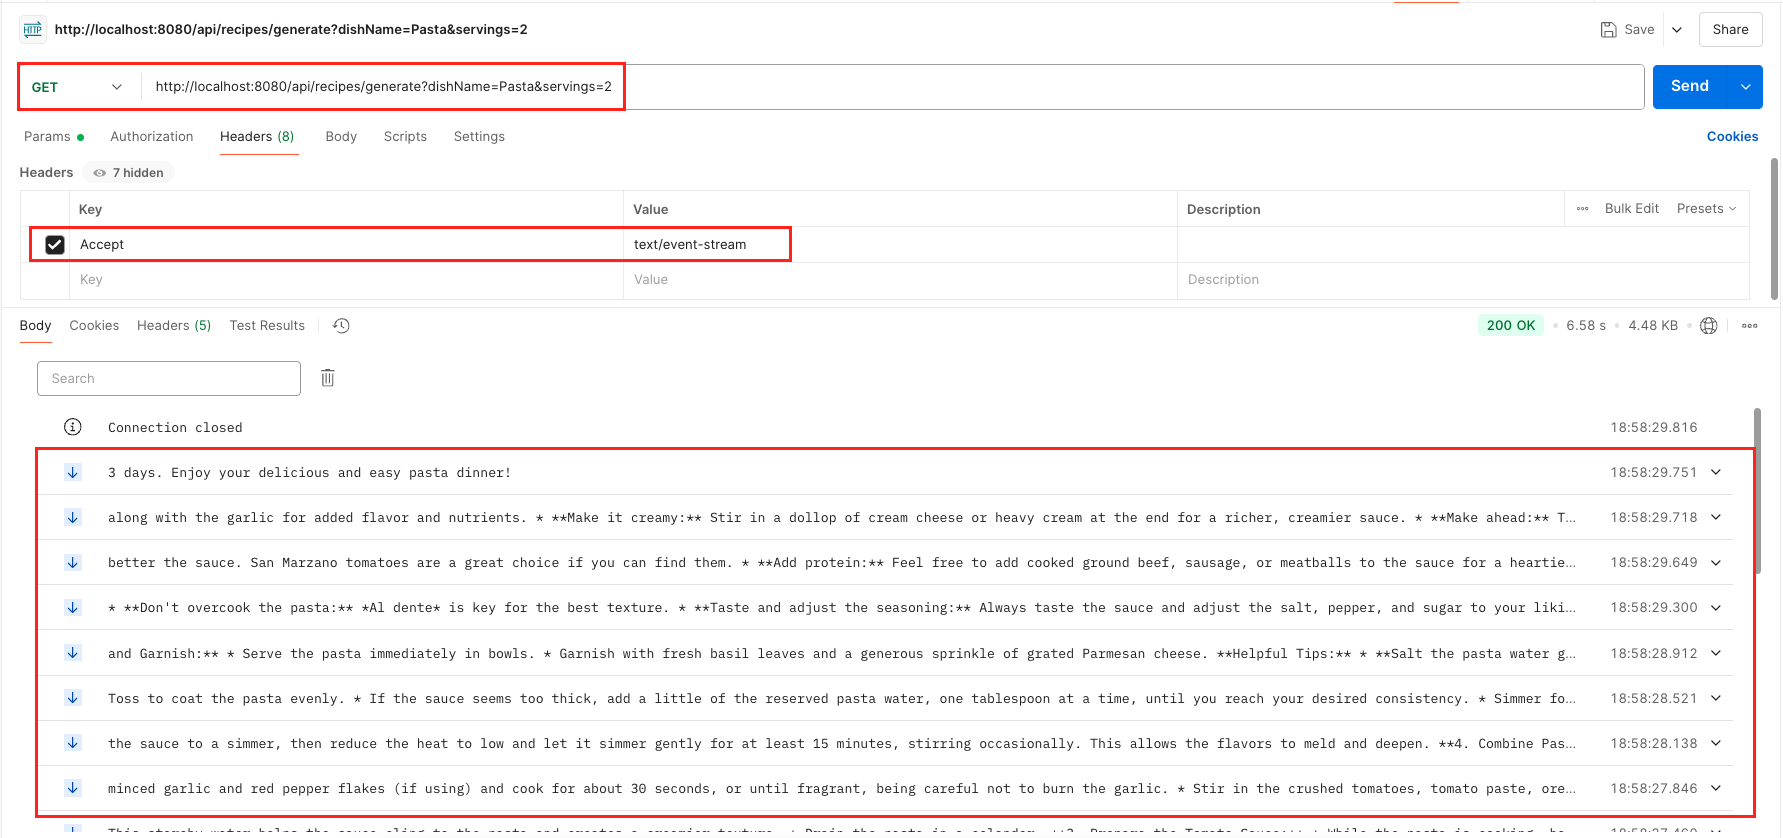
1️⃣ Testing Endpoint 1: The Simple Recipe Stream
This is your main endpoint for getting the recipe text. It’s perfect for showing the result directly to a user.
What it does: Streams the recipe text, piece by piece.
How to Test with cURL (for Terminal Users): Run this command. Use the -N flag in cURL to prevent it from buffering the output, allowing you to see the stream as it happens:
curl -N "http://localhost:8080/api/recipes/generate?dishName=Pasta&servings=2"Expected Result: You will see the recipe for Pasta appear on your screen line by line, not all at once.
2️⃣ Testing Endpoint 2: The Stream with Metadata
This endpoint is for developers. It streams the recipe text along with useful technical details like which AI model was used and why the stream ended.
What it does: Streams a series of detailed JSON objects. Each object contains a piece of the recipe and a lot of technical metadata.
How to Test with cURL (for Terminal Users): For this endpoint, you must tell the server you want a stream by adding an Accept header.
curl -N -H "Accept: text/event-stream" "http://localhost:8080/api/recipes/generate-with-meta?dishName=Pasta&servings=2"
Expected Result: You will see a stream of large JSON objects. Inside each JSON, look for the text field to see the recipe part and other fields like model for technical details.
💻 How to Test with Postman (for Both Endpoints):
Using Postman is great for viewing structured JSON. The key step is adding the Accept header to ensure you see the live stream.
1. Set up the Request:
- Create a new GET request.
- Enter the URL for either endpoint (e.g., http://localhost:8080/api/recipes/generate?dishName=Pasta&servings=2).
2. Add the Magic Header:
- Go to the Headers tab and add new Header
Accept = text/event-stream
Without this header, Postman will wait for the full response and dump it all at once, defeating the purpose of streaming. This header tells Postman, “I’m expecting a live stream, show me the data as it arrives!”
3. See the Stream:
- Click “Send”.
- In the response area, you will see each chunk of data appear one after another, not as a single response. For the metadata endpoint, you’ll see a series of nicely formatted JSON objects arriving in real-time.
Output:
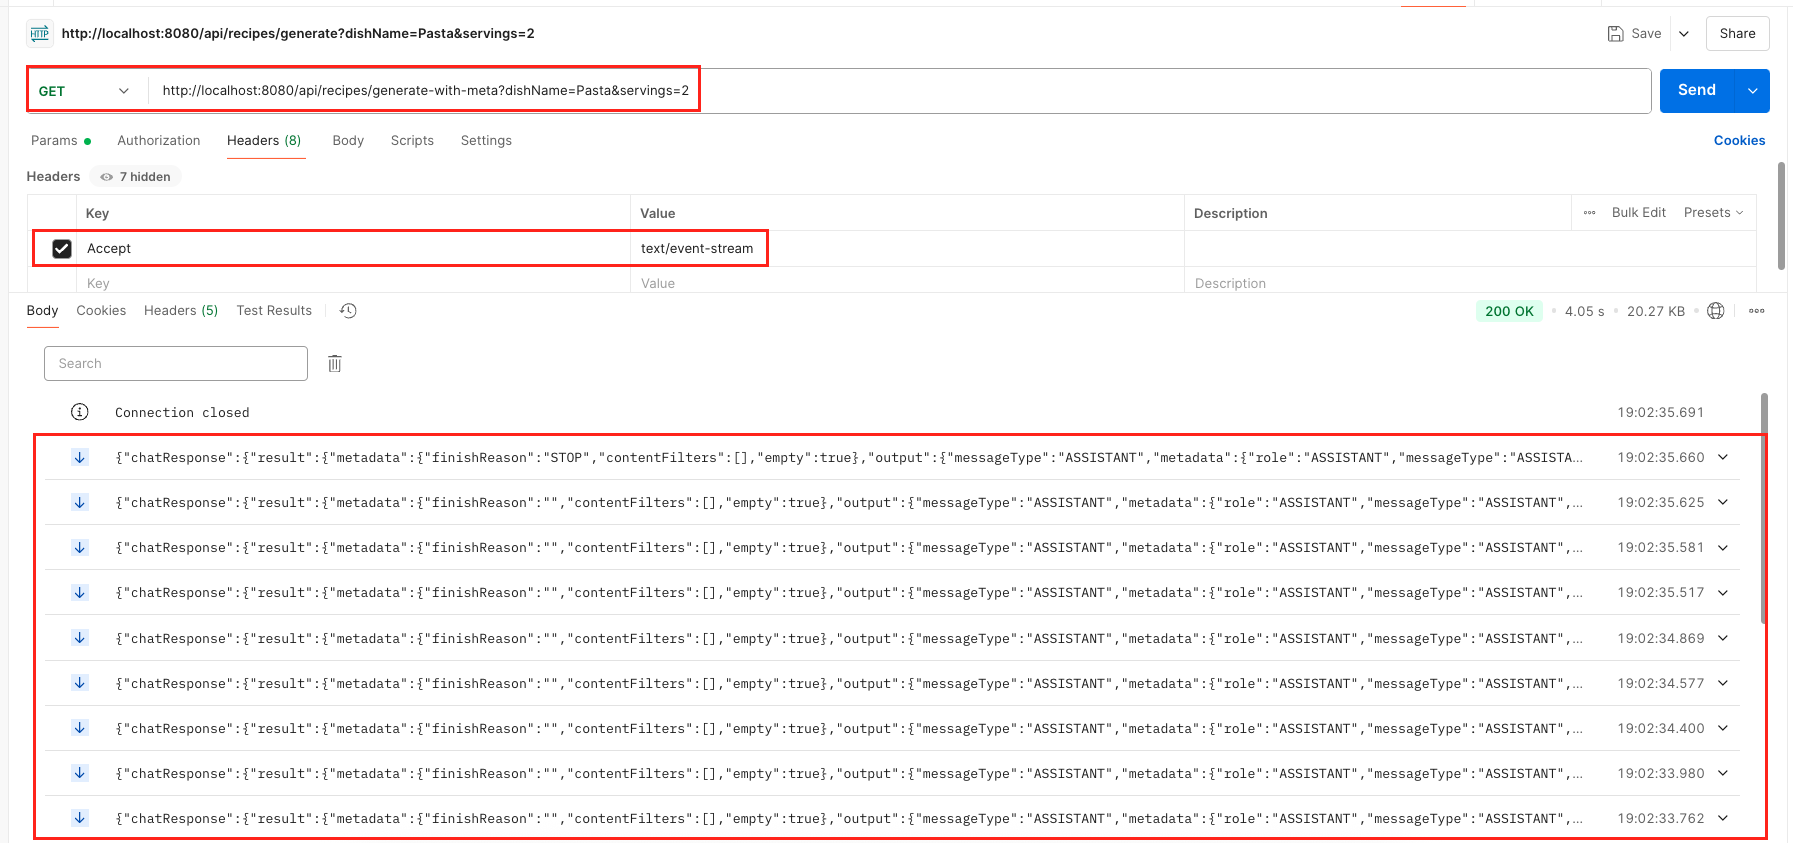
🤔 What’s Inside the Metadata Stream?
When you test the /generate-with-meta endpoint, each JSON chunk gives you deep insights:
- …output.text: This is the piece of the recipe generated in that specific chunk.
- …metadata.model: Tells you which AI model is doing the work (e.g., “gemini-2.0-flash-exp”).
- …metadata.finishReason: The most important field for control. It’s empty until the very last chunk, where it becomes “STOP”. This is how your application knows the AI is finished talking.
This metadata is incredibly powerful for debugging, monitoring costs, and understanding what your AI is doing behind the scenes.
7. Video Tutorial
If you prefer visual learning, check out our step-by-step video tutorial demonstrating the Spring AI Streaming Response implementation in action.
📺 Watch on YouTube:
8. Source Code
The complete source code for this Spring AI Streaming Response example is available on GitHub. You can clone the repository and run it locally to see the streaming response in action.
🔗 Spring AI Streaming Response Demo: https://github.com/BootcampToProd/spring-ai-streaming-response
9. Things to Consider
Keep these important considerations in mind:
- Memory Usage: Streaming minimizes memory footprint by sending chunks immediately instead of buffering the full response.
- Network Efficiency: Chunks are transmitted as soon as they’re ready, reducing perceived latency for the end user.
- Error Handling: Implement proper error handling for network interruptions.
- Backpressure: Use reactive streams’ built-in backpressure handling for high-load scenarios.
- Rate Limiting: Protect your AI endpoint from abuse by enforcing request quotas per client.
- Input Validation: Sanitize and validate all user inputs to guard against prompt‑injection attacks.
- CORS Configuration: Restrict allowed origins and methods to prevent unauthorized cross‑site requests.
- Monitoring: Add metrics and structured logs to track stream health and performance in production.
- SSE Support: Ensure target browsers support Server‑Sent Events; most modern ones do.
10. FAQs
What’s the difference between streaming and regular responses?
Regular responses wait for the complete answer before sending anything. Streaming sends data as soon as it’s available, creating a real-time experience like watching text appear as it’s being typed.
When should I use streaming responses?
Use streaming for long responses (stories, articles, recipes), real-time interactions (chatbots), or when you want to improve perceived performance and user experience.
What happens if the connection drops during streaming?
The stream will terminate, and you’ll need to handle reconnection logic in your client application. SSE provides automatic reconnection, while regular streaming requires manual handling.
How do I handle errors in streaming responses?
Implement error handling in your Flux chain using operators like .onErrorReturn() or .onErrorResume() to provide graceful error recovery.
Is streaming more expensive in terms of AI API costs?
No, the cost is the same as regular requests since you’re still generating the same amount of content. The billing is typically based on tokens generated, not the delivery method.
Why didn’t we add the Spring WebFlux dependency explicitly in our pom.xml?
We rely on the spring‑ai‑starter‑model‑openai starter, which already brings in Spring WebFlux transitively, so you get all the reactive and SSE support without adding an extra dependency.
11. Conclusion
Spring AI’s streaming response capability transforms how users interact with AI-powered applications by providing real-time, responsive experiences. By implementing streaming in your AI application, you create more engaging user interactions while efficiently managing system resources. The combination of Spring Boot’s reactive programming model with AI streaming creates powerful, scalable applications that feel fast and modern. Start with the simple features then gradually add advanced features like metadata tracking as your application grows.
12. Learn More
Interested in learning more?
Spring AI Evaluator Optimizer Pattern: Building Smarter AI That Gets Better With Each Try
Add a Comment