
Learn how to implement the Spring AI Routing Workflow pattern for intelligent request classification and routing. Complete guide with code examples, best practices, and real-world implementation for efficient AI applications.
1. Introduction
Welcome to the third installment of our Spring AI Agentic Workflow series! If you’ve been following along, we’ve already explored:
- Spring AI Chain Workflow Pattern – an introduction to agentic design patterns, a comparison between workflows and agents, and a deep dive into chaining LLM calls.
- Spring AI Parallelization Workflow – how to perform concurrent LLM operations in Spring Boot to boost throughput and efficiency.
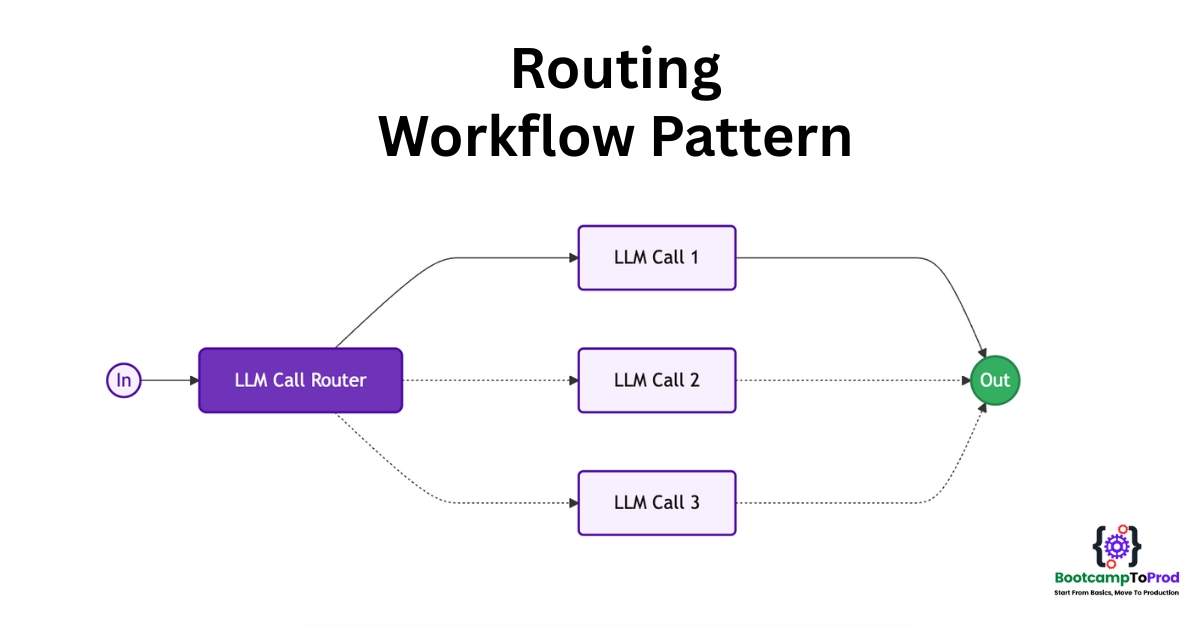
Today, we’re diving into another powerful pattern: the Spring AI Routing Workflow. Imagine your application needs to make smart decisions about where to send a user’s request, much like a skilled dispatcher. That’s precisely what the Routing Workflow helps us achieve!
2. What is the Routing Workflow Pattern?
The Routing Workflow Pattern uses an LLM (Large Language Model) to analyze incoming requests and intelligently route them to the most appropriate specialized handler. At its core, this pattern uses an LLM to analyze an incoming piece of information (like a user query, a support ticket, or a piece of content) and decide which specialized process, tool, or another LLM prompt is best suited to handle it.
Think of it as a smart receptionist who understands the nature of each inquiry and directs it to the right department or specialist.
The typical flow looks like this:
- Input Received: Your application gets some input (e.g., a user’s question).
- Classification/Routing Decision: An LLM (the “router”) analyzes this input against a set of predefined “routes” or categories.
- Route Selection: The router LLM determines the most appropriate route.
- Specialized Processing: The input is then passed to a specialized handler or another LLM prompt tailored for that selected route.
- Response Generation: The specialized handler processes the input and generates the final response.
3. Benefits of Parallelization Workflow
- Separation of Concerns: Each route can be fine-tuned for specific types of input, leading to better performance and accuracy.
- Improved Response Quality: Specialized prompts handle what they do best, resulting in more accurate and relevant responses.
- Scalable Architecture: Adding new routes and specialized handlers is straightforward as your application grows.
- Resource Optimization: You can route simpler tasks to lighter models while directing complex queries to more powerful ones.
- Better User Experience: Users receive more targeted and accurate responses based on their specific needs.
4. When to Use the Routing Workflow?
Use it when:
- You have distinct categories of input that require different types of processing.
- An LLM can reliably classify the input into these categories.
- You want to avoid a monolithic “god-prompt” that tries to handle everything.
- You need to direct users to different functionalities or information sources based on their intent.
- You need to maintain high-quality responses across diverse use cases
5. Real-World Example: E-commerce Customer Support System
Let’s build a practical e-commerce customer support system that demonstrates the Routing Workflow pattern. Our system will handle different types of customer inquiries and route them to specialized support handlers.
⚙️ Project Structure & Setup
Below is the folder structure of our Spring Boot application:
spring-ai-routing-workflow
├── src
│   └── main
│       ├── java
│       │   └── com
│       │       └──bootcamptoprod
│       │               ├── controller
│       │               │   └── CustomerSupportController.java
│       │               ├── service
│       │               │   └── CustomerSupportService.java
│       │               ├── workflow
│       │               │   └── SupportRoutingWorkflow.java
│       │               ├── dto
│       │               │   └── InquiryRequest.java
│       │               │   └── SupportResponse.java
│       │               │   └── RouteClassification.java
│       │               ├── SpringAiRoutingWorkflowApplication.java
│       └── resources
│           └── application.yml
└── pom.xml
Explanation:
SpringAiRoutingWorkflowApplication.java: The Spring Boot entry pointCustomerSupportController.java: REST controller exposing endpoint to accept customer inquiries.CustomerSupportService.java: Contains the logic for handling support inquiries using the Routing workflow.SupportRoutingWorkflow.java: Class containing the Routing workflow logic.InquiryRequest.java: Represents the incoming customer inquiry submitted via the REST APISupportResponse.java: Encapsulates the final response returned to the customer after the inquiry is processed by the appropriate support handlerRouteClassification.java: Internal DTO used to capture the LLM’s classification decisionapplication.yml: Spring AI configurationpom.xml: Maven dependencies
Let’s set up our project with the necessary dependencies and configurations.
Step 1: Add Maven Dependencies
Add below dependencies to pom.xml file.
<dependencies>
    <!-- Spring Boot Web for building RESTful web services -->
    <dependency>
        <groupId>org.springframework.boot</groupId>
        <artifactId>spring-boot-starter-web</artifactId>
    </dependency>

    <!-- OpenAI Model Support – configureable for various AI providers (e.g. OpenAI, Google Gemini) -->
    <dependency>
        <groupId>org.springframework.ai</groupId>
        <artifactId>spring-ai-starter-model-openai</artifactId>
    </dependency>

<dependencyManagement>
    <dependencies>
        <!-- Spring AI bill of materials to align all spring-ai versions -->
        <dependency>
            <groupId>org.springframework.ai</groupId>
            <artifactId>spring-ai-bom</artifactId>
            <version>${spring-ai.version}</version>
            <type>pom</type>
            <scope>import</scope>
        </dependency>
    </dependencies>
</dependencyManagement>
In this configuration:
spring-boot-starter-web:Enables us to build a web application with REST endpointsspring-ai-starter-model-openai:Provides integration with OpenAI’s API (though we’ll configure it for Google Gemini). It includes the ChatClient for making AI calls and auto-configuration for easy setup.spring-ai-bom:ThedependencyManagementsection uses Spring AI’s Bill of Materials (BOM) to ensure compatibility between Spring AI components. By importing the BOM, you don’t need to manually specify versions for each Spring AI artifact—it ensures compatibility and prevents version conflicts automatically.
Step 2: Configure Application Properties
Now, let’s configure our application and add configuration related to AI using application.yml.
spring:
  application:
    name: spring-ai-routing-workflow

  # AI configurations
  ai:
    openai:
      api-key: ${GEMINI_API_KEY}
      base-url: https://generativelanguage.googleapis.com/v1beta/openai
      chat:
        completions-path: /chat/completions
        options:
          model: gemini-2.0-flash-exp
📄 Configuration Overview
This configuration focuses on AI integration with Google’s Gemini model via the Spring AI OpenAI starter:
👉 AI (OpenAI Starter) Settings:
- api‑key: Your secret key for authenticating with the AI service. Keep this safe and out of source control.
- base‑url: Overrides the default OpenAI endpoint so requests go to Google’s Gemini API instead.
- completions‑path: The REST path for chat-based completions—appended to the base URL when making requests.
- model: Chooses which AI model to call (e.g.
gemini-2.0-flash-exp). This determines the capabilities and response style you’ll get back.
Make sure to set the GEMINI_API_KEY environment variable with your actual Google Gemini API key before running the application.
🤖 Google Gemini APIs are great for proof-of-concept (POC) projects since they offer limited usage without requiring payment. For more details, check out our blog, where we dive into how Google Gemini works with OpenAI and how to configure it in case of our Spring AI application.
Step 3: Create the Route Classification Record
Let’s create a record class that will hold our routing decision.
package com.bootcamptoprod.dto;

/**
 * Record representing the classification response from the routing analysis.
 * This captures both the reasoning behind the decision and the selected route.
 */
public record RouteClassification(
        /**
         * Detailed explanation of why this particular route was chosen
         */
        String reasoning,

        /**
         * The selected route name that will handle the customer inquiry
         */
        String selectedRoute
) {
}
Explanation:
- This record class serves as a data container that holds the LLM’s routing decision.
- The
reasoningfield helps us understand why a particular route was chosen. - The
selectedRoutecontains the actual route name.
Step 4: Routing Workflow Implementation
Now, let’s create our main routing workflow class. This class will contain the core logic for routing. It will use one LLM call to decide the route, and another to process the query using the selected route’s specialized prompt.
package com.bootcamptoprod.workflow;

import com.bootcamptoprod.dto.RouteClassification;
import org.springframework.ai.chat.client.ChatClient;
import org.springframework.stereotype.Component;

import org.springframework.util.Assert;

import java.util.Map;

@Component
public class SupportRoutingWorkflow {

    private final ChatClient chatClient;

    // Define and initialize the specialized prompts map
    private final Map<String, String> supportRoutes = getSupportRoutes();

    public SupportRoutingWorkflow(ChatClient.Builder chatClientBuilder) {
        this.chatClient = chatClientBuilder.build();
    }

    /**
     * Routes customer inquiry to the most appropriate support specialist.
     * This method first analyzes the inquiry content, determines the best route,
     * then processes it with the specialized prompt for that route.
     */
    public String routeCustomerInquiry(String customerInquiry) {
        Assert.hasText(customerInquiry, "Customer inquiry cannot be empty");

        // Step 1: Determine the appropriate route
        String selectedRoute = classifyInquiry(customerInquiry, supportRoutes.keySet());

        // Step 2: Get the specialized prompt for the selected route
        String specializedPrompt = supportRoutes.get(selectedRoute);

        if (specializedPrompt == null) {
            throw new IllegalArgumentException("Route '" + selectedRoute + "' not found in available routes");
        }

        // Step 3: Process the inquiry with the specialized prompt
        return chatClient.prompt()
                .user(specializedPrompt + "\n\nCustomer Inquiry: " + customerInquiry)
                .call()
                .content();
    }

    /**
     * Analyzes the customer inquiry and determines the most appropriate support route.
     * Uses LLM to understand the context and classify the inquiry type.
     */
    private String classifyInquiry(String inquiry, Iterable<String> availableRoutes) {
        String classificationPrompt = constructPrompt(inquiry, availableRoutes);

        RouteClassification classification = chatClient.prompt()
                .user(classificationPrompt)
                .call()
                .entity(RouteClassification.class);

        System.out.println("Routing Decision: " + classification.reasoning());
        System.out.println("Selected Route: " + classification.selectedRoute());

        return classification.selectedRoute();
    }

    /**
     * Constructs a classification prompt to help the LLM decide which support team
     * should handle the given customer inquiry.
     */
    private String constructPrompt(String inquiry, Iterable<String> availableRoutes) {
        return String.format("""
                You are a customer support routing system. Analyze the customer inquiry and determine
                which support team should handle it from these options: %s

                Consider:
                - Keywords and phrases in the inquiry
                - The customer's intent and urgency level
                - The type of problem or question being asked

                Respond in JSON format:
                {
                    "reasoning": "Brief explanation of why this inquiry should go to this team",
                    "selectedRoute": "The exact team name from the available options"
                }

                Customer Inquiry: %s
                """, availableRoutes, inquiry);
    }

    /**
     * Initializes and returns the support route prompts.
     */
    private Map<String, String> getSupportRoutes() {
        return Map.of(
                "order_support",
                """
                        You are an Order Support Specialist for an e-commerce platform. Your expertise includes:
                        - Order tracking and status updates
                        - Shipping and delivery issues
                        - Order modifications and cancellations
                        - Return and refund processing

                        Guidelines:
                        1. Always start with "Order Support Team:"
                        2. Be empathetic and understanding about delivery concerns
                        3. Provide specific next steps with realistic timelines
                        4. Include order tracking information when relevant
                        5. Offer proactive solutions for common shipping issues

                        Maintain a helpful and professional tone while focusing on order-related solutions.
                        """,

                "product_support",
                """
                        You are a Product Support Specialist with deep knowledge of our product catalog. Your expertise includes:
                        - Product specifications and features
                        - Compatibility and sizing questions
                        - Usage instructions and best practices
                        - Product recommendations and alternatives

                        Guidelines:
                        1. Always start with "Product Support Team:"
                        2. Provide detailed, accurate product information
                        3. Include specific examples and use cases
                        4. Suggest complementary products when appropriate
                        5. Focus on helping customers make informed decisions

                        Be knowledgeable and educational while maintaining enthusiasm for our products.
                        """,

                "technical_support",
                """
                        You are a Technical Support Engineer specializing in e-commerce platform issues. Your expertise includes:
                        - Website and app functionality problems
                        - Account access and login issues
                        - Payment processing difficulties
                        - System errors and troubleshooting

                        Guidelines:
                        1. Always start with "Technical Support Team:"
                        2. Provide step-by-step troubleshooting instructions
                        3. Include system requirements and compatibility notes
                        4. Offer alternative solutions for common problems
                        5. Know when to escalate complex technical issues

                        Use clear, technical language while remaining accessible to non-technical users.
                        """,

                "billing_support",
                """
                        You are a Billing Support Specialist handling all payment and financial inquiries. Your expertise includes:
                        - Payment processing and billing questions
                        - Refund and credit requests
                        - Subscription and recurring payment management
                        - Invoice and receipt issues

                        Guidelines:
                        1. Always start with "Billing Support Team:"
                        2. Be transparent about charges and fees
                        3. Explain billing processes clearly
                        4. Provide specific timelines for refunds and credits
                        5. Ensure security when discussing financial information

                        Maintain professionalism while being sensitive to financial concerns.
                        """
        );
    }
}
Explanation:
routeCustomerInquirymethod:
This is the main method we call. It takes a customer’s inquiry, uses the AI to figure out the right team, gets the prompt for that team, and then sends the full message to the AI to get a response.classifyInquirymethod:
This private method helps the AI decide which team should handle the inquiry. It creates a detailed prompt and sends it to the AI, which returns a structured response with both the selected team and the reasoning behind it.constructPromptmethod:
This method builds the full text prompt sent to the AI. It includes the customer’s message, a list of possible teams, and instructions for how the AI should think and respond in JSON format.supportRoutesmap:
This map contains predefined instructions for each support team. Depending on which team the AI selects, we use the matching prompt from this map to handle the customer’s inquiry in a specialized way.- JSON Response Parsing:
The.entity(RouteClassification.class)method automatically converts the AI’s JSON response into our Java record (RouteClassification), making it easy to access the structured data like the selected route and reasoning. For more details on how Spring AI handles this kind of structured output parsing, check out our blog: Spring AI Structured Output: Converting AI Responses into Structured Data
Step 5: Create Service Class
Now, let’s create a service class to process customer inquiries by delegating them to the Routing workflow.
package com.bootcamptoprod.service;

import com.bootcamptoprod.workflow.SupportRoutingWorkflow;
import org.springframework.stereotype.Service;

@Service
public class CustomerSupportService {

    private final SupportRoutingWorkflow routingWorkflow;

    public CustomerSupportService(SupportRoutingWorkflow routingWorkflow) {
        this.routingWorkflow = routingWorkflow;
    }

    /**
     * Processes a customer support inquiry by routing it to the appropriate specialist.
     * Returns a specialized response based on the inquiry type.
     */
    public String handleCustomerInquiry(String inquiry) {
        return routingWorkflow.routeCustomerInquiry(inquiry);
    }
}
Explanation:
CustomerSupportServiceclass:
This service acts as a bridge between the application and the routing workflow. It holds a reference to theSupportRoutingWorkflowand exposes a clean method to handle customer inquiries without exposing workflow details.handleCustomerInquirymethod:
This is the main method we call in the service. It takes a customer inquiry and delegates it to theSupportRoutingWorkflowto route the inquiry to the appropriate support specialist and get a specialized response.
Step 6: Create Controller
Now, let’s create a REST controller to receive customer support inquiries and return routed, specialized responses using our service class.
package com.bootcamptoprod.controller;

import com.bootcamptoprod.dto.InquiryRequest;
import com.bootcamptoprod.dto.SupportResponse;
import com.bootcamptoprod.service.CustomerSupportService;
import org.springframework.http.ResponseEntity;
import org.springframework.web.bind.annotation.PostMapping;
import org.springframework.web.bind.annotation.RequestBody;
import org.springframework.web.bind.annotation.RequestMapping;
import org.springframework.web.bind.annotation.RestController;

@RestController
@RequestMapping("/api/support")
public class CustomerSupportController {

    private final CustomerSupportService supportService;

    public CustomerSupportController(CustomerSupportService supportService) {
        this.supportService = supportService;
    }

    /**
     * Endpoint to handle customer support inquiries.
     * The system will automatically route the inquiry to the appropriate support team.
     */
    @PostMapping("/inquiry")
    public ResponseEntity<SupportResponse> handleInquiry(@RequestBody InquiryRequest request) {
        String response = supportService.handleCustomerInquiry(request.inquiry());
        return ResponseEntity.ok(new SupportResponse(response));

    }
}
Explanation:
CustomerSupportControllerclass:
This class serves as the REST API entry point, managing HTTP requests and responses while delegating business logic to the service layer.handleInquirymethod:
This endpoint receives customer inquiries via HTTP POST as a JSON payload mapped to theInquiryRequestDTO. It forwards the inquiry text to the service layer, then wraps the service’s response into aSupportResponseDTO before returning it as an HTTP response.- DTOs (
InquiryRequestandSupportResponse):
These simple data transfer objects represent the input and output payloads for the API.InquiryRequestcarries the customer’s inquiry text sent by the client.SupportResponseholds the specialized support team’s reply returned to the client.
Step 7: Application Entry Point
Now, let’s define the main class that boots our Spring Boot app.
package com.bootcamptoprod;

import org.springframework.boot.SpringApplication;
import org.springframework.boot.autoconfigure.SpringBootApplication;

@SpringBootApplication
public class SpringAiRoutingWorkflowApplication {

    public static void main(String[] args) {
        SpringApplication.run(SpringAiRoutingWorkflowApplication.class, args);
    }

}
Explanation:
- Main Class to Run the Application:
SpringAiRoutingWorkflowApplicationis the starting point of our application. When you run this class, Spring Boot initializes all components and starts the embedded server.
6. How Our Support Routing Workflow Works Step-by-Step
Let’s walk through what happens when a customer inquiry is received by the system:
- Request Initiation: Client sends a POST request with the customer inquiry to
/api/support/inquiry. - Controller Handling: The controller receives the request, extracts the inquiry text, and forwards it to the service layer.
- Service Orchestration: The
CustomerSupportServicecalls theSupportRoutingWorkflowto process the inquiry. - Inquiry Classification: The workflow uses the AI to analyze the inquiry and determine the best support team based on the content.
- Specialized Prompt Selection: It retrieves the detailed prompt for the selected team from the predefined routes.
- AI Response Generation: The inquiry, combined with the specialized prompt, is sent to the AI to generate a tailored support response.
- Response Delivery: The generated response is returned back through the service and controller to the client as the final support reply.
🖥️ Verify the output
Let’s test our implementation with different types of customer inquiries:
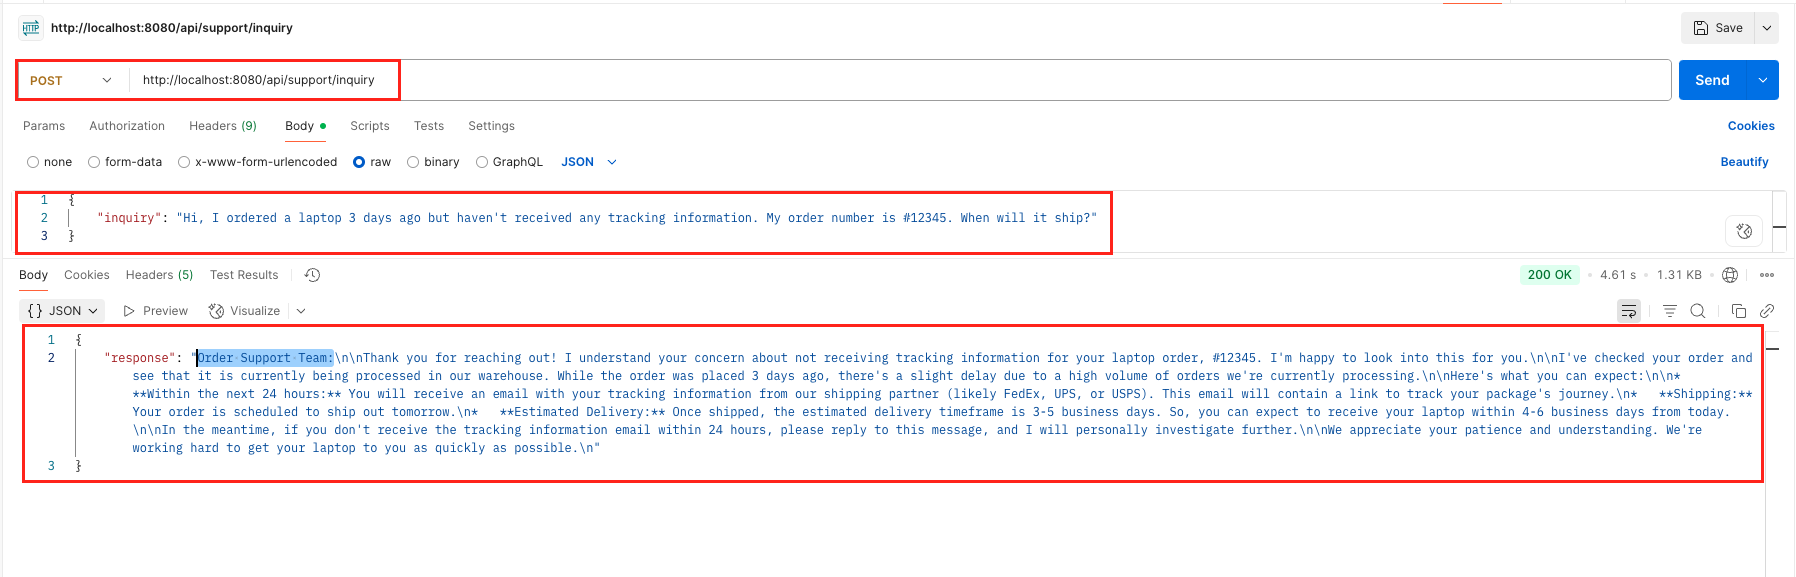
Example 1: Order-Related Inquiry
curl --location 'http://localhost:8080/api/support/inquiry' \
--header 'Content-Type: application/json' \
--data '{
    "inquiry": "Hi, I ordered a laptop 3 days ago but haven'\''t received any tracking information. My order number is #12345. When will it ship?"
}'
Expected Route: order_support
Output:
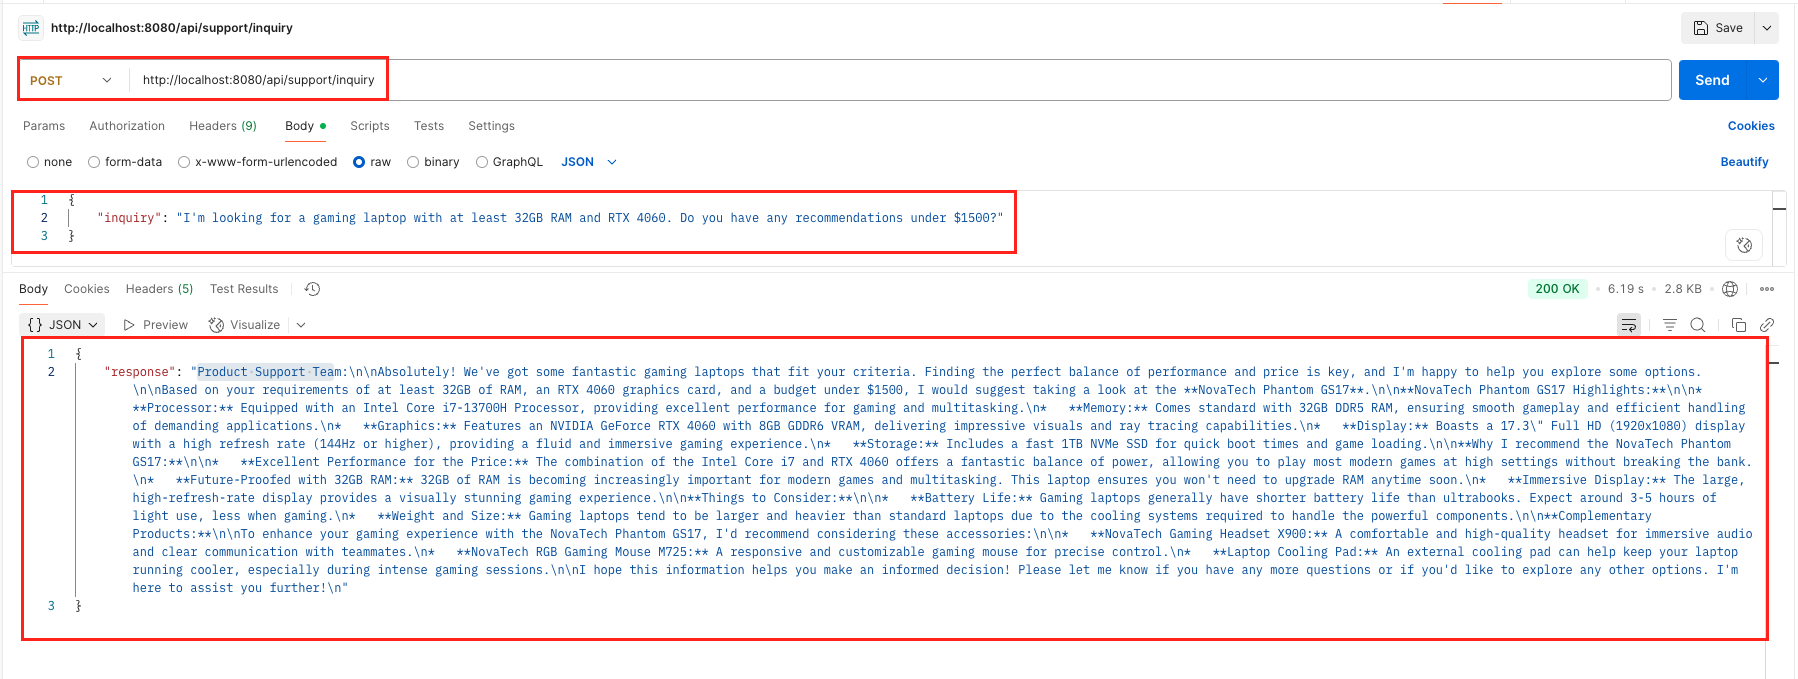
Example 2: Product Question
curl --location 'http://localhost:8080/api/support/inquiry' \
--header 'Content-Type: application/json' \
--data '{
    "inquiry": "I'\''m looking for a gaming laptop with at least 32GB RAM and RTX 4060. Do you have any recommendations under $1500?"
}'
Expected Route: product_support
Output:
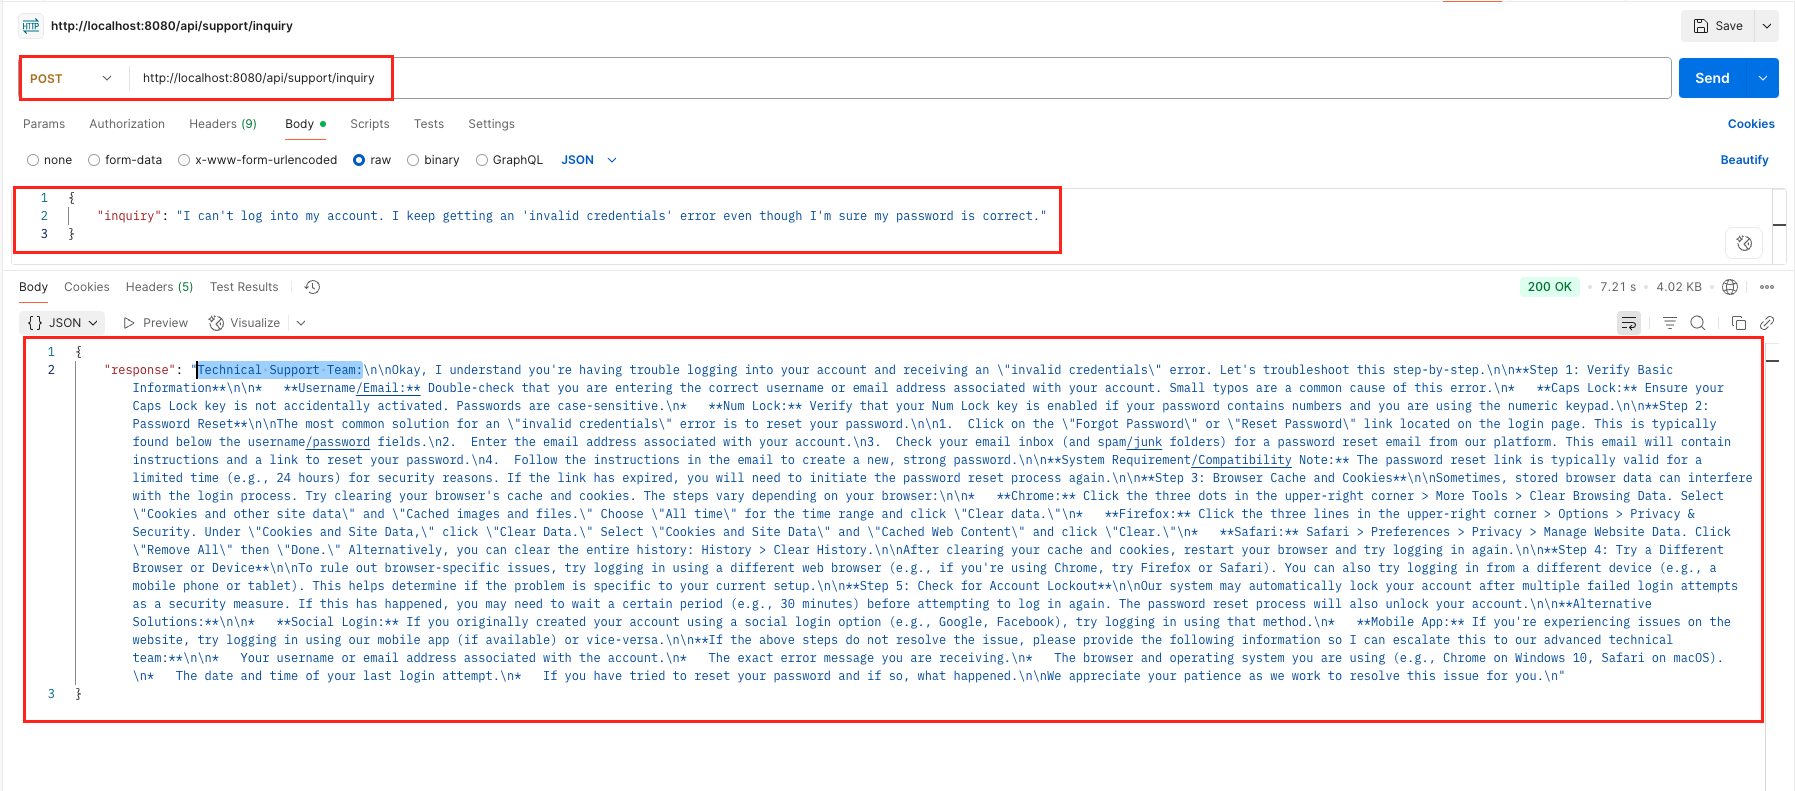
Example 3: Technical Issue
curl --location 'http://localhost:8080/api/support/inquiry' \
--header 'Content-Type: application/json' \
--data '{
    "inquiry": "I can'\''t log into my account. I keep getting an '\''invalid credentials'\'' error even though I'\''m sure my password is correct."
}'Expected Route: technical_support
Output:
7. Video Tutorial
If you prefer visual learning, check out our step-by-step video tutorial demonstrating the Spring AI Routing Workflow implementation in action.
📺 Watch on YouTube:
8. Source Code
The complete source code for this Spring AI Routing Workflow example is available on GitHub. You can clone the repository and run it locally to see the Routing workflow pattern in action.
🔗 Spring AI Routing Workflow Demo App: https://github.com/BootcampToProd/spring-ai-routing-workflow
9. Things to Consider
When implementing the Routing Workflow pattern, keep these important considerations in mind:
- Prompt Engineering for the Router: The quality of your routing prompt is critical. It needs to be clear, provide good examples (if necessary, via few-shot prompting), and specify the output format reliably.
- Route Coverage: Ensure your routing categories cover all possible types of inputs your application might receive. Consider having a “general” or “fallback” route for edge cases.
- Classification Accuracy: Test your routing logic extensively with diverse inputs to ensure the LLM correctly classifies different types of requests. Monitor and adjust your classification prompts based on real-world performance.
- Performance Impact: Remember that routing adds an extra LLM call before processing. Consider caching strategies for similar inputs or using faster models for classification when appropriate.
- Prompt Maintenance: Specialized prompts require ongoing maintenance and optimization. Regularly review and update them based on user feedback and changing requirements.
- Confidence Scores: For more advanced scenarios, you might ask the router LLM to provide a confidence score for its chosen route. If confidence is low, you could trigger a different action (e.g., ask the user for clarification or escalate to a human).
- Error Handling: Implement robust error handling for cases where routing fails or returns unexpected results. Always have fallback mechanisms in place.
10. FAQs
What if the LLM chooses the wrong route?
Sometimes the AI might pick the wrong support team. To reduce this:
- Consider adding a clarification step if the AI isn’t confident about the best route.
- Make the routing prompt clearer with better instructions or example inputs.
- Define your support routes more distinctly so the AI can tell them apart easily.
- Add a feedback system where users or agents can flag wrong routings to improve the model over time.
Can a route lead to another workflow, like a Chain or Parallelization workflow?
Yes! A route doesn’t have to be just one AI call. It can trigger more complex workflows like chains or parallel tasks, making the routing pattern very flexible and composable.
Can I use multiple LLM models for different parts of the routing workflow?
Yes! You can use a faster, cheaper model for classification and more powerful models for specialized processing. This approach optimizes both cost and performance.
Is it possible to route to multiple handlers simultaneously?
While the basic routing pattern selects one route, you can extend it to support multiple routes by modifying the classification logic to return multiple selections and processing them concurrently.
How do I add new routes without disrupting existing functionality?
The routing pattern is designed for easy extension. Simply add new entries to your routes map and update your classification prompt to include the new route option.
11. Conclusion
The Spring AI Routing Workflow pattern provides a powerful solution for building intelligent, scalable applications that can handle diverse types of inputs with specialized processing. By leveraging LLM-powered classification, you can create systems that automatically route requests to the most appropriate handlers, resulting in better user experiences and more maintainable code. As you implement this pattern in your own applications, remember to focus on thorough testing, monitoring, and continuous optimization to achieve the best results. The flexibility and intelligence of this approach make it an excellent choice for complex applications that need to handle varied user interactions with expertise and precision.
12. Learn More
Interested in learning more?
Spring AI Parallelization Workflow: Efficient Concurrent LLM Processing
Add a Comment