Learn how to Prevent concurrent scheduled jobs in Spring Boot with Shedlock, the ultimate solution for reliable task scheduling. Learn how to ensure your jobs run smoothly with Shedlock. This blog post provides a detailed guide on Shedlock’s basic concepts, its usage, features, and examples with MongoDB and MySQL.
Introduction
If you have a distributed system with multiple instances running, you may encounter issues where multiple instances are running the same task at the same time. This can lead to race conditions and other issues. To avoid this, you can use distributed locking to ensure that only one instance of your application is running a task at any given time. Shedlock is a powerful library that provides distributed locking for your tasks in a Spring Boot application. In this blog post, we’ll discuss how Shedlock works, what problem it solves, and how to use it in your Spring Boot application with MongoDB and MySQL.
Shedlock Features
Shedlock provides several features that make it a powerful tool for task synchronization:
- Distributed locking: Shedlock allows you to synchronize your tasks across multiple instances of your application.
- Multiple lock providers: Shedlock supports several lock providers, including MongoDB, MySQL, and Redis.
- Task scheduling: Shedlock integrates with your task scheduling frameworks, such as Quartz or Spring Scheduler, to ensure that your tasks are executed on time.
Why use Shedlock with Spring Boot?
Spring Boot provides a simple way to schedule tasks using annotations like @Scheduled. However, if you have multiple instances of the application running, it’s possible that the same task will be executed by multiple instances at the same time. Shedlock provides a simple way to prevent this from happening.
How does Shedlock work?
Shedlock works by creating a lock for a specific task in a shared database or distributed lock manager. The lock has an expiration time, and if it’s not released before the expiration time, Shedlock assumes that the instance that held the lock has crashed and releases the lock automatically. Shedlock provides different implementations for the lock storage, including JPA, MongoDB, MySQL, Redis, ZooKeeper, and Hazelcast.
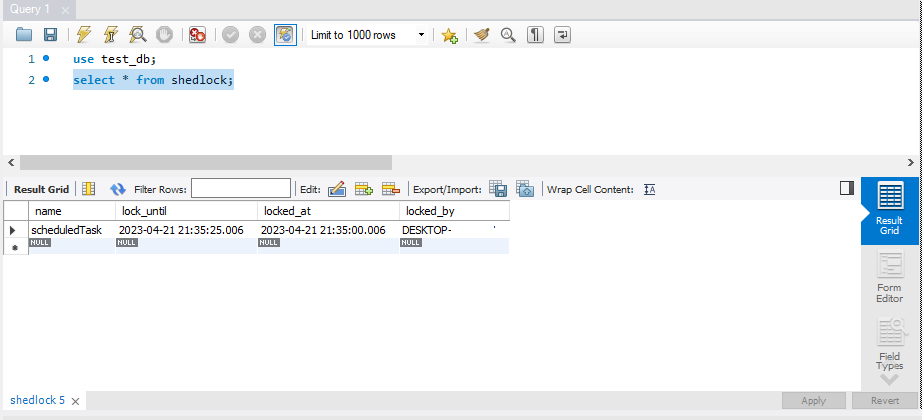
Table Structure Used by Shedlock
Shedlock uses a database table to store information about the locks. The table has the following columns:
name: the name of the locklock_until: the time until which the lock is heldlocked_at: the time at which the lock was acquiredlocked_by: the identifier of the instance that holds the lock
When a task is executed, Shedlock acquires a lock by inserting a row into the table with the name of the task and the lock time. When the task is completed, Shedlock releases the lock.
ShedLock Annotations
There are two annotations provided by Shedlock which we can use to configure the Shedlock in the Spring Boot application.
@EnableSchedulerLock
The @EnableSchedulerLock annotation is used to enable Shedlock’s scheduler locking feature in a Spring Boot application. It should be placed on a configuration class in a Spring Boot application.
Key Attributes:
defaultLockAtMostFor: This attribute sets the default maximum lock duration. For example,"PT10S"sets the default maximum lock duration to 10 seconds.defaultLockAtLeastFor: This attribute sets the default minimum lock duration. For example,"PT1S"sets the default minimum lock duration to 1 second.
@SchedulerLock
The @ annotation is an annotation that can be placed on a scheduled task method to specify the lock settings for that task.SchedulerLock
Key Attributes:
name: This attribute sets the name of the lock. If not specified, the default name is used.lockAtMostFor: This attribute sets the maximum lock duration. For example,"PT10S"sets the maximum lock duration to 10 seconds. If not specified, the default value set by@EnableSchedulerLockwill be used.lockAtLeastFor: This attribute sets the minimum lock duration. For example,"PT1S"sets the minimum lock duration to 1 second. If not specified, the default value set by@EnableSchedulerLockwill be used.
Using Shedlock with Spring Scheduler and MongoDB
Now let’s see how to use Shedlock with Spring Scheduler and MongoDB in a Spring Boot application. First, add the Shedlock dependencies to your project. Next, configure a MongoDB lock provider. Finally, create a scheduled task that is annotated with the @SchedulerLock annotation.
Here’s an example of dependencies to add:
<dependency>
  <groupId>net.javacrumbs.shedlock</groupId>
  <artifactId>shedlock-spring</artifactId>
  <version>{shedlock-spring-version}</version>
</dependency>

<dependency>
  <groupId>net.javacrumbs.shedlock</groupId>
  <artifactId>shedlock-provider-mongo</artifactId>
  <version>{shedlock-provider-mongo-version}</version>
</dependency>The first dependency shedlock-spring provides the Spring integration for Shedlock, which enables the use of Shedlock annotations and configuration in Spring components. It also provides support for creating and managing locks using various lock providers. The latest version of shedlock-spring can be obtained from here.
The second dependency shedlock-provider-mongo is the lock provider implementation for MongoDB. It provides the necessary functionality to create and manage locks using a MongoDB database. This includes creating the lock collection in the database, acquiring and releasing locks, and keeping track of the lock status. The latest version of shedlock-provider-mongo can be obtained from here
Here’s an example of how to configure a MongoDB lock provider:
import com.mongodb.client.MongoClient;
import net.javacrumbs.shedlock.core.LockProvider;
import net.javacrumbs.shedlock.provider.mongo.MongoLockProvider;
import org.springframework.context.annotation.Bean;
import org.springframework.context.annotation.Configuration;

@Configuration
public class ShedlockConfig {

    @Bean
    public LockProvider lockProvider(MongoClient mongoClient) {
        return new MongoLockProvider(mongoClient.getDatabase("test_db")); //test_db is the name of Mongo Database
    }
}This configuration class sets up Shedlock to use MongoDB as the backend for lock management. Next, create a scheduled task that is annotated with the @SchedulerLock annotation:
import net.javacrumbs.shedlock.spring.annotation.EnableSchedulerLock;
import net.javacrumbs.shedlock.spring.annotation.SchedulerLock;
import org.springframework.boot.SpringApplication;
import org.springframework.boot.autoconfigure.SpringBootApplication;
import org.springframework.scheduling.annotation.EnableScheduling;
import org.springframework.scheduling.annotation.Scheduled;

import java.time.ZonedDateTime;
import java.util.concurrent.TimeUnit;

@SpringBootApplication
@EnableScheduling
@EnableSchedulerLock(defaultLockAtLeastFor = "PT20S", defaultLockAtMostFor = "PT25S")
public class SpringSchedulerApplication {

    public static void main(String[] args) {
        SpringApplication.run(SpringSchedulerApplication.class, args);
    }

    @Scheduled(cron = "0/30 * * * * ?")
    @SchedulerLock(name = "scheduledTask", lockAtLeastFor = "PT20S", lockAtMostFor = "PT25S")
    public void scheduledTask() {
        System.out.println("Scheduled task started. " + ZonedDateTime.now());
        try {
            Thread.sleep(15000);
        } catch (Exception e) {
            System.out.println("Something went wrong");
        }
        System.out.println("Scheduled task ended  . " + ZonedDateTime.now());
    }
}In this example, we are scheduling a task to run every 30 seconds using the @Scheduled annotation. We are also annotating the method with @SchedulerLock and providing a name for the lock. This ensures that only one instance of the application is running the task at any given time.
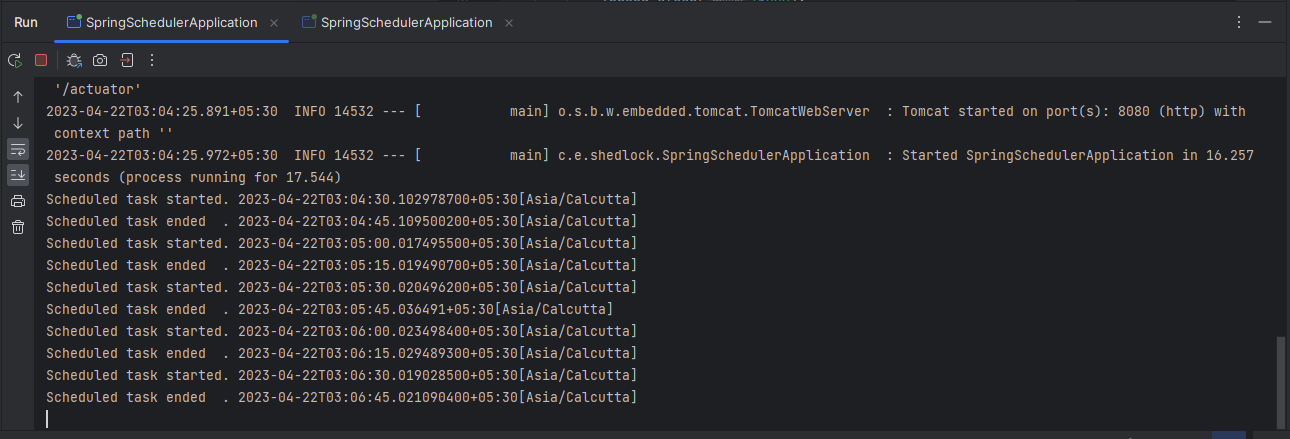
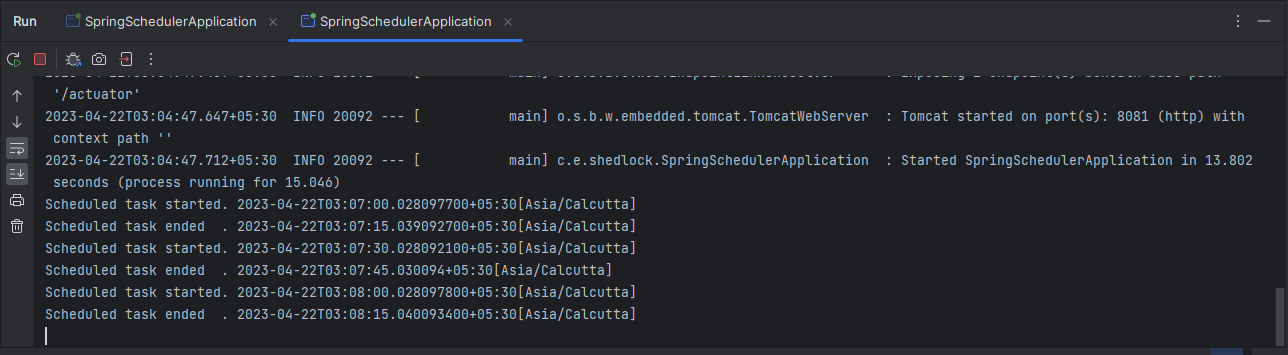
Output:
When we run multiple instances of our application, the scheduled task will only run on one of them.

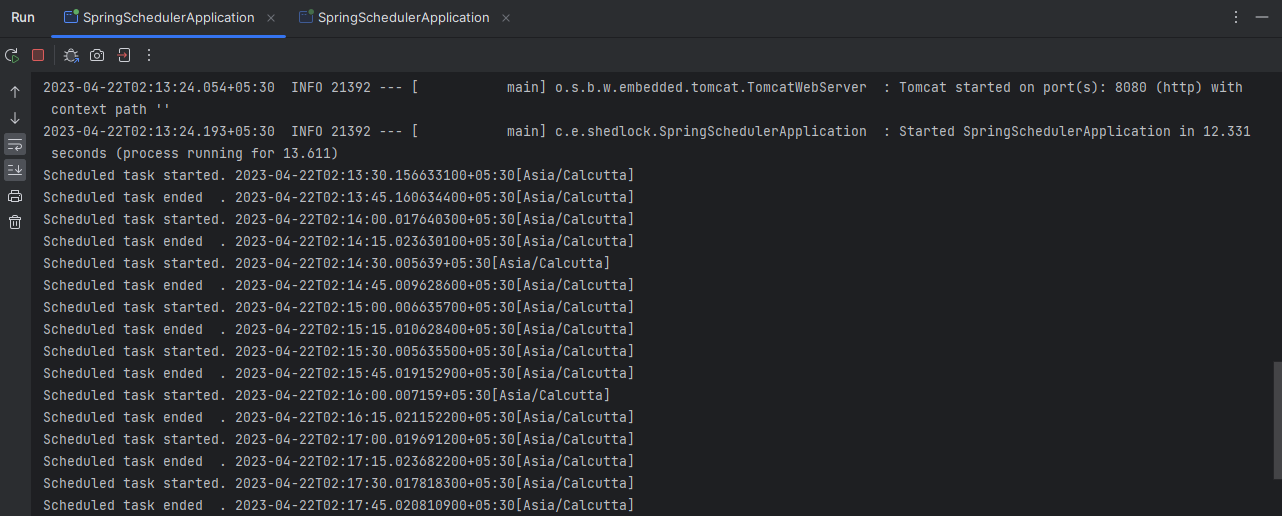
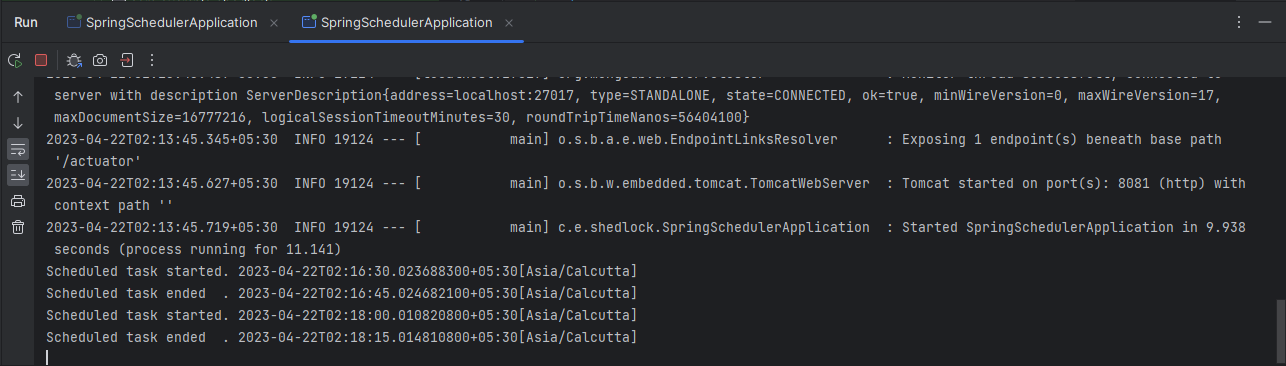
Application instance-1 is running on port 8080 and instance-2 is running on port 8081. The scheduled job is triggered on only one of them at a given instance of time which can be seen in the above images.
Note:
For simplicity, we have defined the scheduled task inside the application main class. While developing the production grade applications, it is recommended to define the scheduled tasks in a separate class.
Source Code:
The complete source code of the above example can be found here.
Using Shedlock with Spring Scheduler and MySQL
Now let’s see how to use Shedlock with Spring Scheduler and MySQL in a Spring Boot application. First, add the Shedlock dependencies to your project. Next, configure a MySQL lock provider. Finally, create a scheduled task that is annotated with the @SchedulerLock annotation.
Here’s an example of dependencies to add:
<dependency>
  <groupId>net.javacrumbs.shedlock</groupId>
  <artifactId>shedlock-spring</artifactId>
  <version>{shedlock-spring-version}</version>
</dependency>

<dependency>
  <groupId>net.javacrumbs.shedlock</groupId>
  <artifactId>shedlock-provider-jdbc-template</artifactId>
  <version>{shedlock-provider-jdbc-template-version}</version>
</dependency>

<dependency>
  <groupId>org.springframework.boot</groupId>
  <artifactId>spring-boot-starter-data-jpa</artifactId>
</dependency>

<dependency>
  <groupId>com.mysql</groupId>
  <artifactId>mysql-connector-j</artifactId>
  <version>{mysql-connector-j-version}</version>
</dependency>
The first dependency shedlock-spring provides the Spring integration for Shedlock, which enables the use of Shedlock annotations and configuration in Spring components. It also provides support for creating and managing locks using various lock providers. The latest version of shedlock-spring can be obtained from here.
The second dependency shedlock-provider-jdbc-template is the lock provider implementation for JDBC, which provides the necessary functionality to create and manage locks using a MySQL database. It allows Shedlock to use a MySQL database as the backend for lock management by creating the lock table, acquiring and releasing locks, and keeping track of the lock status. The latest version of shedlock-provider-jdbc-template can be obtained from here.
The third dependency spring-boot-starter-data-jpa provides the necessary Spring components to use JPA (Java Persistence API) for data access. JPA is used to interact with the MySQL database and perform CRUD (Create, Read, Update, Delete) operations.
The fourth dependency mysql-connector-j is the JDBC driver for MySQL database. It provides the necessary functionality to connect to a MySQL database and execute SQL queries. The latest version of mysql-connector-j can be obtained from here.
Here’s an example of how to configure a MySQL lock provider:
import net.javacrumbs.shedlock.core.LockProvider;
import net.javacrumbs.shedlock.provider.jdbctemplate.JdbcTemplateLockProvider;
import org.springframework.context.annotation.Bean;
import org.springframework.context.annotation.Configuration;
import org.springframework.jdbc.core.JdbcTemplate;

import javax.sql.DataSource;

@Configuration
public class ShedlockConfig {

    @Bean
    public LockProvider lockProvider(DataSource dataSource) {
        return new JdbcTemplateLockProvider(
                JdbcTemplateLockProvider.Configuration.builder()
                        .withJdbcTemplate(new JdbcTemplate(dataSource))
                        .usingDbTime() // Works on Postgres, MySQL, MariaDb, MS SQL, Oracle, DB2, HSQL and H2
                        .build()
        );
    }
}This configuration class sets up Shedlock to use MySQL as the backend for lock management. This code defines a Spring bean for the LockProvider, which is responsible for creating and managing locks in a MySQL database using JdbcTemplate. The configuration uses a DataSource object to configure the JdbcTemplateLockProvider, which is built with a JdbcTemplate instance created using the dataSource and the usingDbTime() method to ensure consistency across multiple instances of the application. The JdbcTemplateLockProvider is then returned as a LockProvider bean for use by Shedlock in managing locks. Next, create a scheduled task that is annotated with the @SchedulerLock annotation:
import net.javacrumbs.shedlock.spring.annotation.EnableSchedulerLock;
import net.javacrumbs.shedlock.spring.annotation.SchedulerLock;
import org.springframework.boot.SpringApplication;
import org.springframework.boot.autoconfigure.SpringBootApplication;
import org.springframework.scheduling.annotation.EnableScheduling;
import org.springframework.scheduling.annotation.Scheduled;

import java.time.ZonedDateTime;
import java.util.concurrent.TimeUnit;

@SpringBootApplication
@EnableScheduling
@EnableSchedulerLock(defaultLockAtLeastFor = "PT20S", defaultLockAtMostFor = "PT25S")
public class SpringSchedulerApplication {

    public static void main(String[] args) {
        SpringApplication.run(SpringSchedulerApplication.class, args);
    }

    @Scheduled(cron = "0/30 * * * * ?")
    @SchedulerLock(name = "scheduledTask", lockAtLeastFor = "PT20S", lockAtMostFor = "PT25S")
    public void scheduledTask() {
        System.out.println("Scheduled task started. " + ZonedDateTime.now());
        try {
            Thread.sleep(15000);
        } catch (Exception e) {
            System.out.println("Something went wrong");
        }
        System.out.println("Scheduled task ended  . " + ZonedDateTime.now());
    }
}In this example, we are scheduling a task to run every 30 seconds using the @Scheduled annotation. We are also annotating the method with @SchedulerLock and providing a name for the lock. This ensures that only one instance of the application is running the task at any given time.
Output:
When we run multiple instances of our application, the scheduled task will only run on one of them.
Application instance-1 is running on port 8080 and instance-2 is running on port 8081. The scheduled job is triggered on only one of them at a given instance of time which can be seen in the above images.
Note:
For simplicity, we have defined the scheduled task inside the application main class. While developing the production grade applications, it is recommended to define the scheduled tasks in a separate class.
Source Code:
The complete source code of the above example can be found here.
FAQs
What databases does Shedlock support?
Shedlock supports a wide range of databases, including MySQL, PostgreSQL, Oracle, and MongoDB.
Can Shedlock be used in a microservices environment?
Yes, Shedlock can be used in a microservices environment to manage distributed locks across multiple instances of a service.
Can ShedLock be used with multiple databases?
Yes, ShedLock can be used with multiple databases. You simply need to configure a separate LockProvider for each database and ensure that each provider has a unique lock name.
What happens if a lock is not released due to an application crash or system failure?
If a lock is not released due to an application crash or system failure, ShedLock will automatically release the lock after a specified timeout period. This ensures that the lock is not held indefinitely and other processes can eventually obtain the lock and proceed with their work.
Does ShedLock support distributed locks?
Yes, ShedLock supports distributed locks through the use of supported lock providers such as ZooKeeper, Redis, and Hazelcast.
Things to Consider
- Ensure that the lock name is unique to prevent conflicts with other processes or applications using ShedLock.
- Consider the impact of lock timeouts on the application. If locks are held for too long, other processes may be delayed or fail to execute altogether.
- Test the application thoroughly to ensure that ShedLock is working as expected and that locks are being acquired and released properly.
- Monitor the application and database to ensure that locks are being acquired and released in a timely manner and to identify any potential issues or bottlenecks.
- Consider the performance impact of using ShedLock, especially if the application requires frequent lock acquisitions or if the database is heavily loaded. It may be necessary to optimize the database or adjust the lock timeout settings to achieve optimal performance.
Conclusion
In conclusion, Shedlock is a great library to synchronize your tasks in a distributed system. It provides distributed locking, which ensures that only one instance of your application is running a task at any given time. Shedlock supports multiple lock providers, including MongoDB, JDBC, and Redis, and you can customize the lock time for each task. With Shedlock, you can avoid race conditions and ensure that your tasks are executed efficiently and reliably in your Spring Boot application.
Add a Comment