Discover how to seamlessly integrate ChatGPT with Java Spring Boot using our step-by-step guide. We will discuss how to integrate ChatGPT with Spring Boot using the ChatGPT API. No OpenAI dependency is required.
Context
Chatbots are revolutionizing the way businesses interact with their customers. The use of AI in chatbots is making the experience more human-like, and Chat GPT is one such AI language model that can help us develop conversational interfaces. These chatbots help in automating repetitive tasks and providing 24/4 customer support. In this tutorial, we will show you how to integrate Chat GPT with Spring Boot Java without any Open AI dependency.
Prerequisites
To follow along with this tutorial, you will need the following:
- A basic understanding of Spring Boot
- An OpenAI API key.
- A basic understanding of the OpenAI Chat/Completions API endpoint. For more details, click here.
- A text editor or integrated development environment (IDE)
Step 1: Create a new Spring Boot project
Create a new Spring Boot project. You can use the Spring Initializr to generate a new project. Choose the “Spring Web” dependency to include the necessary libraries for building web applications. Import the newly created project inside your IDE.

Step 2: Add the OpenAI API Key to your Application
To access the OpenAI Chat/Completion API endpoint, you will need an API key. If you haven’t already, sign up for an OpenAI account and generate an API key. An API key can be obtained from here.
Add the following line to the application.properties file present in the src/main/resources directory.
openai.api.key=YOUR_API_KEY
Replace YOUR_API_KEY with your actual API key.
Step 3: Create a ChatGPT Service
In this step, we will create a service class that will interact with the OpenAI Chat/Completions API endpoint.
import org.springframework.beans.factory.annotation.Value;
import org.springframework.http.HttpEntity;
import org.springframework.http.HttpHeaders;
import org.springframework.http.MediaType;
import org.springframework.stereotype.Service;
import org.springframework.web.client.RestTemplate;

import java.util.List;

@Service
public class ChatGPTService {

    @Value("${openai.api.key}")
    private String apiKey;

    private static final String OPEN_AI_CHAT_ENDPOINT = "https://api.openai.com/v1/chat/completions";

    private RestTemplate restTemplate;

    public ChatGPTService(RestTemplate restTemplate) {
        this.restTemplate = restTemplate;
    }

    public ChatGPTResponse getChatCPTResponse(String prompt) {

        HttpHeaders headers = new HttpHeaders();
        headers.setContentType(MediaType.APPLICATION_JSON);
        headers.set("Authorization", "Bearer " + apiKey);

        ChatGPTRequest chatGPTRequest = new ChatGPTRequest();
        chatGPTRequest.setModel("gpt-3.5-turbo"); // Most capable GPT-3.5 model and optimized for chat.
        chatGPTRequest.setMessages(List.of(new Message("user", prompt))); // Input prompt for ChatGPT
        chatGPTRequest.setMax_tokens(20); // The maximum number of tokens to generate in the chat completion.

        RestTemplate restTemplate = new RestTemplate();
        HttpEntity<ChatGPTRequest> request = new HttpEntity<>(chatGPTRequest, headers);

        return restTemplate.postForObject(OPEN_AI_CHAT_ENDPOINT, request, ChatGPTResponse.class);
    }
}This service class uses the OpenAI Chat/Completions API endpoint to get a response to a prompt. It takes a prompt string as input and returns an object that represents the response from the API endpoint.
The “getChatGPTResponse” method constructs the request body using the model, prompt, and maxTokens parameters. It then sends a POST request to the OpenAI Chat/Completions API endpoint with the request body and the API key in the Authorization header. Finally, it retrieves the response body as a ChatGPTResponse object.
For ChatGPT request and response, we have created a few model/POJO classes for sending a request in a format that is required for Chat/Completions API Endpoint and also, for mapping response into Java objects from ChatGPT API.
public class ChatGPTRequest {

    private String model;
    private List<Message> messages;
    private Integer max_tokens;

    // Constructors, Getters and Setters
}

public class Message {
    public String role;
    public String content;

    // Constructors, Getters and Setters
}public class ChatGPTResponse {
public String id;
public String object;
public int created;
public List<Choice> choices;
public Usage usage;
// Constructors, Getters and Setters
}
public class Choice {
public int index;
public Message message;
public String finish_reason;
// Constructors, Getters and Setters
}
public class Usage {
public int prompt_tokens;
public int completion_tokens;
public int total_tokens;
// Constructors, Getters and Setters
}
public class Message {
public String role;
public String content;
// Constructors, Getters and Setters
}Step 4: Create a REST Controller
In this step, we will create a REST controller that will expose an API endpoint to get a response from the ChatGPTService.
import org.springframework.http.HttpStatus;
import org.springframework.http.ResponseEntity;
import org.springframework.web.bind.annotation.PostMapping;
import org.springframework.web.bind.annotation.RequestBody;
import org.springframework.web.bind.annotation.RestController;

@RestController
public class ChatGPTController {

    private ChatGPTService chatGPTService;

    public ChatGPTController(ChatGPTService chatGPTService) {
        this.chatGPTService = chatGPTService;
    }

    @PostMapping("/chat")
    public ResponseEntity<ChatGPTResponse> processInputRequest(@RequestBody ChatBotInputRequest chatbotInputRequest) {
        ChatGPTResponse chatCPTResponse = chatGPTService.getChatCPTResponse(chatbotInputRequest.getMessage());
        return new ResponseEntity<>(chatCPTResponse, HttpStatus.OK);
    }
}This controller class exposes a POST API endpoint at “/chat” that takes a ChatBotInputRequest as an input in which the user needs to pass a message. It calls the “getChatGPTResponse” method of the ChatGPTService and returns an object representing the response from ChatGPT.
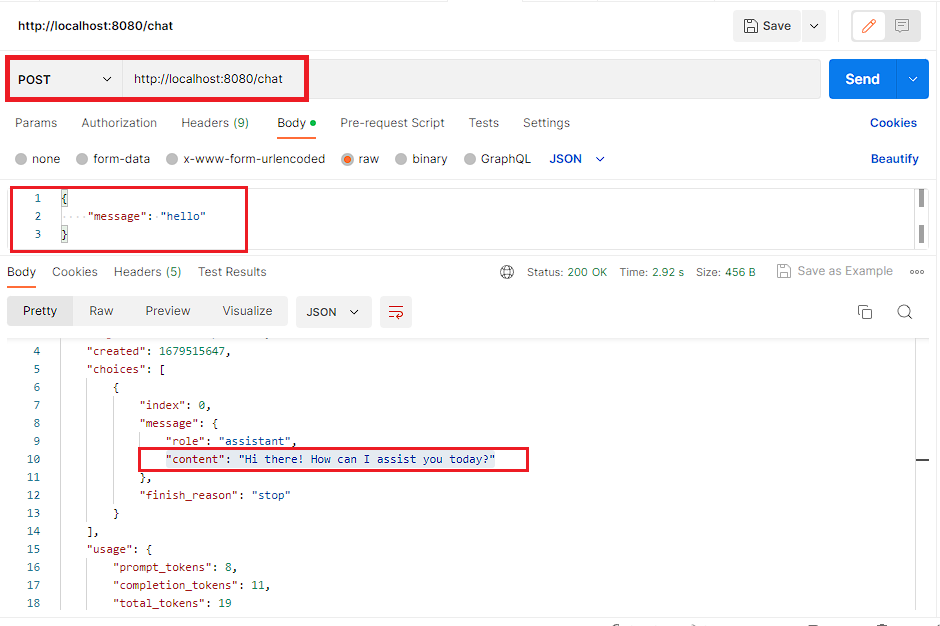
Step 5: Test the Application
You can now test the application by running it and making a POST request to the “/chat” endpoint using a tool like Postman.
Source Code
The source code for this example can be found on GitHub. Link: click here
Conclusion
In this blog post, we have explored how to integrate ChatGPT with Spring Boot using Spring Boot and OpenAI’s Chat/Completions API endpoint. We have created a ChatGPT service that interacts with the API endpoint and a REST controller that exposes an API endpoint to get a response from the service. You can use this approach to build sophisticated chatbots that can understand and respond to customer queries.
Add a Comment