
Explore the power of Spring Boot Caching to enhance your application’s speed and efficiency. Learn how to implement caching effectively and leverage its benefits for optimal performance.
Introduction
In the world of software development, performance is crucial. As your Spring Boot applications grow, you might notice that certain operations are repeatedly executed, consuming valuable time and resources. This is where caching comes to the rescue! Caching is a technique that can significantly improve your application’s speed and efficiency by storing frequently used data in memory.
What is Caching and Why Does it Matter?
Caching is a technique that involves storing frequently accessed data in a cache, such as memory or a dedicated caching layer, to reduce the need to fetch the data from its original source repeatedly. This can lead to significant performance improvements, as fetching data from memory is much faster than retrieving it from a database or an external service.
How Does Caching Work?
Caching operates by intercepting method calls and checking if the requested data already exists in the cache. If it does, the cached data is returned; if not, the data is fetched from the primary source, cached, and then returned. This process optimizes response times and minimizes redundant data retrieval operations.
Real-World Example of Caching
Imagine an e-commerce application wherein users are frequently browsing popular products. By caching the popular product’s information, the application reduces database load, resulting in improved response times and a seamless user experience.
Types of Caching
Two crucial types of caching mechanisms are:
1. In-Memory Caching
In-Memory Caching is one of the most basic and widely used caching mechanisms in Spring Boot. This type of caching involves storing data in memory, which allows for rapid data retrieval. Spring Boot can also integrate with popular in-memory caching libraries like Caffeine and Ehcache. This type of caching is particularly effective for scenarios where data is frequently accessed and doesn’t change frequently.
2. Distributed Caching
Distributed Caching is essential for applications that are deployed in a clustered or distributed environment. It ensures that the cached data is accessible across multiple instances of the application. Spring Boot seamlessly integrates with distributed caching systems like Redis and Hazelcast. This type of caching is highly beneficial for scenarios where high availability and scalability are paramount.
Key Components of Spring Boot Caching
Spring Boot Caching comprises several key components:
- Cache Managers: These are responsible for managing the cache and its underlying storage. They provide a bridge between your application and the caching infrastructure.
- Caching Annotations: Spring provides a set of annotations that allow you to easily mark methods for caching.
- Cache Abstraction: This layer provides a consistent interface to various caching providers, such as Ehcache, Caffeine, and Redis.
Spring Boot, by default, utilizes a simple and efficient cache manager based on the ConcurrentHashMap. This default cache manager is well-suited for small to medium-sized applications and is seamlessly integrated into Spring Boot’s auto-configuration.
The ConcurrentHashMap cache manager creates and manages caches using concurrent hash maps, providing thread-safe caching for improved performance. While it may not be suitable for large-scale applications or distributed environments, it offers a lightweight and straightforward caching solution for many use cases.
Leveraging Spring Boot Caching
Step-1: Setting Up Caching Dependencies
Embarking on your Spring Boot caching journey involves adding the necessary caching dependencies to your project’s configuration. For instance, including the spring-boot-starter-cache dependency sets the stage for cache integration.
<dependency>
    <groupId>org.springframework.boot</groupId>
    <artifactId>spring-boot-starter-cache</artifactId>
</dependency>
Step-2: Igniting the Caching Engine
The @EnableCaching annotation is used to enable caching in a Spring Boot application. It is typically applied to a configuration class or the main application class. By adding this annotation, Spring Boot will create and manage caches based on the cache-related annotations used in your application.
@SpringBootApplication
@EnableCaching
public class MyCachingApplication {
    // ...
}
Step-3: Annotating Methods for Caching
1. @Cacheable: Storing Data in the Cache
Think of the @Cacheable annotation like a memory box for storing data. When you use it on a method, the method’s result is put into the box. If you call the method again with the same inputs, instead of doing the work again, the method gets the result from the box, saving time.
Example 1: No Method Arguments
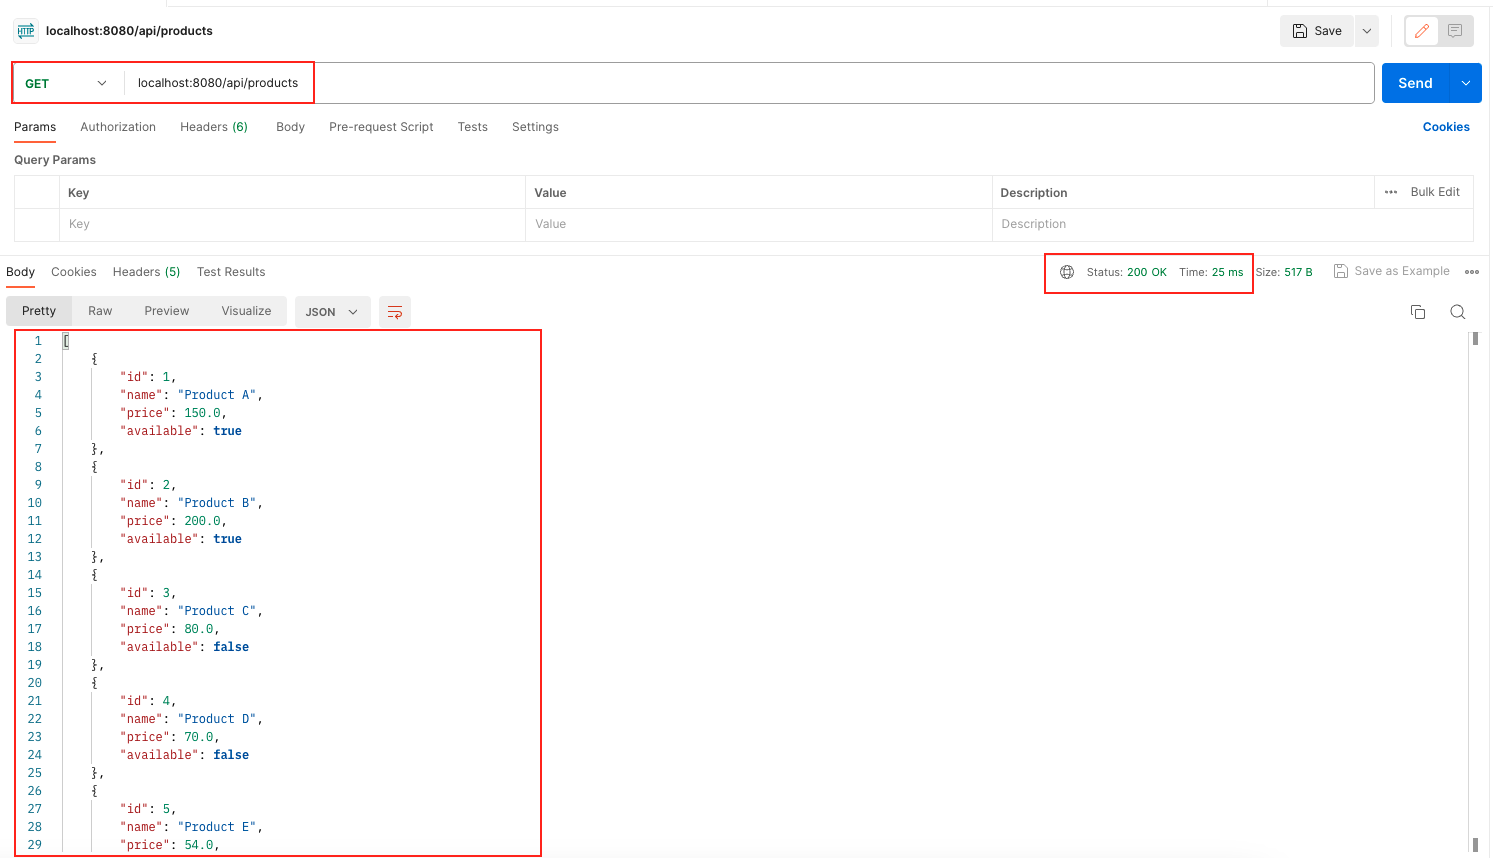
Suppose you have a method to fetch a list of all products. You want to save time by not fetching the list every time the method is called. Here’s how you can use @Cacheable:
@Cacheable("products")
public List<Product> getAllProducts() {
    // Logic to fetch and return a list of products
}
With this, the first time you call getAllProducts(), it fetches the list and puts it in the “products” box. The next time you call it, Spring checks the box, finds the list, and gives it to you directly.
Example 2: Method Arguments
Now, let’s say you want to fetch a specific product using its ID. You can use @Cacheable with method arguments:
@Cacheable(value = "products", key = "#productId")
public Product getProductById(long productId) {
    // Logic to fetch and return a product by ID
}
Here, when you call getProductById(123), Spring uses the ID (123) as the key and puts the result (product details) in the “products” box. Next time you ask for the same product, Spring checks the box using the ID, and if it’s there, you get the product details quickly.

In both cases, you don’t need to worry about setting up the box or putting things in it manually. Spring takes care of it, helping you save time and effort by reusing the results you’ve already fetched before.
2. @CachePut: Refreshing the Cache
Think of the @CachePut annotation like a quick way to refresh a memory box. When you use it on a method, the method does its work as usual, and then the result is put into the box. If you call the method again with the same inputs, the box is refreshed with the new result, keeping the memory up-to-date.
Example:
Imagine you have a method to update a product’s details. You want to make sure that when you update the details, the stored information is also updated. Here’s how you can use @CachePut:
@CachePut("products")
public Product updateProduct(Product product) {
    // Logic to update the product and return the updated object
}
With this, when you call updateProduct(someProduct), the method updates the product’s details as usual. But, in addition, the memory box labeled “products” is also updated with the new product data. So, the next time you ask for the same product, you get the most recent details without waiting or redoing the update process.


In simple terms, @CachePut helps you keep your memory box fresh and up-to-date with the latest information, so you always get the most recent results when you need them.
3. @CacheEvict: Clearing Cache Entries
Think of the @CacheEvict annotation as a way to clean up a specific memory box. When you use it on a method, it’s like throwing away a particular item from the box. This ensures that when you remove something, you won’t get outdated or incorrect data.
Example 1: Using Key
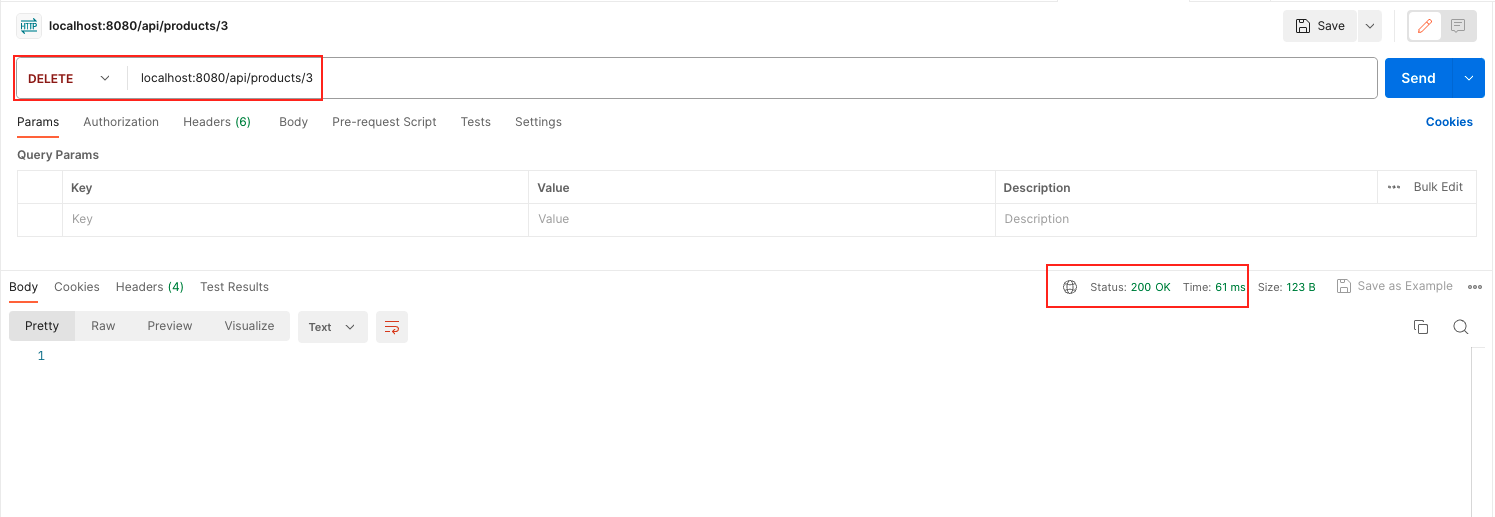
Suppose you want to delete a specific product and also remove its details from the cache. You can use @CacheEvict with a specific key:
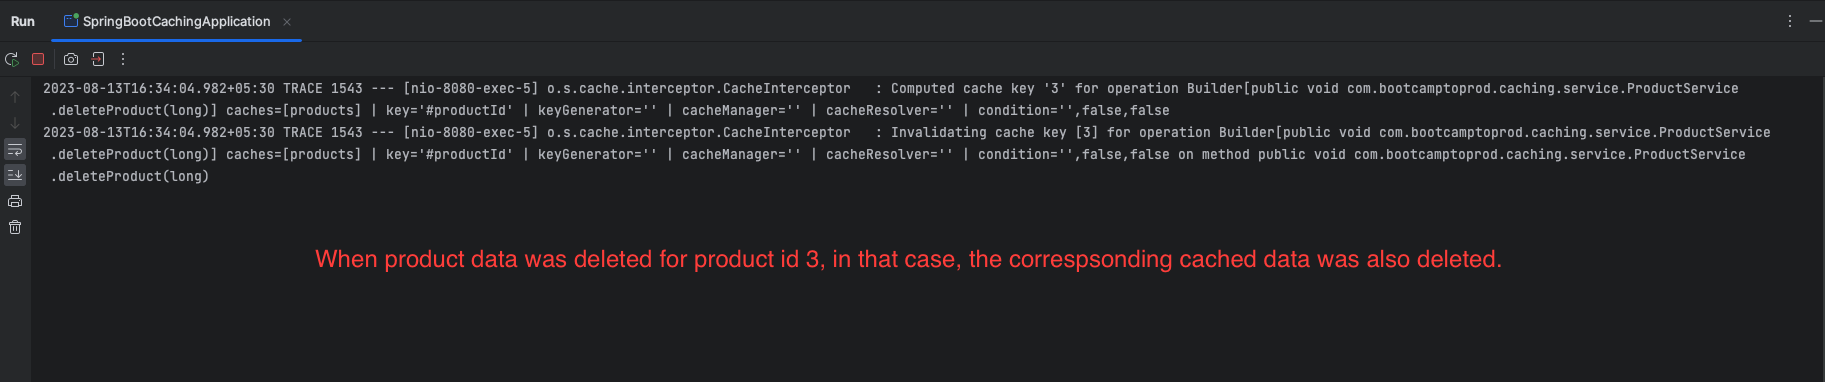
@CacheEvict(value = "products", key = "#productId")
public void deleteProduct(long productId) {
    // Logic to delete a product
}
When you call deleteProduct(someProductId), the method deletes the product as usual. But it also checks the “products” box and removes the cached data related to the deleted product using its ID as the key.
Example 2: Removing All Entries
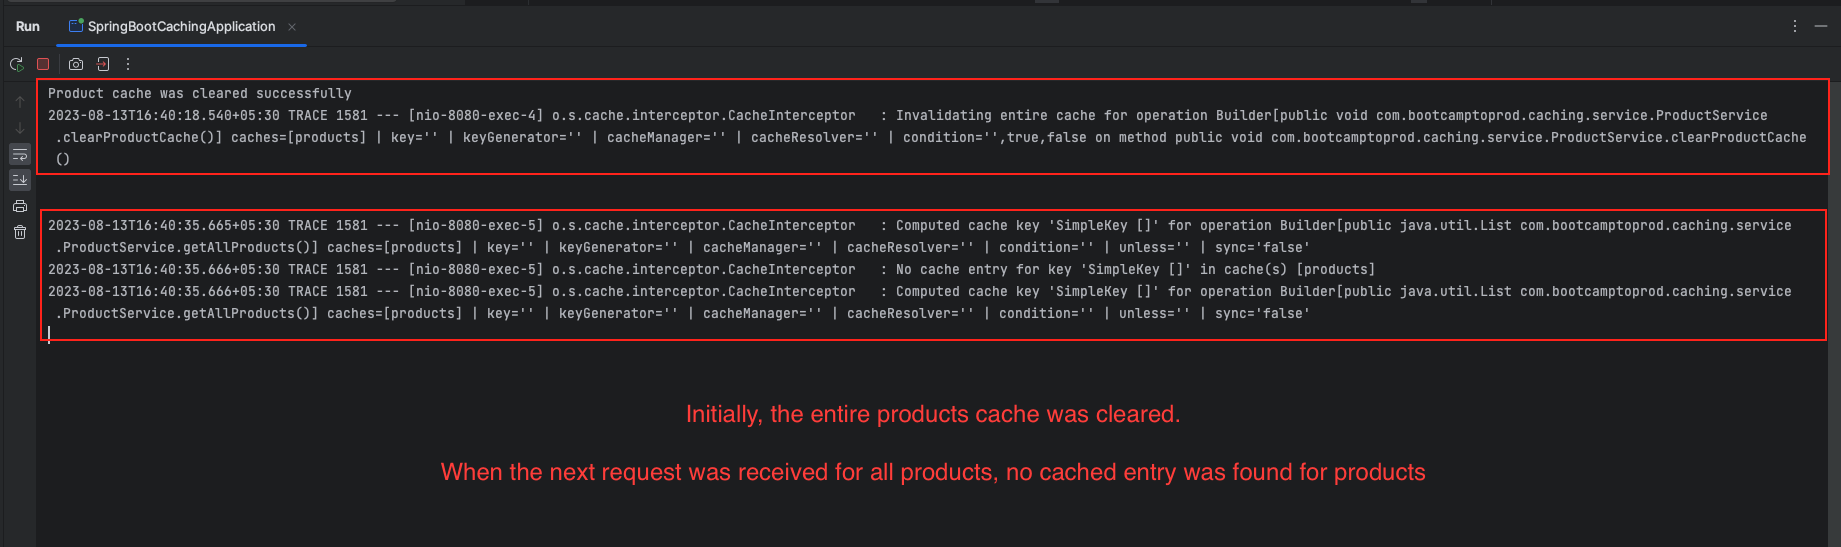
Now, let’s say you want to clear out the entire cache for a specific memory box, not just one entry. You can use @CacheEvict with allEntries=true:
@CacheEvict(value = "products", allEntries = true)
public void clearProductCache() {
    System.out.println("Product cache was cleared successfully");
}
In this case, when you call clearProductCache(), the method clears the entire “products” box. It’s like telling your assistant, “Empty out the whole box, we’re starting fresh.”
In simpler terms, @CacheEvict is like a cleaning command for your memory boxes. You can use it to remove a specific item or even wipe out an entire box if needed, helping you keep your cached data accurate and up to date.
4. @Caching: Orchestrating Multiple Cache Actions
Think of the @Caching annotation as a way to handle your memory boxes more efficiently. It helps you store important things in a box and clean up some mess in other boxes all at once.
Example:
Suppose you have a method to fetch product details. You want to save these details and also clean up another box. Here’s how you can use @Caching:
@Caching(
   cacheable = {@Cacheable(value = "products", key = "#product.id")},
   evict = {@CacheEvict(value = "recentProducts", allEntries = true)}
)
public Product getProductDetails(Product product) {
    // Logic to fetch product details
}
When you call getProductDetails(someProduct), it’s like using a special label. The method gets the product details and puts them in a box called “products.” At the same time, it cleans up a different box called “recentProducts.”

In simpler terms, @Caching is like a helper label for your memory boxes. It helps you put stuff away neatly and also do some quick cleaning in your boxes, all in one go.
5. @CacheConfig: Centralized Cache Configuration
The @CacheConfig annotation helps you to simplify the cache setup by putting some configuration instructions in one spot at the class level. This way, you can avoid repeating the same instructions multiple times.
Example:
Suppose you’re often dealing with product details, and you want to use the same memory box strategy each time. Instead of explaining the strategy repeatedly, you can set up the rule once with @CacheConfig:
@CacheConfig(cacheNames = "products")
public class ProductService {

    @Cacheable
    public Product getProductDetails(long productId) {
        // Logic to fetch and return product details
    }

    @CacheEvict
    public void deleteProduct(long productId) {
        // Logic to delete a product
    }
}
With @CacheConfig(cacheNames = "products"), you’re telling Spring to use the “products” memory box for caching in all methods of the ProductService class. So, when you use @Cacheable or @CacheEvict without specifying the cache name, Spring knows to use the “products” box for those operations.
In simple terms, @CacheConfig is like creating a memory box rule once, which you can apply to many tasks involving products. It saves you from repeating the same instructions and makes your memory management more organized.
Fine-Tuning Cache for Optimal Performance
1. Cache Expiration
To keep the cached product list up-to-date, you can set a time-to-live (TTL) interval that clears the cache after a certain time. This ensures that the cache stays fresh, reflecting any changes in the database. Here’s how to achieve this using the @CacheEvict and @Scheduled annotation:
For a TTL of 12 hours, you can set the value as 12 x 3600 x 1000 = 43200000 milliseconds.
@CacheEvict(value = "products", allEntries = true)
@Scheduled(fixedRateString = "43200000")
public void clearProductsCache() {
    System.out.println("Refreshing Product cache");
}
2. Conditional Caching
Conditional caching is like using a special rule to decide when to save something in your memory box. You can say, “Save it only if something specific is true,” or “Don’t save it if something is the case.” It helps you keep your memory organized and accurate.
a. Conditional caching with condition
It is like instructing your assistant, “Only store this in the memory box if something special is true.” It lets you control what gets saved, making your memory box more organized.
Example: Using condition
Suppose you have a requirement to cache product details based on their productId, but you want to cache details only for products with valid and positive productId values. You can achieve this using the condition attribute within the @Cacheable annotation:
@Cacheable(value = "products", key = "#productId", condition = "#productId > 0")
public Product getProductById(long productId) {
    // Logic to fetch product details by ID
}
Here, the getProductById method’s result will be cached only if the provided productId is greater than zero. The condition attribute ensures that only valid and positive productId values trigger the caching mechanism.
Remember that the condition attribute evaluates a condition based on the method’s input arguments. In this case, the condition checks whether the productId argument is greater than zero. If the condition is met, the method’s result is cached; otherwise, it is not cached. This approach allows you to selectively cache data that fulfills specific criteria, enhancing the efficiency and relevance of the cache.
b. Conditional caching with unless
It is like telling your helper, “Don’t put this in the memory box if something specific is true.” It helps you keep unwanted items out of your memory box.
Example: Using unless
Imagine you want to cache product details, but you don’t want to save details for products with a low price. You can use unless to create this rule:
@Cacheable(value = "products", key = "#productId", unless = "#result.price < 100")
public Product getProductWithPriceCheck(long productId) {
    // Logic to fetch product details by ID
}
With this setup, if the product’s price is less than $100, the details won’t be saved in the cache. It’s like telling your assistant, “Don’t bother storing this if the price is too low.”
Remember that the unless attribute evaluates a condition based on the method’s return value (#result) and any relevant properties of that return value. If the condition evaluates to true, the method’s result is not cached; otherwise, it is cached.
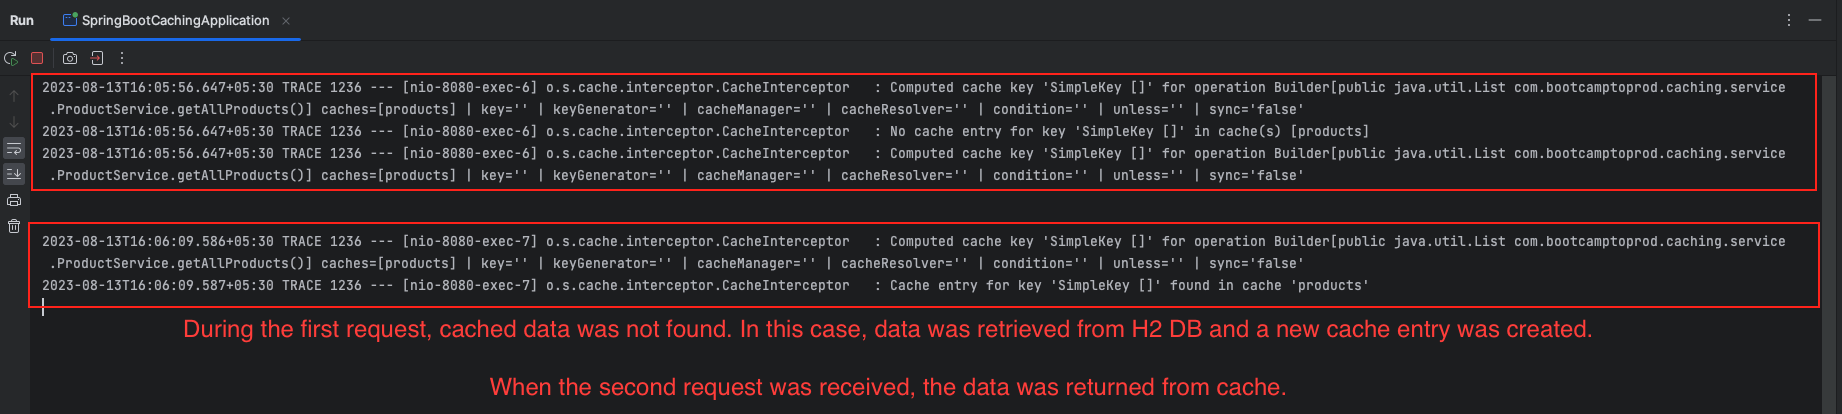
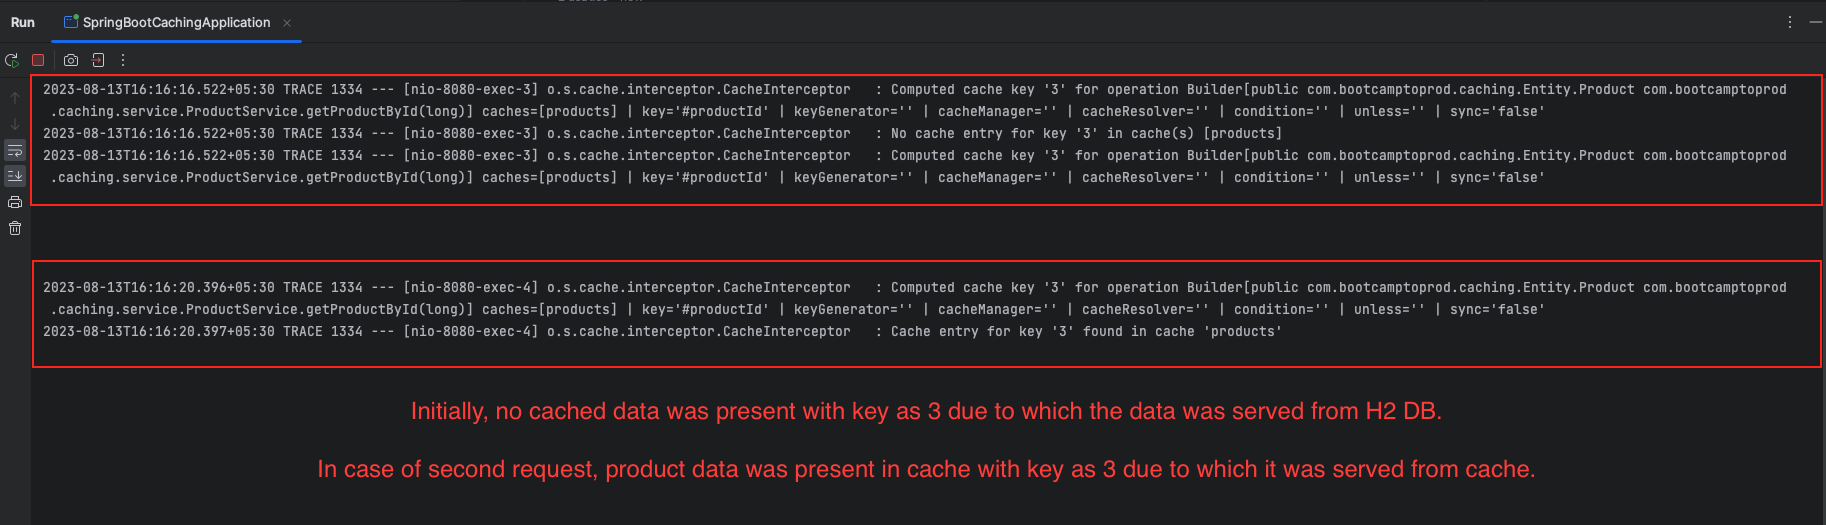
Enabling Tracing for Spring Boot Cache
To enable tracing for the Spring Boot cache, simply add the line logging.level.org.springframework.cache=TRACE to your application.properties file. This configuration will generate detailed trace logs for cache operations, helping you debug and monitor cache behavior effectively.
Efficient Monitoring and Metrics with Spring Boot Actuator
Spring Boot Actuator provides several useful endpoints related to caching that offer control over your application’s caching behavior. These endpoints can be very helpful in managing the caching aspect of your Spring Boot application. Let’s explore these caching-related endpoints in detail:
1. GET /actuator/caches:
This endpoint provides information about the available cache managers and their associated caches in your application. It lists all the defined cache names, their details, and the cache manager(s) they are associated with.
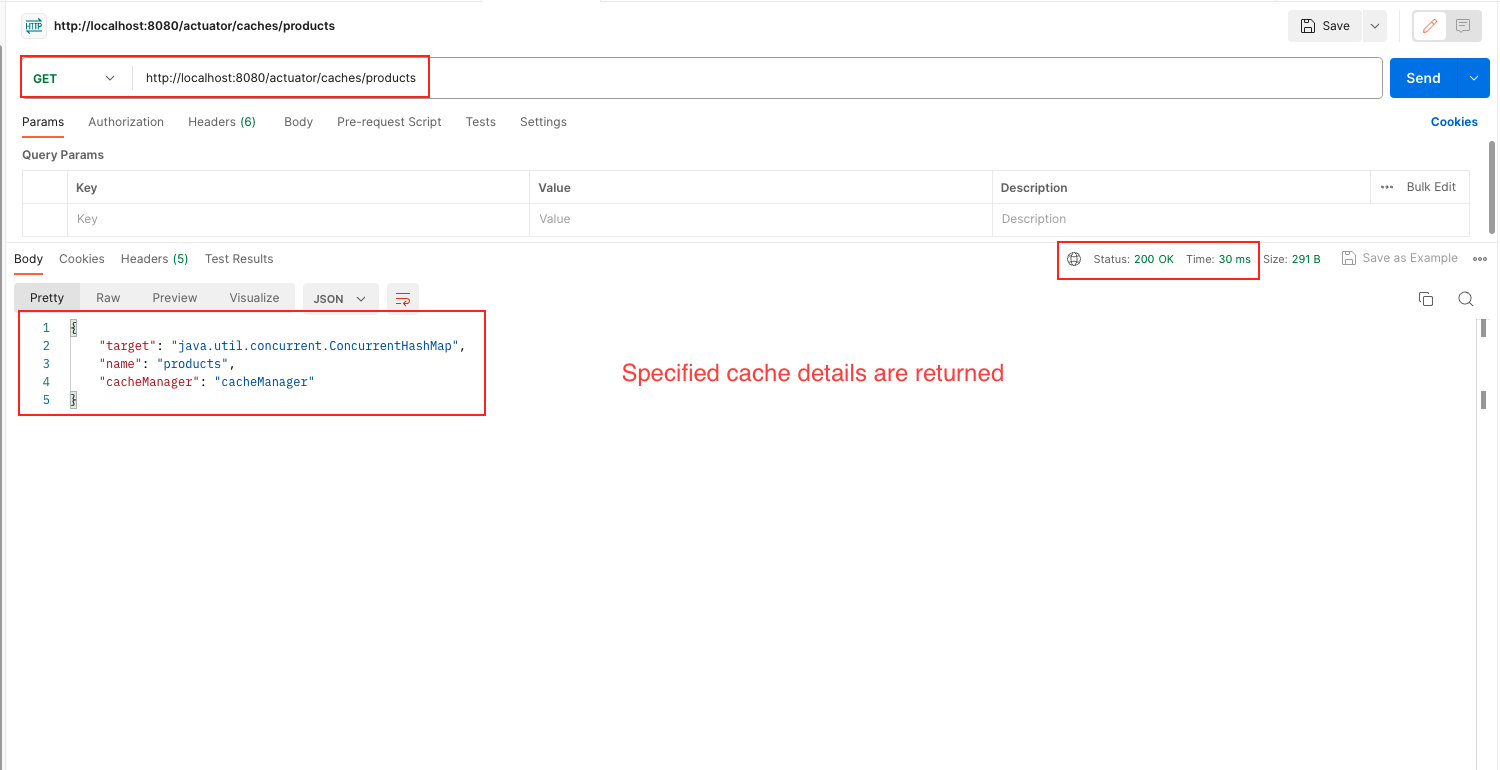
2. GET /actuator/caches/{cacheName}:
Accessing this endpoint provides information about a specific cache.
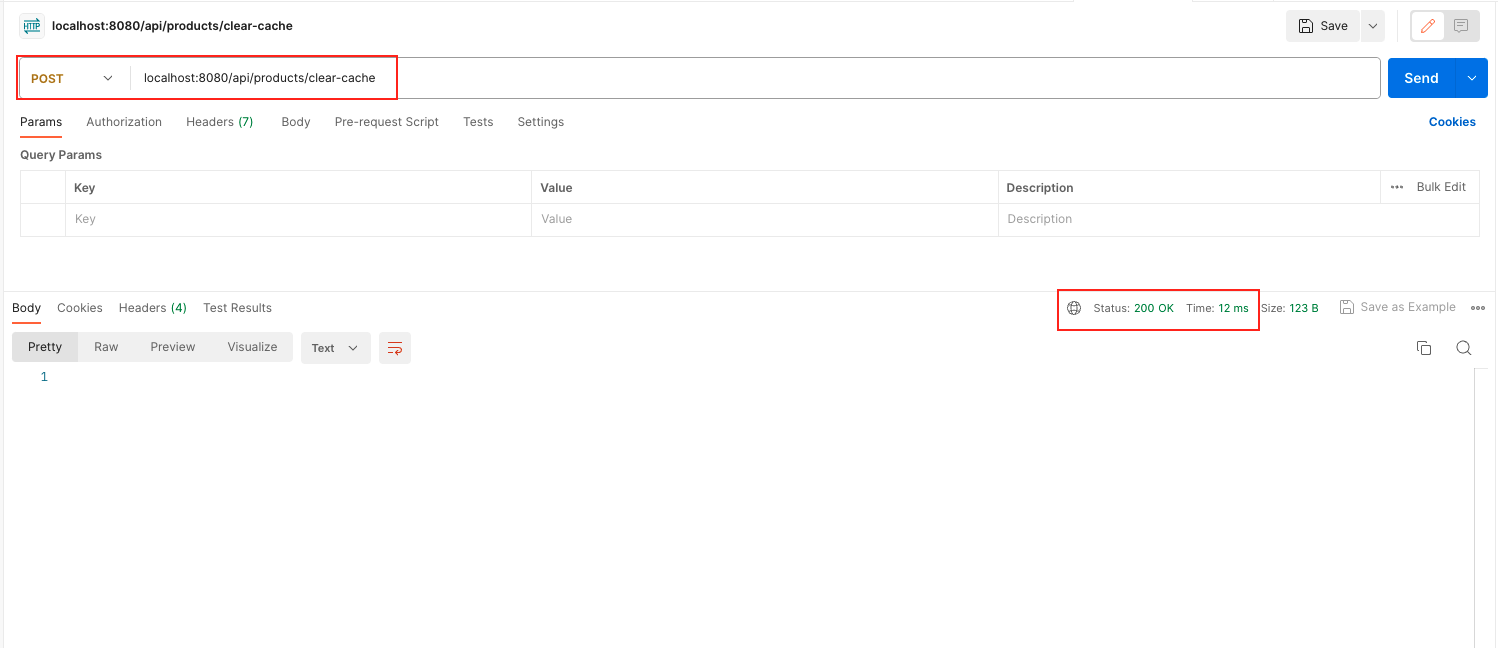
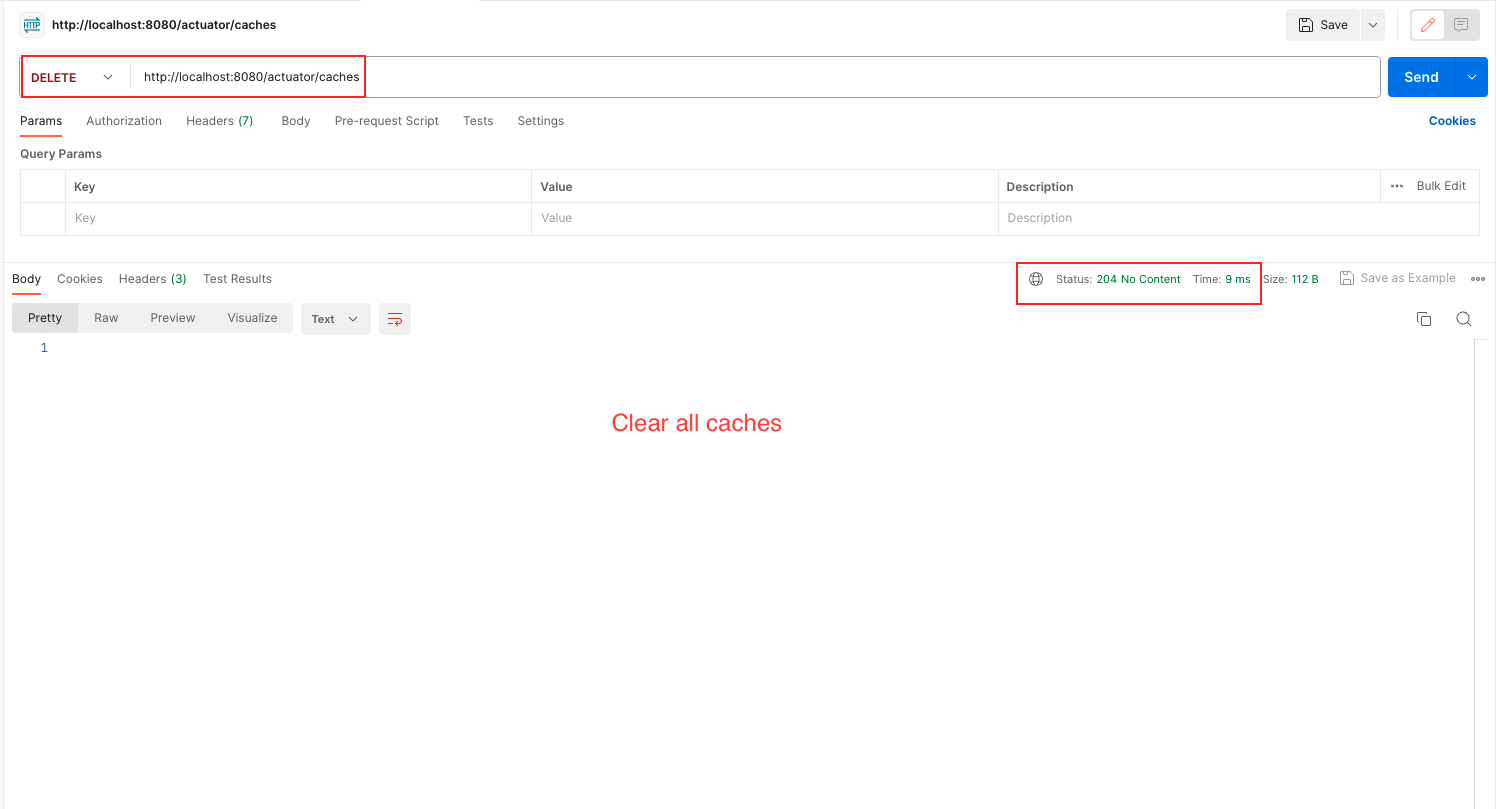
3. DELETE /actuator/caches:
This endpoint allows you to clear the contents of all caches. Sending a DELETE request to this endpoint will result in all the caches being emptied, removing all cached entries of each and every cache.
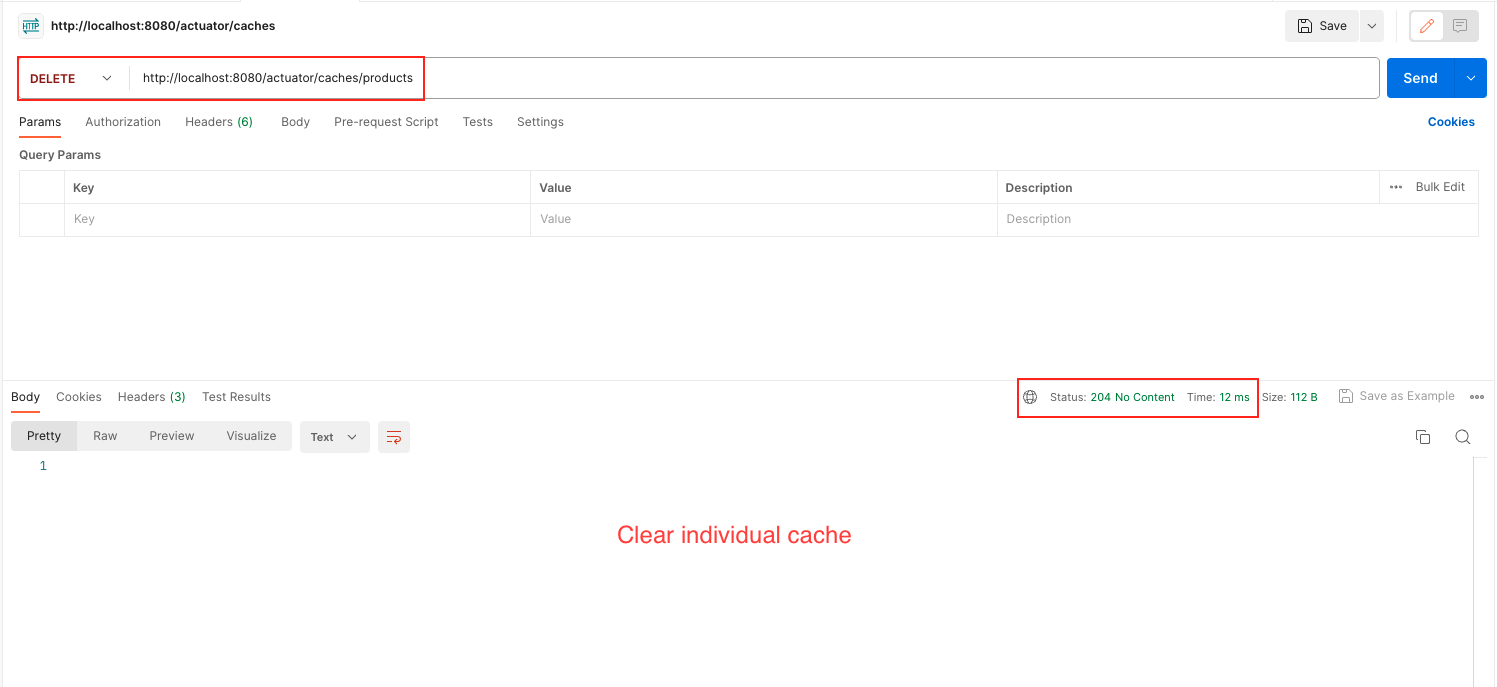
4. DELETE /actuator/caches/{cacheName}:
This endpoint allows you to clear the contents of a specific cache. Sending a DELETE request to this endpoint will result in the cache being emptied, removing all cached entries.

Note
If you’re seeking comprehensive cache control and insights, explore our dedicated blog on cache management and statistics by clicking here.
Source Code
The complete source code of the above examples can be found here.
Caching Best Practices and Pitfalls
While caching offers numerous advantages, adhering to best practices is crucial to reap its benefits and avoid potential pitfalls.
Best Practices:
- Identify and cache data that is frequently accessed and unlikely to change frequently.
- Use appropriate cache eviction strategies based on your application’s data access patterns.
- Regularly monitor cache metrics to identify bottlenecks and adjust caching strategies accordingly.
- Caching consumes memory, so be mindful of the cache size and its impact on your system.
Pitfalls to Avoid:
- Over-caching: Caching excessive data can lead to increased memory usage and decreased cache efficiency.
- Ignoring cache consistency: Ensure cache data remains consistent with the underlying data source.
- Neglecting cache expiration: Configure appropriate expiration times to prevent serving stale data.
FAQs
What is caching in Spring Boot?
Caching in Spring Boot is a technique that involves storing frequently accessed data in memory or other storage locations to improve the performance and responsiveness of applications.
How does Spring Boot caching work?
Spring Boot caching uses annotations to mark methods for caching. When a method is called, Spring checks if the data is already cached. If cached, the cached data is returned; otherwise, the method is executed, and its result is stored in the cache for subsequent calls.
What if cached data needs real-time updates?
Use @CachePut – it refreshes cached data alongside method execution.
What is the difference between @Cacheable and @CachePut annotations in Spring Boot?
Both @Cacheable and @CachePut are caching annotations in Spring Boot, but they serve different purposes. The @Cacheable annotation is used to cache the result of a method’s execution, based on its input arguments. Subsequent calls with the same arguments will retrieve the cached result instead of executing the method again. On the other hand, the @CachePut annotation is used to update the cached value of a method without affecting its execution. It is often used to refresh the cache with new data while ensuring the method is still executed. In summary, @Cacheable is for reading and retrieving cached data, while @CachePut is for updating cached data.
What is the difference between cache abstraction and native caching solutions?
Spring Boot provides a cache abstraction that supports various caching providers (e.g., EhCache, Caffeine, Redis) without tightly coupling your code to a specific implementation. Native caching solutions, on the other hand, involve using a specific caching library directly.
Can I use caching with distributed systems or microservices?
Yes, caching can be used effectively in distributed systems or microservices architectures. You can configure distributed caching solutions like Redis to store cached data across multiple instances or services.
What is cache key generation, and how is it determined?
Cache key generation involves determining how cached data is identified and retrieved. By default, Spring Boot uses method parameters as cache keys. You can also customize cache keys using SpEL expressions in caching annotations.
Does Spring Boot support distributed caching?
Yes, Spring Boot supports distributed caching by integrating with distributed caching providers like Redis or Hazelcast. You can configure your application to use a distributed cache manager for improved scalability.
What happens if a cached method throws an exception?
If a cached method throws an exception, Spring Boot will not cache the result. Subsequent calls with the same arguments will still execute the method and attempt to cache the successful result.
Conclusion
Spring Boot caching emerges as a game-changer in the pursuit of enhanced application performance. By intelligently storing frequently accessed data, developers can create applications that respond swiftly, provide a seamless user experience, and leverage available resources optimally.
Add a Comment