
Dive into the Spring Bean life cycle. Explore each stage’s significance, understand the management responsibilities, and learn how to leverage this knowledge for optimized development.
Introduction
The Spring Bean life cycle is the heartbeat of any Spring application, dictating how beans are created, initialized, and eventually destroyed. For developers venturing into the world of Spring Boot, comprehending this life cycle is crucial for building efficient and robust applications. In this guide, we’ll delve deep into each stage of the Spring Bean life cycle, understanding not only how to implement them with code examples but also why they matter in real-world scenarios.
What is a Spring Bean?
Before we delve into the life cycle intricacies, let’s establish a fundamental understanding of what a Spring bean is. In essence, a Spring bean is a Java object managed by the Spring IoC container. These objects can be anything, from simple data holders to complex business logic components. The magic lies in Spring’s ability to manage the creation, configuration, and lifecycle of these beans.
Why Understand the Spring Bean Life Cycle?
Understanding the life cycle of Spring beans is like having a backstage pass to the inner workings of your Spring application. A solid grasp of the bean life cycle empowers you to effectively manage resources, configure beans, and ensure proper initialization and cleanup. With this knowledge, you can optimize your application’s performance, prevent memory leaks, and implement custom logic at various stages of a bean’s existence.
Benefits of Exploring the Spring Bean Life Cycle
- Resource Management: As you traverse the life cycle stages, you’re in control of resources. This translates to efficient memory utilization and prevents resource leaks, ensuring your application runs like a well-oiled machine.
- Customization: By harnessing the life cycle stages, you can inject custom logic at strategic points. This customization allows your beans to adapt to specific requirements, setting the stage for a flexible and responsive application.
- Dependency Injection: Understanding the stages of bean initialization also unravels the magic of dependency injection. You’ll learn how beans communicate, collaborate, and share information, building a cohesive application architecture.
- Debugging: With a firm grasp of the life cycle, troubleshooting becomes a breeze. By tracing a bean’s journey through each stage, you can pinpoint issues and enhance the overall stability of your application.
Who Manages the Spring Bean Life Cycle?
In Spring applications, the IoC container is responsible for managing the life cycle of beans. The IoC container is the architectural backbone that handles the instantiation, configuration, and disposal of beans. By understanding this container’s orchestration, you gain insight into how your beans come to life, evolve, and gracefully bow out.
When Does the Spring Bean Life Cycle Begin?
The Spring Bean life cycle commences when the IoC container is initialized. As your application starts, the container springs to life, creating the foundation for the journey your beans are about to embark upon. This initialization is the genesis of the entire life cycle and sets the stage for beans to shine.
The Spring Bean life cycle begins when the IoC container starts up with your application. It’s like the first moment the curtain goes up in a play, setting the stage for everything that follows. This initial step marks the start of the bean’s journey in the Spring framework.
Visualizing the Spring Bean Life Cycle
Before we dive into the stages, let’s visualize the Spring Bean life cycle with a simplified flowchart:
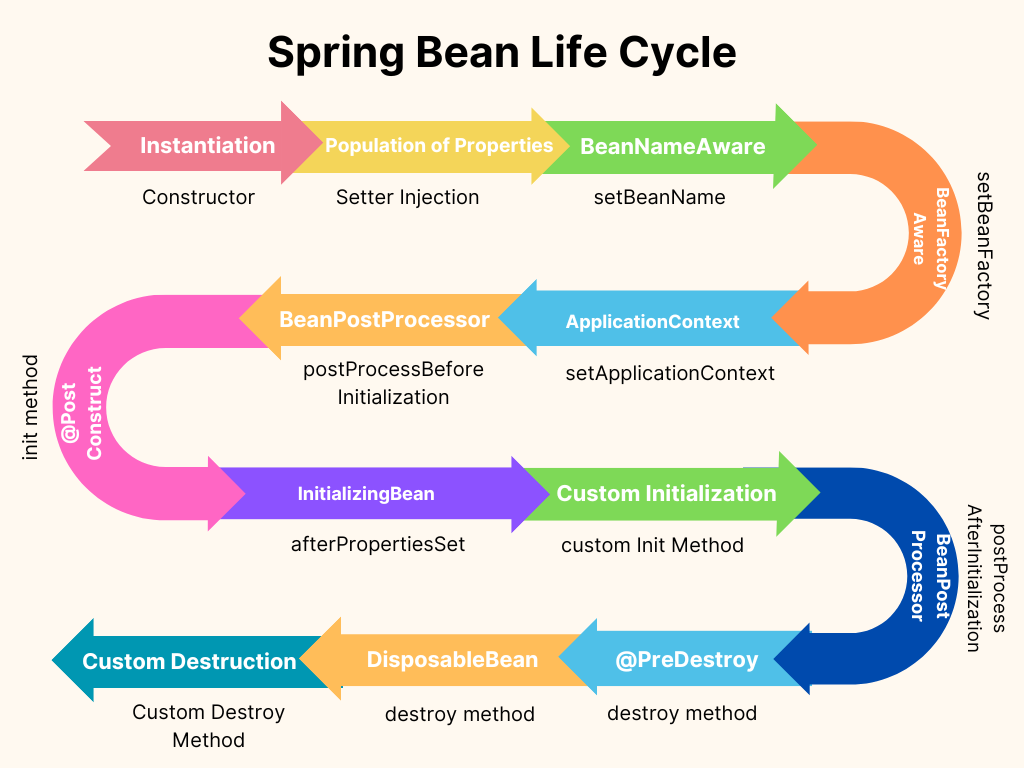
This chart serves as a roadmap, guiding beans through various stages and helping you grasp the sequence that underpins the life cycle.
Spring Bean Life Cycle Stages
Now, let’s embark on our journey through each of the Spring Bean life cycle stages.
1. Instantiation: Setting the Foundation
The journey of a Spring bean begins with its instantiation. During this stage, the container creates a new instance of the bean by invoking its constructor. The primary purpose of this stage is to prepare the bean for further initialization.
Purpose:
- Initialize essential properties and resources.
- Set up the initial state of the bean.
When to Use:
- Set initial values or configurations.
Example:
Instantiation is like giving birth to a new character in a game. Imagine you’re creating a hero for your gaming world. You start with the essence of the character, its core identity. Similarly, the instantiation stage initializes the bean and sets the foundation for its journey.
public class Character {
    public Character() {
        System.out.println("Instantiation: A new character has been created.");
    }
    // Other methods
}
2. Population of Properties: Filling the Gaps
At this stage, the Spring container injects properties and dependencies into the bean. This population of properties equips the bean with the necessary resources for operation.
Purpose:
- Inject properties and dependencies into the bean.
- Configure the bean with the required resources.
When to Use:
- To populate bean properties from the context.
Example:
Heroes arm themselves with weapons and tools. Likewise, beans equip themselves with dependencies during this stage. The container injects these properties, ensuring beans are fully prepared for their roles.
public class Character {
    private Weapon weapon;
    private Item item;

    public void setWeapon(Weapon weapon) {
        this.weapon = weapon;
        System.out.println("Population of Properties: Equipping " + weapon.getName() + " to " + getName());
    }

    public void setItem(Item item) {
       this.item = item;
        System.out.println("Population of Properties: Adding " + item.getName() + " to " + getName() + "'s inventory");
    }
    // Other methods
}
3. BeanNameAware: Giving Identity
After instantiation, the bean becomes aware of its assigned name within the Spring container. This enables the bean to identify itself using the assigned name.
Purpose:
- Allow beans to know their assigned name.
- Access the name assigned to the bean.
When to Use:
- When the bean needs to reference itself within the context.
Example:
With the character created, let’s give it a name. In Spring terms, the bean becomes aware of its assigned name within the container. This gives the bean a sense of identity within the Spring ecosystem, much like our character recognizing its own name in the gaming universe.
public class Character implements BeanNameAware {
    @Override
    public void setBeanName(String name) {
        System.out.println("BeanNameAware: Setting bean name: " + name);
    }
    // Other methods
}
4. BeanFactoryAware and ApplicationContextAware: Embracing Context
The next stage involves the bean gaining awareness of the bean factory or application context it’s part of. This awareness fosters interaction with other beans and resources within the context.
Purpose:
- Access the broader application context.
- Interact with other beans and resources.
When to Use:
- To access global context and resources.
Example:
Our character doesn’t live in isolation; it’s part of a bigger world. Similarly, beans are often part of a larger application context. During this stage, the bean becomes aware of the context it belongs to – a world where other beans and resources reside.
public class Character implements BeanFactoryAware, ApplicationContextAware {

    @Override
    public void setBeanFactory(BeanFactory beanFactory) {
        System.out.println("BeanFactoryAware: Setting bean factory");
    }

    @Override
    public void setApplicationContext(ApplicationContext applicationContext) {
        System.out.println("ApplicationContextAware: Setting application context.");
    }
    // Other methods
}
5. BeanPostProcessor: Adding Magic
During this phase, custom logic can be executed before and after the bean’s initialization. It allows for additional actions and transformations during bean creation.
Purpose:
- Execute custom logic before and after initialization.
- Customize the bean’s behavior during creation.
When to Use:
- For adding custom behavior during bean creation.
Example:
Our gaming character might need some magical enhancements, right? Similarly, during the BeanPostProcessor stage, you can sprinkle some magic on your beans. This is the time to perform custom logic just before and after a bean’s initialization – an enchantment that transforms your bean into something extraordinary.
public class MagicBeanPostProcessor implements BeanPostProcessor {

    @Override
    public Object postProcessBeforeInitialization(Object bean, String beanName) {
        if (bean instanceof Character) {
            System.out.println("BeanPostProcessor: Adding a touch of magic to " + ((Character) bean).getName());
        }
        return bean;
    }

    @Override
    public Object postProcessAfterInitialization(Object bean, String beanName) {
        if (bean instanceof Character) {
            System.out.println("BeanPostProcessor: Magic continues for " + ((Character) bean).getName());
        }
        return bean;
    }
}
6. @PostConstruct: Customizing Bean Initialization
The @PostConstruct annotation plays a significant role in customizing the initialization of a bean. It’s like adding a touch of magic to your beans as they come to life.
Purpose:
- Execute custom logic after a bean has been initialized.
When to Use:
- Customization: Utilize
@PostConstructwhen you want to add your own custom behavior to a bean after its creation. - Final Setup: It’s useful when you need to perform specific actions on the bean right after it’s initialized, such as configuring properties or performing last-minute preparations.
Example:
Our gaming character might need to perform some readiness checks before it can enter the virtual world.
import jakarta.annotation.PostConstruct;

public class Character {

    @PostConstruct
    public void init() {
         System.out.println("@PostConstruct: " + getName() + " is preparing for action.");
    }
}
7. InitializingBean: Preparing for Action
As the bean gets closer to being fully operational, it enters the initialization stage. This stage provides an opportunity for executing custom setup logic after properties are set and before the bean is ready for use.
Purpose:
- Perform custom setup and initialization logic.
- Execute actions after properties are set.
When to Use:
- When additional setup beyond the constructor is needed.
Example:
After character creation and magical enchantments, it’s time for the character to gear up and prepare for its adventures. Similarly, during the initialization stage, your beans are getting ready for their mission. This is where you can execute custom setup logic after properties are set, ensuring your beans are fully prepared for action.
public class Character implements InitializingBean {
    @Override
    public void afterPropertiesSet() {
        System.out.println("Initialization: " + getName() + " is undergoing intensive training.");
    }
    // Other methods
}
8. Custom Initialization: Tailored Setup
In some scenarios, the need arises for specialized initialization steps that go beyond standard setup. This is where custom initialization methods come into play.
Purpose:
- Perform unique setup tasks for the bean.
- Execute specialized initialization logic.
When to Use:
- When specific initialization is required.
Example:
Heroes have unique abilities that require special training. Similarly, beans can undergo personalized preparation during this stage. Custom initialization methods allow beans to gear up for their roles in unique ways.
public class Character {
    public void customInit() {
        System.out.println("Custom Initialization: Executing custom init for " + getName());
        performSpecialTraining();
    }

    private void performSpecialTraining() {
        System.out.println("Custom Initialization: " + getName() + " is performing a special training routine.");
    }
    // Other methods
}
9. @PreDestroy: Preparing for Cleanup
In the Spring framework, the @PreDestroy annotation marks a method within a bean as a pre-destruction callback. This means that the annotated method is executed just before the bean is removed or destroyed by the Spring container. It offers an opportunity to perform cleanup operations and release resources gracefully before the bean’s final disposal.
Purpose:
- Implement custom cleanup operations before the destruction of the bean.
- Ensure proper resource release and perform any necessary cleanup tasks.
When to Use:
- When you need to execute specific cleanup logic just before a bean is destroyed.
- To ensure that resources, such as open files or database connections, are properly released.
Example:
In our gaming world, every character has a special ritual they perform just before they bid farewell and prepare to rest. This is similar to what happens in the Spring framework when the @PreDestroy annotation is used.
import jakarta.annotation.PreDestroy;

public class Character {

    @PreDestroy
    public void preDestroyCleanup() {
        System.out.println("@PreDestroy: " + getName() + " is saying goodbye and preparing to rest.");
    }
}
10. DisposableBean: Bidding Farewell
As beans live their lifecycle, they eventually face the end. The DisposableBean interface provides a method for executing cleanup operations before the bean is destroyed.
Purpose:
- Implement cleanup operations before destruction.
- Ensure proper resource release and cleanup.
When to Use:
- To perform cleanup actions before destruction.
Example:
Every adventure has its conclusion, and so does the life cycle of a bean. During the DisposableBean stage, beans wrap up their journey. This is the moment for final actions and cleanup before the bean’s exit.
public class Character implements DisposableBean {

    @Override
    public void destroy() {
        System.out.println("DisposableBean: " + getName() + " is saying goodbye and resting.");
        restAndRecover();
    }

    private void restAndRecover() {
        System.out.println("DisposableBean: " + getName() + " is resting and recovering energy.");
    }

}
11. Custom Destruction: Parting Moments
In addition to standard destruction methods, you can implement custom destruction logic. This allows you to perform any final actions before the bean’s departure.
Purpose:
- Execute custom logic before destruction.
- Perform specialized cleanup actions.
When to Use:
- When unique cleanup is necessary.
Example:
The customDestroy method is a custom-defined routine that a character, represented by this method, follows just before saying goodbye and performing a final action.
public class Character {

    public void customDestroy() {
       System.out.println("Custom Destruction: " + getName() + " is bidding farewell and performing a final action.");
        sayGoodbye();
        performFinalAction();
    }

    private void sayGoodbye() {
        System.out.println("Custom Destruction: " + getName() + " says goodbye.");
    }

    private void performFinalAction() {
        System.out.println("Custom Destruction: " + getName() + " performs a final action.");
    }
}
Source Code
The complete source code of the above examples can be found here.
Output:

Best Practices
Here are some best practices related to managing the Spring Bean life cycle:
- Use Constructor Initialization: Whenever possible, initialize bean properties through constructors. Constructor injection promotes immutability and ensures that a bean is in a valid state from the moment it’s created.
- Avoid Excessive Customization: While custom initialization and destruction methods (e.g.,
@PostConstructand@PreDestroy) are valuable, use them judiciously. Overly complex custom logic can make your application harder to maintain. - Leverage Annotations: Take advantage of annotations like
@PostConstructand@PreDestroyfor defining initialization and destruction methods. They provide a clear and concise way to manage the life cycle. - Use InitializingBean and DisposableBean Sparingly: Interfaces like
InitializingBeanandDisposableBeanshould be used only when your beans require specific initialization or cleanup logic. In most cases, annotations or custom methods are preferred for clarity. - Favor @Bean Initialization: When creating beans, favor Java-based configuration with
@Beanmethods within@Configurationclasses. This approach allows for centralized configuration and clear bean management. - Keep Initialization Lightweight: Initialization logic should be lightweight and focused on setting up the bean’s state. Heavy operations, like database connections, should be performed lazily to avoid unnecessary resource consumption.
- Be Mindful of Dependencies: Understand the order in which beans are initialized when they have dependencies on each other. Use
@DependsOnor constructor injection to ensure that dependencies are available when needed. - Use Bean Scopes Wisely: Choose the appropriate bean scope (
singleton,prototype, etc.) based on the use case. Singleton beans have a longer life cycle, while prototype beans are created each time they are requested. - Consider Bean Post-Processors: BeanPostProcessors can be powerful tools for customizing bean behavior. However, use them cautiously, as they can complicate the bean life cycle.
- Test Life Cycle Behavior: Write unit tests to validate that beans are being initialized and destroyed as expected. This ensures that your configuration and life cycle management are correct.
- Document Custom Life Cycle Logic: If you use custom initialization or destruction methods, document their purpose and when they should be called. This helps maintainers understand the intended behavior.
- Monitor Resource Usage: Keep an eye on resource usage during initialization and destruction, especially in applications with many beans. Excessive resource consumption can impact application performance.
FAQs
What is the Spring Bean life cycle?
The Spring Bean life cycle refers to the series of steps a Spring bean goes through from its creation to its disposal. It includes instantiation, initialization, and eventual destruction.
How does Spring manage the Bean life cycle?
Spring manages the Bean life cycle through the Inversion of Control (IoC) container. The container creates, configures, and manages beans according to their scope and configuration.
Can I use constructor injection and setter injection in the same bean?
Yes, you can combine constructor injection and setter injection in the same bean, allowing you to set mandatory properties through the constructor and optional properties using setter methods.
What happens if a bean fails to initialize during the application startup process?
If a bean fails to initialize (e.g., due to an exception), Spring typically halts the application startup and provides error messages or exceptions that indicate the problem.
Can I use AOP (Aspect-Oriented Programming) with Spring Bean life cycle methods?
Yes, you can use AOP to apply aspects (cross-cutting concerns) before, after, or around Spring Bean life cycle methods, enabling you to add custom behavior such as logging or security checks.
Are there any performance considerations when using Spring Bean life cycle methods extensively?
Extensive use of life cycle methods can affect application startup time, so it’s important to keep them efficient. Also, avoid performing costly operations during initialization.
Conclusion
In conclusion, the Spring Bean life cycle is the heartbeat of Spring applications. It’s the behind-the-scenes magic that makes Spring such a powerful and flexible framework. Understanding this life cycle not only empowers developers to control the creation, configuration, and disposal of beans but also enables them to optimize resource usage, add custom behavior, and ensure the seamless operation of their applications. As you navigate the vast landscape of software development, remember that the Spring Bean life cycle is your compass, guiding you towards excellence in crafting robust and reliable applications. Happy coding!
Learn More
Interested in learning more?
Check out our blog on Spring Boot cache management and statistics.
Add a Comment