Learn how to implement real-time Spring AI Text-to-Speech streaming with ElevenLabs. Build responsive audio applications with instant playback using streaming responses in Spring Boot.
1. Introduction
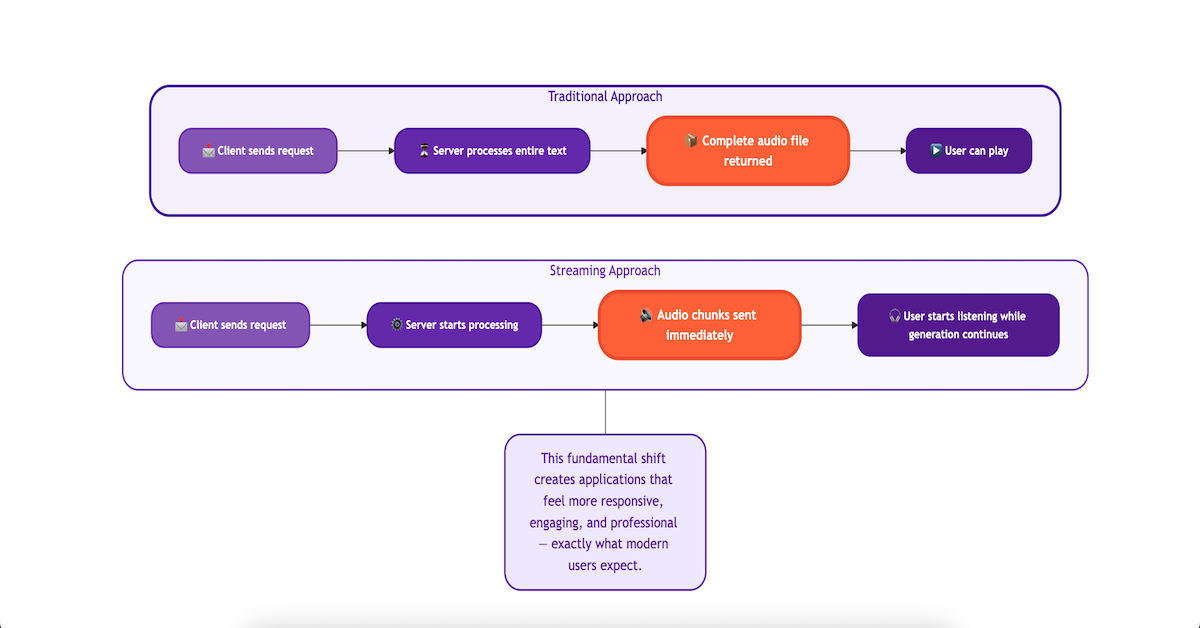
In our previous blog, we explored how to build a Text-to-Speech application using Spring AI and ElevenLabs. While that solution worked perfectly, it had one limitation: users had to wait for the entire audio file to be generated before they could start listening. This approach works fine for short texts, but what about longer content like articles, stories, or reports?
Enter streaming responses – the game-changer that transforms user experience from waiting to instant gratification. With streaming, audio chunks are sent to the client as soon as they’re generated, allowing users to start listening immediately while the rest continues processing in the background.
In this comprehensive guide, we’ll build upon our previous foundation and implement real-time audio streaming using Spring AI and ElevenLabs. By the end of this tutorial, you’ll have a Spring Boot application that delivers lightning-fast audio responses with a seamless playback experience.
2. Why Streaming is a Game-Changer for Text-to-Speech
Imagine watching a YouTube video. You don’t have to download the entire video file before you can start watching; it plays as it downloads. That’s streaming. We can apply the same concept to our text-to-speech (TTS) application.
Instead of waiting for one large audio file, our server will receive audio from ElevenLabs in small chunks and immediately forward them to the client. This technique, known as chunked transfer encoding, dramatically reduces the perceived wait time.
3. Spring AI Text-to-Speech Streaming Benefits
Here are the key benefits of using Spring AI Text-to-Speech Streaming approach:
- Reduced Latency: Users start hearing the audio almost immediately, which is crucial for interactive applications like chatbots or virtual assistants.
- Improved User Experience: Instant feedback makes the application feel more responsive and dynamic, keeping users engaged.
- Efficient Memory Usage: The server doesn’t need to hold the entire large audio file in memory, making it more scalable.
4. Spring AI Text-to-Speech Streaming Blueprint
So, how does streaming change the game? Let’s look at the blueprint for our real-time application. The following diagram illustrates the continuous and dynamic journey your text takes—from a single request to a live flow of audio data, enabling instant playback in the user’s browser.
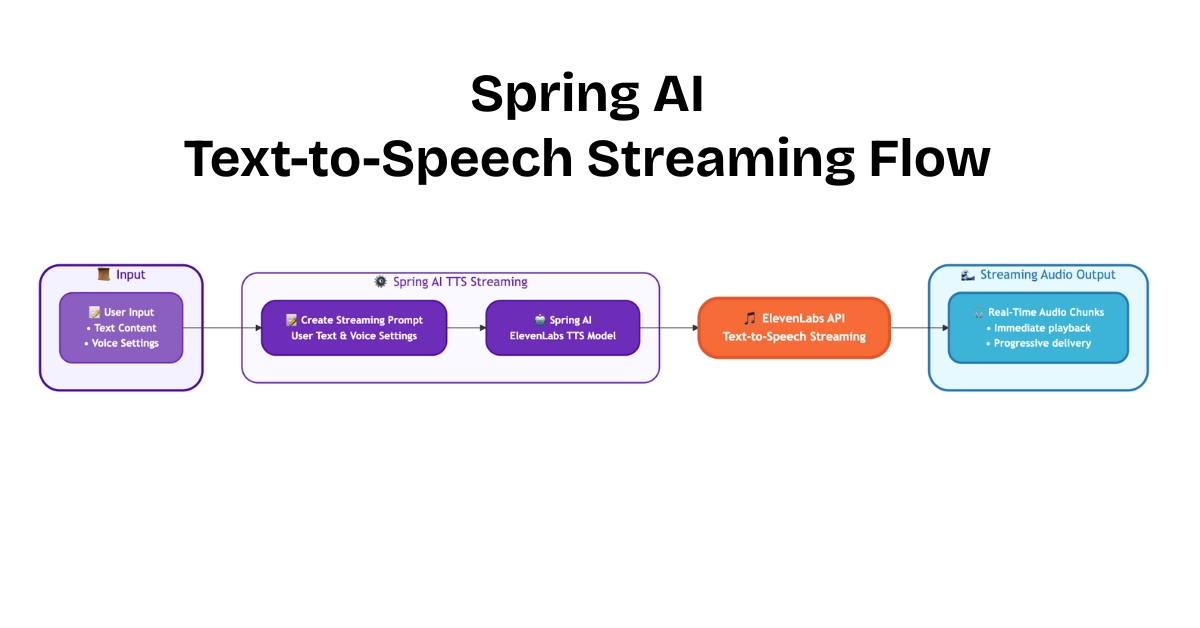
- Input: The process begins when a user provides the necessary information. This includes the text they want to hear spoken aloud and their choice of voice settings (like which voice to use, its tone, and style).
- Create Streaming Prompt: Our Spring application takes this input and bundles it into a
TextToSpeechPrompt. This prompt is the instruction set for the AI, but this time, it’s geared to initiate a streaming connection. - Spring AI Model (Streaming): The prompt is then passed to the
ElevenLabsTextToSpeechModel, but with a crucial difference: we call the.stream()method. This tells Spring AI not to wait for a complete file, but to open a persistent connection and handle the incoming audio data as a reactive stream (a Flux of audio chunks). - ElevenLabs API Streaming: The Spring AI model sends the request to the ElevenLabs API, which is specifically designed to handle streaming. Instead of processing the entire text and then sending one large file, the API starts generating audio and immediately sends back the first piece, then the second, and so on, in a continuous flow.
- Streaming Audio Output: This is where the magic of real-time happens. The output is not a single downloadable file but a series of Real-Time Audio Chunks. Our Spring Boot application forwards these chunks to the client as soon as they arrive. This progressive delivery allows the client to start playing the audio almost instantly, long before the full speech has even been generated, creating a fluid and responsive user experience.
5. Let’s Build: A Real-Time Text-to-Speech Streaming API
We’ll now build a Spring Boot service that accepts a text prompt and streams the generated audio back to the client in real-time.
⚙️ Project Structure & Setup
Below is the folder structure of our Spring Boot application:
spring-ai-text-to-speech-elevenlabs-streaming-response
├── src
│   └── main
│       ├── java
│       │   └── com
│       │       └── bootcamptoprod
│       │               ├── controller
│       │               │   └── TextToSpeechController.java
│       │               ├── dto
│       │               │   └── TextToSpeechRequest.java
│       │               └── SpringAITextToSpeechElevenlabsStreamingResponseApplication.java
│       └── resources
│           ├── application.yml
│           └── static
│               └── index.html
└── pom.xml
Understanding the Project Structure
Here is a quick breakdown of the key files in our project and what each one does:
- TextToSpeechController.java: The REST controller that exposes our
/api/tts/streamendpoint and handles the audio streaming logic. - TextToSpeechRequest.java: A simple Java record class (DTO) that defines the JSON structure for the incoming request, holding the text and voice settings.
- SpringAITextToSpeechElevenlabsStreamingResponseApplication.java: The main class that boots up and runs the entire Spring Boot application.
- application.yml: Our configuration file, used for setting the essential ElevenLabs API key and default text-to-speech options.
- static/index.html: A simple web page with JavaScript that provides a user interface for easily testing our TTS API.
- pom.xml: The Maven file where we manage all our project dependencies, including the crucial
spring-ai-starter-model-elevenlabslibrary.
Let’s set up our project with the necessary dependencies and configurations.
Step 1: Add Maven Dependencies
Every Spring Boot project starts with the pom.xml file. This is where we tell Maven which libraries our project needs to function.
<properties>
    <java.version>21</java.version>
    <spring-ai.version>1.1.0-SNAPSHOT</spring-ai.version>
</properties>

<dependencies>
    <!-- Spring Boot Web for building RESTful web services -->
    <dependency>
        <groupId>org.springframework.boot</groupId>
        <artifactId>spring-boot-starter-web</artifactId>
    </dependency>

    <!-- Spring AI starter for ElevenLabs integration -->
    <dependency>
        <groupId>org.springframework.ai</groupId>
        <artifactId>spring-ai-starter-model-elevenlabs</artifactId>
    </dependency>

    <!-- Optional: For Logging Spring AI calls -->
    <dependency>
        <groupId>org.zalando</groupId>
        <artifactId>logbook-spring-boot-starter</artifactId>
        <version>3.12.2</version>
    </dependency>

<dependencyManagement>
    <dependencies>
        <!-- Spring AI bill of materials to align all spring-ai versions -->
        <dependency>
            <groupId>org.springframework.ai</groupId>
            <artifactId>spring-ai-bom</artifactId>
            <version>${spring-ai.version}</version>
            <type>pom</type>
            <scope>import</scope>
        </dependency>
    </dependencies>
</dependencyManagement>

<!-- IMPORTANT: Required for SNAPSHOT versions -->
<repositories>
    <repository>
        <id>spring-snapshots</id>
        <name>Spring Snapshots</name>
        <url>https://repo.spring.io/snapshot</url>
        <releases>
            <enabled>false</enabled>
        </releases>
    </repository>
    <repository>
        <name>Central Portal Snapshots</name>
        <id>central-portal-snapshots</id>
        <url>https://central.sonatype.com/repository/maven-snapshots/</url>
        <releases>
            <enabled>false</enabled>
        </releases>
        <snapshots>
            <enabled>true</enabled>
        </snapshots>
    </repository>
</repositories>
In this configuration:
spring-boot-starter-web:This is the essential dependency for creating a web application with REST endpoints.spring-ai-starter-model-elevenlabs:This is the magic ingredient. It pulls in all the necessary classes to interact with the ElevenLabs API through the Spring AI abstraction.logbook-spring-boot-starter: A very helpful utility for debugging. It logs all outgoing HTTP requests (to ElevenLabs) and their responses, which is invaluable for seeing exactly what’s being sent and received.spring-ai-bom:This isn’t a direct dependency but a Bill of Materials. It’s a best practice that ensures all the differentspring-ai-*modules you might use will have versions that are tested and work together, preventing conflicts.
A Note on SNAPSHOT Versions: At the time of writing, the ElevenLabs integration is available in the 1.1.0-SNAPSHOT version. SNAPSHOT versions are development builds and are not hosted in the standard Maven Central repository. This is why the <repositories> section is crucial. It instructs Maven to search Spring’s snapshot repository for
Pro Tip: If a stable, non-snapshot version (e.g., 1.1.0) is available by the time you read this, you should always prefer it. You can remove the entire <repositories> section and update the <spring-ai.version> accordingly.
Step 2: Configure Application Properties
Next, let’s configure our application properties:
spring:
  application:
    name: spring-ai-text-to-speech-elevenlabs-streaming-response

  # AI configurations
  ai:
    elevenlabs:
      api-key: ${ELEVENLABS_API_KEY}
      tts:
        enableLogging: true
        options:
          model-id: eleven_multilingual_v2
          output-format: mp3

# (Optional) For detailed request/response logging
logging:
  level:
    org.zalando.logbook.Logbook: TRACE
📄 Configuration Overview
- api-key: Your ElevenLabs API key (replace {ELEVENLABS_API_KEY} with your actual key)
- model-id: We’re using
eleven_multilingual_v2which supports multiple languages - output-format: MP3 format for audio output
- Logbook TRACE: Provides detailed HTTP logging for troubleshooting
Step 3: Application Entry Point
This is the main class that bootstraps our entire application.
package com.bootcamptoprod;

import org.springframework.boot.SpringApplication;
import org.springframework.boot.autoconfigure.SpringBootApplication;
import org.springframework.boot.web.client.RestClientCustomizer;
import org.springframework.context.annotation.Bean;
import org.zalando.logbook.Logbook;
import org.zalando.logbook.spring.LogbookClientHttpRequestInterceptor;

@SpringBootApplication
public class SpringAITextToSpeechElevenlabsStreamingResponseApplication {

    public static void main(String[] args) {
        SpringApplication.run(SpringAITextToSpeechElevenlabsStreamingResponseApplication.class, args);
    }

    /**
     * Configures a RestClientCustomizer bean to integrate Logbook for HTTP logging.
     * This bean adds an interceptor to all outgoing REST client calls made by Spring,
     * allowing us to log the requests sent to the AI model and the responses received.
     */
    @Bean
    public RestClientCustomizer restClientCustomizer(Logbook logbook) {
        return restClientBuilder -> restClientBuilder.requestInterceptor(new LogbookClientHttpRequestInterceptor(logbook));
    }

}
Explanation:
- Main Class to Run the Application:
SpringAITextToSpeechElevenlabsStreamingResponseApplicationis the starting point of our application. When you run this class, Spring Boot initializes all components and starts the embedded server. - HTTP Logging: This is an optional but highly recommended configuration during the development. We are defining a
@Beanthat customizes the RestClient used by Spring AI under the hood. By adding theLogbookClientHttpRequestInterceptor, we ensure that every API call to ElevenLabs gets logged in our console.
Step 4: Create Data Transfer Object (DTOs)
Let’s create our request model using Java records:
package com.bootcamptoprod.dto;

public record TextToSpeechRequest(
        String text,
        String voiceId,
        Double stability,
        Double similarityBoost,
        Double style,
        Boolean useSpeakerBoost,
        Double speed
) {}
Explanation:
This record simply defines the data structure for our incoming request. Each field corresponds to a setting we want to apply to our text-to-speech generation.
- Text: The text to convert to speech (required)
- Voice ID: ElevenLabs voice identifier – each voice has a unique ID like “21m00Tcm4TlvDq8ikWAM” for Rachel
For a detailed explanation of what each voice parameter (stability, similarityBoost, etc.) does, please refer to the “8.1. Voice Settings Parameters” section in our previous Spring AI text-to-speech blog post, where we cover them in depth.
Step 5: The Controller Layer: API Endpoint
This is where the magic happens! The TextToSpeechController will expose our streaming endpoint.
package com.bootcamptoprod.controller;

import com.bootcamptoprod.dto.TextToSpeechRequest;
import org.springframework.ai.audio.tts.TextToSpeechPrompt;
import org.springframework.ai.audio.tts.TextToSpeechResponse;
import org.springframework.ai.elevenlabs.ElevenLabsTextToSpeechModel;
import org.springframework.ai.elevenlabs.ElevenLabsTextToSpeechOptions;
import org.springframework.ai.elevenlabs.api.ElevenLabsApi;
import org.springframework.beans.factory.annotation.Autowired;
import org.springframework.http.MediaType;
import org.springframework.http.ResponseEntity;
import org.springframework.web.bind.annotation.PostMapping;
import org.springframework.web.bind.annotation.RequestBody;
import org.springframework.web.bind.annotation.RequestMapping;
import org.springframework.web.bind.annotation.RestController;
import org.springframework.web.servlet.mvc.method.annotation.StreamingResponseBody;
import reactor.core.publisher.Flux;

import java.io.IOException;
import java.io.UncheckedIOException;

@RestController
@RequestMapping("/api/tts")
public class TextToSpeechController {

    private final ElevenLabsTextToSpeechModel textToSpeechModel;

    @Autowired
    public TextToSpeechController(ElevenLabsTextToSpeechModel textToSpeechModel) {
        this.textToSpeechModel = textToSpeechModel;
    }

    @PostMapping(value = "/stream", produces = "audio/mpeg")
    public ResponseEntity<StreamingResponseBody> ttsStream(@RequestBody TextToSpeechRequest request) {

        var voiceSettings = new ElevenLabsApi.SpeechRequest.VoiceSettings(
                request.stability(), request.similarityBoost(), request.style(), request.useSpeakerBoost(), request.speed()
        );

        var textToSpeechOptions = ElevenLabsTextToSpeechOptions.builder()
                .model("eleven_multilingual_v2")
                .voiceSettings(voiceSettings)
                .outputFormat(ElevenLabsApi.OutputFormat.MP3_44100_128.getValue())
                .build();

        textToSpeechOptions.setEnableLogging(Boolean.TRUE);

        var textToSpeechPrompt = new TextToSpeechPrompt(request.text(), textToSpeechOptions);
        Flux<TextToSpeechResponse> responseStream = textToSpeechModel.stream(textToSpeechPrompt);

        StreamingResponseBody body = outputStream -> {
            responseStream.toStream().forEach(speechResponse -> {
                try {
                    outputStream.write(speechResponse.getResult().getOutput());
                    outputStream.flush();
                } catch (IOException e) {
                    throw new UncheckedIOException(e);
                }
            });
        };

        return ResponseEntity.ok()
                .contentType(MediaType.valueOf("audio/mpeg"))
                .body(body);
    }

}
Let’s break down the core logic in the ttsStream method:
- Return Type ResponseEntity<StreamingResponseBody>: This is the key to enabling streaming in Spring MVC. Instead of returning
byte[], we return aStreamingResponseBody, which allows us to write data to the responseOutputStreamdirectly and asynchronously. - textToSpeechModel.stream(textToSpeechPrompt): This is the crucial difference from our previous blog. We call the
.stream()method instead of.call(). This returns aFlux<TextToSpeechResponse>, which is a reactive stream that emits audio chunks as they are generated by ElevenLabs. - Implementing StreamingResponseBody: We create a lambda that gets an
OutputStreamas its parameter. ThisOutputStreamis connected directly to the client’s HTTP response. - Writing to the Stream: Inside the lambda, we convert the Flux to a standard Java Stream
responseStream.toStream()and iterate over it. For each speechResponse (which contains a chunk of audio bytes), we:- Write the bytes to the outputStream
outputStream.write(...). - Flush the stream
outputStream.flush(). This is critical! Flushing sends the written chunk of data immediately to the client instead of waiting for a buffer to fill up.
- Write the bytes to the outputStream
- Setting Headers: Finally, we build the ResponseEntity, setting the Content-Type to
audio/mpegso the browser knows how to handle the data, and return ourStreamingResponseBody.
6. How It All Works Together
The streaming process follows this flow:
- Client Request: User sends text and voice parameters to
/api/tts/stream. - Prompt Creation: Spring AI creates a
TextToSpeechPromptwith streaming configuration. - ElevenLabs Streaming: The model calls ElevenLabs with streaming enabled.
- Reactive Stream: ElevenLabs returns audio chunks as a reactive Flux.
- Real-time Delivery: Each chunk is immediately written to the HTTP response stream.
- Client Playback: Browser/client can start playing audio as soon as the first chunks arrive.
7. Testing the Application
Once your application is running, you can test the streaming functionality in two ways: using command-line tools or through a web interface.
Option 1: Testing with cURL
For a quick command-line test, cURL is an excellent tool. The --no-buffer flag is important as it tells cURL to output the data as it’s received, allowing us to see the streaming in action.
curl --no-buffer -X POST http://localhost:8080/api/tts/stream \
--header 'Content-Type: application/json' \
--data '{
    "text": "Hello, this is a real-time streaming test with Spring AI!",
    "voiceId": "pNInz6obpgDQGcFmaJgB",
    "stability": 0.75,
    "similarityBoost": 0.75,
    "style": 0.0,
    "useSpeakerBoost": true,
    "speed": 1.0
}' --output speech.mp3After running this command, you will have a speech.mp3 file in your directory containing the generated audio.
You can pipe the output directly to a file or an audio player that supports standard input, like ffplay or mpv. Think of them as the developer’s equivalent of VLC or Windows Media Player. The key difference is that they don’t have a fancy graphical user interface (GUI) with buttons and menus. You run them directly from your terminal, which makes them incredibly fast and scriptable.
curl --no-buffer -X POST http://localhost:8080/api/tts/stream \
--header 'Content-Type: application/json' \
--data '{
    "text": "Hello, this is a real-time streaming test with Spring AI!",
    "voiceId": "pNInz6obpgDQGcFmaJgB",
    "stability": 0.75,
    "similarityBoost": 0.75,
    "style": 0.0,
    "useSpeakerBoost": true,
    "speed": 1.0
}' | ffplay -i -Option 2: Using a Web Interface
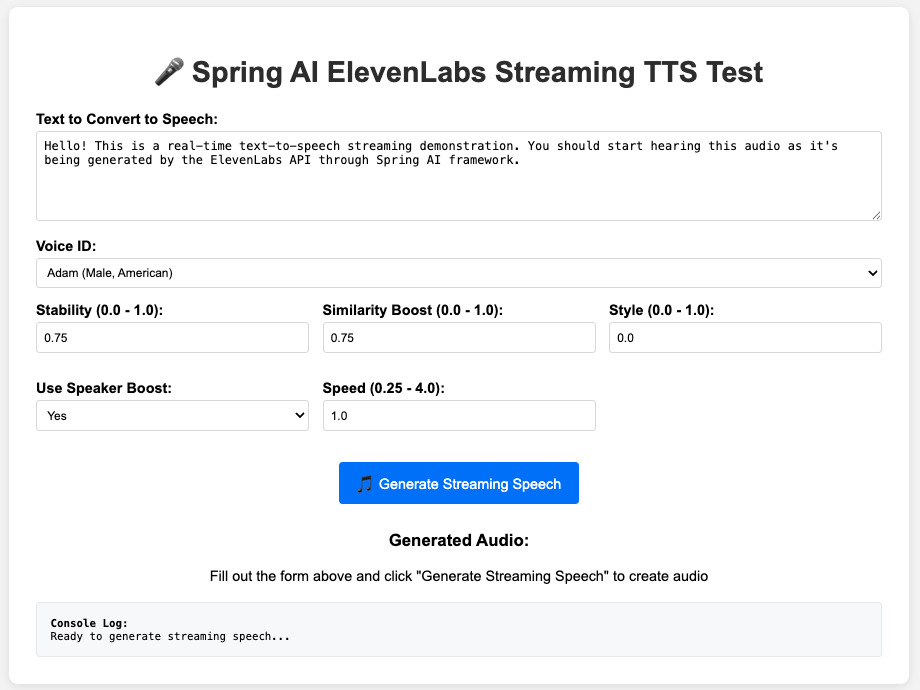
For a more interactive and visual test, we have created a simple index.html page. This UI allows you to input text, select a voice, and adjust all the voice parameters with sliders.
Key Features of the Web Interface:
- Real-time Progress Tracking: Visual progress bar and statistics showing bytes received, chunks processed, and streaming speed
- Live Streaming Data: Hexadecimal and ASCII preview of incoming audio chunks as they arrive
- MediaSource Extensions (MSE) Support: Enables true streaming playback in modern browsers
- Voice Parameter Controls: Interactive sliders and dropdowns for all ElevenLabs voice settings
- Console Logging: Detailed logging of the entire streaming process for debugging
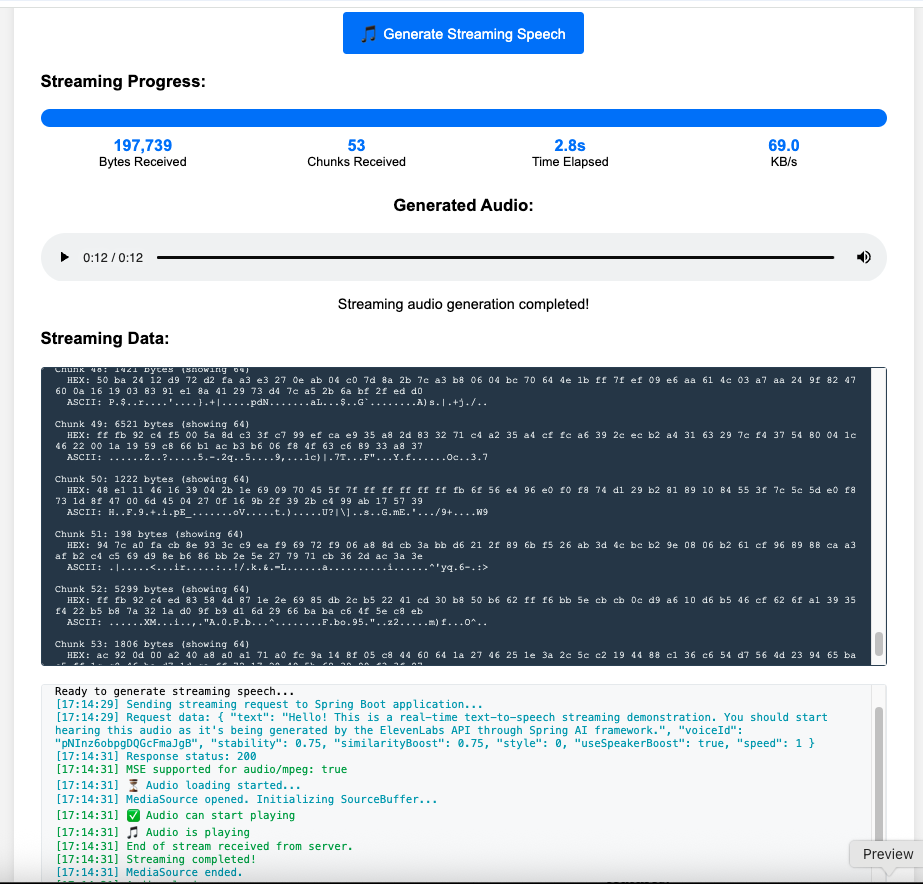
This test page makes it easy to experiment with different voices and settings and experience the low-latency playback firsthand.
If you are interested in checking out the complete HTML file, you can find it in the project’s GitHub repository.
How to Test with the Web UI:
- Make sure the
index.htmlfile is placed inside the src/main/resources/static/ directory in your project structure. - With your Spring Boot application running, open your favorite web browser.
- You can now launch the web UI by visiting either http://localhost:8080 or http://localhost:8080/index.html on your browser. Because the file is named index.html and located in the static folder, Spring Boot automatically serves it as the root page.
- Once the page loads, you will see the form. Enter the text you want to convert into speech.
- Select a voice from the dropdown and adjust the sliders for stability, similarity, and style to your liking.
- Click the “🎵 Generate Streaming Speech” button.
- You will see an audio player appear and start playing almost immediately.
- Below the player, you can see real-time statistics like bytes and chunks received, and a log showing the streaming data as it arrives from the server.
8. Streaming vs Non-Streaming: Comparison
| Aspect | Traditional | Streaming |
| Initial Response Time | Wait for complete generation | Wait for the complete generation |
| User Experience | Loading → Complete audio | Progressive playback |
| Memory Usage | Full audio in memory | Chunk-by-chunk processing |
| Perceived Performance | Slower for long texts | Always fast |
| Network Efficiency | Single large transfer | Multiple small transfers |
9. Video Tutorial
If you’re a visual learner, our step-by-step video tutorial is the perfect companion to this guide. It walks you through building this real-time, streaming Text-to-Speech application, showing you exactly how to leverage the power of Spring AI and ElevenLabs to create a responsive, low-latency voice experience in your Spring Boot applications.
📺 Watch on YouTube:
10. Source Code
The complete source code for this Spring AI streaming text-to-speech project is available on our GitHub. Just clone the repository, plug in your ElevenLabs API key as an environment variable, and run it locally. It’s the best way to experiment with the code and see firsthand how all the streaming components fit together.
🔗 Spring AI Text-to-Speech Streaming: https://github.com/BootcampToProd/spring-ai-text-to-speech-elevenlabs-streaming-response
11. Things to Consider
When implementing streaming text-to-speech, keep these important factors in mind:
- Network Considerations: Streaming requires stable network connections. Implement proper error handling for network interruptions and consider retry mechanisms for failed chunk deliveries.
- Browser Compatibility: Ensure your client-side implementation can handle streaming audio responses. Modern browsers support progressive audio loading, but older versions might need additional handling.
- Memory Management: While streaming reduces server memory usage, monitor client-side memory consumption, especially for very long audio content that accumulates over time.
- Error Handling: Implement comprehensive error handling for partial stream failures, network timeouts, and ElevenLabs API rate limits during streaming operations.
- Concurrent Requests: Consider implementing request queuing or rate limiting to manage multiple simultaneous streaming requests and prevent resource exhaustion.
- Audio Quality vs Speed: Balance audio quality settings with streaming performance. Higher quality settings may introduce slight delays in chunk delivery.
12. FAQs
What is the main difference between .call() and .stream() in ElevenLabsTextToSpeechModel?
The .call() method is a blocking operation. It sends the request and waits until the entire audio file is generated before returning a single TextToSpeechResponse. The .stream() method is non-blocking and returns a Flux<TextToSpeechResponse>, which emits multiple responses (audio chunks) as they become available.
Can I pause and resume streaming audio?
Yes, but this depends on your client-side implementation. The server streams continuously, but clients can pause playback and resume from buffered content.
Is streaming more expensive than regular API calls?
No, ElevenLabs charges the same for streaming and non-streaming requests. The cost is based on character count, not delivery method.
Can I use other audio formats for streaming?
Yes. You can configure a different outputFormat in the ElevenLabsTextToSpeechOptions. ElevenLabs supports various MP3, PCM, and OPUS formats. Just ensure you set the correct Content-Type in your ResponseEntity.
13. Conclusion
By leveraging the power of reactive streams with Spring AI and the StreamingResponseBody from Spring MVC, we can transform a standard text-to-speech API into a real-time audio streaming service. This approach significantly enhances the user experience by providing immediate audio feedback, making it ideal for building modern, interactive, and voice-enabled applications. The ability to start playback before the full audio is generated opens up new possibilities for creating more engaging and responsive software.
14. Learn More
Interested in learning more?
Spring AI Text-to-Speech with ElevenLabs: Give Your Application a Voice
Add a Comment