Understand LangChain4j ChatModel with practical examples. Complete guide covering all chat methods, ChatRequest, ChatResponse and parameters.
1. Introduction
Welcome back to our LangChain4j series! In our first article, we covered the basics of the LangChain4j framework. Today, we’re doing a deep dive into the ChatModel interface – the heart of AI interactions in LangChain4j.
This is a comprehensive guide covering everything from basic building blocks to advanced features. We’ll explore all ChatModel methods, parameters, request and response handling.
2. What is ChatModel?
The ChatModel interface in LangChain4j is the primary way for interacting with Large Language Models (LLMs). It’s located in the dev.langchain4j.model.chat package and provides multiple methods for sending messages to AI models and receiving responses.
package dev.langchain4j.model.chat;

public interface ChatModel {
    // Main API methods
    default ChatResponse chat(ChatRequest chatRequest)
    default ChatResponse doChat(ChatRequest chatRequest)

    // Convenience methods
    default String chat(String userMessage)
    default ChatResponse chat(ChatMessage... messages)
    default ChatResponse chat(List<ChatMessage> messages)

    // Configuration and metadata
    default ChatRequestParameters defaultRequestParameters()
    default List<ChatModelListener> listeners()
    default ModelProvider provider()
    default Set<Capability> supportedCapabilities()
}3. Core Building Blocks – Deep Dive
Before exploring the methods, let’s understand all the classes and concepts that ChatModel uses.
3.1 ChatMessage – The Message Hierarchy
ChatMessage is an interface class representing any message in a conversation. It has several concrete implementations:
- SystemMessage: Instructions for AI. Defines the AI’s behavior, personality, role, or constraints. This is like giving instructions to an employee about their job role.
- UserMessage: Messages from Users. Represents what the user (human or application) says to the AI.
- AiMessage: Messages from AI. Represents the AI model’s response. You typically receive this from the AI, not create it manually.
- ToolExecutionResultMessage: Tool Call Results. Used in advanced scenarios where AI calls external tools/functions. We’ll cover this in a future article.
How to create them:
You can create these messages using the constructor (new) or static helper methods (.from). Both do the same thing.
// 1. System Message: Instructions
SystemMessage systemMsg = new SystemMessage("You are a helpful coding assistant.");
SystemMessage systemMsg2 = SystemMessage.from("You are a helpful coding assistant."); // Shorthand

// 2. User Message: The Question
UserMessage userMsg = new UserMessage("How do I print in Java?");
UserMessage userMsg2 = UserMessage.from("How do I print in Java?");

// 3. AI Message: The Response (Usually created by the model, but you can create it for testing)
AiMessage aiMsg = new AiMessage("Use System.out.println();");
AiMessage aiMsgBuilder = AiMessage.builder().text("Use System.out.println();").build();
3.2 ChatRequestParameters – The Settings
Every time you talk to an AI, you can tweak “knobs and dials” to change how it answers. In LangChain4j, these are grouped into ChatRequestParameters interface.
Key Parameters Explained:
- modelName: Which specific brain to use (e.g., “gpt-4o”).
- temperature (0.0 – 2.0): Controls randomness and creativity in responses. 0.0 gives very fixed and predictable answers, while 2.0 gives more creative and varied responses.
- topP (0.0 – 1.0): Controls how many possible words the model can choose from – 0.0 means very strict and focused responses, while 1.0 allows more variety in the output.
- topK: Controls how many of the most likely words the model can choose from – lower values make responses more focused, while higher values allow more variety.
- frequencyPenalty (-2.0 – 2.0): Controls repetition – negative values allow more repetition, while positive values reduce repeated words and phrases.
- presencePenalty (-2.0 – 2.0): Controls topic diversity – negative values stick to the same topic, while positive values encourage introducing new topics or ideas.
- maxOutputTokens: Limits the length of the AI answer (mostly used to save money).
- stopSequences: Tells the AI to stop generating when it encounters specific text.
- responseFormat: Forces the AI to reply in a specific format, like JSON.
- toolSpecifications: Describes tools that language model can execute.
- toolChoice: Tells the model whether it can use tools on its own (AUTO), must use tools (REQUIRED), or should not use tools at all (NONE).
Example:
ChatRequestParameters params = ChatRequestParameters.builder()
        .modelName("gpt-4o")                    // AI model to be used for generating responses
        .temperature(0.7)                       // Controls creativity
        .maxOutputTokens(100)                   // Maximum number of tokens in the AI response
        .responseFormat(ResponseFormat.TEXT)    // Output format: plain text or JSON
        .topP(0.9)                              // Limits word choices based on probability
        .topK(1)                                // Limits selection to top K most likely words
        .frequencyPenalty(1.5)                  // Reduces repeated words or phrases
        .presencePenalty(1.5)                   // Encourages introducing new topics
        .toolChoice(ToolChoice.AUTO)            // Lets the model decide whether to use tools
        .stopSequences(List.of("stop"))         // Stops response generation when this text appears
        .build();
3.3 ChatRequest – The Container
Now that we have Messages (3.1) and Settings (3.2), we package them into a single box called the ChatRequest. ChatRequest is a comprehensive object that bundles messages and configuration parameters for the AI model.
This is the object we actually hand over to the ChatModel.
ChatRequest request = ChatRequest.builder()
        .messages(systemMsg, userMsg) // The conversation history
        .parameters(params)           // The settings we defined above
.build();3.4 ChatResponse – The Output
ChatResponse is the result object returned by all ChatModel chat methods. When you call chatModel.chat(request), you get back a ChatResponse. This object is rich with information. It contains the answer, but also metadata about what happened.
Key methods:
chatResponse.aiMessage()– Returns the AI-generated message.aiMessage.text()– Returns the actual text content produced by the AI.
chatResponse.metadata()– Returns metadata explaining how the response was generated.metadata.modelName()– Returns the name of the AI model used.metadata.finishReason()– Explains why the AI stopped generating the response.metadata.tokenUsage()– Returns token usage information for the request.tokenUsage.inputTokenCount()– Number of tokens sent to the model as input.tokenUsage.outputTokenCount()– Number of tokens generated by the model.tokenUsage.totalTokenCount()– Total tokens used (input + output).
chatResponse.id()– Returns the unique identifier of the chat response.chatResponse.modelName()– Shortcut method to get the model name directly.chatResponse.finishReason()– Shortcut method to get the reason the response ended.
Example:
ChatResponse chatResponse = chatModel.chat(chatRequest);

// 1️⃣ Get the AI-generated message
AiMessage aiMessage = chatResponse.aiMessage();
String responseText = aiMessage.text();

// 2️⃣ Read basic metadata
String responseId = chatResponse.id();
String modelName = chatResponse.modelName();
FinishReason finishReason = chatResponse.finishReason();

// 3️⃣ Read token usage details
TokenUsage tokenUsage = chatResponse.metadata().tokenUsage();
Integer inputTokens = tokenUsage.inputTokenCount();
Integer outputTokens = tokenUsage.outputTokenCount();
Integer totalTokens = tokenUsage.totalTokenCount();
3.5. ChatModel Add-ons
Beyond the core chat functionality, the ChatModel ecosystem includes three critical components that handle observability, feature detection, and vendor identification. These “add-ons” help you build production-ready applications by allowing you to log interactions, check for specific features, and identify which AI provider is currently active.
3.5.1. ChatModelListener
ChatModelListener is an interface that acts as an interceptor for your AI interactions. It allows you to “listen” to requests, responses, and errors. This is extremely useful for logging, debugging, and auditing to see exactly what data is being sent to and received from the LLM without cluttering your main business logic.
Key methods:
onRequest(ChatModelRequestContext requestContext)– Runs before the request is sent, useful for logging prompts and request details.onResponse(ChatModelResponseContext responseContext)– Runs after a successful response, useful for logging answers and token usage.onError(ChatModelErrorContext errorContext)– Runs when something goes wrong, useful for capturing failures like timeouts or auth issues.
3.5.2. Capability
Capability defines which advanced features a ChatModel supports, allowing LangChain4j to safely use only the features that the model can handle.
Key Value:
RESPONSE_FORMAT_JSON_SCHEMA– Indicates the model can return responses in a strict JSON structure based on a defined schema.
3.5.3. ModelProvider
ModelProvider is an Enum that identifies the specific vendor or platform backing the ChatModel. In complex applications where you might switch between different AI providers dynamically (e.g., using OpenAI for complex tasks and Ollama for local tasks), this helps identify which engine is currently doing the work.
Key values:
- OPEN_AI – Represents models from OpenAI (e.g., GPT-4o, GPT-3.5).
- GOOGLE_AI_GEMINI – Represents Google’s Gemini models via the Google AI API.
- GOOGLE_VERTEX_AI_GEMINI – Represents Gemini models hosted on Google Cloud Vertex AI.
- OLLAMA – Represents local models running via Ollama (e.g., Llama 3, Mistral).
- ANTHROPIC – Represents Claude models.
- AMAZON_BEDROCK – Represents models hosted on AWS Bedrock.
- AZURE_OPEN_AI – Represents OpenAI models hosted on Microsoft Azure.
- MISTRAL_AI – Represents models from Mistral AI.
- OTHER – Used for custom or less common providers not explicitly listed.
4. How ChatModel Works in LangChain4j
Now since the basics are clear, this is how the ChatModel works. The interaction with an AI model in LangChain4j follows a structured lifecycle. It is not just about sending text; it is about packaging a request, passing it through a standardized interface, and unpacking the rich response.
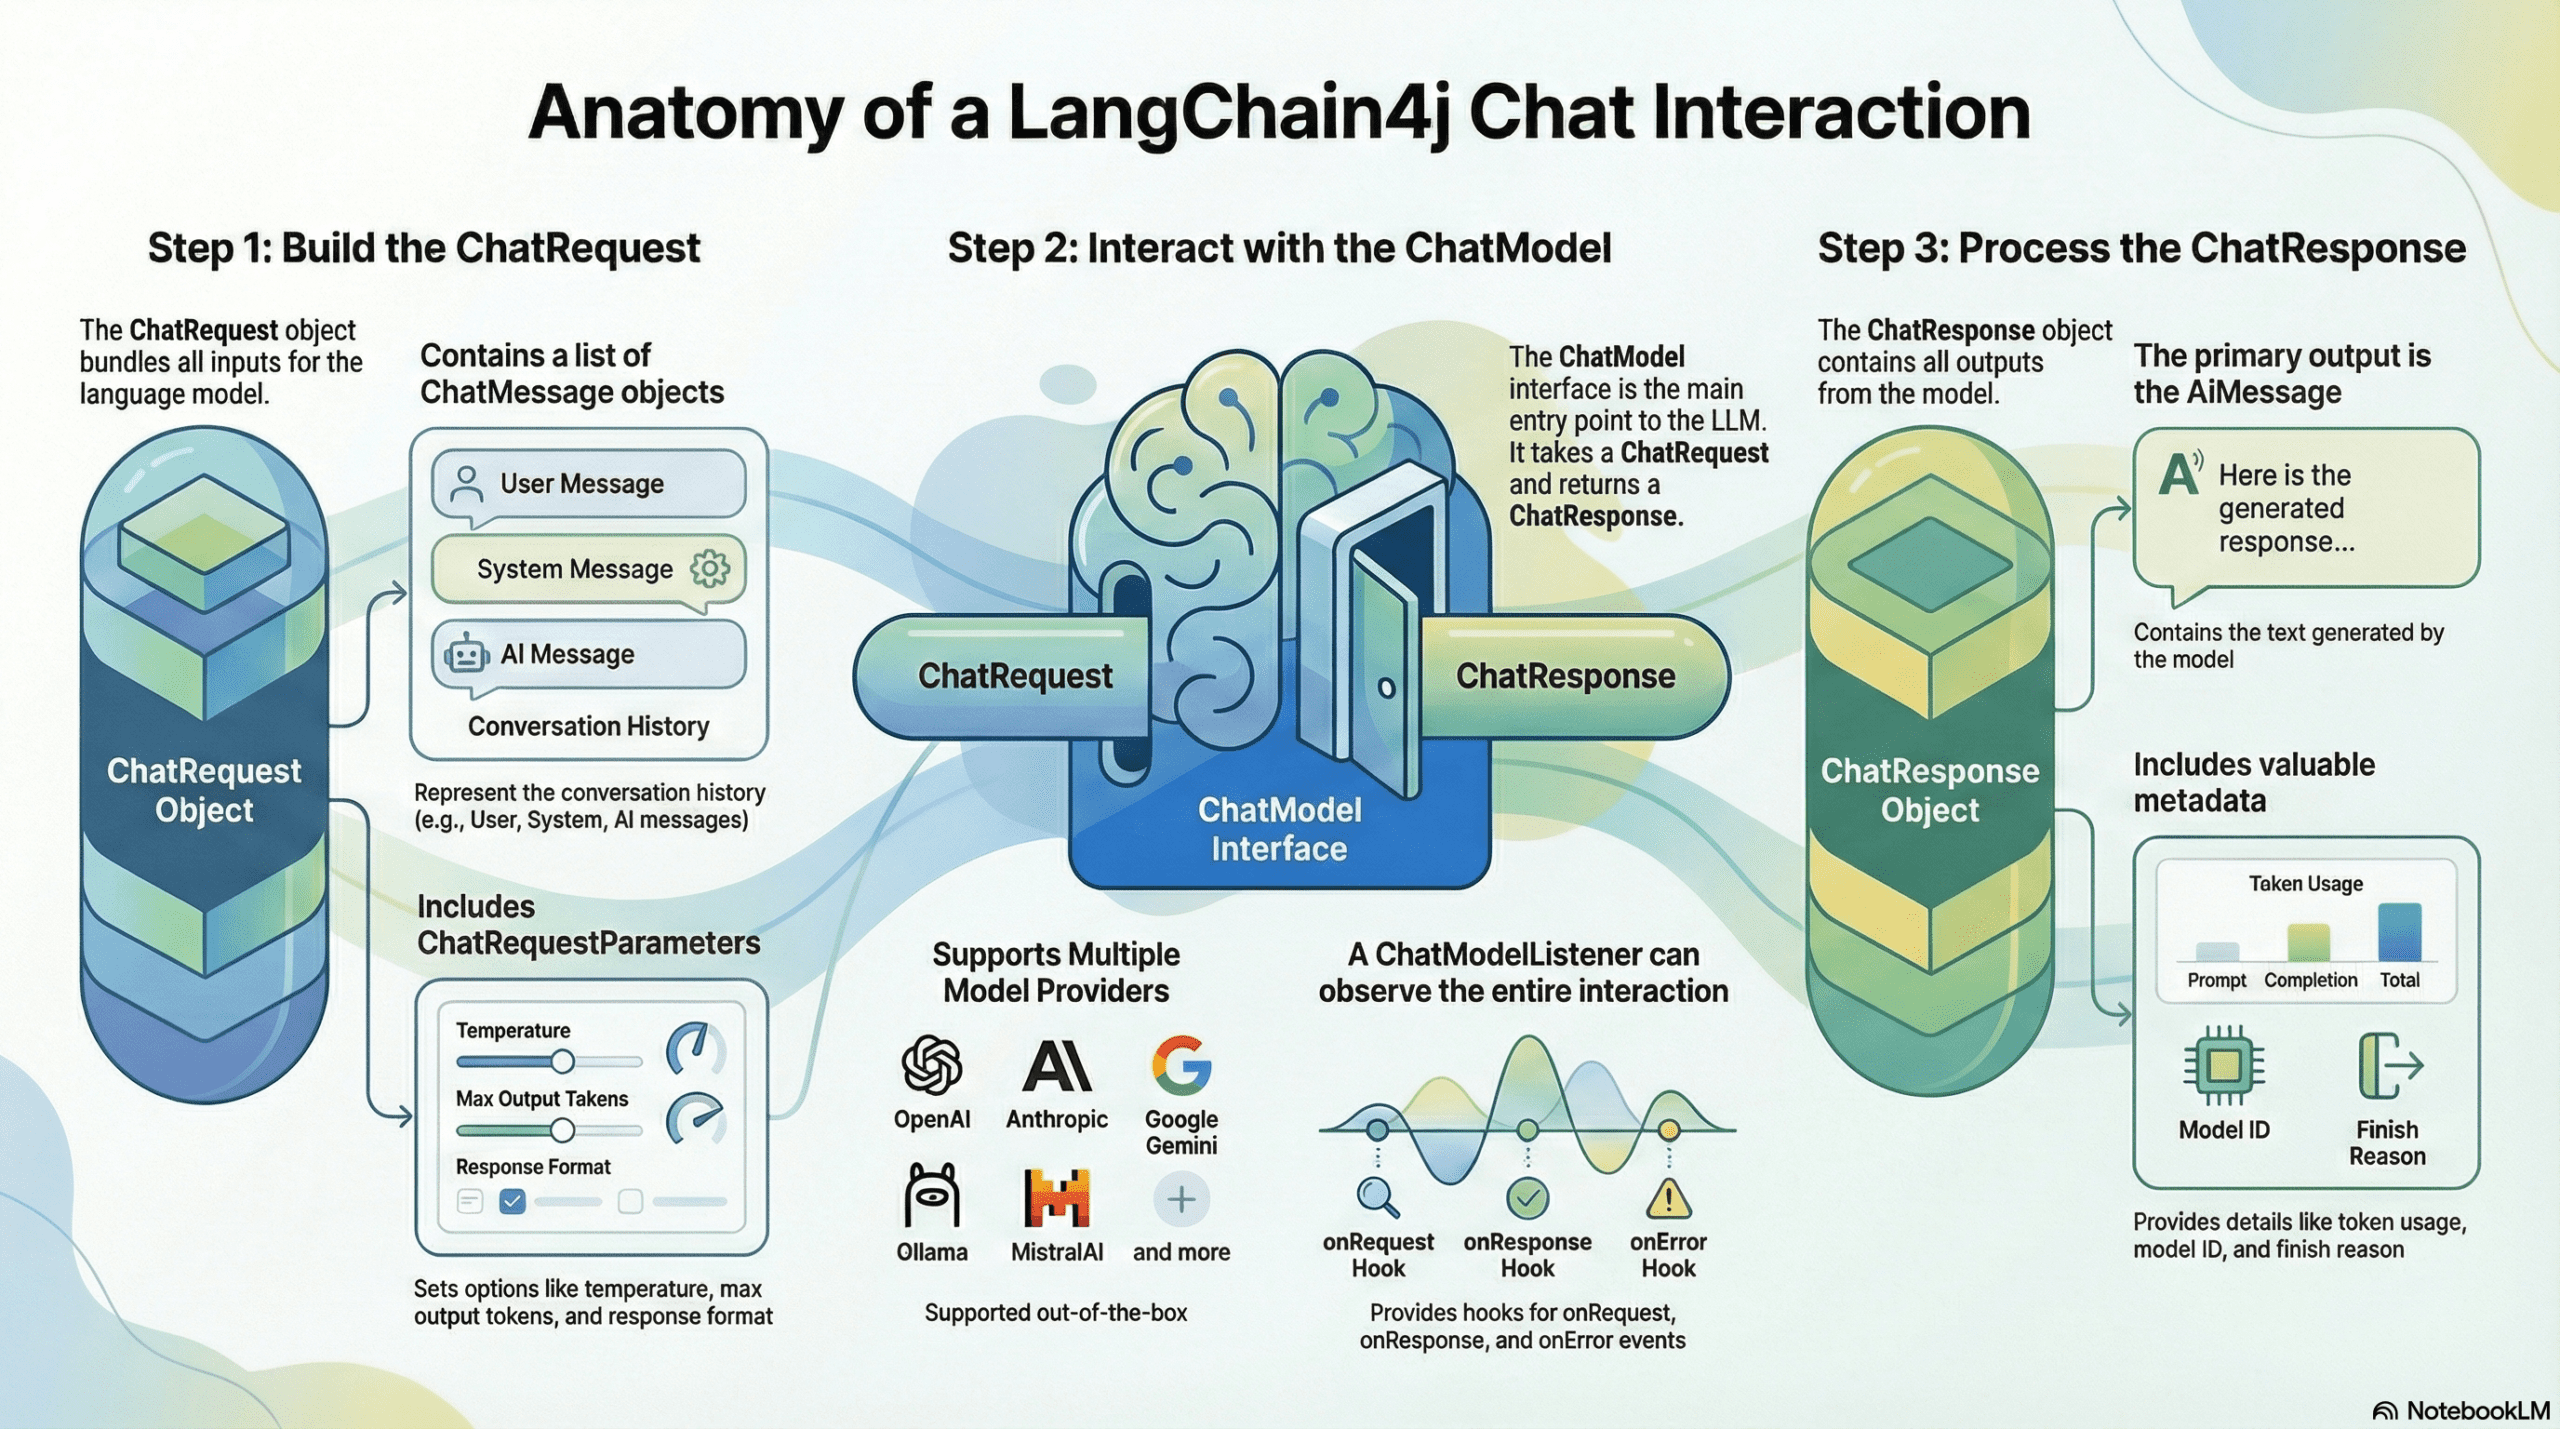
Here is the step-by-step breakdown of the flow:
- Build the ChatRequest: Everything starts by bundling the conversation history (UserMessage, SystemMessage) and the configuration settings (ChatRequestParameters like temperature and max tokens) into a single container called the ChatRequest.
- Interact with the Interface: This request is passed to the ChatModel. This interface acts as a universal adapter. Whether you are connecting to OpenAI, Google Gemini, or Mistral, the entry point remains exactly the same.
- Observe the Interaction (Optional): If you have registered a ChatModelListener, it “hooks” into the process. It captures the data exactly when the request leaves your application (onRequest) and exactly when the response arrives (onResponse), allowing for logging and debugging.
- Process the ChatResponse: Finally, the model returns a ChatResponse object. This is unpacked to retrieve the actual answer (AiMessage) to show to the user, and the metadata (TokenUsage, FinishReason) to handle billing and logic control.
5. Building a Comprehensive ChatModel Demo
We are going to build a ChatModel Laboratory. This Spring Boot application will expose 5 different endpoints, each demonstrating a different way to interact with the ChatModel interface – from simple strings to complex, parameter-tuned requests, and even low-level direct calls.
5.1. Project Structure Overview
Before diving into code, let’s understand our project structure:
langchain4j-chatmodel-demo
├── src
│   └── main
│       ├── java
│       │   └── com
│       │       └── bootcamptoprod
│       │               ├── controller
│       │               │   └── ChatModelDemoController.java           # Contains 5 endpoints
│       │               └── Langchain4jChatmodelDemoApplication.java   # Entry point
│       └── resources
│           └── application.yml                                        # OpenRouter/DeepSeek configuration
└── pom.xml                                                            # Dependency management
Structure Breakdown:
Here’s what each component does in our application:
- Langchain4jChatmodelDemoApplication.java: The standard Spring Boot main class that initializes and starts our application.
- ChatModelDemoController.java: This is the heart of our demo. It interacts with the
ChatModelbean to demonstrate the full spectrum of capabilities, from sending simple text to inspecting token usage and configuring advanced parameters like temperature and penalties. - application.yml: The configuration center. We configure it to use OpenRouter, which allows us to access the DeepSeek model using the standard OpenAI connection protocol.
- pom.xml: Defines our project dependencies, including Java 21 and the LangChain4j OpenAI starter.
5.2. Diving Into the Code
Step 1: Setting Up Maven Dependencies
First, let’s set up our Maven project with all necessary dependencies. The pom.xml file defines our project configuration and required libraries:
<properties>
	<java.version>21</java.version>
	<langchain4j.version>1.10.0</langchain4j.version>
</properties>

<dependencies>
	<!-- Spring Boot Web for REST endpoints -->
	<dependency>
		<groupId>org.springframework.boot</groupId>
		<artifactId>spring-boot-starter-web</artifactId>
	</dependency>
	<!-- LangChain4j OpenAI Spring Boot Starter -->
	<dependency>
		<groupId>dev.langchain4j</groupId>
		<artifactId>langchain4j-open-ai-spring-boot-starter</artifactId>
	</dependency>
</dependencies>

<dependencyManagement>
	<dependencies>
	  <!-- LangChain4j BOM for version management -->
		<dependency>
			<groupId>dev.langchain4j</groupId>
			<artifactId>langchain4j-bom</artifactId>
			<version>${langchain4j.version}</version>
			<type>pom</type>
			<scope>import</scope>
		</dependency>
	</dependencies>
</dependencyManagement>
What’s Important Here:
- langchain4j-open-ai-spring-boot-starter: This is the primary bridge between Spring Boot and the AI world. It handles the heavy lifting of integrating the framework and setting up the communication channels needed to talk to Large Language Models (LLMs) automatically.
- langchain4j-bom: This is the Bill of Materials. Think of it as a master version controller. It ensures that all LangChain4j-related libraries (like core and model providers) are perfectly compatible with each other, so you don’t have to worry about individual version numbers.
- spring-boot-starter-web: This dependency is what allows our application to function as a web service. It provides the necessary tools to create endpoints so our app can receive questions and send back answers.
Step 2: Configure Application Properties
Next, let’s configure our application settings in application.yml. Also, we will configure the AI model connection:
spring:
  application:
    name: langchain4j-chatmodel-demo

langchain4j:
  open-ai:
    chat-model:
      base-url: https://openrouter.ai/api/v1            # OpenRouter's API endpoint (compatible with OpenAI API format)
      api-key: ${OPENROUTER_API_KEY}                    # Get your free API key from https://openrouter.ai/
      model-name: tngtech/deepseek-r1t2-chimera:free    # Using DeepSeek's free model via OpenRouter
      log-requests: true                                # Enable logging to see requests
      log-responses: true                               # Enable logging to see responses
📄 Configuration Overview
- spring.application.name: Simply gives our application a name for identification within the Spring ecosystem.
- langchain4j:
- open-ai.chat-model: This section configures the “Chat” capabilities of our AI.
- api-key: This is your “password” for the AI service. It allows the application to securely authenticate with the model provider.
- base-url: Tells our application where to send the requests. Since we are using OpenRouter, we point it to their specific API address.
- model-name: Specifies exactly which “brain” we want to use – in this case, the DeepSeek model provided by OpenRouter.
- log-requests: When set to true, this shows the exact message we send to the AI in our console, which is very helpful for learning and debugging.
- log-responses: This displays the full response we get back from the AI in the console, allowing us to see the metadata and the raw text response.
- open-ai.chat-model: This section configures the “Chat” capabilities of our AI.
💡 Note: Since LangChain4j uses a standardized protocol, switching from OpenRouter to actual OpenAI models is incredibly easy. Simply update these values in your application.yml:
langchain4j:
  open-ai:
    chat-model:
      base-url: https://api.openai.com/v1
      api-key: ${OPENAI_API_KEY}
      model-name: gpt-4o # (or your preferred OpenAI model)
Step 3: Application Entry Point
This is the main class that bootstraps our entire application.
package com.bootcamptoprod;

import org.springframework.boot.SpringApplication;
import org.springframework.boot.autoconfigure.SpringBootApplication;

@SpringBootApplication
public class Langchain4jChatmodelDemoApplication {

    public static void main(String[] args) {
        SpringApplication.run(Langchain4jChatmodelDemoApplication.class, args);
    }

}
Explanation:
- This is the standard Spring Boot application entry point. The
@SpringBootApplicationannotation enables auto-configuration, component scanning, and configuration properties. LangChain4j’s Spring Boot starter automatically configures theChatModelbean based on ourapplication.ymlsettings.
Step 4: Creating the REST Controller
This is the core of our application. We will implement this controller piece by piece to understand how the ChatModel interface evolves from simple text to complex, parameter-driven interactions.
4.1. The Setup and Injection
First, we annotate our class and inject the ChatModel. Spring Boot automatically detects our application.yml configuration and provides this bean.
package com.bootcamptoprod.controller;


@RestController
@RequestMapping("/api/v1/chat")
public class ChatModelDemoController {

    private static final Logger log = LoggerFactory.getLogger(ChatModelDemoController.class);

    @Autowired
    private ChatModel chatModel;

    // Endpoints and helper methods will go here...
}4.2. The “Easy Button”: Simple String Chat
Method Used: chat(String)
This is the entry-level method. You pass raw text, and the model returns raw text.
@PostMapping("/simple")
public ResponseEntity<Map<String, Object>> simpleChat(@RequestBody Map<String, String> request) {
    String userMessage = request.get("message");

    // The simplest interaction: String in -> String out
    String response = chatModel.chat(userMessage);

    Map<String, Object> result = new LinkedHashMap<>();
    result.put("aiResponse", response);
    return ResponseEntity.ok(result);
}What’s Happening:
- We extract the message from the input JSON body.
- We call
chatModel.chat(userMessage). This uses the model’s default settings. - It returns the answer directly as a String. We lose metadata (like token usage), but it is perfect for quick prototypes.
4.3. Adding Personality: Chat with Varargs
Method Used: chat(ChatMessage…)
To give the AI a specific persona (e.g., “You are a Java Expert”), we need to use Message Objects instead of raw strings.
@PostMapping("/with-chat-messages")
public ResponseEntity<Map<String, Object>> chatWithMessages(@RequestBody Map<String, String> request) {
    String systemText = request.getOrDefault("systemMessage", "You are a helpful assistant");
    String userText = request.get("userMessage");

    // Create Chat messages
    SystemMessage systemMessage = SystemMessage.from(systemText);
    UserMessage userMessage = UserMessage.from(userText);

    // Pass messages as arguments (Varargs)
    ChatResponse response = chatModel.chat(systemMessage, userMessage);

    // Use helper to format output
    return ResponseEntity.ok(buildDetailedResponse(response));
}What’s Happening:
- SystemMessage: Tells the AI how to behave.
- UserMessage: The actual question.
- chat(msg1, msg2): We pass these messages as arguments.
- ChatResponse: Unlike the first example, this returns a complex object containing the answer and metadata like token usage, finish reason, model name and response id.
4.4. The Chatbot Logic: Conversation with History
Method Used: chat(List<ChatMessage>)
AI models have no memory. To create a back-and-forth conversation, you must send the entire history every time.
@PostMapping("/conversation")
public ResponseEntity<Map<String, Object>> conversationalChat(@RequestBody Map<String, Object> request) {
    List<Map<String, String>> messagesData = (List<Map<String, String>>) request.get("messages");

    // Convert raw JSON list to ChatMessage objects (using helper method)
    List<ChatMessage> messages = messagesData.stream()
            .map(this::convertToChatMessage)
            .collect(Collectors.toList());

    // Send the full history list
    ChatResponse response = chatModel.chat(messages);

    return ResponseEntity.ok(buildDetailedResponse(response));
}What’s Happening:
- We accept a list of messages from the client.
- We convert them into LangChain4j objects (UserMessage, AiMessage, SystemMessage).
- The model reads the full list, understands the context, and generates the next response.
4.5. The Power User: Advanced Chat with Parameters
Method Used: chat(ChatRequest)
This is the most powerful method. It allows us to bundle the messages and specific configuration knobs (Parameters) into a single request.
@PostMapping("/advanced")
public ResponseEntity<Map<String,Object>> advancedChat(@RequestBody Map<String,Object> request) {

    // Extract messages
    String systemText = (String) request.getOrDefault("systemMessage", "You are a helpful assistant");
    String userText = (String) request.get("userMessage");

    // Extract parameters (with defaults)
    Double temperature = getDoubleParam(request, "temperature", 0.7);
    Integer maxTokens = getIntegerParam(request, "maxTokens", 500);
    Double topP = getDoubleParam(request, "topP", 0.9);
    Double frequencyPenalty = getDoubleParam(request, "frequencyPenalty", 1.5);
    Double presencePenalty = getDoubleParam(request, "presencePenalty", 1.5);
    @SuppressWarnings("unchecked")
    List <String> stopSequences = (List <String> ) request.get("stopSequences");

    // Build ChatRequestParameters
    ChatRequestParameters requestParameters = ChatRequestParameters.builder()
        .modelName("tngtech/deepseek-r1t2-chimera:free")
        .temperature(temperature)
        .maxOutputTokens(maxTokens)
        .topP(topP)
        .frequencyPenalty(frequencyPenalty)
        .presencePenalty(presencePenalty)
        .stopSequences(stopSequences)
        .build();


    // Build ChatRequest
    ChatRequest chatRequest = ChatRequest.builder()
        .messages(
            SystemMessage.from(systemText),
            UserMessage.from(userText)
        )
        .parameters(requestParameters)
        .build();

    // Call ChatModel with full ChatRequest
    ChatResponse response = chatModel.chat(chatRequest);

    return ResponseEntity.ok(buildDetailedResponse(response));
}
What’s Happening:
- This method demonstrates the most powerful way to use the ChatModel: passing a full
ChatRequestcontaining messages + parameters. - Extracting Parameters: We read specific tuning values (like temperature and maxTokens) from the user’s JSON input. (Note: We use helper methods like getDoubleParam to safely handle defaults, which we will look at shortly).
- ChatRequestParameters: We build a configuration object that acts as a “control panel.” This allows us to override the default settings and fine-tune the AI’s creativity and constraints for this specific request.
- ChatRequest Wrapper: We bundle the Messages (System + User) and the Parameters into a single
ChatRequestobject. - Execution: We pass this complete package to
chatModel.chat(chatRequest), giving us total control over both the content and the behavior of the AI.
4.6. Low Level Access: Direct Chat
Method Used: doChat(ChatRequest)
@PostMapping("/direct")
public ResponseEntity<Map<String, Object>> directChat(@RequestBody Map<String, String> request) {
    String userMessage = request.get("message");

    // We need to provide OpenAiChatRequestParameters specifically here
    OpenAiChatRequestParameters openAiChatRequestParameters = OpenAiChatRequestParameters.builder()
            .modelName("tngtech/deepseek-r1t2-chimera:free")
            .temperature(0.8)
            .build();

    // Build simple ChatRequest
    ChatRequest chatRequest = ChatRequest.builder()
            .messages(UserMessage.from(userMessage))
            .parameters(openAiChatRequestParameters)
            .build();

    // Call doChat - bypasses standard API wrappers
    ChatResponse response = chatModel.doChat(chatRequest);

    return ResponseEntity.ok(buildDetailedResponse(response));
}What’s Happening:
- Provider-Specific Parameters: Here we use
OpenAiChatRequestParametersinstead of the genericChatRequestParameters. This allows us to access configuration settings that are specific only to OpenAI-compatible models (like DeepSeek). It gives you access to vendor-specific features that the generic LangChain4j interface doesn’t cover by default. - doChat vs chat:
- chat(ChatRequest): This is the standard method you should use 99% of the time. It is the official public API designed for interaction.
- doChat(ChatRequest): This is the internal method that actually performs the logic. Under the hood, when you call chat(), it eventually calls doChat() to get the job done but skips the listeners. By calling doChat() directly, we are simply bypassing the standard entry point to invoke the execution logic immediately.
4.7. Model Inspection & Capabilities
Method Used: provider(), supportedCapabilities(), defaultRequestParameters(), listeners()
@GetMapping("/model-info")
public ResponseEntity< Map<String,Object>> getModelInfo() {


    Map<String,Object> modelInfo = new LinkedHashMap<> ();

    // 1. Provider Information
    ModelProvider provider = chatModel.provider();
    modelInfo.put("provider", provider.name());

    // 2. Supported Capabilities
    Set <Capability> capabilities = chatModel.supportedCapabilities();
    List <String> capabilityNames = capabilities.stream()
        .map(Capability::name)
        .sorted()
        .collect(Collectors.toList());

    modelInfo.put("supportedCapabilities", capabilityNames);
    modelInfo.put("capabilitiesCount", capabilities.size());

    // 3. Default Request Parameters
    ChatRequestParameters defaultParams = chatModel.defaultRequestParameters();
    Map <String,Object> paramsMap = new LinkedHashMap<> ();

    if (defaultParams != null) {
        paramsMap.put("modelName", defaultParams.modelName());
        paramsMap.put("temperature", defaultParams.temperature());
        paramsMap.put("maxOutputTokens", defaultParams.maxOutputTokens());
        paramsMap.put("topP", defaultParams.topP());
        paramsMap.put("topK", defaultParams.topK());
        paramsMap.put("frequencyPenalty", defaultParams.frequencyPenalty());
        paramsMap.put("presencePenalty", defaultParams.presencePenalty());
        paramsMap.put("stopSequences", defaultParams.stopSequences());

        ResponseFormat responseFormat = defaultParams.responseFormat();
        if (responseFormat != null) {
            paramsMap.put("responseFormat", responseFormat.type().name());
        }
    }

    modelInfo.put("defaultParameters", paramsMap);

    // 4. Registered Listeners
    List<ChatModelListener> listeners = chatModel.listeners();
    List<String> listenerNames = listeners.stream()
        .map(listener -> listener.getClass().getSimpleName())
        .collect(Collectors.toList());

    modelInfo.put("registeredListeners", listenerNames);
    modelInfo.put("listenersCount", listeners.size());

    return ResponseEntity.ok(modelInfo);
}
What’s Happening:
This endpoint acts as a Diagnostic Dashboard. It doesn’t send a message to the AI; instead, it looks “under the hood” of your application to see how the ChatModel is configured at runtime.
- Provider Information:
chatModel.provider()tells you exactly which service is backing your application (e.g., OPEN_AI, GOOGLE_AI_GEMINI). This is useful in complex apps that might switch providers dynamically. - Supported Capabilities:
chatModel.supportedCapabilities()returns a list of features the current model supports. For example, does this model support JSON Output? This helps your code decide which features to enable or disable based on the loaded model. - Default Parameters:
chatModel.defaultRequestParameters()shows the default parameters. It confirms that your configuration (like temperature or model-name) was applied correctly during startup. - Registered Listeners:
chatModel.listeners()lists any active observers. This allows you to verify that your logging or monitoring tools are correctly attached to the model.
4.8. Helper Methods (The Utility Belt)
You might have noticed that our controller delegates a lot of work to private methods like buildDetailedResponse. We do this to keep our endpoint logic clean and readable. Let’s break down what these helpers do.
/**
 * Build detailed response map with all metadata
 */
private Map<String, Object> buildDetailedResponse(ChatResponse response) {

    Map<String, Object> result = new LinkedHashMap<>();
    result.put("aiResponse", response.aiMessage().text());

    // Add all metadata
    addTokenUsageInfo(result, response);
    addFinishReasonInfo(result, response);
    addMetadataInfo(result, response);

    return result;
}

/**
 * Add token usage information to result
 */
private void addTokenUsageInfo(Map<String, Object> result, ChatResponse response) {
    TokenUsage tokenUsage = response.metadata().tokenUsage();

    if (tokenUsage != null) {
        Map<String, Object> tokenInfo = new LinkedHashMap<>();
        tokenInfo.put("inputTokens", tokenUsage.inputTokenCount());
        tokenInfo.put("outputTokens", tokenUsage.outputTokenCount());
        tokenInfo.put("totalTokens", tokenUsage.totalTokenCount());

        result.put("tokenUsage", tokenInfo);
    }
}

/**
 * Add finish reason information to result
 */
private void addFinishReasonInfo(Map<String, Object> result, ChatResponse response) {
    FinishReason finishReason = response.metadata().finishReason();

    if (finishReason != null) {
        Map<String, String> finishInfo = new LinkedHashMap<>();
        finishInfo.put("reason", finishReason.name());
        result.put("finishReason", finishInfo);
    }
}

/**
 * Add response metadata to result
 */
private void addMetadataInfo(Map<String, Object> result, ChatResponse response) {
    Map<String, Object> metadata = new LinkedHashMap<>();
    metadata.put("modelName", response.metadata().modelName());
    metadata.put("responseId", response.id());

    result.put("metadata", metadata);
}

/**
 * Convert DTO map to ChatMessage
 */
private ChatMessage convertToChatMessage(Map<String, String> messageData) {
    String type = messageData.get("type").toLowerCase();
    String content = messageData.get("content");

    return switch (type) {
        case "system" -> SystemMessage.from(content);
        case "user" -> UserMessage.from(content);
        case "ai", "assistant" -> AiMessage.from(content);
        default -> throw new IllegalArgumentException("Unknown message type: " + type);
    };
}

/**
 * Safely extract Double parameter from request
 */
private Double getDoubleParam(Map<String, Object> request, String key, Double defaultValue) {
    Object value = request.get(key);
    if (value == null) return defaultValue;
    if (value instanceof Number) return ((Number) value).doubleValue();
    return defaultValue;
}

/**
 * Safely extract Integer parameter from request
 */
private Integer getIntegerParam(Map<String, Object> request, String key, Integer defaultValue) {
    Object value = request.get(key);
    if (value == null) return defaultValue;
    if (value instanceof Number) return ((Number) value).intValue();
    return defaultValue;
}Breakdown:
- buildDetailedResponse(ChatResponse response): This orchestrator method converts the complex
ChatResponseobject into a clean Map for the JSON API response. It populates the main AI answer and calls sub-methods to inject metadata, token usage, and finish reasons. - addTokenUsageInfo(Map<String, Object> result, ChatResponse response): This method extracts input, output, and total token counts from the response metadata. It ensures this information is added to the API response only if it is available.
- addFinishReasonInfo(Map<String, Object> result, ChatResponse response): This captures why the AI stopped generating text (e.g., STOP for natural completion or LENGTH if the token limit was reached). This is vital for clients to know if the received answer is complete or cut off.
- addMetadataInfo(Map<String, Object> result, ChatResponse response): This extracts traceability details, such as the specific Model Name used and the unique ID. These details are essential for debugging and tracking individual requests in production logs.
- convertToChatMessage(Map<String, String> messageData): This acts as a factory that converts raw JSON input into specific LangChain4j classes (UserMessage, SystemMessage, AiMessage) based on the “type” field. This transformation is necessary to rebuild conversation history for the AI.
- getDoubleParam(…) & getIntegerParam(…): These utility methods safely extract numeric values from the request map, handling type casting and null checks. They ensure the application falls back to sensible defaults (like 0.7 for temperature) if the user omits a parameter.
6. Testing the Application
- Get an API Key: Go to OpenRouter and generate a free API key.
- Run the App: Set
OPENROUTER_API_KEYenvironment variable and run the Spring Boot app. - Send a Request: Use Postman or cURL:
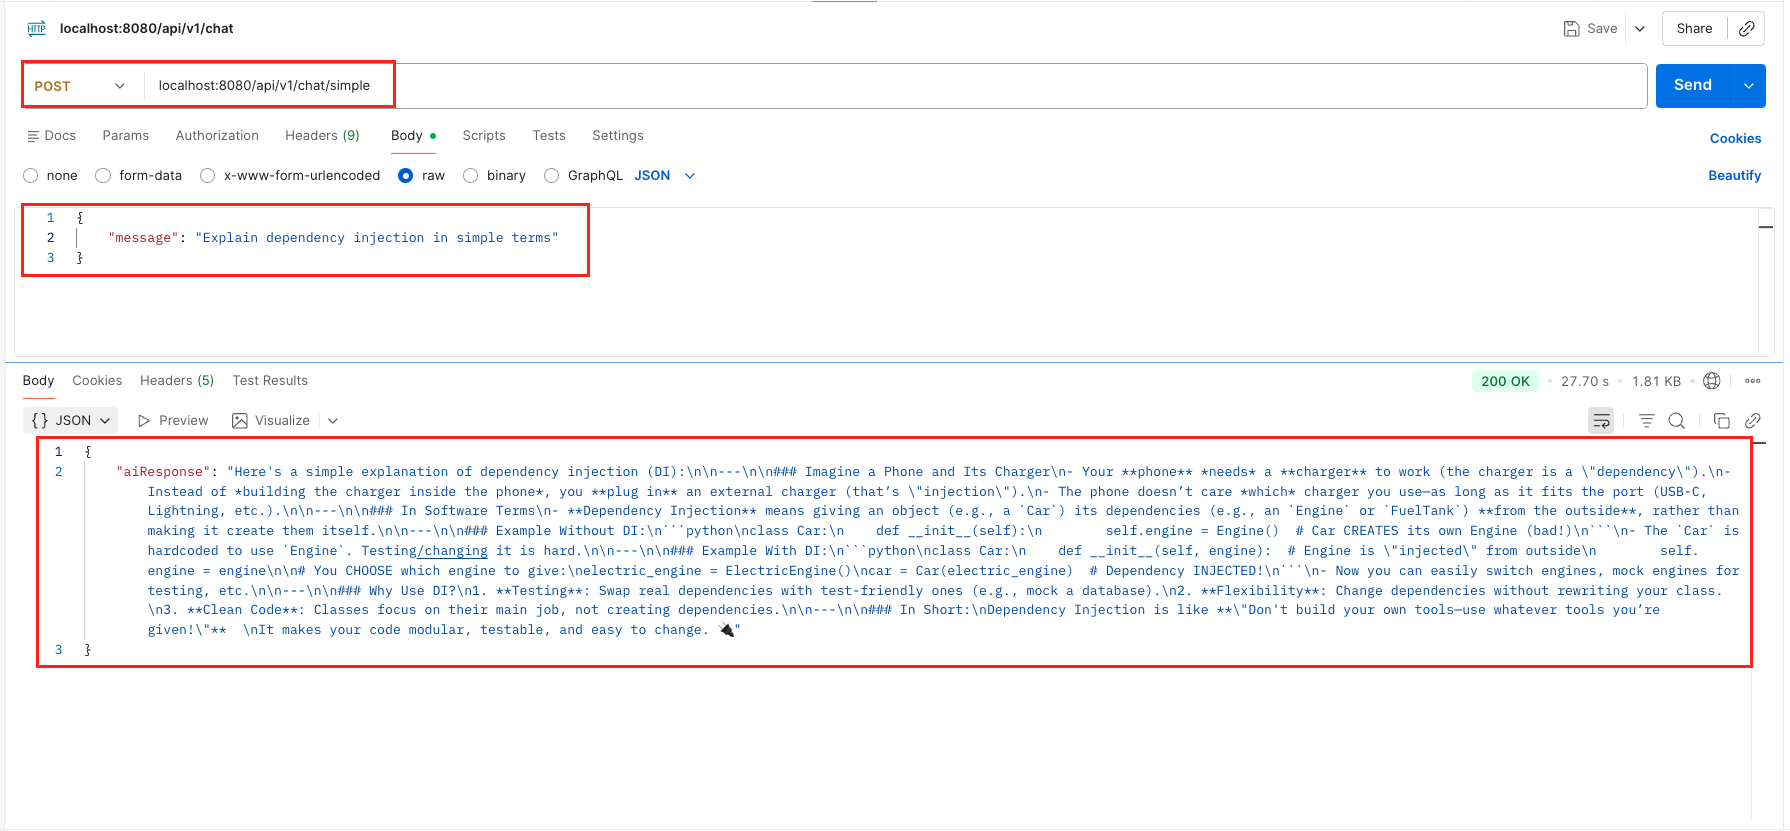
6.1. Test Simple Chat (String-in, String-out)
Tests the basic chat(String) method.
curl 'localhost:8080/api/v1/chat' \
--header 'Content-Type: application/json' \
--data '{
    "message": "Explain dependency injection in simple terms"
}'
6.2. Test Role-Based Chat (Varargs)
Tests chat(ChatMessage…) with a specific System Persona.
curl -X POST 'http://localhost:8080/api/v1/chat/with-chat-messages' \
--header 'Content-Type: application/json' \
--data '{
    "systemMessage": "You are a funny pirate captain.",
    "userMessage": "Where is the treasure?"
}'
6.3. Test Conversation History
Tests chat(List<ChatMessage>) to see if the AI remembers context.
curl -X POST 'http://localhost:8080/api/v1/chat/conversation' \
--header 'Content-Type: application/json' \
--data '{
    "messages": [
        { "type": "system", "content": "You are a math tutor." },
        { "type": "user", "content": "What is 10 + 10?" },
        { "type": "ai", "content": "The answer is 20." },
        { "type": "user", "content": "Multiply that result by 5." }
    ]
}'
6.4. Test Advanced Parameters
Tests chat(ChatRequest) with custom parameters.
curl -X POST 'localhost:8080/api/v1/chat/advanced' \
--header 'Content-Type: application/json' \
--data '{
    "systemMessage": "You are a Spring Boot expert",
    "userMessage": "Explain Spring Boot from a beginner’s point of view",
    "temperature": 0.9,
    "maxTokens": 600,
    "topP": 0.95,
    "frequencyPenalty": 0.5,
    "presencePenalty": 0.5,
    "stopSequences": [
        "END"
    ]
}'
6.5. Test Direct Execution
Tests doChat(ChatRequest)
curl -X POST 'http://localhost:8080/api/v1/chat/direct' \
--header 'Content-Type: application/json' \
--data '{
    "message": "Hello, can you briefly tell me how you can help me?"
}'
6.6. Test Model Info
Tests provider(), capabilities(), and listeners() inspection.
curl -X GET 'http://localhost:8080/api/v1/chat/model-info'
Output:
 Test Simple Chat Output – LangChain4j ChatModel
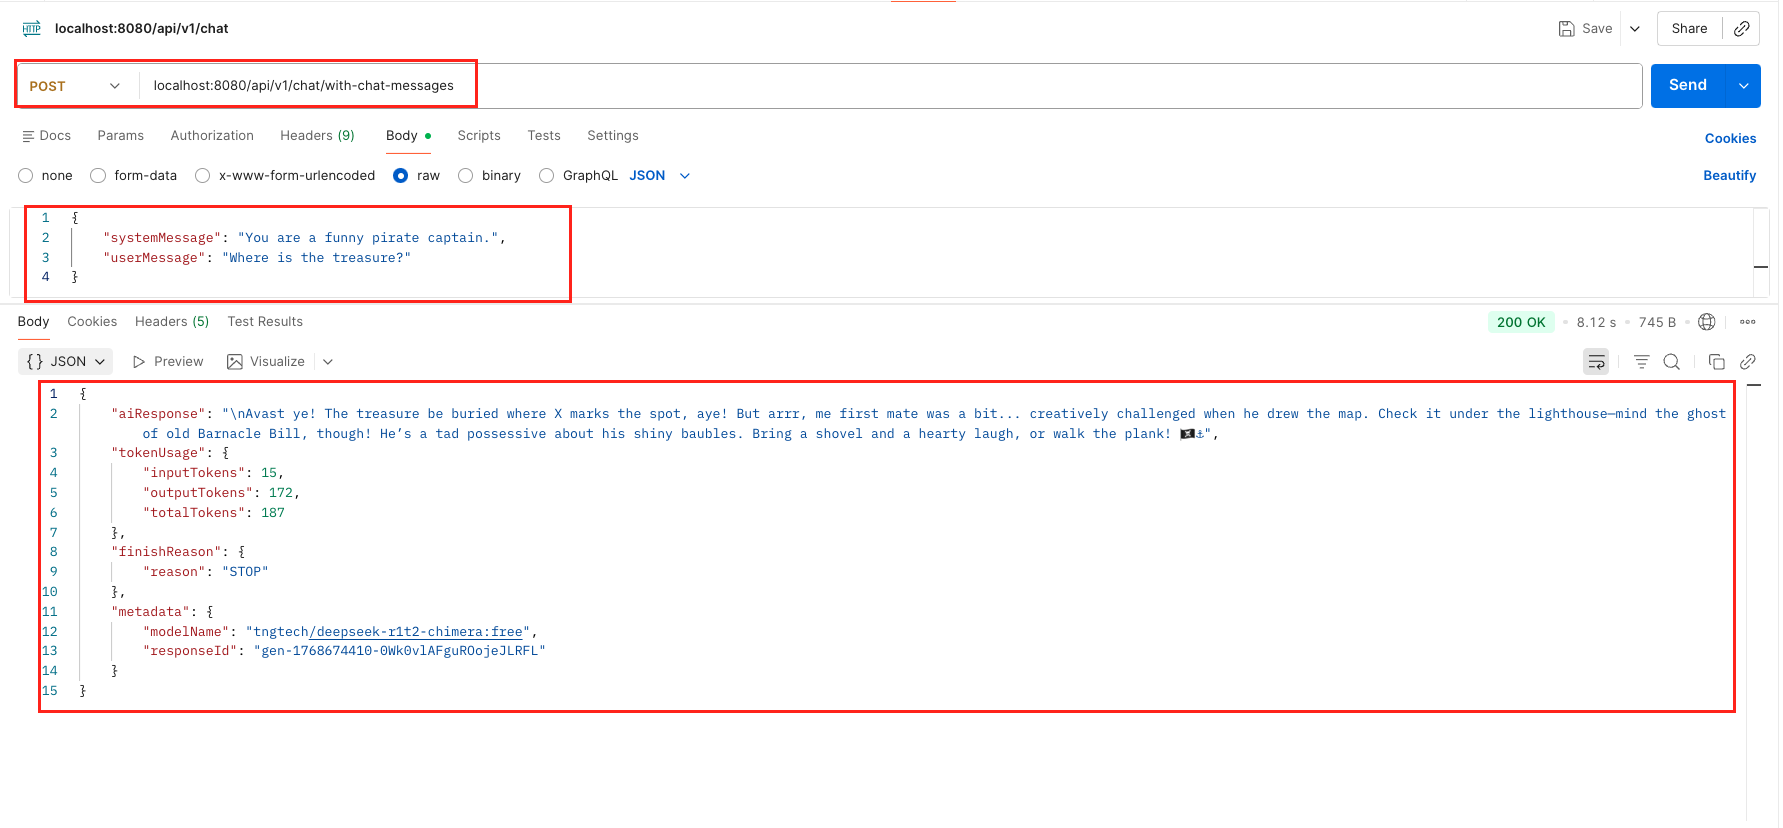 Test Role Based Chat With ChatMessage Output – LangChain4j ChatModel
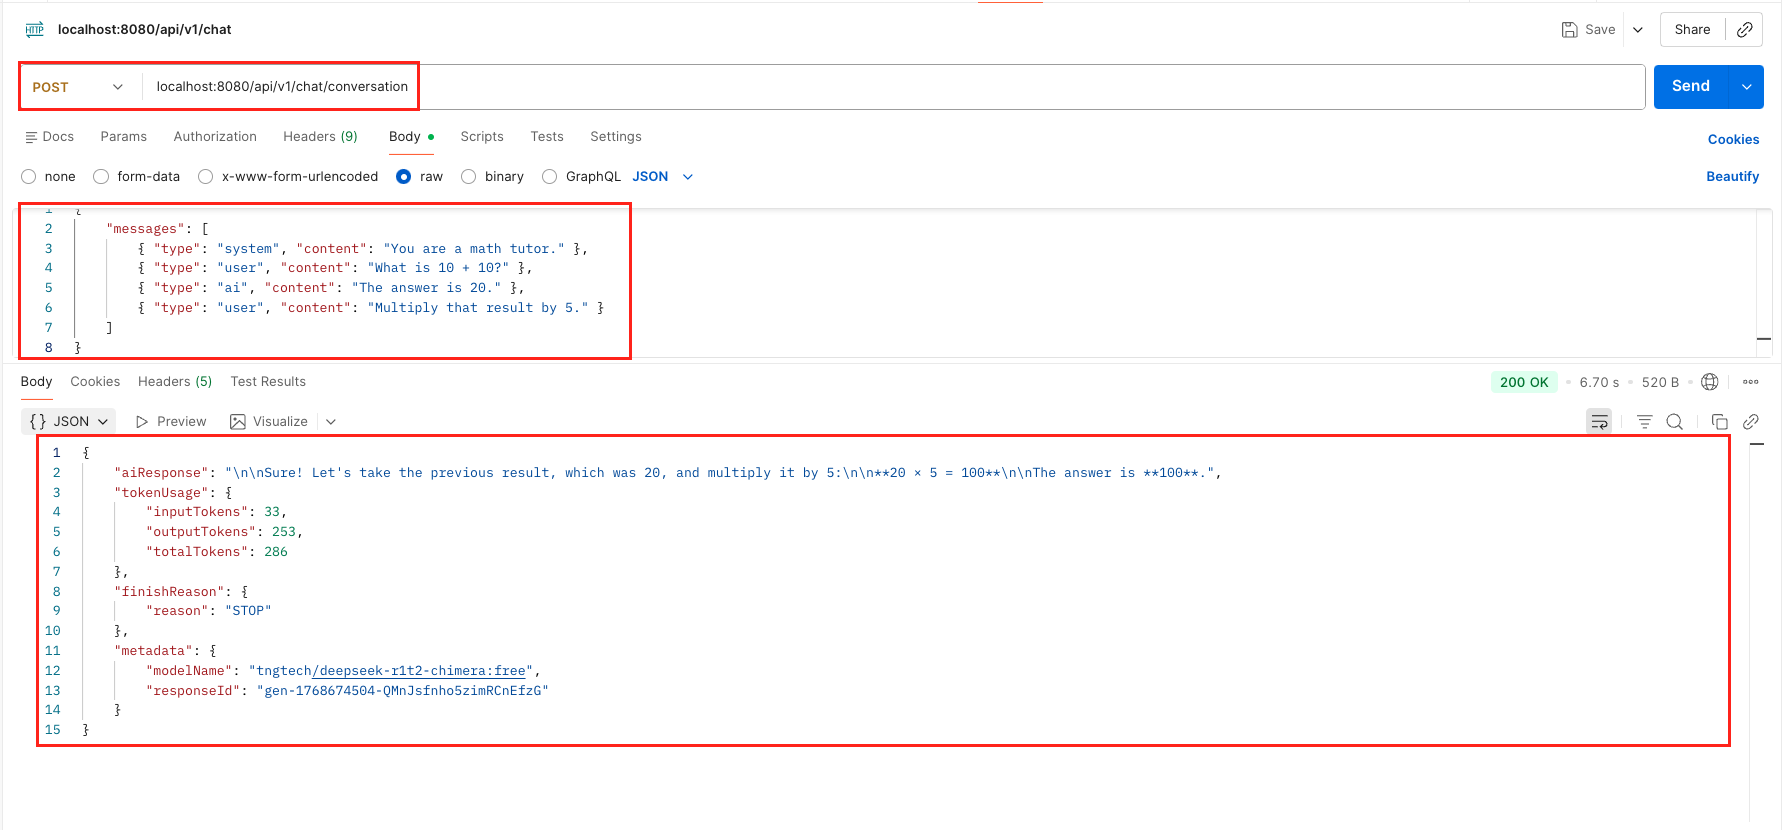 Test Conversation History With ChatMessage List Output – LangChain4j ChatModel
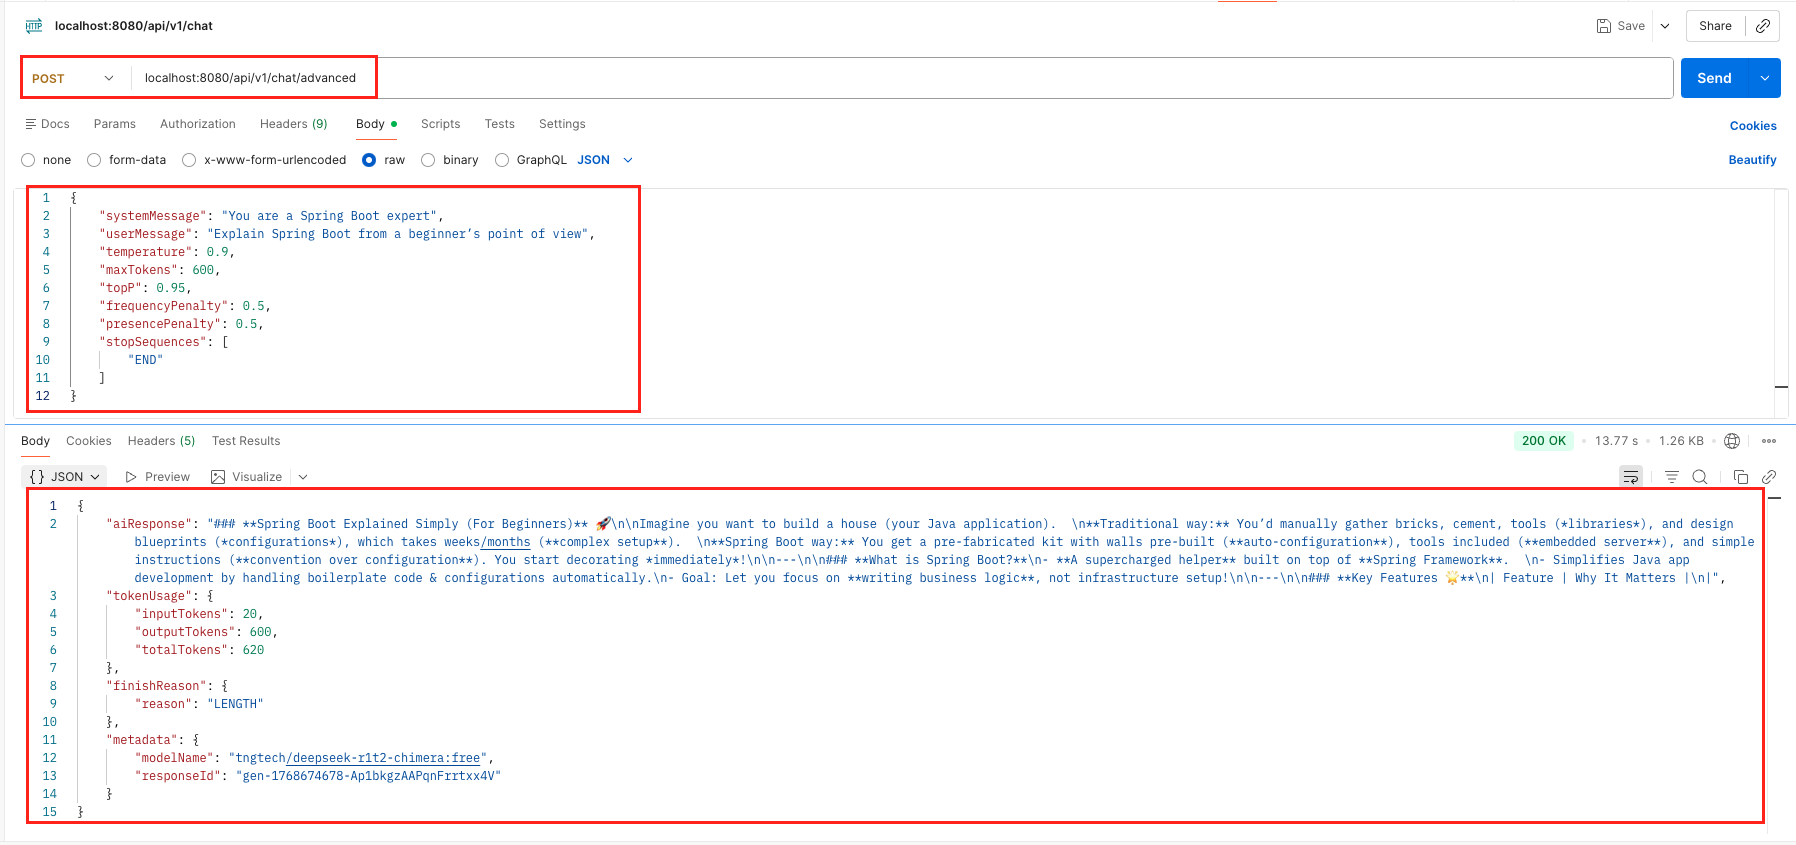 Test ChatRequest With ChatRequestParameters Output – LangChain4j ChatModel
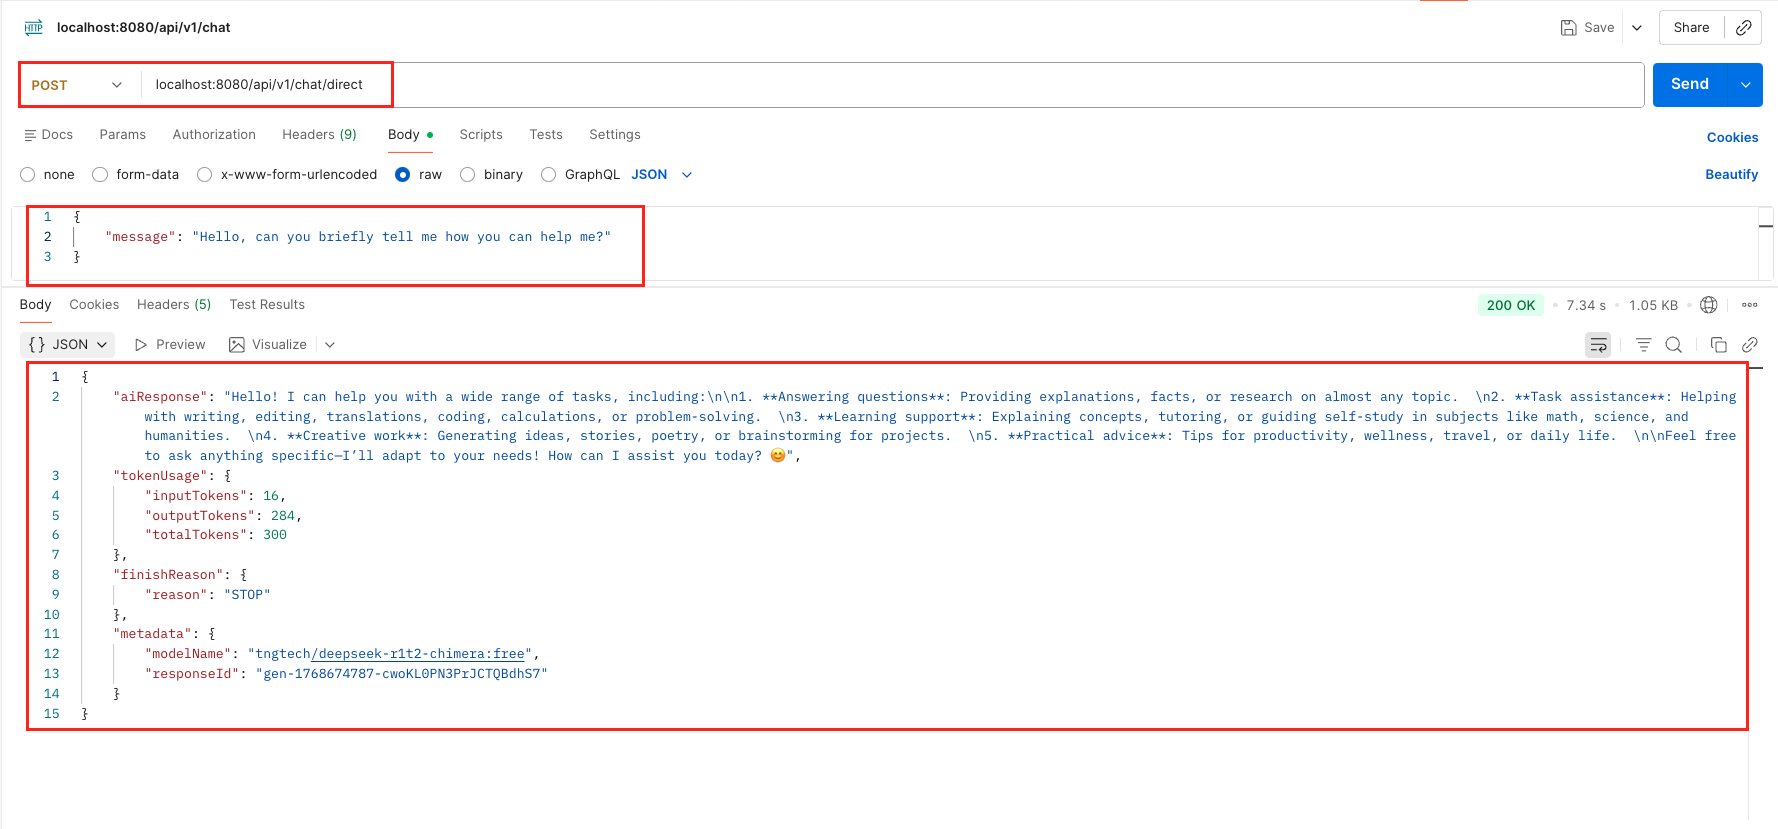 Test doChat Output – LangChain4j ChatModel
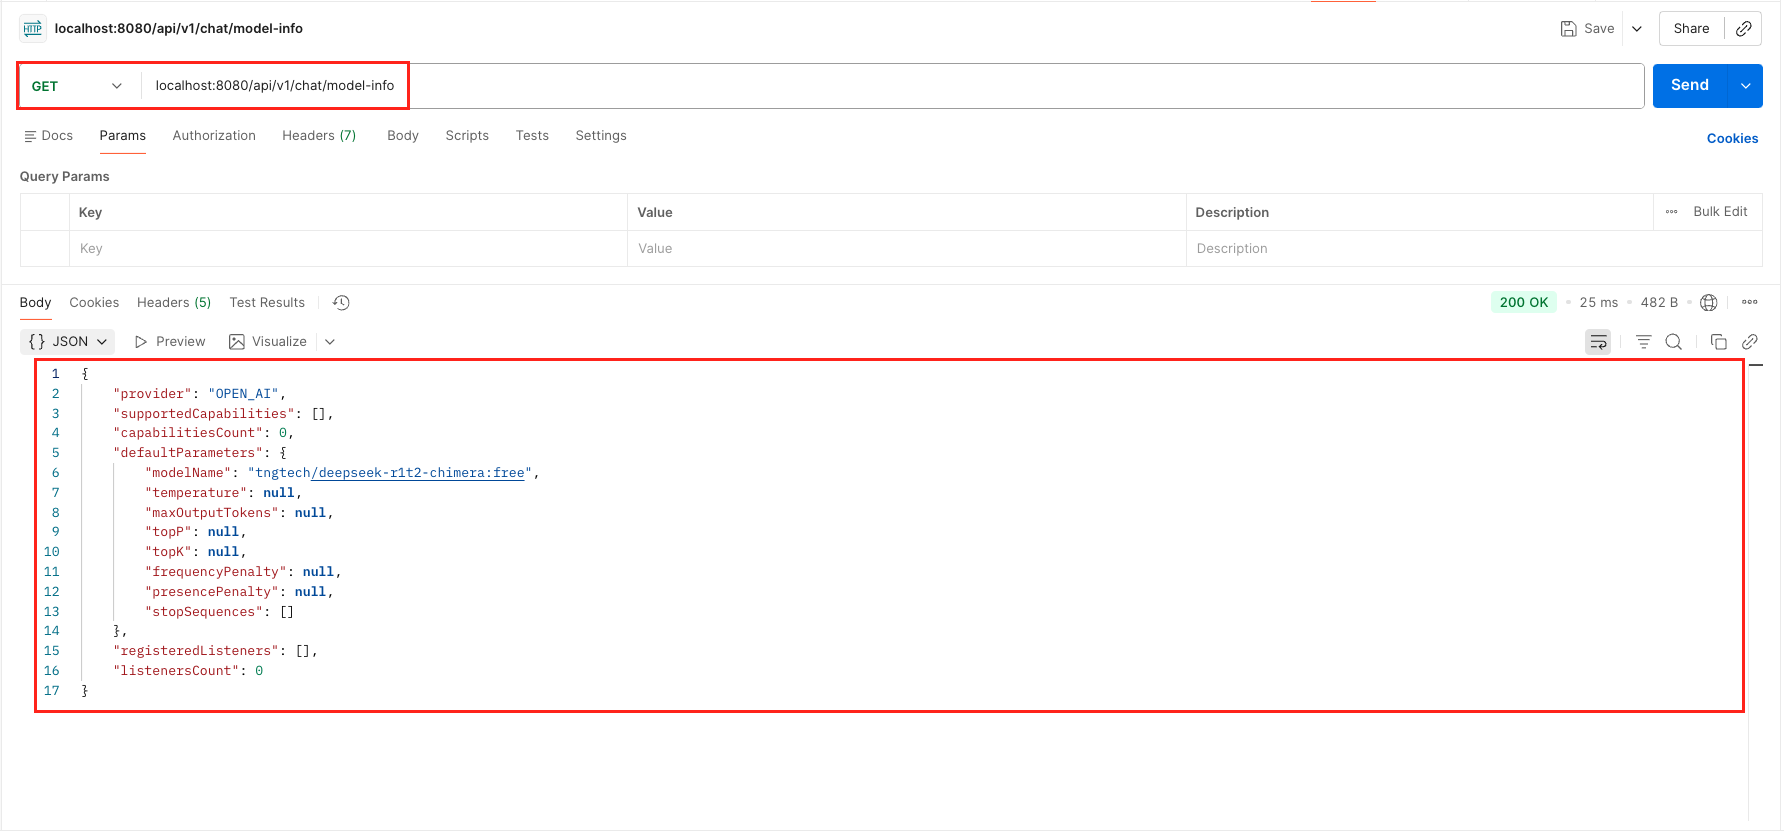 Test Model Info Output – LangChain4j ChatModel
7. Video Tutorial
For a complete step-by-step walkthrough, check out our video tutorial where we build the LangChain4j ChatModel Demo from scratch. We demonstrate all 5 distinct ways to interact with the ChatModel interface, covering everything from simple text chats to advanced parameter tuning and direct execution!
📺 Watch on YouTube:
8. Source Code
The full source code for our LangChain4j ChatModel Demo is available on GitHub. Clone the repo, set your OPENROUTER_API_KEY as an environment variable, and launch the Spring Boot application to test all 5 interaction methods yourself!
🔗 LangChain4j ChatModel Demo: https://github.com/BootcampToProd/langchain4j-chatmodel-demo
9. Things to Consider
While the ChatModel interface is powerful, there are a few architectural and operational details you must keep in mind to build reliable applications.
- Statelessness & Context: The ChatModel itself is stateless. It does not remember your previous request. If you want to build a chatbot that remembers conversation history, you cannot use chat(String). You must maintain the list of ChatMessage objects yourself (or use a Memory Store) and send the full history with every new request using chat(List<ChatMessage>).
- Token Economics: Every request and response consumes tokens (which cost money). In production, always monitor the token usgae. Sending large conversation histories for simple questions wastes tokens and increases costs unnecessarily.
- Finish Reasons: Always check the finish reason. If the finish reason is STOP, the AI completed the response normally; if it is LENGTH, the output was truncated due to a low
maxOutputTokenslimit, so you may need to increase it or request a shorter answer. - Blocking vs. Streaming: The ChatModel interface is blocking. It waits until the entire response is generated before returning. If you want the “typewriter effect” (where text appears word-by-word like ChatGPT), you cannot use ChatModel; you must use the StreamingChatModel interface instead.
- System Message Priority: Beginners often put instructions (e.g., “Act like a pirate”) inside the UserMessage. However, ChatModel allows you to use a SystemMessage for this exact purpose. Most modern LLMs are trained to prioritize instructions in the System Message over the User Message, making your application more robust against “prompt injection” attacks.
- Content Filtering: In addition to STOP and LENGTH, the FinishReason can also be CONTENT_FILTER. This happens if the user asks something that violates the AI provider’s safety guidelines (e.g., hate speech or illegal acts). Your application logic should explicitly check for this reason to warn the user that their request was blocked.
- Error Handling Network failures, rate limits, and invalid API keys can cause exceptions. Always wrap ChatModel calls in try-catch blocks and provide meaningful error messages to users.
10. FAQs
What’s the difference between chat() and doChat()?
chat() is the standard method that triggers all registered listeners, making it ideal for production with monitoring. doChat() is a low-level method that bypasses listeners, used primarily when you need direct API access without overhead.
How do I maintain conversation history across application restarts?
Store conversation histories in a database (PostgreSQL, MongoDB) or cache (Redis). Load the history when initializing the conversation and save after each interaction.
Why is my response cut off?
Check the finishReason. If it’s LENGTH, you hit the maxTokens limit. Increase maxTokens in your request or model configuration.
Can I switch from OpenAI to Google Gemini without changing my Java code?
Yes! Because your controller injects the ChatModel interface (and not a specific class like OpenAiChatModel), you can switch providers simply by changing your dependencies in pom.xml and updating the configuration in application.yml. Your controller logic remains exactly the same.
Why doesn’t the chat(String) method remember my previous questions?
The ChatModel is stateless. It treats every request as a brand-new conversation. If you need the AI to remember context (like a chatbot), you must store the conversation history yourself and send it back to the model using the chat(List<ChatMessage>) method.
Can I use ChatModel to stream responses word-by-word like ChatGPT?
No. The ChatModel interface is blocking, meaning it waits for the full response to be generated before returning. To achieve the “typewriter effect,” you need to use the StreamingChatModel interface, which pushes data chunks as they arrive.
11. Conclusion
The ChatModel interface in LangChain4j provides a simple and consistent way to add AI chat capabilities to Spring Boot applications. By providing a unified abstraction, it lets you focus on building features rather than dealing with provider-specific APIs. Whether you use OpenAI, Google Gemini, or switch between multiple providers, ChatModel makes it easy. Start small with basic examples, experiment with models and parameters, and gradually build more advanced conversational features.The key is understanding that behind every great AI-powered application is a simple, well designed interface and in LangChain4j, that interface is ChatModel.
12. Learn More
Interested in learning more?
LangChain4j Getting Started: A Simple Guide for Beginners
Add a Comment