Learn how to build MCP server using Embabel Framework. In this guide, we will develop a File System MCP server to let AI agents perform CRUD operations on local files.
1. Introduction
Welcome back to our series on the Embabel Framework! If you have been following along, you know we are on a journey to master building AI agents in Java.
This is the fourth article in our Embabel series. We have come a long way from simple shell scripts to decision-making agents. Here is a quick recap of our journey so far:
- Basics & Shell Agent: We covered the fundamentals and built a meeting summarizer.
- REST API Agents: We learned how to expose our agents over HTTP.
- Decision Making: We explored how to use the Condition annotation to make smart choices.
Today, we are taking a massive leap forward. We are going to build an MCP Server.
2. What is an MCP Server?
Think of the Model Context Protocol (MCP) as a “universal USB port” for AI models. The MCP is an open standard developed by Anthropic that enables AI applications to securely connect with external data sources and tools. Instead of building custom integrations for every AI model, MCP provides a universal protocol that works across different platforms. Think of it as a bridge that lets AI models interact with your file system, databases, APIs, or any other service you expose.
With Embabel’s MCP server support, you can turn your Java applications into powerful tool providers that AI agents can discover and use automatically.
2.1. Why Use MCP?
Imagine you’re using Claude Desktop and you want it to:
- Read files from your computer
- Query your database
- Fetch data from an API
- Control smart home devices
Without MCP, each of these capabilities would require custom code and integration. With MCP, you build a server once, and any MCP-compatible AI client can use it immediately.
2.2. MCP Architecture
MCP follows a client-server architecture:
- MCP Client: The AI application (like Claude Desktop) that wants to use tools.
- MCP Server: Your application that exposes tools and capabilities.
- Transport Layer: How they communicate (HTTP, SSE, stdio).
Embabel makes it incredibly easy to build the server side of this equation!
3. Build MCP Server: File Operations MCP Server
In this tutorial, we’ll create a File Operations MCP Server with four core capabilities:
- Create File: Create a new file with content
- Read File: Read the contents of an existing file
- Edit File: Modify an existing file’s content
- Delete File: Remove a file from the system
Our server will expose these operations through the MCP protocol, allowing AI assistants like Claude to perform file operations through natural language commands.
⚙️ Project Structure & Setup
Before we dive into the code, let’s understand how our project is organized:
embabel-mcp-file-server
├── src
│   └── main
│       ├── java
│       │   └── com
│       │       └── bootcamptoprod
│       │               ├── config
│       │               │   └── ConfigureOpenRouterModels.java         # LLM configuration
│       │               ├── dto
│       │               │   └── FileOperationRequest.java              # Input parameter for file ops
│       │               │   └── FileMetadata.java                      # Output response with file info
│       │               ├── mcp
│       │               │   └── FileOperationsMcp.java                 # Main MCP server logic
│       │               └── EmbabelMcpFileServerApplication.java       # Spring Boot main class
│       └── resources
│           └──application.yml                                         # Configuration
└── pom.xml                                                            # Maven dependencies
Understanding the Project Structure
Here’s a quick breakdown of what each key file and package does:
- FileOperationsMcp.java: This is the core of our application. It defines the agent capable of performing file operations (Create, Read, Edit, Delete). It uses the @Export annotation to expose these Java methods as “Tools” that AI clients (like Claude) can execute via the Model Context Protocol.
- dto package (FileOperationRequest.java, FileMetadata.java): This directory holds our Data Transfer Objects (DTOs). FileOperationRequest defines the input parameters the AI must provide (filename and content), while FileMetadata defines the structured response we send back to the AI, containing details like file size, creation time, and actual content.
- EmbabelMcpFileServerApplication.java: The main class that boots up our Spring Boot application. It initializes the Spring context and prepares the application to listen for incoming MCP connections over SSE (Server-Sent Events).
- ConfigureOpenRouterModels.java: A Spring @Configuration class responsible for setting up the LLM connection. Even though this is an MCP server, Embabel requires an LLM configuration to initialize the internal agent context. We are using free models via OpenRouter for this demonstration.
- application.yml: Our configuration file. This is where we define the application name and set the default Language Model (LLM) that the Embabel framework will use for internal processing.
- pom.xml: The Maven project file. It manages all our project’s dependencies. The most important addition here is embabel-agent-starter-mcpserver, which automatically configures the SSE endpoints and protocol handlers required to make our application a functioning MCP server.
Diving Into the Code
Let’s break down each component of our application.
Step 1: Setting Up Maven Dependencies
First, let’s create our pom.xml file. The key dependency here is embabel-agent-starter-mcpserver, which provides all the MCP server capabilities.
<properties>
	<java.version>21</java.version>
	<embabel-agent.version>0.3.0</embabel-agent.version>
</properties>

<dependencies>
	<!-- Spring Boot Web for REST endpoints -->
	<dependency>
		<groupId>org.springframework.boot</groupId>
		<artifactId>spring-boot-starter-web</artifactId>
	</dependency>
	<!-- Spring Boot Actuator for health checks -->
	<dependency>
		<groupId>org.springframework.boot</groupId>
		<artifactId>spring-boot-starter-actuator</artifactId>
	</dependency>
	<!-- Embabel MCP Server Starter - The magic ingredient! -->
	<dependency>
		<groupId>com.embabel.agent</groupId>
		<artifactId>embabel-agent-starter-mcpserver</artifactId>
		<version>${embabel-agent.version}</version>
	</dependency>
	<!-- OpenAI Compatible Model Support -->
  <dependency>
    <groupId>com.embabel.agent</groupId>
    <artifactId>embabel-agent-starter-openai</artifactId>
    <version>${embabel-agent.version}</version>
  </dependency>
</dependencies>

<dependencyManagement>
	<dependencies>
		<dependency>
			<groupId>com.embabel.agent</groupId>
			<artifactId>embabel-agent-dependencies</artifactId>
			<version>${embabel-agent.version}</version>
			<type>pom</type>
			<scope>import</scope>
		</dependency>
	</dependencies>
</dependencyManagement>

<repositories>
	<repository>
		<id>embabel-releases</id>
		<url>https://repo.embabel.com/artifactory/libs-release</url>
		<releases>
			<enabled>true</enabled>
		</releases>
		<snapshots>
			<enabled>false</enabled>
		</snapshots>
	</repository>
	<repository>
		<id>embabel-snapshots</id>
		<url>https://repo.embabel.com/artifactory/libs-snapshot</url>
		<releases>
			<enabled>false</enabled>
		</releases>
		<snapshots>
			<enabled>true</enabled>
		</snapshots>
	</repository>
</repositories>
What’s Important Here:
- This Maven configuration sets up our Spring Boot project with Java 21.
- The key dependency here is
embabel-agent-starter-mcpserver. This starter library does all the heavy lifting. This single dependency brings in all MCP server capabilities. It also automatically configures endpoints (specifically Server-Sent Events or SSE) that allow MCP clients to connect to your Java application. - We also included
embabel-agent-starter-openai. You might wonder why we need an LLM dependency if we are just building a server for tools. Even though our MCP server’s tools are just deterministic Java code, the Embabel framework requires at least one LLM model to be configured to initialize its internal agent context. In our case, we will use this to configure free models from OpenRouter. - We’ve also included custom repositories to fetch the latest Embabel artifacts.
- The Actuator dependency adds health checks and metrics endpoints for production monitoring.
Step 2: Configure Application Properties
Next, let’s configure our application settings in application.yml:
spring:
  application:
    name: embabel-mcp-file-server

embabel:
  models:
defaultLlm: x-ai/grok-4.1-fast:free📄 Configuration Overview
- defaultLlm: We’re using Grok 4.1 Fast (free tier) via OpenRouter
This configuration tells Embabel which default LLM to use for generating intelligent responses. The free tier model works great for learning and development!
Step 3: Application Entry Point
This is the main class that bootstraps our entire application.
import org.springframework.boot.SpringApplication;
import org.springframework.boot.autoconfigure.SpringBootApplication;

@SpringBootApplication
public class EmbabelMcpFileServerApplication {

	public static void main(String[] args) {
		SpringApplication.run(EmbabelMcpFileServerApplication.class, args);
	}

}Explanation:
- This is our Spring Boot application entry point. This class bootstraps both Spring Boot and Embabel frameworks simultaneously.
- It scans for
@Agentclasses, exposes them via MCP protocol, sets up SSE endpoints, and also configures tool discovery
Step 4: Create Data Transfer Object (DTOs)
Our DTOs define the structure of data flowing through the application.
FileOperationRequest.java: This record represents the input parameters for our file operations
package com.bootcamptoprod.dto;

import org.springaicommunity.mcp.annotation.McpToolParam;

/**
 * Request record for file operations containing file name and content.
 */
public record FileOperationRequest(
    @McpToolParam(description = "File Name", required = true)
    String fileName,

    @McpToolParam(description = "File Content", required = false)
    String fileContent
) {
}This record holds the input data. The @McpToolParam annotation is crucial. It provides descriptions that the AI reads to understand what arguments it needs to provide. For example, if the AI wants to write a file, it knows it must provide fileName and fileContent.
FileMetadata.java: This record represents the output of our file operations with rich metadata
package com.bootcamptoprod.dto;

import java.io.IOException;
import java.nio.file.Files;
import java.nio.file.Path;
import java.nio.file.attribute.BasicFileAttributes;
import java.time.Instant;

/**
 * Record to hold the result of file operations.
 * Includes helper methods to automatically extract file attributes.
 */
public record FileMetadata(
        String fileName,
        String exactPath,
        long fileSize,
        Instant createdAt,
        Instant updatedAt,
        String content,
        boolean isDeleted,
        String error
) {
    /**
     * Factory method: Creates metadata by reading actual file attributes from disk.
     */
    public static FileMetadata fromPath(Path path, String content, boolean isDeleted) throws IOException {

        // Try to read file attributes (creation time, etc.)
        BasicFileAttributes attrs = Files.readAttributes(path, BasicFileAttributes.class);

        return new FileMetadata(
                path.getFileName().toString(),
                path.toAbsolutePath().toString(),
                content != null ? content.getBytes().length : 0,
                attrs.creationTime().toInstant(),
                attrs.lastModifiedTime().toInstant(),
                content,
                isDeleted,
                null // No error
        );
    }

    /**
     * Factory method: Creates an error response.
     */
    public static FileMetadata error(String fileName, String errorMessage) {
        return new FileMetadata(
                fileName,
                "Unknown",
                0,
                Instant.now(),
                Instant.now(),
                null,
                false,
                errorMessage
        );
    }
}
FileMetadata is what we return to the AI. It includes the file content but also metadata like fileSize and createdAt. Providing rich context helps the AI make better decisions.
Understanding FileMetadata:
- Rich Response: Includes file size, timestamps, content, and error information
- Factory Methods:
fromPath()anderror()provide clean ways to create instances - Automatic Metadata Extraction: Reads file attributes directly from the OS
- Timestamp Tracking: Captures creation and modification times
Step 5: Configuring LLM Models
This configuration class sets up multiple LLM models via OpenRouter, a unified API gateway for various AI models. Here’s what’s happening:
package com.bootcamptoprod.config;

import com.embabel.agent.openai.OpenAiCompatibleModelFactory;
import com.embabel.common.ai.model.Llm;
import com.embabel.common.ai.model.PerTokenPricingModel;
import io.micrometer.observation.ObservationRegistry;
import org.jetbrains.annotations.NotNull;
import org.springframework.beans.factory.annotation.Value;
import org.springframework.context.annotation.Bean;
import org.springframework.context.annotation.Configuration;

import java.time.LocalDate;

@Configuration
public class ConfigureOpenRouterModels extends OpenAiCompatibleModelFactory {

    public ConfigureOpenRouterModels(@NotNull ObservationRegistry observationRegistry,
                                     @Value("${OPENAI_API_KEY}") String apiKey) {
        super(
                "https://openrouter.ai",
                apiKey,
                "/api/v1/chat/completions",
                null,
                observationRegistry
        );
    }

    @Bean
    public Llm mistral7b_free() {
        return openAiCompatibleLlm(
                "mistralai/mistral-7b-instruct:free",
                new PerTokenPricingModel(0.0, 0.0),
                "OpenRouter",
                LocalDate.of(2024, 10, 1)
        );
    }

    @Bean
    public Llm deepseek_r1_t2() {
        return openAiCompatibleLlm(
                "tngtech/deepseek-r1t2-chimera:free",
                new PerTokenPricingModel(0.0, 0.0),
                "OpenRouter",
                LocalDate.of(2025, 5, 28)
        );
    }

    @Bean
    public Llm glm_4_5_air() {
        return openAiCompatibleLlm(
                "z-ai/glm-4.5-air:free",
                new PerTokenPricingModel(0.0, 0.0),
                "OpenRouter",
                LocalDate.of(2025, 5, 28)
        );
    }

    @Bean
    public Llm grok_4_1_free() {
        return openAiCompatibleLlm(
                "x-ai/grok-4.1-fast:free",
                new PerTokenPricingModel(0.0, 0.0),
                "OpenRouter",
                LocalDate.of(2025, 11, 28)
        );
    }
}Explanation:
- This configuration class registers OpenRouter as an AI model provider.
- By extending
OpenAiCompatibleModelFactory, we leverage OpenRouter’s OpenAI-compatible API. - The constructor configures the base URL and endpoint for OpenRouter API.
- The
@Value("${OPENAI_API_KEY}")annotation injects your API key, which you must provide as an environment variable when running the application. - The LLM beans methods create different model instances with zero pricing (useful for free tier or internal tracking) and metadata about the model.
- The
PerTokenPricingModel(0.0, 0.0)indicates these are free-tier models with no cost per token. - The
ObservationRegistryintegration enables automatic metrics collection for model usage.
Why Multiple Models? Having multiple models configured gives you flexibility to switch between them without code changes.
Step 6: Building the MCP Server (The Heart of Our Tutorial!)
Now comes the exciting part – building our actual MCP server! Create FileOperationsMcp.java:
package com.bootcamptoprod.mcp;

import com.bootcamptoprod.dto.FileMetadata;
import com.bootcamptoprod.dto.FileOperationRequest;
import com.embabel.agent.api.annotation.AchievesGoal;
import com.embabel.agent.api.annotation.Action;
import com.embabel.agent.api.annotation.Agent;
import com.embabel.agent.api.annotation.Export;
import org.slf4j.Logger;
import org.slf4j.LoggerFactory;

import java.nio.file.Files;
import java.nio.file.Path;
import java.nio.file.Paths;
import java.nio.file.StandardOpenOption;

/**
 * File Operations MCP Server - Direct file operations without AI agent capabilities.
 * Provides 4 core file operations: create, read, edit, delete with rich metadata.
 * Uses FileOperationRequest as input parameter for all operations.
 */
@Agent(description = "An agent capable of managing files on the local file system.")
public class FileOperatiosnMcp {

    private static final Logger logger = LoggerFactory.getLogger(FileOperationMcp.class);

    private static final Path BASE_DIR = Paths.get(System.getProperty("user.dir")).toAbsolutePath().normalize();

    /**
     * Create a file. Fails if the file already exists to prevent accidental overwrite.
     */
    @Action
    @AchievesGoal(
            description = "Create a new file with specific content.",
            export = @Export(remote = true, name = "createFile", startingInputTypes = {FileOperationRequest.class})
    )
    public FileMetadata createFile(FileOperationRequest request) {
        logger.info("Request received: Create file '{}'", request.fileName());
        try {
            Path path = resolvePath(request.fileName());

            // Safety check: Don't overwrite existing files in create mode
            if (Files.exists(path)) {
                logger.warn("Creation failed: File '{}' already exists", request.fileName());
                return FileMetadata.error(request.fileName(), "File already exists.");
            }

            String content = request.fileContent();

            // Write content and create new file
            Files.writeString(path, content, StandardOpenOption.CREATE_NEW);
            logger.info("Success: Created file '{}'", request.fileName());

            return FileMetadata.fromPath(path, content, false);
        } catch (Exception e) {
            return handleError("create", request.fileName(), e);
        }
    }

    /**
     * Read file content. Fails if file is missing.
     */
    @Action
    @AchievesGoal(
            description = "Read the contents of a file.",
            export = @Export(remote = true, name = "readFile", startingInputTypes = {FileOperationRequest.class})
    )
    public FileMetadata readFile(FileOperationRequest request) {
        logger.info("Request received: Read file '{}'", request.fileName());
        try {
            Path path = resolvePath(request.fileName());

            if (!Files.exists(path)) {
                logger.warn("Read failed: File '{}' not found", request.fileName());
                return FileMetadata.error(request.fileName(), "File not found.");
            }

            String content = Files.readString(path);
            logger.info("Success: Read file '{}' ({} bytes)", request.fileName(), content.length());

            return FileMetadata.fromPath(path, content, false);
        } catch (Exception e) {
            return handleError("read", request.fileName(), e);
        }
    }

    /**
     * Edit/Overwrite a file. Fails if file is missing.
     */
    @Action
    @AchievesGoal(
            description = "Edit/Overwrite an existing file.",
            export = @Export(remote = true, name = "editFile", startingInputTypes = {FileOperationRequest.class})
    )
    public FileMetadata editFile(FileOperationRequest request) {
        logger.info("Request received: Edit file '{}'", request.fileName());
        try {
            Path path = resolvePath(request.fileName());

            if (!Files.exists(path)) {
                logger.warn("Edit failed: File '{}' not found", request.fileName());
                return FileMetadata.error(request.fileName(), "File not found.");
            }

            String content = request.fileContent();

            // Truncate existing allows us to completely replace old content
            Files.writeString(path, content, StandardOpenOption.TRUNCATE_EXISTING);
            logger.info("Success: Edited file '{}'", request.fileName());

            return FileMetadata.fromPath(path, content, false);
        } catch (Exception e) {
            return handleError("edit", request.fileName(), e);
        }
    }

    /**
     * Delete a file. Returns metadata of the deleted file.
     */
    @Action
    @AchievesGoal(
            description = "Delete a specific file.",
            export = @Export(remote = true, name = "deleteFile", startingInputTypes = {FileOperationRequest.class})
    )
    public FileMetadata deleteFile(FileOperationRequest request) {
        logger.info("Request received: Delete file '{}'", request.fileName());
        try {
            Path path = resolvePath(request.fileName());

            if (!Files.exists(path)) {
                logger.warn("Delete failed: File '{}' not found", request.fileName());
                return FileMetadata.error(request.fileName(), "File not found.");
            }

            // Capture metadata snapshot before deleting so we can return what we destroyed
            FileMetadata deletedMeta = FileMetadata.fromPath(path, null, true);

            Files.delete(path);
            logger.info("Success: Deleted file '{}'", request.fileName());

            return deletedMeta;
        } catch (Exception e) {
            return handleError("delete", request.fileName(), e);
        }
    }

    // --- Helper Methods ---

    /**
     * Ensures filename is valid and resolves to the BASE_DIR.
     */
    private Path resolvePath(String fileName) {
        if (fileName == null || fileName.isBlank()) {
            throw new IllegalArgumentException("Filename cannot be empty");
        }
        // Strip directory parts and just take the filename
        String safeName = Paths.get(fileName).getFileName().toString();
        return BASE_DIR.resolve(safeName);
    }

    /**
     * Centralized error logging and response generation.
     */
    private FileMetadata handleError(String operation, String fileName, Exception e) {
        String msg = "Error during " + operation + ": " + e.getMessage();
        logger.error(msg, e);
        return FileMetadata.error(fileName, msg);
    }
}Explanation:
This is the heart of our application – the MCP Server Agent. Unlike our previous agents that used AI for internal reasoning, this agent exposes “Tools” that an external AI (like Claude or ChatGPT) can remotely control.
- @Agent: This annotation marks the class as an Embabel agent. The description (“An agent capable of managing files…”) is crucial here because the connecting AI client reads this description to understand the high-level purpose of this server.
- @Action: This annotation denotes actions that the agent can perform.
- @AchievesGoal: This is the most important annotation for building an MCP server. It wraps the logic with metadata.
- description: A human-readable explanation of what the tool does (e.g., “Create a new file…”). The AI uses this to decide which tool to call.
- @Export(remote = true, …): This is the magic switch. By setting remote = true, we tell Embabel to expose this method over the Model Context Protocol.
- name: This sets the specific tool name (e.g., “createFile”) that the AI will see in its tool list.
- startingInputTypes: This tells Embabel that this tool requires a FileOperationRequest object as input.
- createFile, readFile, editFile, deleteFile: These are the actual tool implementations. When the AI decides to “create a file,” it sends a request which triggers the corresponding Java method. Notice that these methods are deterministic—they use standard Java Files APIs to perform the work. This ensures that when the AI asks to write a file, it happens exactly as programmed without hallucination.
- FileOperationRequest: You will notice every action takes this as a parameter. It acts as the data carrier, containing the fileName and fileContent sent by the AI.
- resolvePath: This is a critical security helper method. Since we are giving an AI access to our hard drive, we must ensure it stays within our project folder. This method prevents “Directory Traversal” attacks (e.g., trying to access ../../windows/system32) by stripping directory paths and forcing the file to be created in our safe BASE_DIR.
- handleError: A centralized way to catch exceptions (like trying to read a missing file) and return a clean error message to the AI, rather than crashing the server.
Important Note on File Location:
Notice the BASE_DIR variable in the code. We are using System.getProperty(“user.dir”). This means the MCP server is currently configured to operate strictly within your project’s root folder (where your pom.xml resides). If you create a file named hello.txt, it will appear there.
4. How to Test Your MCP Server
Now let’s test our server! We’ll cover two methods: MCP Inspector and Claude Desktop.
Method 1: Using MCP Inspector (Web Based)
The MCP Inspector is a developer tool created by the Model Context Protocol team to test servers.
Step 1: Install Node.js Make sure Node.js is installed on your system (version 22.7.5 or higher recommended).
Step 2: Start Your Server
# Set your OpenRouter API key
export OPENAI_API_KEY=your_key_here

# Run the application
mvn spring-boot:runYour server will start on http://localhost:8080.
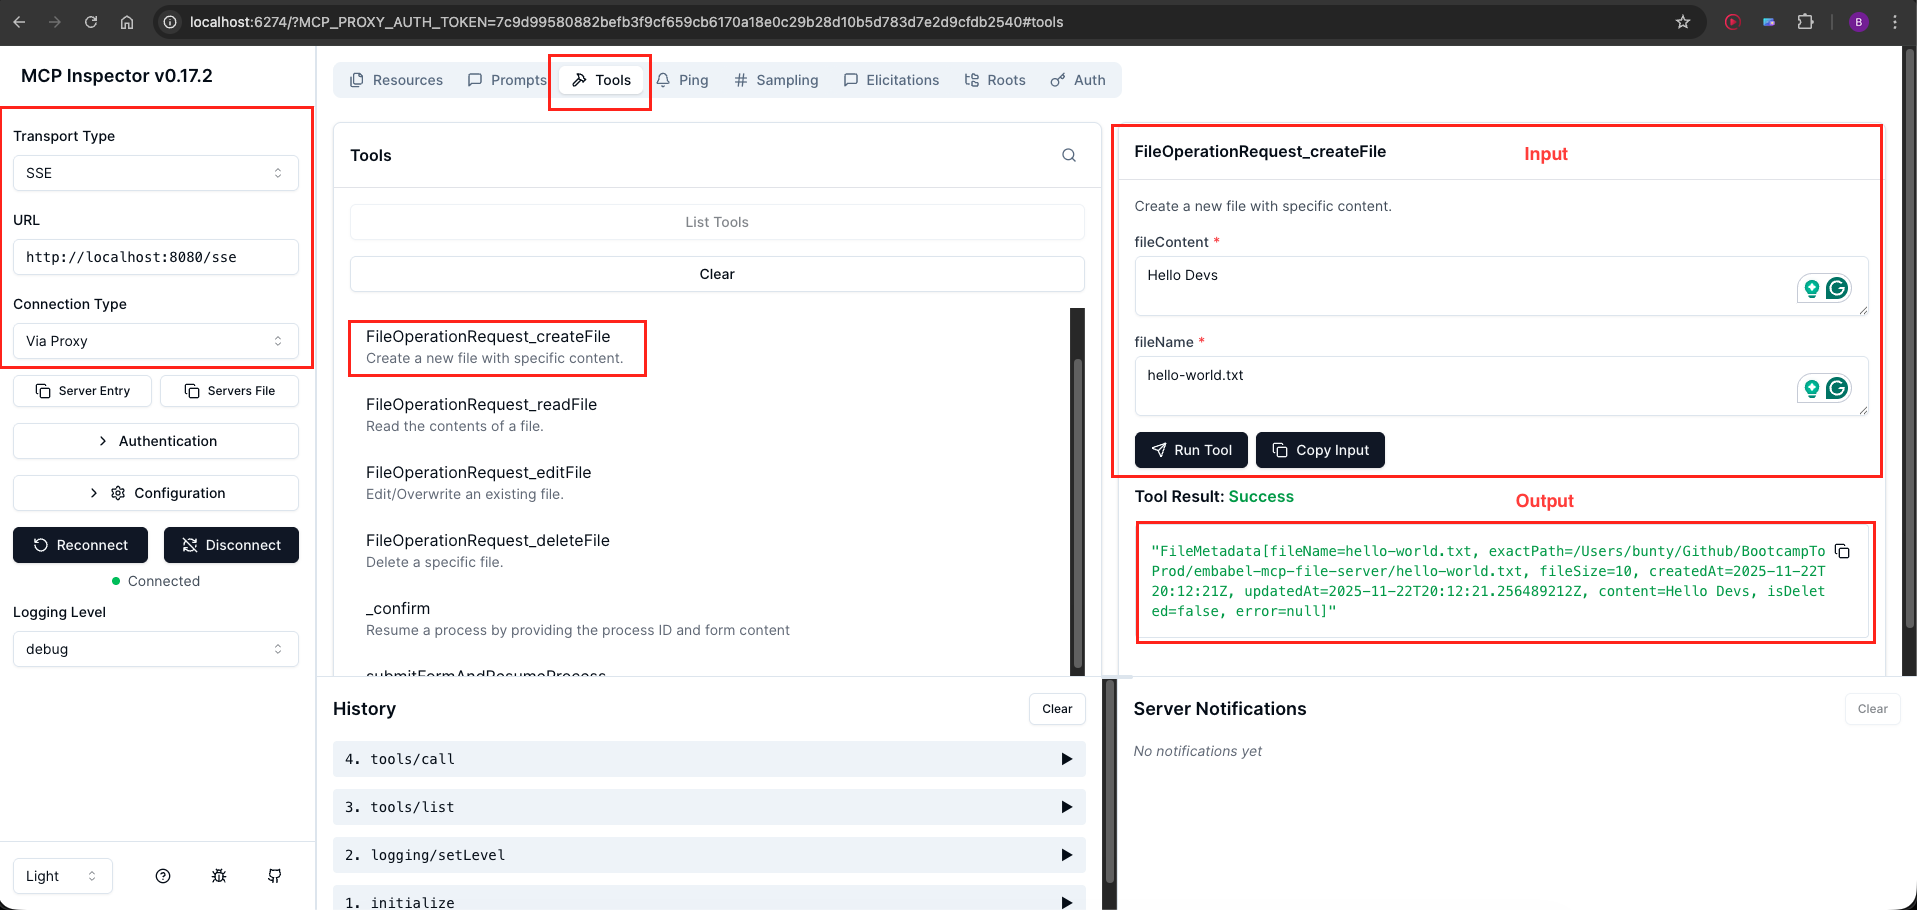
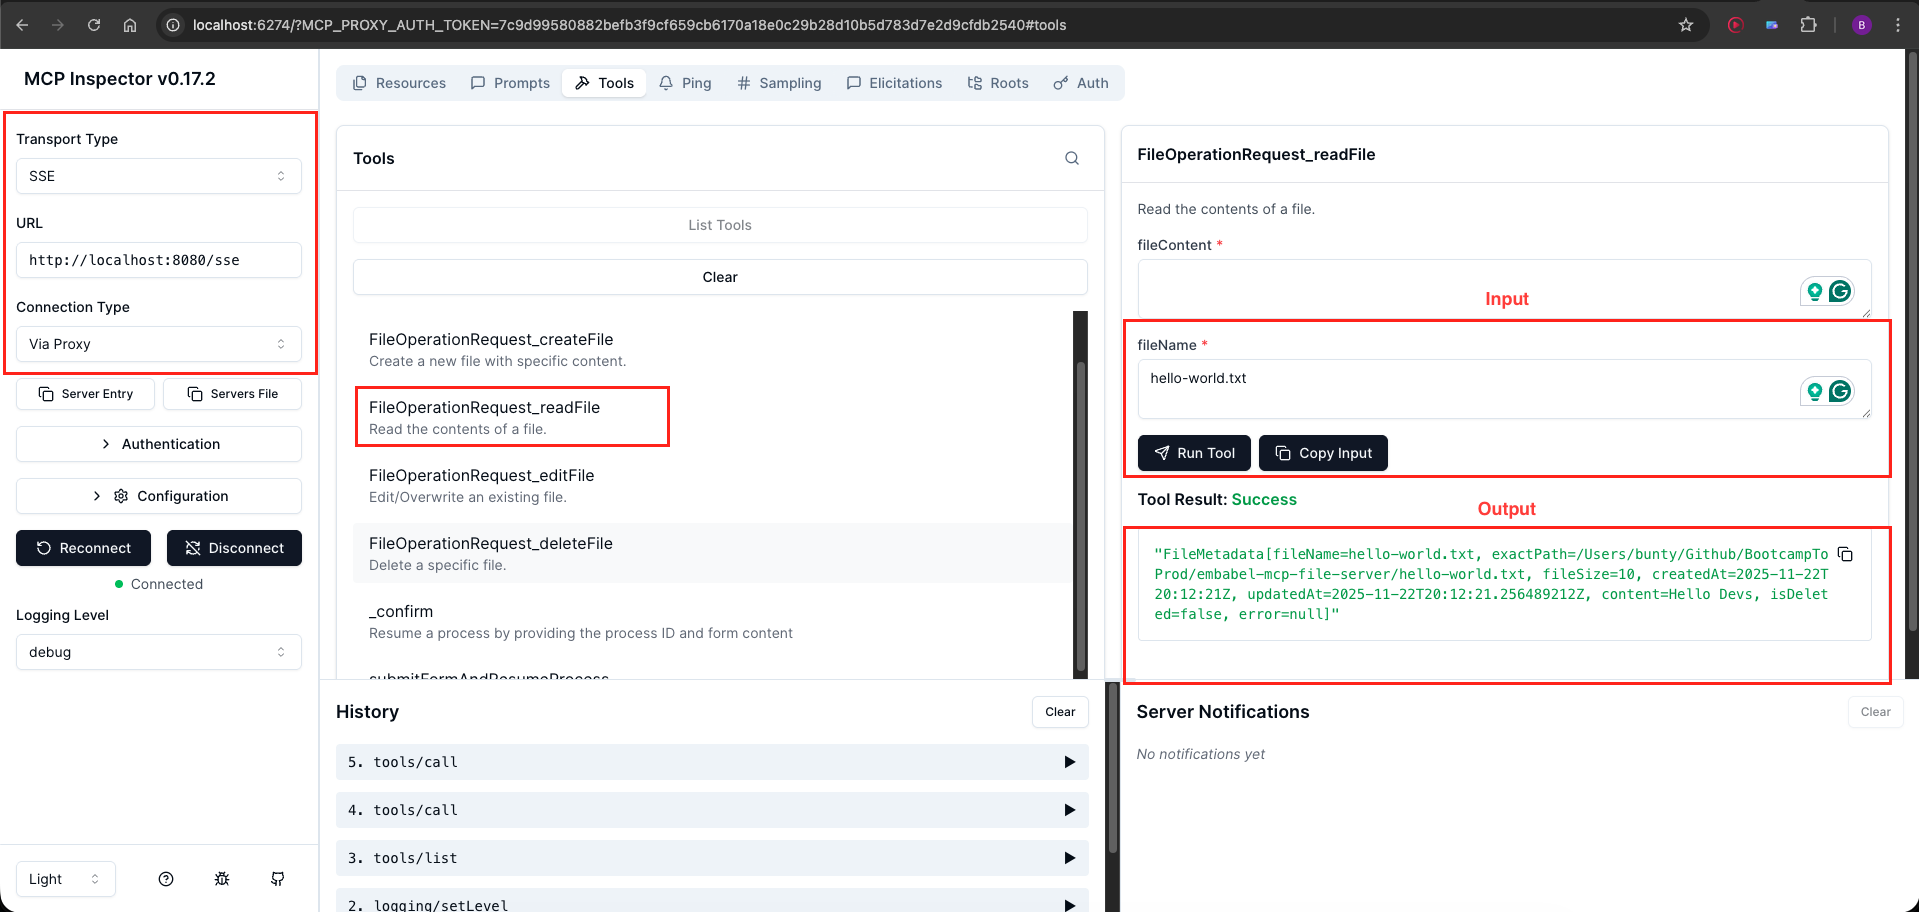
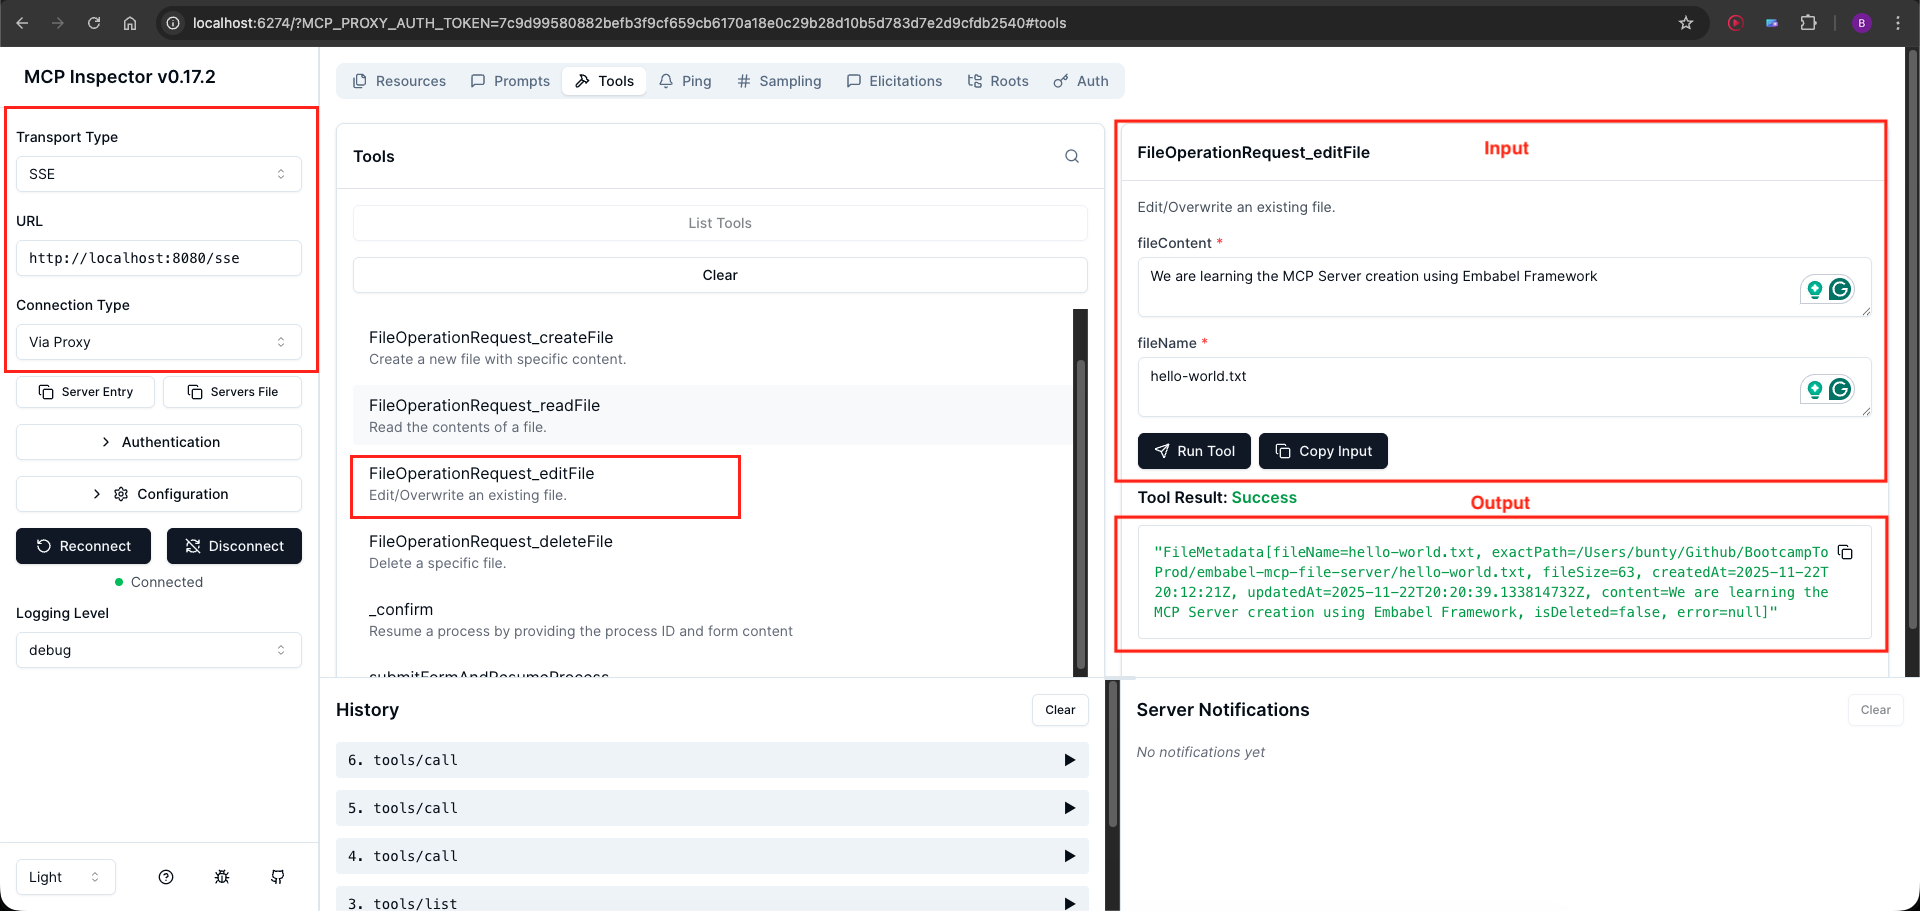
Step 3: Launch MCP Inspector Open a new terminal and run:
npx @modelcontextprotocol/inspector
Step 4: Connect to Your Server
- A browser window will open automatically
- Configure the connection:
- Transport Type: SSE
- URL:
http://localhost:8080/sse - Connection Type: Via Proxy
- Click Connect
Step 5: Test Operations
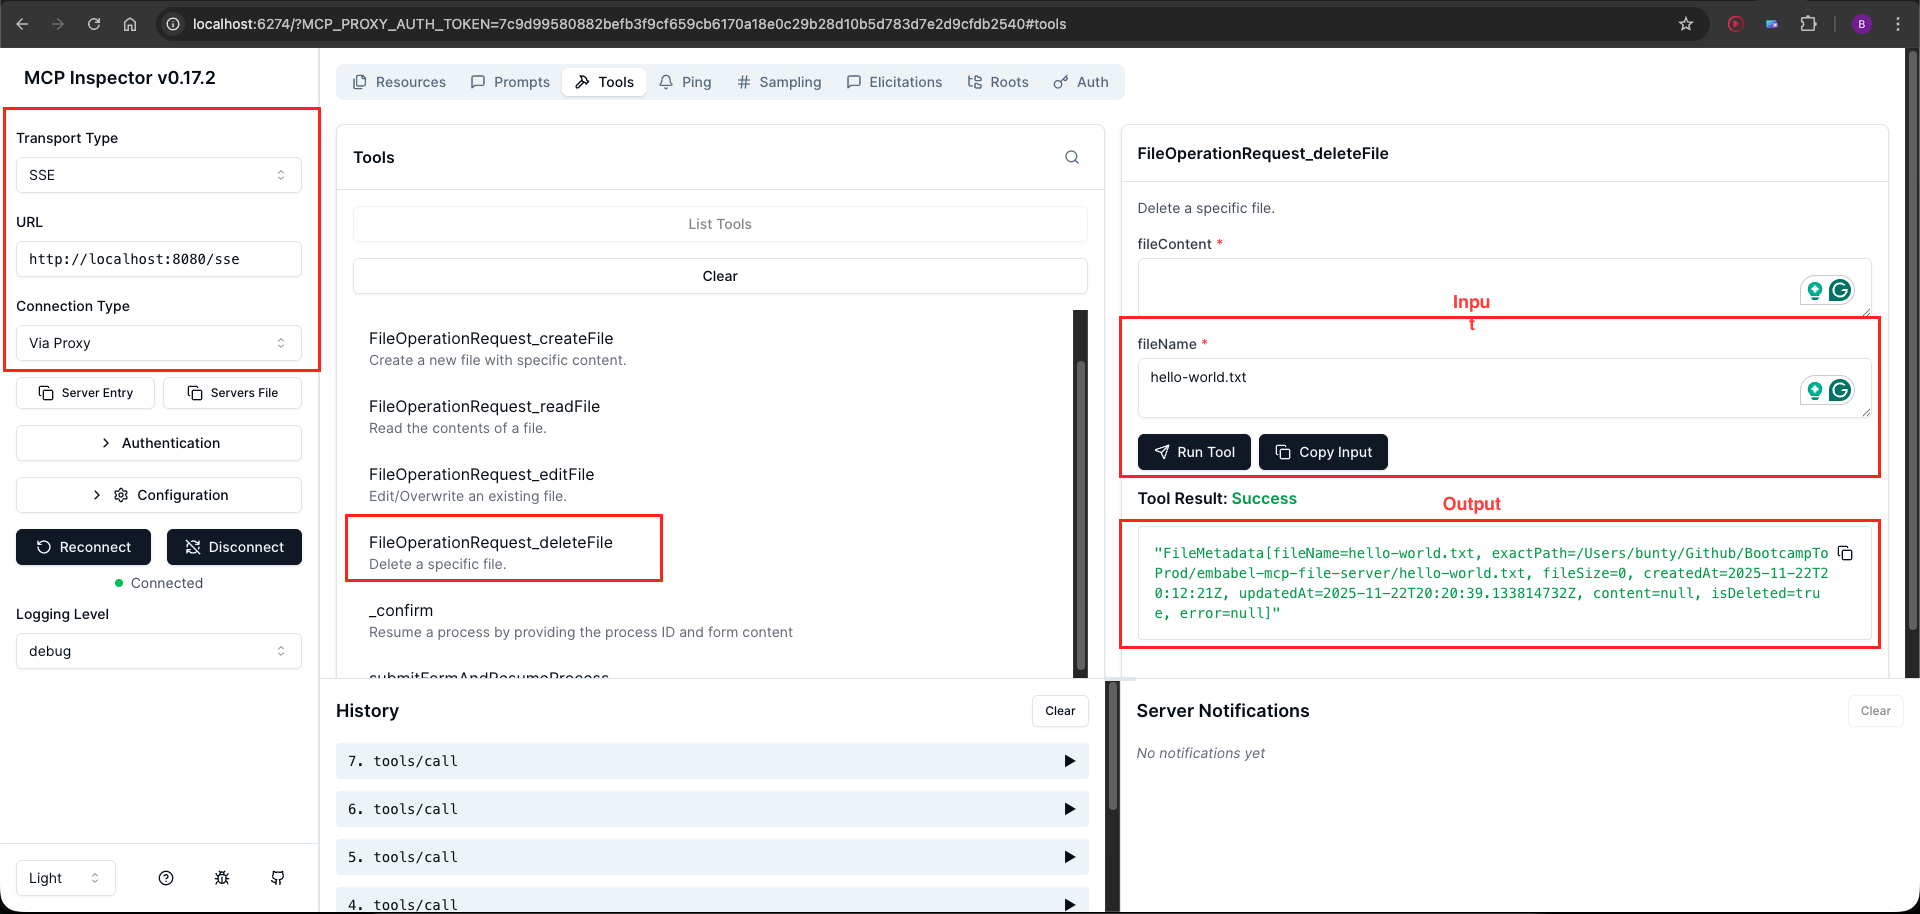
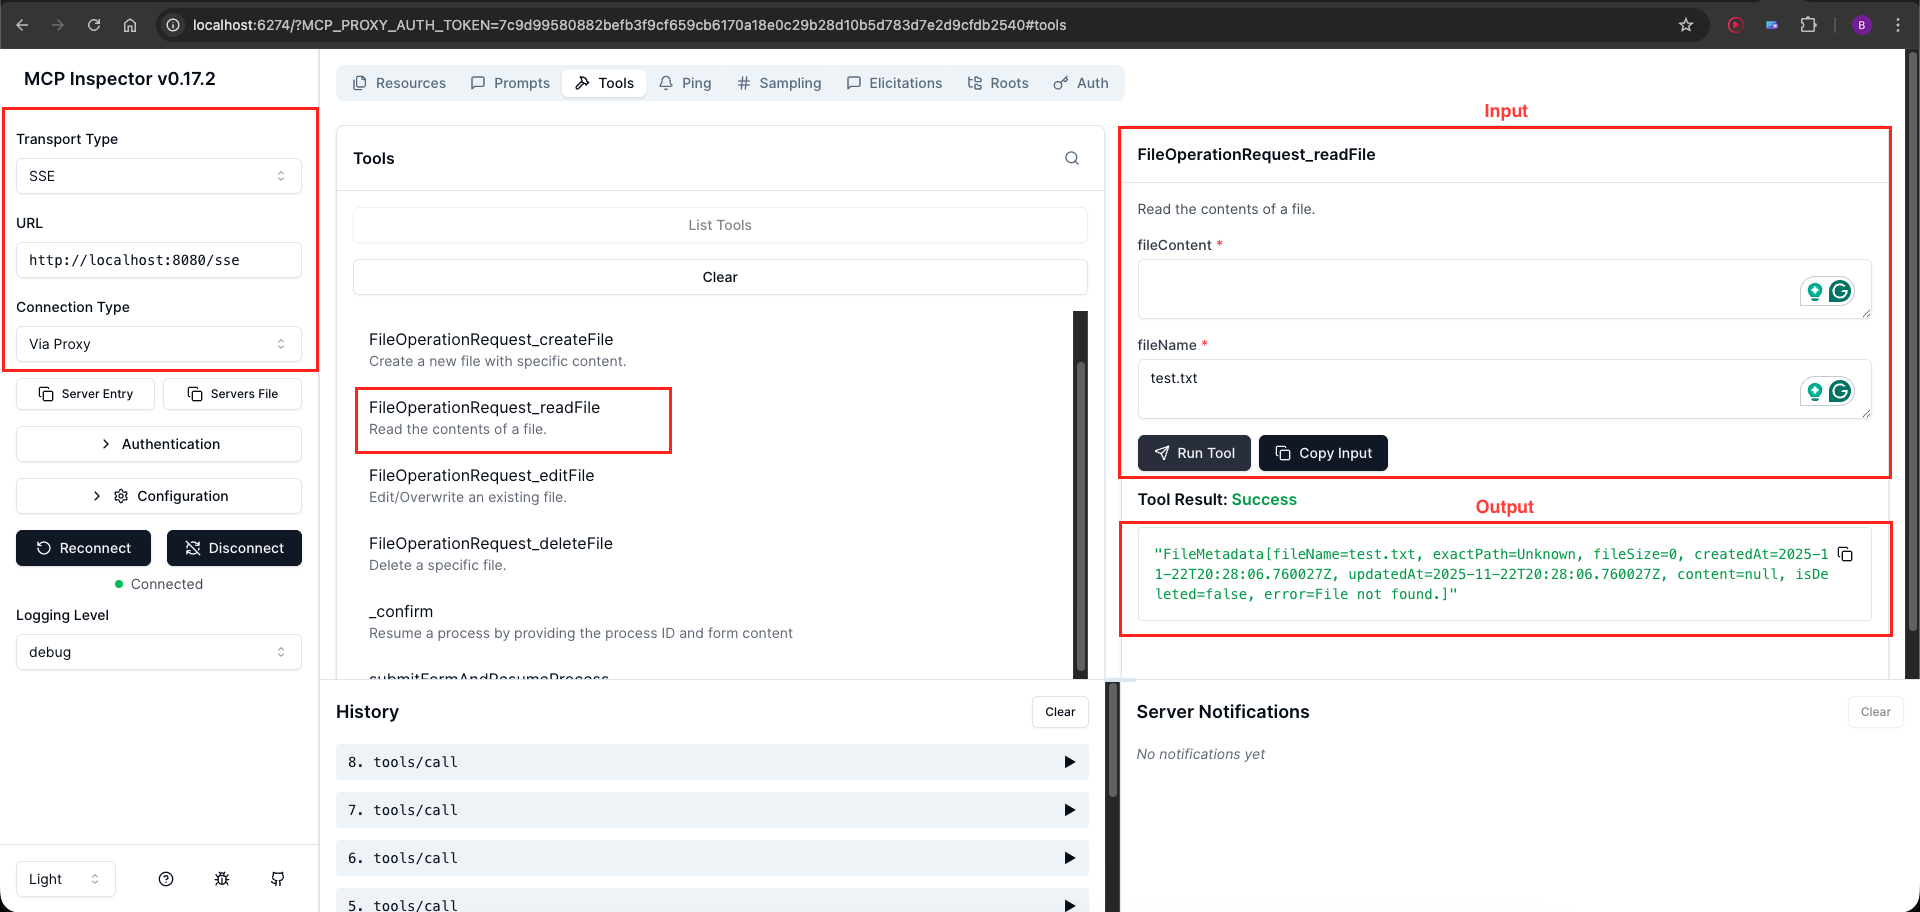
Navigate to the Tools section and click List Tools. You should see four tools:
- createFile
- readFile
- editFile
- deleteFile
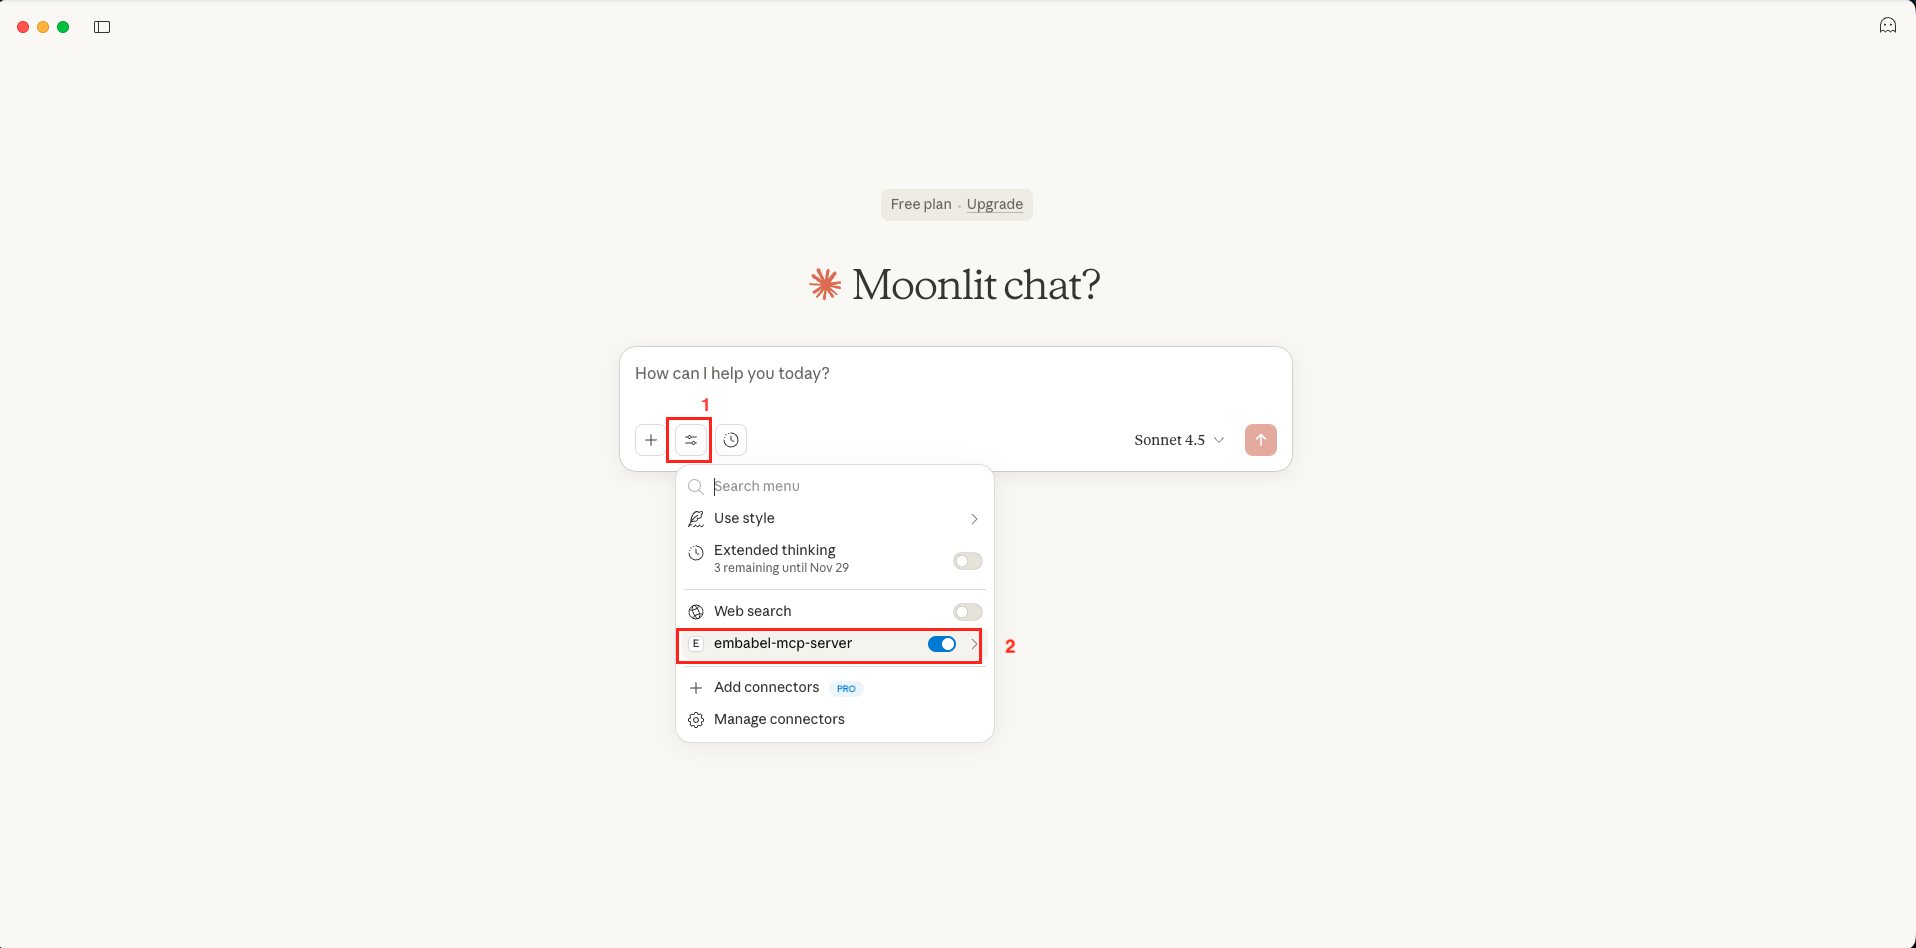
Method 2: Using Claude Desktop
Now let’s integrate our MCP server with Claude Desktop for a real AI assistant experience!
Step 1: Locate Claude Desktop Config
Find your claude_desktop_config.json file:
- macOS:
~/Library/Application Support/Claude/claude_desktop_config.json - Windows:
%APPDATA%\Claude\claude_desktop_config.json
Step 2: Add MCP Server Configuration
Edit the file to add our server:
{
  "mcpServers": {
    "embabel-file-server": {
      "command": "npx",
      "args": [
        "-y",
        "mcp-remote",
        "http://localhost:8080/sse"
      ]
    }
  }
}Configuration Explained:
- embabel-file-server: Friendly name for your server
- command: Uses npx to run the mcp-remote package
- mcp-remote: Bridge that connects Claude Desktop to SSE-based MCP servers
- URL: Points to your local server’s SSE endpoint
Step 3: Restart Claude Desktop
Close and reopen Claude Desktop completely for the configuration to take effect.
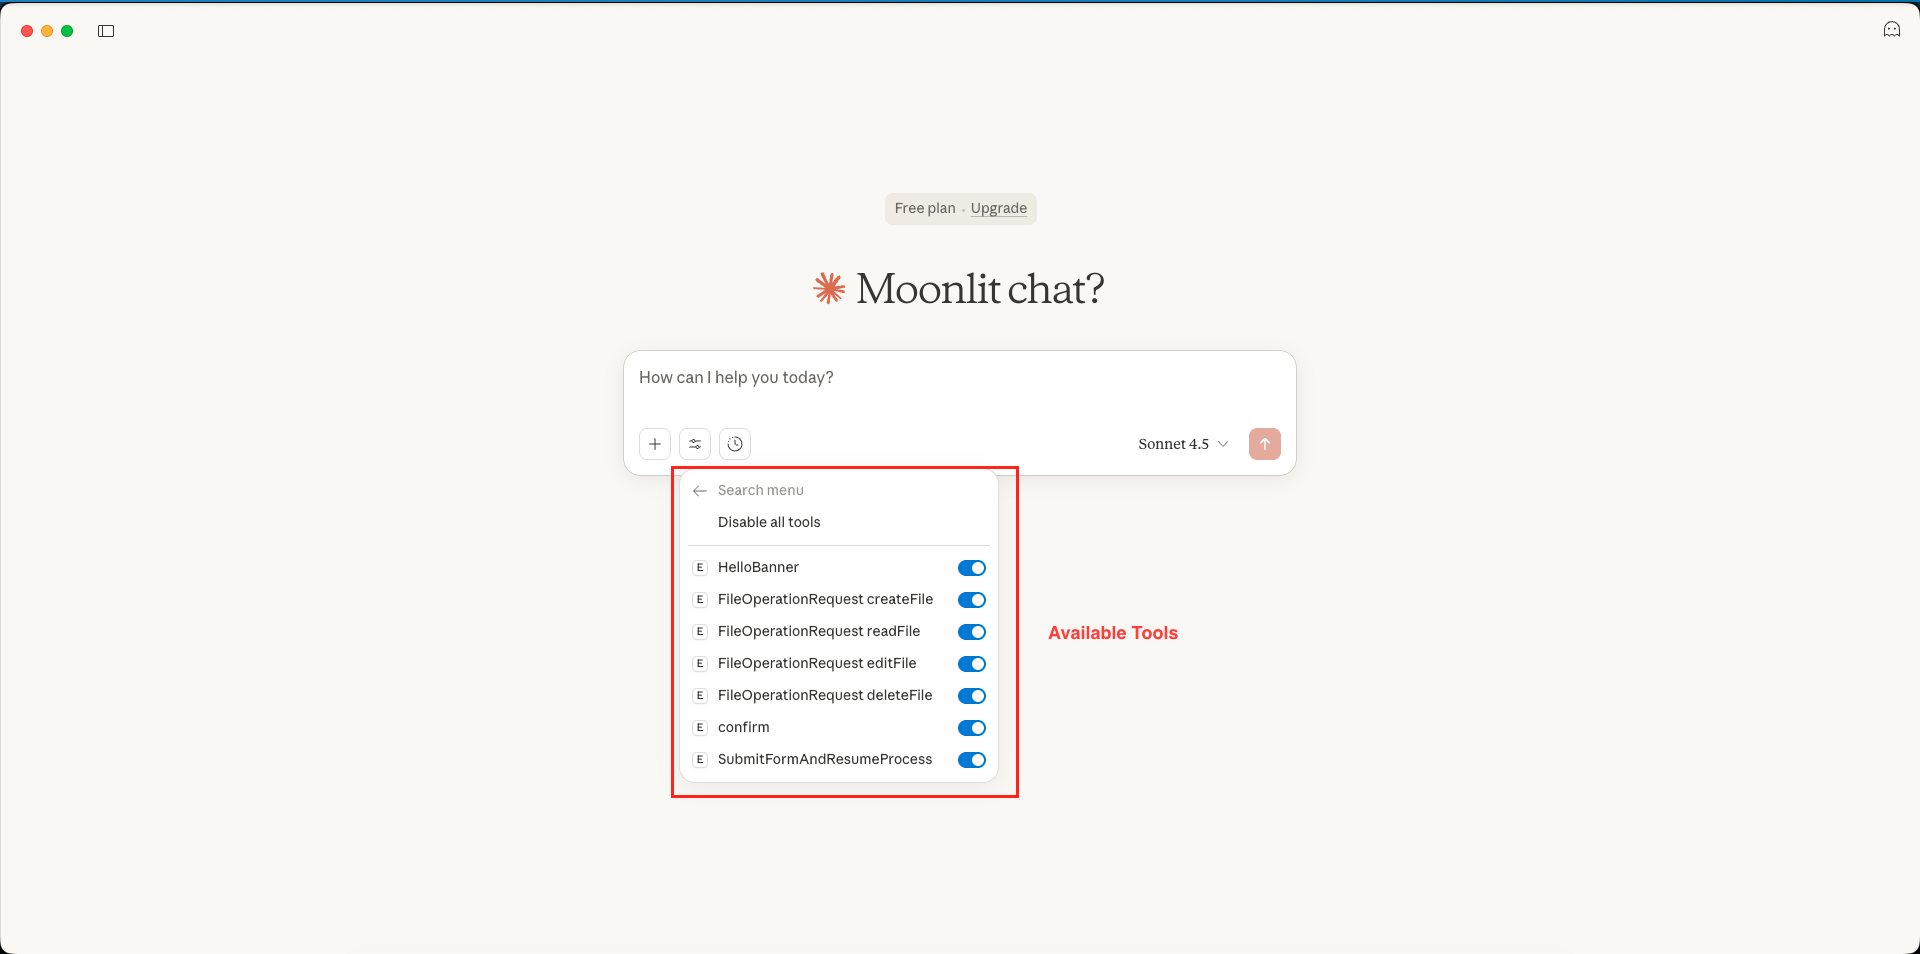
Step 4: Verify Connection
Look for “Search and tools” option in Claude Desktop’s interface. Click it to see available tools. You should see: – createFile – readFile – editFile – deleteFile
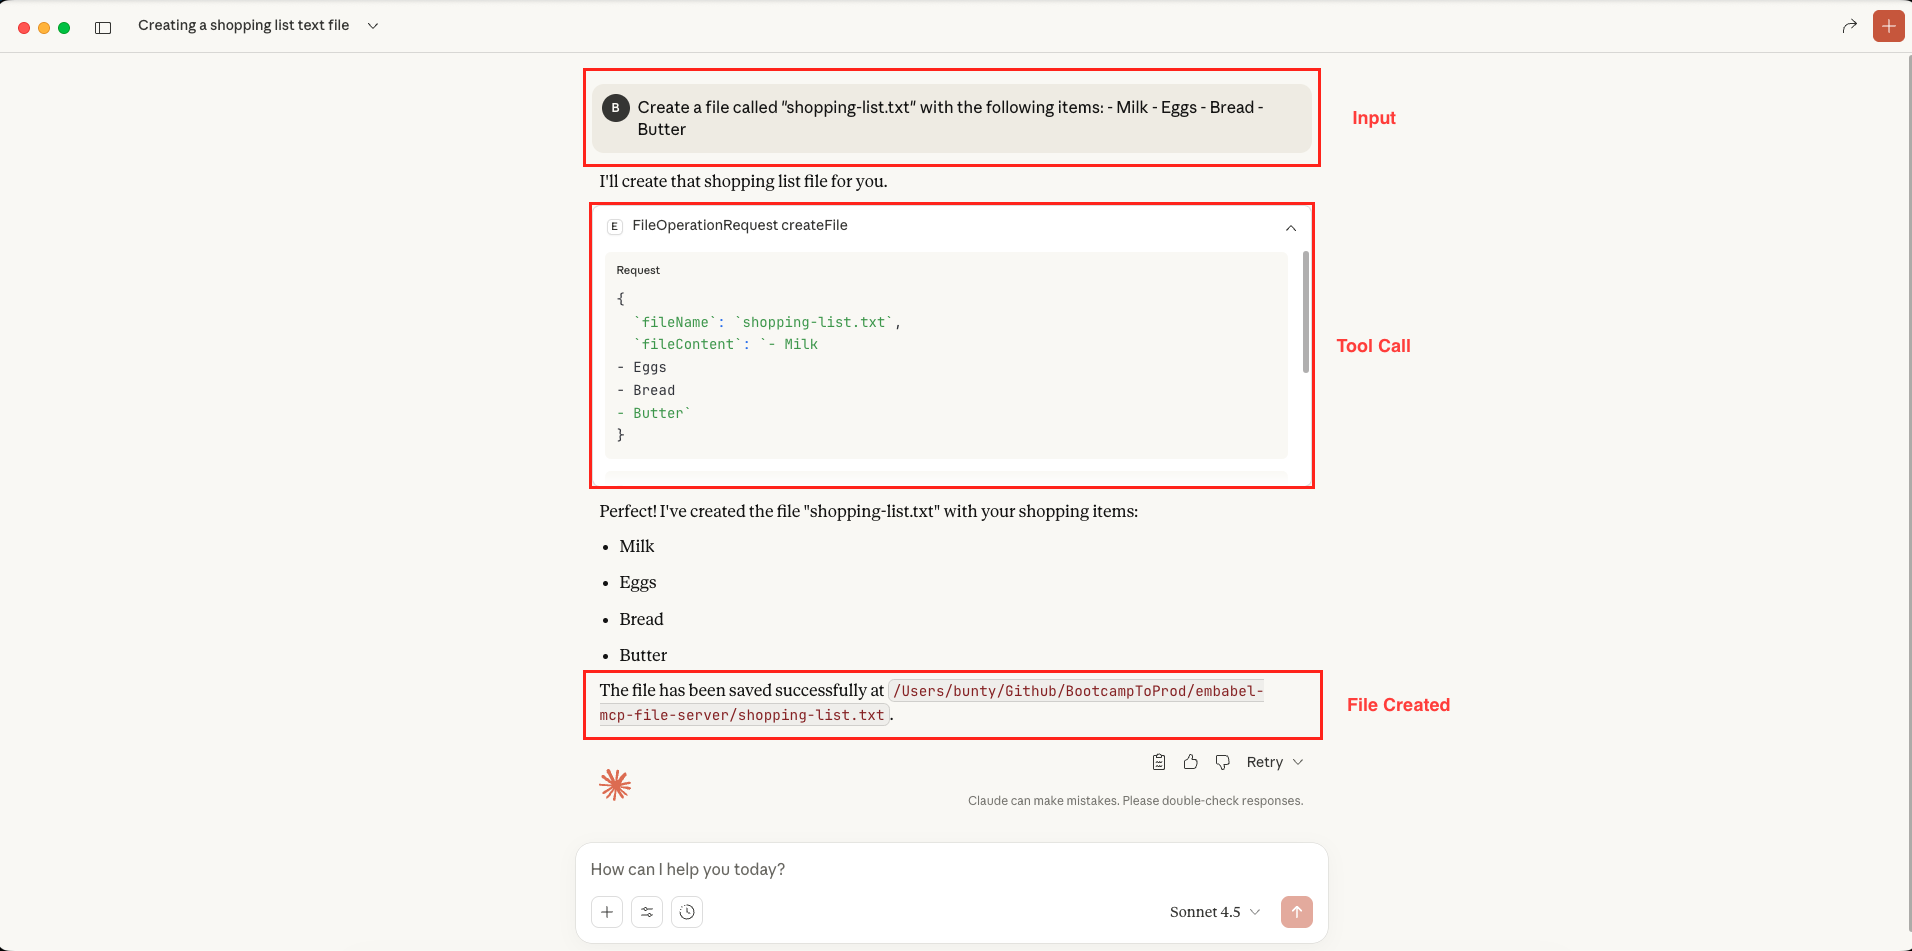
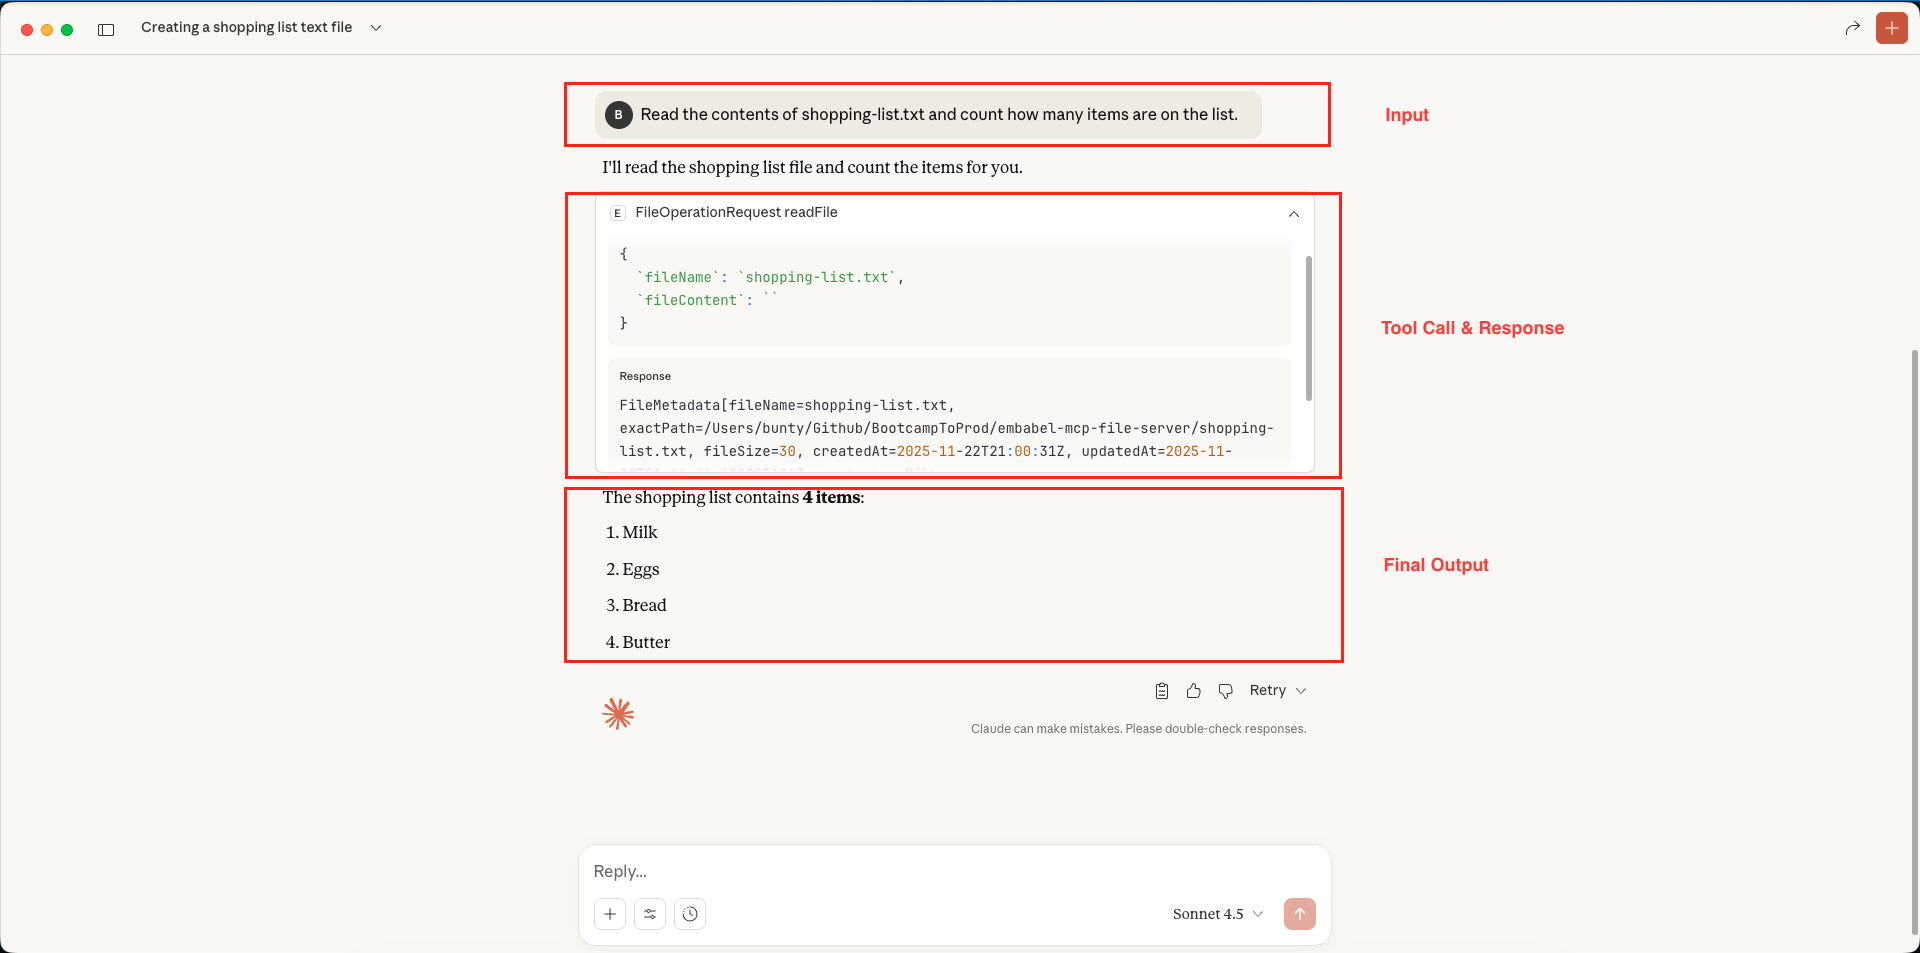
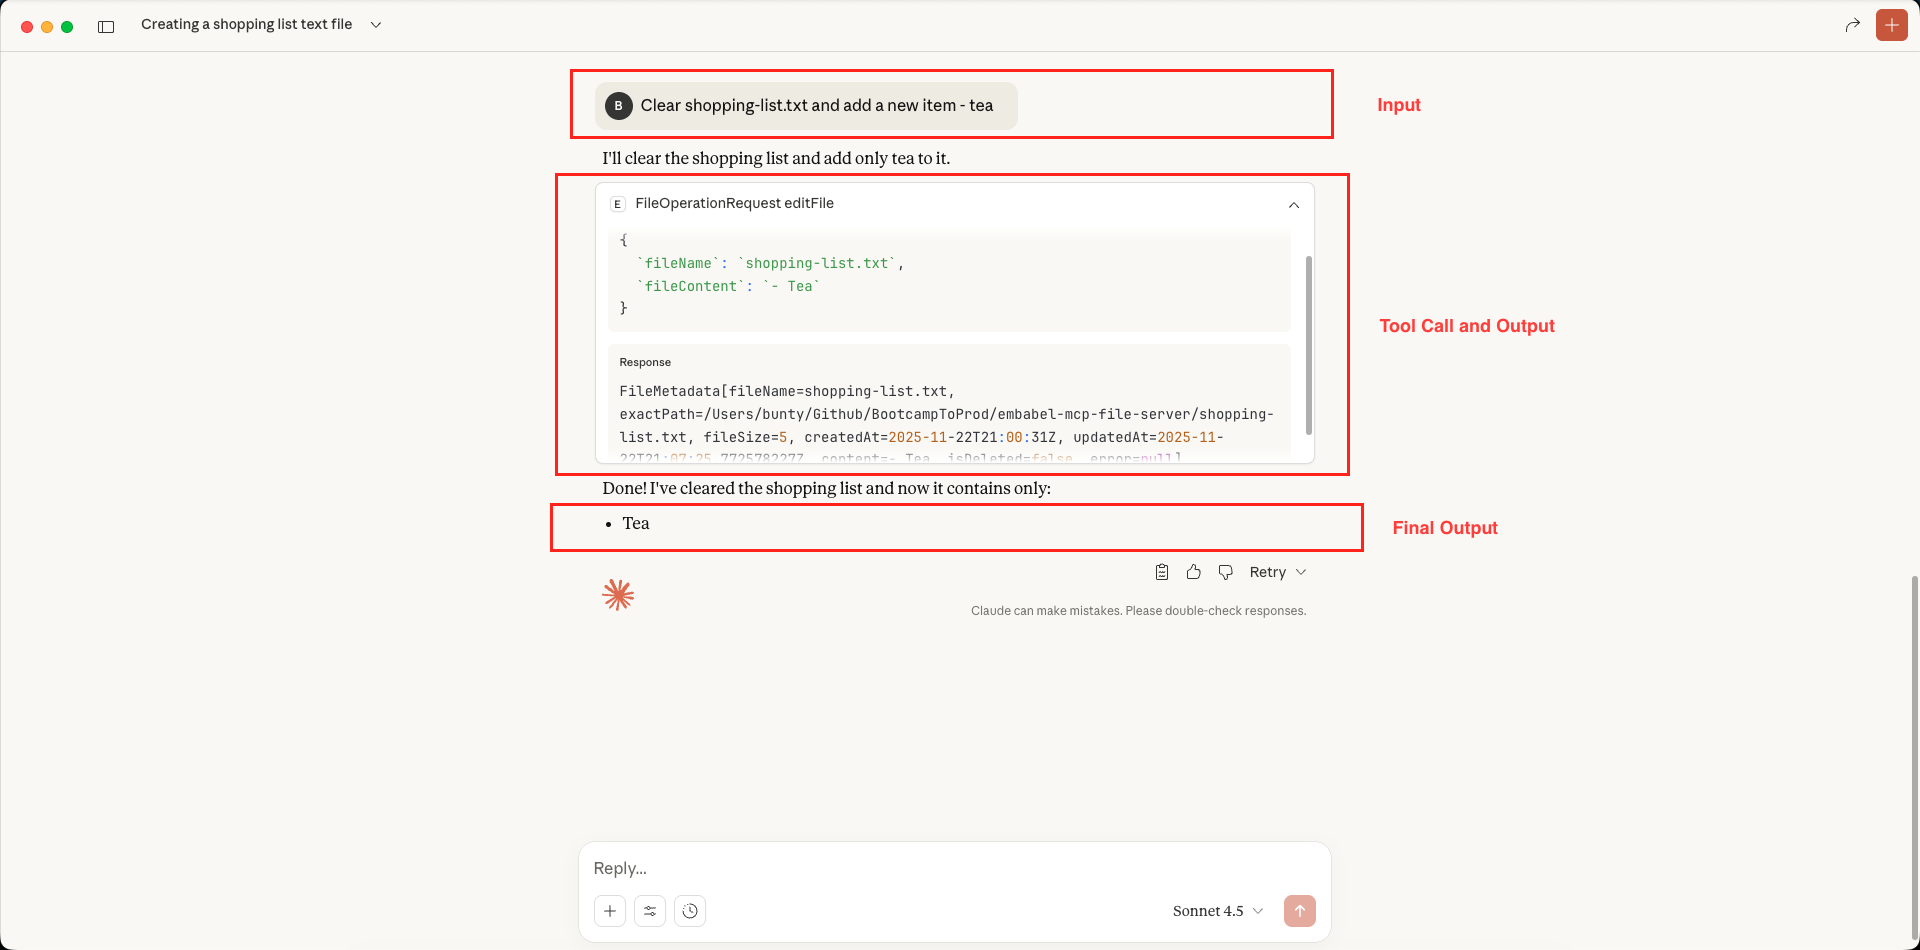
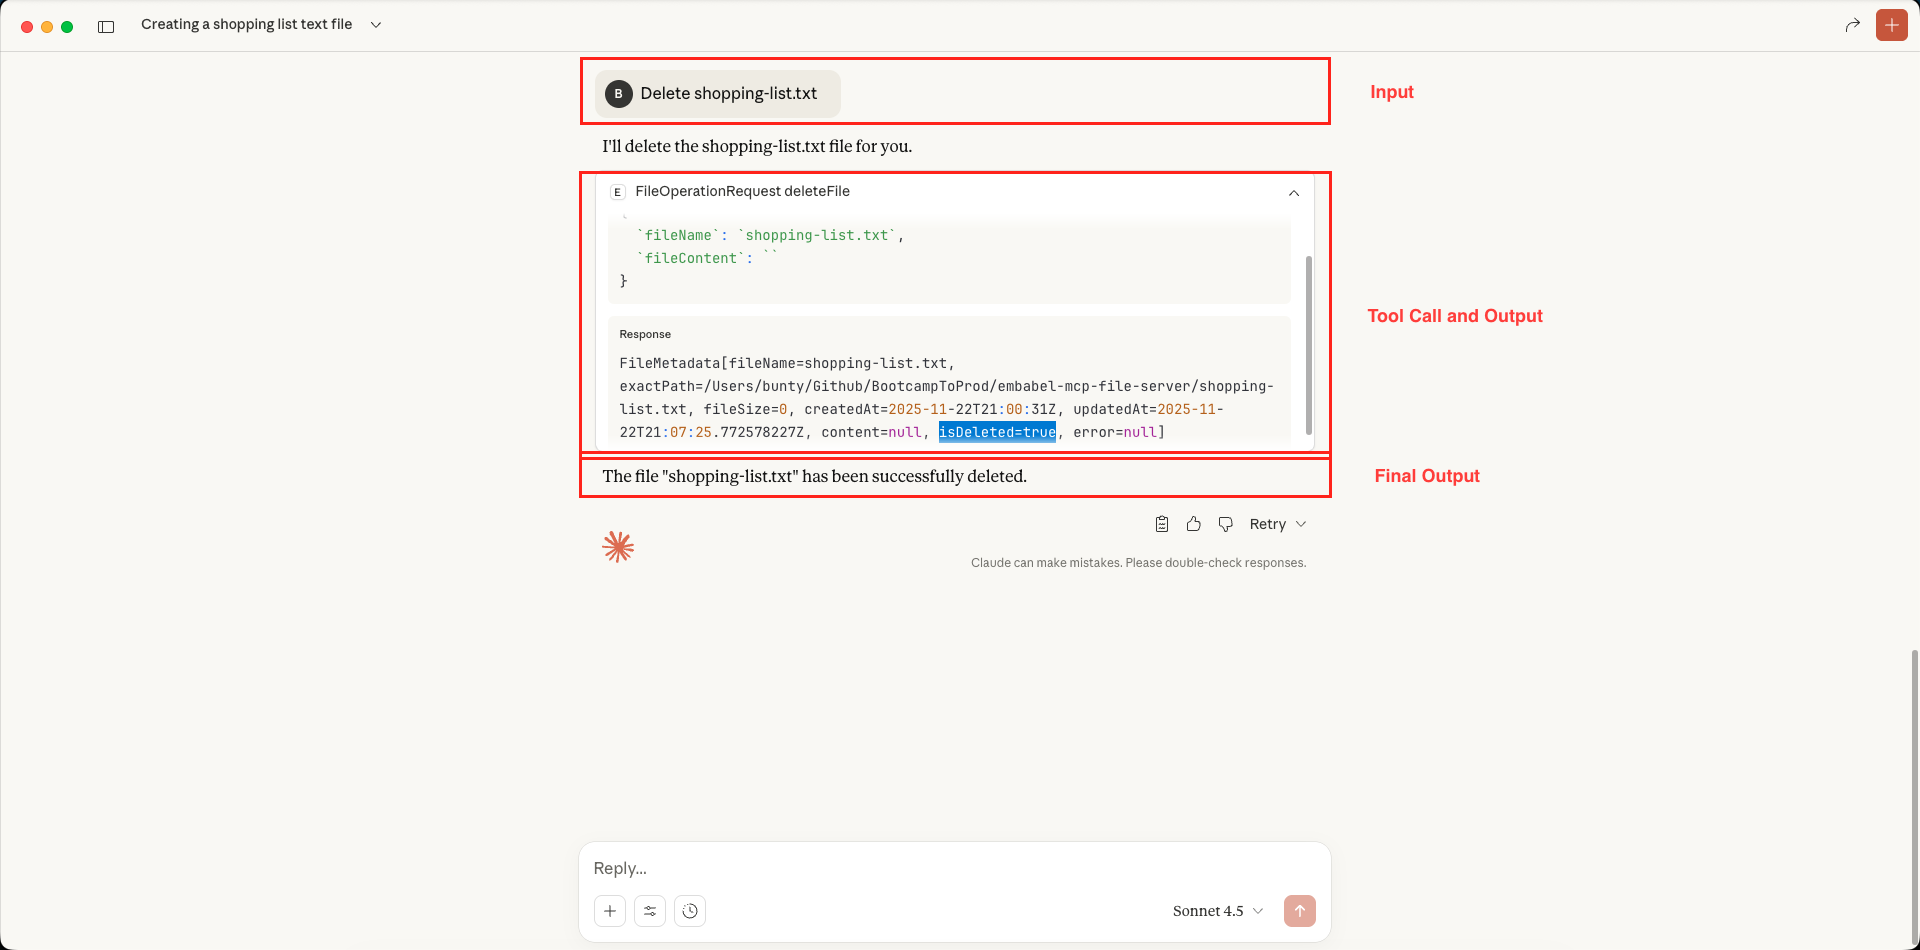
Step 5: Test with Natural Language
Now you can interact with your file system using natural language!
5. Video Tutorial
For a complete walkthrough, check out our video tutorial. We build the File Operation MCP Server from the ground up, providing a live demonstration of how to verify your tools using the MCP Inspector and how to fully integrate them with Claude Desktop to enable real-time file management by AI.
📺 Watch on YouTube:
6. Source Code
The full source code for our File System MCP Server is available on our GitHub repository. The best way to learn is by doing, so we encourage you to clone the repo, set your OPENAI_API_KEY as an environment variable, and launch the Spring Boot application. This will let you connect the server to Claude Desktop or the MCP Inspector and start experimenting.
🔗 Embabel MCP File Server: https://github.com/BootcampToProd/embabel-mcp-file-server
7. Things to Consider
As you build mcp server keep these best practices in mind:
- Directory Traversal Protection: Our
resolvePath()method prevents attackers from accessing files outside the working directory. - Validation: Always validate file names and content before operations.
- Production Deployment: Consider adding authentication/authorization for remote access.
- File Size Limits: Add checks to prevent memory issues with large files.
- Timeouts: Large file operations might take time. Ensure your SSE connection doesn’t time out during large reads/writes.
- Comprehensive Logging: Log every operation for audit trails.
- Error Handling: Return meaningful error messages to help AI agents understand failures.
- Metadata: Rich metadata helps AI agents make better decisions
- Idempotency: Design operations to be safely retryable.
8. FAQs
What is SSE?
SSE (Server-Sent Events) is a standard that allows a web server to push updates to a client. Embabel uses this to keep a persistent connection open between the MCP Client (Claude) and your Java Server.
Is it safe to expose my file system to AI agents?
Our implementation includes a few safety measures: directory traversal protection, file existence checks, and operations limited to the working directory. However, for production use, you should add additional layers like authentication, authorization, file size limits, and operation logging. Never expose an MCP server directly to the public internet without proper security measures.
Can multiple AI clients connect to the same MCP server simultaneously?
Yes! The SSE (Server-Sent Events) transport supports multiple concurrent connections. Each client gets its own session, and Embabel handles concurrent requests safely. However, be aware of file system race conditions if multiple clients try to modify the same file simultaneously.
Can I use this MCP server with other AI assistants besides Claude?
Yes! MCP is an open protocol. Any application that supports the Model Context Protocol can connect to your server. This includes custom AI applications, other AI assistants that adopt MCP, and developer tools like the MCP Inspector.
9. Conclusion
Congratulations! You’ve successfully built an MCP server using the Embabel Framework. You’ve learned how to expose file system operations through the Model Context Protocol, making your Java application accessible to AI agents like Claude Desktop. This opens up exciting possibilities for AI-powered automation, intelligent file management, and seamless integration between AI assistants and your backend systems.
10. Learn More
Interested in learning more?
Embabel Framework Condition Annotation: Building Decision Making AI Agents
Add a Comment