Explore Spring AI Text-to-Speech with ElevenLabs and see how you can instantly give your Spring Boot application a dynamic, realistic voice. Learn the essentials of AI voice integration in Spring Boot.
1. Introduction
Are you looking to add voice capabilities to your Spring Boot application? With the rise of AI-powered text-to-speech services, creating applications that can convert text into natural-sounding speech has never been easier. In this comprehensive guide, we’ll explore how to integrate Spring AI text-to-speech using ElevenLabs – one of the most advanced voice synthesis platforms available today.
By the end of this tutorial, you’ll have a fully functional Spring Boot application that can convert any text into high-quality audio using ElevenLabs’ powerful AI voices.
2. What is ElevenLabs?
Before we dive in, let’s talk about the star of our show: ElevenLabs. They’re a leading AI research and development company focused on creating advanced voice technologies. Their work goes beyond simple text-to-speech — they specialize in generating highly realistic, context-aware voices that capture natural emotion and intonation, making them perfect for creating engaging user experiences. You can explore their technology and create an account on their official website.
A great advantage for developers is that ElevenLabs gives 10,000 free credits every month, which is ideal for learning, experimenting, and building proof-of-concept projects without spending anything. This generous free tier lets you explore their platform, try different voices, and understand the possibilities of high-quality AI voice generation with zero upfront cost.
3. Why Use Text-to-Speech? Exploring the Use Cases
Before we build our application, let’s take a moment to think about why this technology is so powerful. Integrating Text-to-Speech (TTS) can elevate your projects from simple text-based applications to rich, multi-sensory experiences. Here are just a few exciting use cases:
- Accessibility: This is one of the most important applications. TTS can make your content accessible to users with visual impairments or reading disabilities, ensuring everyone can consume your information.
- E-Learning and Audiobooks: Convert educational materials, articles, or entire books into audio format, allowing users to learn on the go, whether they’re commuting, exercising, or just resting their eyes.
- Voice Notifications and Alerts: Instead of a generic “beep,” your application can provide clear, descriptive voice alerts. Imagine a system that says, “Warning: System CPU has exceeded 90% utilization,” instead of just sending a silent text notification.
- Interactive Voice Assistants and IVR: Power the voice of a chatbot, an in-app assistant, or an Interactive Voice Response (IVR) system for customer service, providing a more natural and human-like interaction.
- Content Creation for Videos: Automatically generate voice-overs for YouTube videos, presentations, or social media content, saving hours of recording and editing time.
- Language Learning: Help users learn pronunciation and cadence by allowing them to listen to how words and phrases are spoken in different languages and accents.
By integrating a high-quality TTS engine like ElevenLabs, you can unlock these capabilities and many more, making your applications more engaging, accessible, and professional.
4. Spring AI Text-to-Speech Blueprint: From Text to Audio
So, how does it all connect? Let’s look at the blueprint for our application. The following diagram shows the simple yet powerful journey your text will take—from a request to our Spring Boot backend, through the ElevenLabs engine, and back as a high-quality audio file.

- Input: The process begins when a user provides the necessary information. This includes the text they want to hear spoken aloud and their choice of voice settings (like which voice to use, its tone, and style).
- Create Prompt: Once our Spring application receives this input, its first job is to prepare it. It takes the user’s text and voice settings and bundles them together into a formal “Prompt.” Think of this as creating a clear set of instructions for the AI.
- Spring AI Model: This newly created prompt is then handed off to the Spring AI ElevenLabs TTS Model. This is the core component in our application that acts as a smart client—it knows exactly how to communicate with the ElevenLabs service.
- ElevenLabs API: Our application, via the Spring AI model, sends the prompt to the actual ElevenLabs API. This powerful, external service does the real magic: it reads the instructions and generates a natural-sounding audio file.
- Audio Output: The ElevenLabs API sends the generated audio file back to our application. This high-quality audio is the final product, which our application can then save or stream back to the user.
5. Let’s Build: Our Text-to-Speech API Using Spring AI
With the concepts and data flow clear, let’s translate these concepts into code. We will now build a complete Text-to-Speech (TTS) API using Spring AI from the ground up.
This Spring Boot service will be designed to receive a simple request containing text and voice settings. It will then use Spring AI to communicate with ElevenLabs and return a ready-to-play audio stream. Let’s begin by examining the project’s structure.
⚙️ Project Structure & Setup
Below is the folder structure of our Spring Boot application:
spring-ai-text-to-speech-elevenlabs
├── src
│   └── main
│       ├── java
│       │   └── com
│       │       └── bootcamptoprod
│       │               ├── controller
│       │               │   └── TextToSpeechController.java
│       │               │   └── VoicesController.java
│       │               ├── dto
│       │               │   └── TextToSpeechRequest.java
│       │               └── SpringAITextToSpeechElevenLabsApplication.java
│       └── resources
│           ├── application.yml
│           └── static
│               └── index.html
└── pom.xml
Understanding the Project Structure
Here is a quick breakdown of the key files in our project and what each one does:
- TextToSpeechController.java: The REST controller that exposes our
/api/tts/speakendpoint and uses theElevenLabsTextToSpeechModelto generate audio from the user’s request. - VoicesController.java: The REST controller that exposes 4 endpoints under
/api/voicesto discover available ElevenLabs voices and retrieve their specific settings. - TextToSpeechRequest.java: A simple Java record class (DTO) that defines the JSON structure for the incoming request, holding the text and voice settings.
- SpringAITextToSpeechElevenLabsApplication.java: The main class that boots up and runs the entire Spring Boot application.
- application.yml: Our configuration file, used for setting the essential ElevenLabs API key and default text-to-speech options.
- static/index.html: A simple web page with JavaScript that provides a user interface for easily testing our TTS API.
- pom.xml: The Maven file where we manage all our project dependencies, including the crucial
spring-ai-starter-model-elevenlabslibrary.
Let’s set up our project with the necessary dependencies and configurations.
Step 1: Add Maven Dependencies
Every Spring Boot project starts with the pom.xml file. This is where we tell Maven which libraries our project needs to function.
<properties>
    <java.version>21</java.version>
    <spring-ai.version>1.0.1</spring-ai.version>
</properties>

<dependencies>
    <!-- Spring Boot Web for building RESTful web services -->
    <dependency>
        <groupId>org.springframework.boot</groupId>
        <artifactId>spring-boot-starter-web</artifactId>
    </dependency>

    <!-- Spring AI starter for ElevenLabs integration -->
    <dependency>
        <groupId>org.springframework.ai</groupId>
        <artifactId>spring-ai-starter-model-elevenlabs</artifactId>
    </dependency>

    <!-- Optional: For Logging Spring AI calls -->
    <dependency>
        <groupId>org.zalando</groupId>
        <artifactId>logbook-spring-boot-starter</artifactId>
        <version>3.12.2</version>
    </dependency>

<dependencyManagement>
    <dependencies>
        <!-- Spring AI bill of materials to align all spring-ai versions -->
        <dependency>
            <groupId>org.springframework.ai</groupId>
            <artifactId>spring-ai-bom</artifactId>
            <version>${spring-ai.version}</version>
            <type>pom</type>
            <scope>import</scope>
        </dependency>
    </dependencies>
</dependencyManagement>

<!-- IMPORTANT: Required for SNAPSHOT versions -->
<repositories>
    <repository>
        <id>spring-snapshots</id>
        <name>Spring Snapshots</name>
        <url>https://repo.spring.io/snapshot</url>
        <releases>
            <enabled>false</enabled>
        </releases>
    </repository>
    <repository>
        <name>Central Portal Snapshots</name>
        <id>central-portal-snapshots</id>
        <url>https://central.sonatype.com/repository/maven-snapshots/</url>
        <releases>
            <enabled>false</enabled>
        </releases>
        <snapshots>
            <enabled>true</enabled>
        </snapshots>
    </repository>
</repositories>
In this configuration:
spring-boot-starter-web:This is the essential dependency for creating a web application with REST endpoints.spring-ai-starter-model-elevenlabs:This is the magic ingredient. It pulls in all the necessary classes to interact with the ElevenLabs API through the Spring AI abstraction.logbook-spring-boot-starter: A very helpful utility for debugging. It logs all outgoing HTTP requests (to ElevenLabs) and their responses, which is invaluable for seeing exactly what’s being sent and received.spring-ai-bom:This isn’t a direct dependency but a Bill of Materials. It’s a best practice that ensures all the differentspring-ai-*modules you might use will have versions that are tested and work together, preventing conflicts.
A Note on SNAPSHOT Versions: At the time of writing, the ElevenLabs integration is available in the 1.1.0-SNAPSHOT version. SNAPSHOT versions are development builds and are not hosted in the standard Maven Central repository. This is why the <repositories> section is crucial. It instructs Maven to search Spring’s snapshot repository for
Pro Tip: If a stable, non-snapshot version (e.g., 1.1.0) is available by the time you read this, you should always prefer it. You can remove the entire <repositories> section and update the <spring-ai.version> accordingly.
Step 2: Configure Application Properties
Next, let’s configure our application properties:
spring:
  application:
    name: spring-ai-text-to-speech-elevenlabs

  # AI configurations
  ai:
    elevenlabs:
      api-key: ${ELEVENLABS_API_KEY}
      tts:
        enableLogging: true
        options:
          model-id: eleven_multilingual_v2
          output-format: mp3

# (Optional) For detailed request/response logging
logging:
  level:
    org.zalando.logbook.Logbook: TRACE
📄 Configuration Overview
- api-key: Your ElevenLabs API key (replace {ELEVENLABS_API_KEY} with your actual key)
- model-id: We’re using
eleven_multilingual_v2which supports multiple languages - output-format: MP3 format for audio output
- Logbook TRACE: Provides detailed HTTP logging for troubleshooting
Step 3: Application Entry Point
This is the main class that bootstraps our entire application.
package com.bootcamptoprod;

import org.springframework.boot.SpringApplication;
import org.springframework.boot.autoconfigure.SpringBootApplication;
import org.springframework.boot.web.client.RestClientCustomizer;
import org.springframework.context.annotation.Bean;
import org.zalando.logbook.Logbook;
import org.zalando.logbook.spring.LogbookClientHttpRequestInterceptor;

@SpringBootApplication
public class SpringAITextToSpeechElevenLabsApplication {

    public static void main(String[] args) {
        SpringApplication.run(SpringAITextToSpeechElevenLabsApplication.class, args);
    }

    /**
     * Configures a RestClientCustomizer bean to integrate Logbook for HTTP logging.
     * This bean adds an interceptor to all outgoing REST client calls made by Spring,
     * allowing us to log the requests sent to the AI model and the responses received.
     */
    @Bean
    public RestClientCustomizer restClientCustomizer(Logbook logbook) {
        return restClientBuilder -> restClientBuilder.requestInterceptor(new LogbookClientHttpRequestInterceptor(logbook));
    }

}
Explanation:
- Main Class to Run the Application:
SpringAITextToSpeechElevenLabsApplicationis the starting point of our application. When you run this class, Spring Boot initializes all components and starts the embedded server. - HTTP Logging: This is an optional but highly recommended configuration during the development. We are defining a
@Beanthat customizes the RestClient used by Spring AI under the hood. By adding theLogbookClientHttpRequestInterceptor, we ensure that every API call to ElevenLabs gets logged in our console.
Step 4: Create Data Transfer Object (DTOs)
Let’s create our request model using Java records:
package com.bootcamptoprod.dto;

public record TextToSpeechRequest(
        String text,
        String voiceId,
        Double stability,
        Double similarityBoost,
        Double style,
        Boolean useSpeakerBoost,
        Double speed
) {}
Explanation:
This record simply defines the data structure for our incoming request. Each field corresponds to a setting we want to apply to our text-to-speech generation.
- Text: The text to convert to speech (required)
- Voice ID: ElevenLabs voice identifier – each voice has a unique ID like “21m00Tcm4TlvDq8ikWAM” for Rachel
For a detailed explanation of what each voice parameter (stability, similarityBoost, etc.) does, please refer to the “8.1. Voice Settings Parameters” section below.
Step 5: The Controller Layer: API Endpoint
Finally, let’s create our REST controller – the heart of our application:
package com.bootcamptoprod.controller;

import com.bootcamptoprod.dto.TextToSpeechRequest;
import org.springframework.ai.audio.tts.TextToSpeechPrompt;
import org.springframework.ai.elevenlabs.ElevenLabsTextToSpeechModel;
import org.springframework.ai.elevenlabs.ElevenLabsTextToSpeechOptions;
import org.springframework.ai.elevenlabs.api.ElevenLabsApi;
import org.springframework.beans.factory.annotation.Autowired;
import org.springframework.http.HttpHeaders;
import org.springframework.http.HttpStatus;
import org.springframework.http.MediaType;
import org.springframework.http.ResponseEntity;
import org.springframework.web.bind.annotation.PostMapping;
import org.springframework.web.bind.annotation.RequestBody;
import org.springframework.web.bind.annotation.RequestMapping;
import org.springframework.web.bind.annotation.RestController;

@RestController
@RequestMapping("/api/tts")
public class TextToSpeechController {

    private final ElevenLabsTextToSpeechModel textToSpeechModel;

    @Autowired
    public TextToSpeechController(ElevenLabsTextToSpeechModel textToSpeechModel) {
        this.textToSpeechModel = textToSpeechModel;
    }

    @PostMapping(value = "/speak", produces = MediaType.APPLICATION_OCTET_STREAM_VALUE)
    public ResponseEntity<byte[]> speak(@RequestBody TextToSpeechRequest request) {

        var voiceSettings = new ElevenLabsApi.SpeechRequest.VoiceSettings(
                request.stability(), request.similarityBoost(), request.style(), request.useSpeakerBoost(), request.speed()
        );

        var textToSpeechOptions = ElevenLabsTextToSpeechOptions.builder()
                .model("eleven_multilingual_v2")
                .voiceId(request.voiceId())
                .voiceSettings(voiceSettings)
                .outputFormat(ElevenLabsApi.OutputFormat.MP3_44100_128.getValue())
                .build();

        textToSpeechOptions.setEnableLogging(Boolean.TRUE);

        var textToSpeechPrompt = new TextToSpeechPrompt(request.text(), textToSpeechOptions);
        var textToSpeechResponse = textToSpeechModel.call(textToSpeechPrompt);

        byte[] audio = textToSpeechResponse.getResult().getOutput();

        HttpHeaders headers = new HttpHeaders();
        headers.setContentType(MediaType.valueOf("audio/mpeg"));
        headers.setContentLength(audio.length);

        return new ResponseEntity<>(audio, headers, HttpStatus.OK);
    }
}
The speak method in the controller receives the user’s request, builds a detailed options object with the desired voice settings, passes everything to the Spring AI ElevenLabsTextToSpeechModel, and then returns the resulting audio bytes with proper MIME type headers, allowing browsers to play the audio directly or download it.
6. How It All Works Together
When a client sends a POST request to /api/tts/speak with text and voice parameters:
- Request Reception: Spring Boot receives and deserializes the JSON into our
TextToSpeechRequestrecord - Voice Configuration: The controller extracts voice settings and creates an options object
- API Call: Spring AI uses these options to call the ElevenLabs API
- Audio Generation: ElevenLabs processes the text and returns MP3 audio data
- Response: Our application returns the audio bytes with appropriate headers
7. Testing the Application
Once the application is started, you can test the endpoint using a command-line tool like cURL or Postman. You can even test using a simple web interface we’ve prepared. Here are example requests for each scenario.
Option 1: Using Postman
Import the below-mentioned cURL command in Postman and send the request:
curl 'http://localhost:8080/api/tts/speak' \
--header 'Content-Type: application/json' \
--data '{
    "text": "Hello, this is a test of Spring AI with ElevenLabs!",
    "voiceId": "21m00Tcm4TlvDq8ikWAM",
    "stability": 0.75,
    "similarityBoost": 0.75,
    "style": 0.3,
    "useSpeakerBoost": true,
    "speed": 1.0
}'Once the request processing is completed, you will see an audio player directly inside the Postman response body section. You can simply click the play button to listen to the generated speech immediately, making the testing process incredibly fast and convenient.
Option 2: Using a Web Interface
To make testing more interactive, we’ve also created a simple index.html page that acts as a user interface for our API.
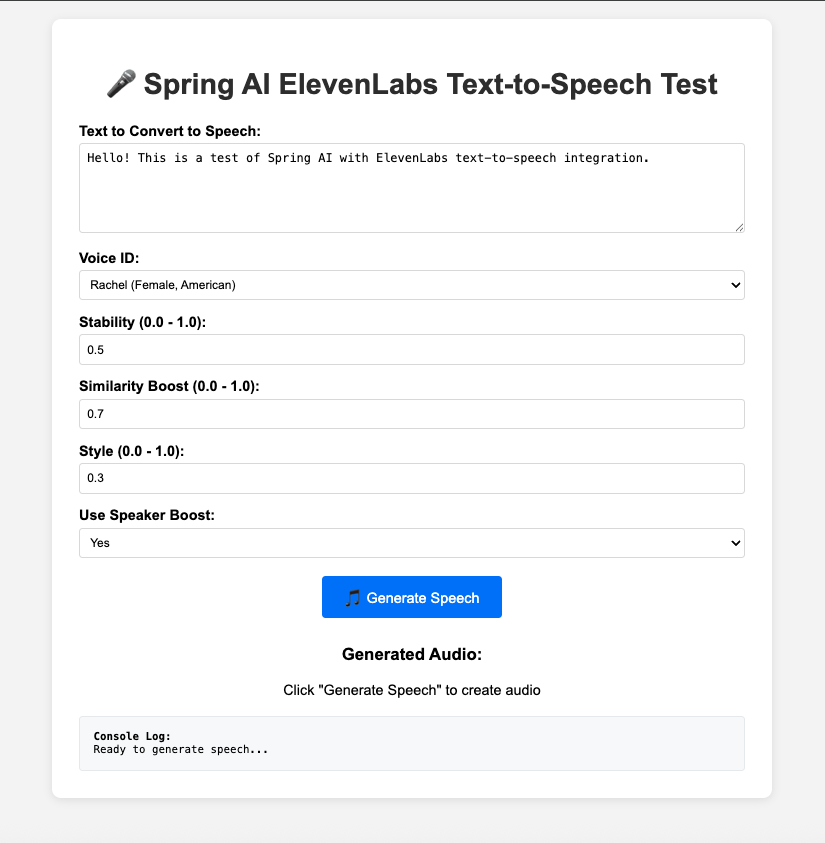
This web page provides a user-friendly form to interact with our text-to-speech service. It includes a text area for your input, a dropdown to select different voices from ElevenLabs, and sliders to fine-tune voice characteristics like stability and style. After you fill out the form and click the “Generate Speech” button, it sends the data to our Spring Boot application. Once the audio is generated, an HTML5 audio player will appear, allowing you to listen to the result directly in your browser. The page also features a console log to show the real-time status of the API request and response.
If you are interested in checking out the complete HTML file, you can find it in the project’s GitHub repository.
How to Test with the Web UI:
- Make sure the
index.htmlfile is placed inside the src/main/resources/static/ directory in your project structure. - With your Spring Boot application running, open your favorite web browser.
- You can now launch the web UI by visiting either http://localhost:8080 or http://localhost:8080/index.html on your browser. Because the file is named index.html and located in the static folder, Spring Boot automatically serves it as the root page.
- Once the page loads, you will see the form. Enter the text you want to convert into speech.
- Select a voice from the dropdown and adjust the sliders for stability, similarity, and style to your liking.
- Click the “🎵 Generate Speech” button.
- The button will change to a “Generating…” state. After a few moments, an audio player will appear with the generated speech.
- Press the play button on the audio player to hear your text come to life
8. Understanding ElevenLabs Voice Parameters and Output Formats
Based on the ElevenLabs API documentation and Spring AI implementation, let’s dive deeper into the available options:
8.1. Voice Settings Parameters
The VoiceSettings class provides fine-grained control over speech generation:
public static record VoiceSettings(
    Double stability,           // 0.0 to 1.0
    Double similarityBoost,     // 0.0 to 1.0
    Double style,              // 0.0 to 1.0
    Boolean useSpeakerBoost,   // true/false
    Double speed              // 0.25 to 4.0
)
Detailed Parameter Explanations:
- Stability
- Type: Double (from 0.0 to 1.0) or null
- What it does: Think of this as controlling the voice’s emotional consistency and randomness. A high value (e.g., 0.8) makes the delivery very stable and predictable, sometimes even monotonous. A low value (e.g., 0.3) introduces more variation and a wider emotional range with each generation.
- Pro Tip: For a straightforward news report, you might want high stability. For a dramatic storyteller, lower stability would be better. A good starting point is usually around 0.5.
- Similarity Boost
- Type: Double (from 0.0 to 1.0) or null
- What it does: This parameter controls how much the generated audio sounds like the original speaker’s voice sample. A higher value forces the AI to stick closely to the original voice’s unique characteristics.
- Pro Tip: This is like a “likeness” slider. If a voice generation sounds a bit off, boosting this value to 0.7 or higher can often fix it.
- Style
- Type: Double (from 0.0 to 1.0) or null
- What it does: This setting exaggerates the unique speaking style of the original voice. If the speaker was naturally expressive, a higher style value will make them even more expressive. This can add significant personality but may slightly increase latency.
- Pro Tip: This is great for creating character voices. A value of 0 means no exaggeration, while a value of 0.4 or more can add significant flair.
- Use Speaker Boost
- Type: Boolean or null
- What it does: This is a boolean toggle that further enhances the voice’s quality and fidelity to the original speaker. Enabling it generally improves the output but, as it requires more computation, it can add a small amount of latency to the API response.
- Pro Tip: For the best audio quality, you should generally keep this set to true unless you are building a real-time application where every millisecond of latency counts.
- Speed
- Type: Double or null
- What it does: As the name suggests, this controls how fast the generated speech is. The default value is 1.0. Values below 1.0 (e.g., 0.9) will slow down the speech, while values above 1.0 (e.g., 1.2) will speed it up.
8.2. Supported Output Formats
ElevenLabs supports various audio formats through the OutputFormat enum:
- MP3 Formats (Recommended for web applications):
MP3_22050_32: 22.05kHz, 32kbps – Compact size, good for mobileMP3_44100_32: 44.1kHz, 32kbps – Standard quality, small file sizeMP3_44100_64: 44.1kHz, 64kbps – Good quality-to-size ratioMP3_44100_96: 44.1kHz, 96kbps – High qualityMP3_44100_128: 44.1kHz, 128kbps – Very high quality (recommended)MP3_44100_192: 44.1kHz, 192kbps – Maximum MP3 quality
- PCM Formats (Uncompressed, larger files):
PCM_8000toPCM_48000: Various sample rates for different use cases- Best for professional audio processing
- OPUS Formats (Efficient compression):
OPUS_48000_32toOPUS_48000_192: Modern codec, excellent compression- Good for real-time applications
- Specialized Formats:
ULAW_8000,ALAW_8000: Telephony applications
9. Bonus: Discovering Voices and Settings with APIs
While generating speech is great, a truly robust application shouldn’t rely on hardcoded voice IDs. What if you want to let users pick from a list of voices in your application’s UI? For this, we can create a set of utility endpoints to discover available voices and their settings directly from the ElevenLabs API.
We’ll add a new, self-contained VoicesController to our project for this purpose.
The Voices Controller: This controller is responsible for exposing endpoints related to voice discovery. It cleverly creates its own instance of the ElevenLabsVoicesApi by injecting the API key directly into its constructor from our application.yml file. This makes the controller completely independent and easy to manage.
package com.bootcamptoprod.controller;
import org.springframework.ai.elevenlabs.api.ElevenLabsVoicesApi;
import org.springframework.beans.factory.annotation.Value;
import org.springframework.http.ResponseEntity;
import org.springframework.web.bind.annotation.GetMapping;
import org.springframework.web.bind.annotation.PathVariable;
import org.springframework.web.bind.annotation.RequestMapping;
import org.springframework.web.bind.annotation.RestController;
@RestController
@RequestMapping("/api/voices")
public class VoicesController {
private final ElevenLabsVoicesApi voicesApi;
public VoicesController(@Value("${spring.ai.elevenlabs.api-key}") String apiKey) {
this.voicesApi = ElevenLabsVoicesApi.builder()
.apiKey(apiKey)
.build();
}
@GetMapping
public ResponseEntity<ElevenLabsVoicesApi.Voices> getAllVoices() {
return voicesApi.getVoices();
}
@GetMapping("/settings/default")
public ResponseEntity<ElevenLabsVoicesApi.VoiceSettings> getDefaultVoiceSettings() {
return voicesApi.getDefaultVoiceSettings();
}
@GetMapping("/{voiceId}")
public ResponseEntity<ElevenLabsVoicesApi.Voice> getVoiceDetails(@PathVariable String voiceId) {
return voicesApi.getVoice(voiceId);
}
@GetMapping("/{voiceId}/settings")
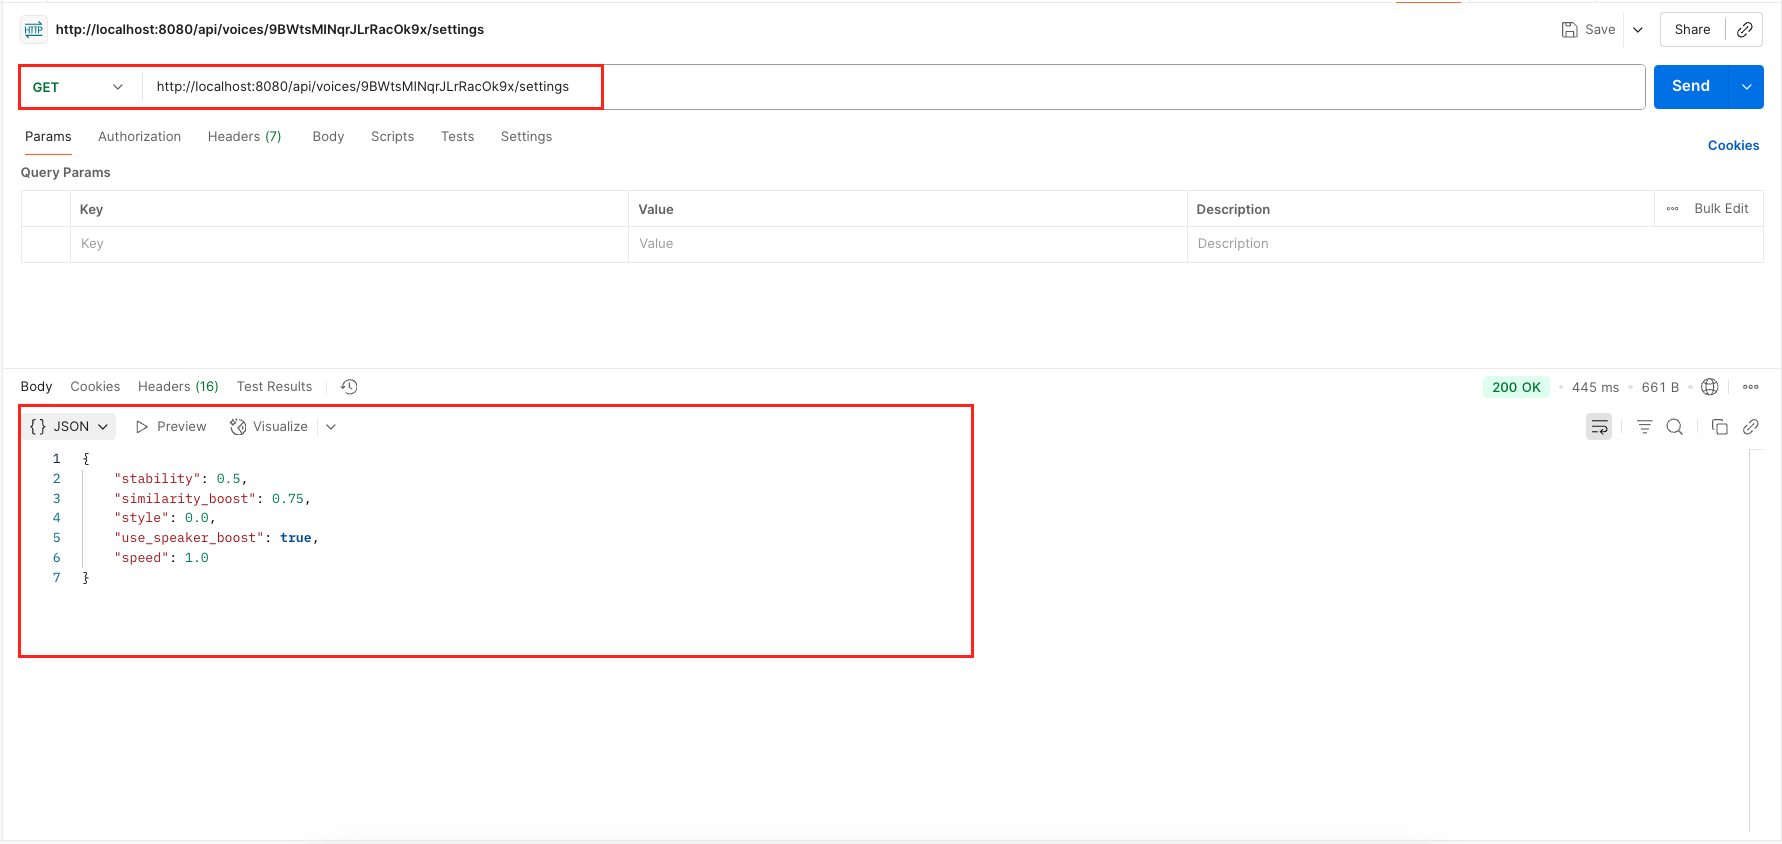
public ResponseEntity<ElevenLabsVoicesApi.VoiceSettings> getVoiceSettings(@PathVariable String voiceId) {
return voicesApi.getVoiceSettings(voiceId);
}
}
Available Endpoints:
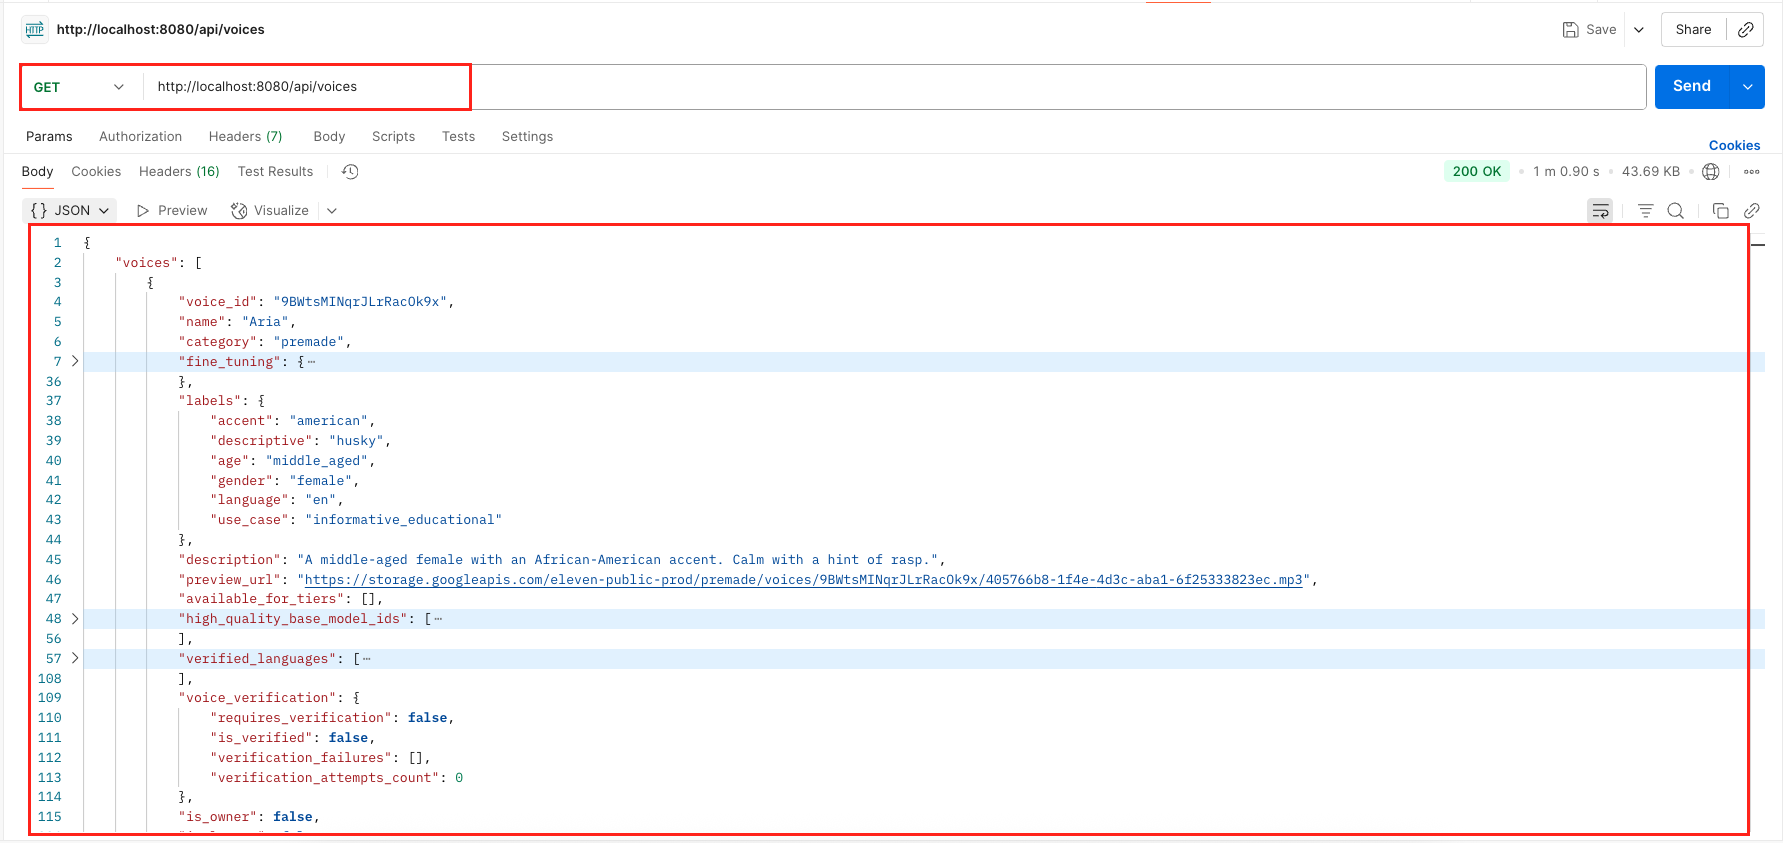
- GET /api/voices: This endpoint fetches a list of all voices available in your ElevenLabs account, including pre-made voices and any custom ones you’ve cloned.
- GET /api/voices/settings/default: This endpoint retrieves the default voice settings (stability, similarity boost, etc.)
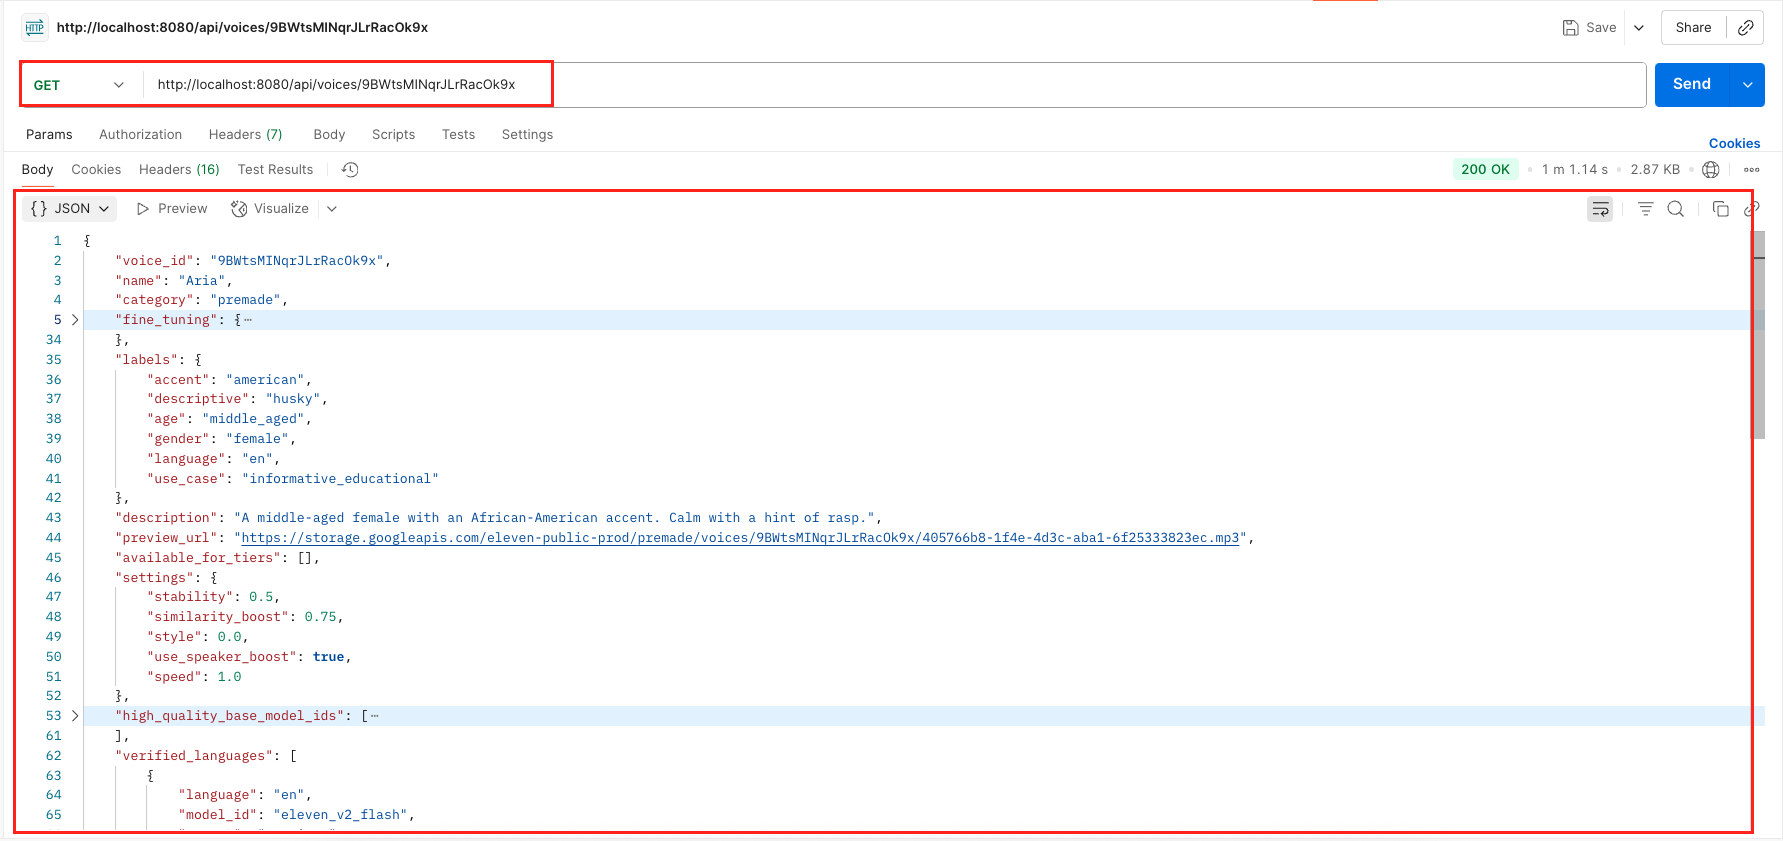
- GET /api/voices/{voiceId}: By providing a voiceId, you can get all the detailed metadata for that specific voice, including its own default settings.
- GET /api/voices/{voiceId}/settings: This endpoint returns only the settings object for a specific voice.
Output:

10. Peeking Under the Hood – Logging Your Text-to-Speech API Calls
When you send a text prompt and voice settings to an AI service, have you ever wondered what that API request actually looks like? Seeing the raw data is incredibly helpful for debugging. It’s the best way to verify that the correct voice ID is being used, that your stability settings are being applied, or to troubleshoot why a request might be failing.
In our project, we made this easy by using a fantastic library called Logbook. With just three simple configuration steps, we enabled detailed logging for all our interactions with the ElevenLabs API:
- We added the
logbook-spring-boot-starterdependency to ourpom.xml. - We configured a
RestClientCustomizerbean in our main application class, which automatically hooks Logbook into every web call made by Spring. - We set the logging level for
org.zalando.logbook.LogbooktoTRACEin our application.yml to capture the full request and response details.
With that simple setup, every API call our application makes to the ElevenLabs model is automatically printed to the console for us to inspect.
For a more in-depth guide on this topic, you can read our detailed article: Spring AI Log Model Requests and Responses – 3 Easy Ways
👉 Sample Request Log
Here is an example of what the log looks like when our application sends a request to ElevenLabs. You can clearly see the API endpoint, the specific voiceId in the URL, and the JSON body containing our text and all the voice settings. This is perfect for confirming that the data from our UI is being correctly translated into an API call.
{
  "origin": "local",
  "type": "request",
  "correlation": "a717f6250f5808e7",
  "protocol": "HTTP/1.1",
  "method": "POST",
  "uri": "https://api.elevenlabs.io/v1/text-to-speech/21m00Tcm4TlvDq8ikWAM?output_format=mp3_44100_128",
  "headers": {
    "Content-Type": [
      "application/json"
    ],
    "xi-api-key": [
      "sk_elevvanlabs_api_key"
    ]
  },
  "body": {
    "text": "Hello, this is a test of Spring AI with ElevenLabs!",
    "model_id": "eleven_multilingual_v2",
    "voice_settings": {
      "stability": 0.75,
      "similarity_boost": 0.75,
      "style": 0.3,
      "use_speaker_boost": true,
      "speed": 1.0
    }
  }
}👉 Sample Response Log
Here is the corresponding response from the ElevenLabs API. Notice the status: 200, which confirms success. The content-type: audio/mpeg header tells our application (and tools like Postman) that the response body is an MP3 file. The body itself is shown as <binary>, which is exactly what we expect for a raw audio file.
{
  "origin": "remote",
  "type": "response",
  "correlation": "a717f6250f5808e7",
  "duration": 1954,
  "protocol": "HTTP/1.1",
  "status": 200,
  "headers": {
    "content-type": [
      "audio/mpeg"
    ],
    "content-length": [
      "51036"
    ],
    "history-item-id": [
      "JecZF3kDcs4cN4Yuyyrs"
    ],
    "server": [
      "uvicorn"
    ],
    "date": [
      "Tue, 12 Aug 2025 19:19:49 GMT"
    ]
  },
  "body": "<binary>"
}11. Video Tutorial
If you prefer visual learning, check out our step-by-step video tutorial. It walks you through building this powerful Text-to-Speech Application from scratch, demonstrating how to integrate ElevenLabs AI voices with Spring Boot and customize voice parameters for different use cases using Spring AI.
📺 Watch on YouTube:
12. Source Code
The complete source code for this Spring AI text-to-speech project with ElevenLabs is available on our GitHub. Just clone the repository, plug in your ElevenLabs API key, and run it locally. It’s the best way to experiment with the code and see how all the pieces fit together.
🔗 Spring AI Text-to-Speech with ElevenLabs: https://github.com/BootcampToProd/spring-ai-text-to-speech-elevenlabs
13. Things to Consider
When implementing text-to-speech, keep these important factors in mind:
- API Rate Limits: ElevenLabs has usage limits based on your subscription tier – monitor your usage to avoid service interruption.
- Error Handling: Implement comprehensive exception handling for API failures, network issues, and invalid requests.
- Input Validation: Validate text length, content filtering, and parameter ranges to prevent abuse.
- Security Measures: Implement rate limiting, input sanitization, and API key protection in production environments.
- Monitoring & Analytics: Track API usage, response times, error rates, and costs for better application management.
- Async Processing: For large-scale applications, consider implementing asynchronous processing to handle multiple requests efficiently.
- Audio Storage: Decide whether to store generated audio files or generate them on-demand based on your use case.
- Cost Management: Monitor ElevenLabs credit usage and implement alerts when approaching limits.
14. FAQs
Can I use different voices?
Yes! You can find the Voice ID for different pre-made voices or even voices you’ve cloned yourself in the Voice Lab on your ElevenLabs dashboard. Simply pass the desired voiceId in your JSON request.
Can I customize the voice speed?
Yes, ElevenLabs supports speed control through the VoiceSettings. You can set speed values from 0.25 (very slow) to 4.0 (very fast), with 1.0 being normal speed.
What voice IDs can I use with ElevenLabs?
You can find and copy voice IDs from the official ElevenLabs Voice Library or programmatically fetch a list of available voices by using our support endpoints present inside the VoicesController.
Can I use custom voices?
Yes, ElevenLabs allows you to create custom voices by uploading audio samples. This feature requires a paid subscription but offers various voice customization possibilities.
How do I handle large text inputs?
You can handle large texts by splitting them into smaller chunks, as ElevenLabs has different character limits depending on the model (from 10,000 to 40,000 characters via the API).
15. Conclusion
Building text-to-speech functionality with Spring AI and ElevenLabs is straightforward and powerful. This integration opens up possibilities for accessibility features, content narration, voice assistants, and interactive applications. The combination of Spring Boot’s robust framework and ElevenLabs’ advanced AI voices provides a solid foundation for any voice-enabled application.
16. Learn More
Interested in learning more?
Spring AI Video Analysis: Transcribe, Summarize & Query Video with LLMs
Add a Comment