Learn how to implement the Spring AI Orchestrator-Workers workflow pattern for dynamic task decomposition and parallel processing in AI applications. Complete guide with practical examples.
1. Introduction
Welcome back to our Spring AI Agentic Workflow Patterns series! In our previous articles, we explored the foundational concepts of AI agent workflows and implemented three powerful patterns:
- Spring AI Chain Workflow Pattern – an introduction to agentic design patterns, a comparison between workflows and agents, and a deep dive into chaining LLM calls.
- Spring AI Parallelization Workflow – how to perform concurrent LLM operations in Spring Boot to boost throughput and efficiency.
- Spring AI Routing Workflow – Intelligent request routing based on content classification
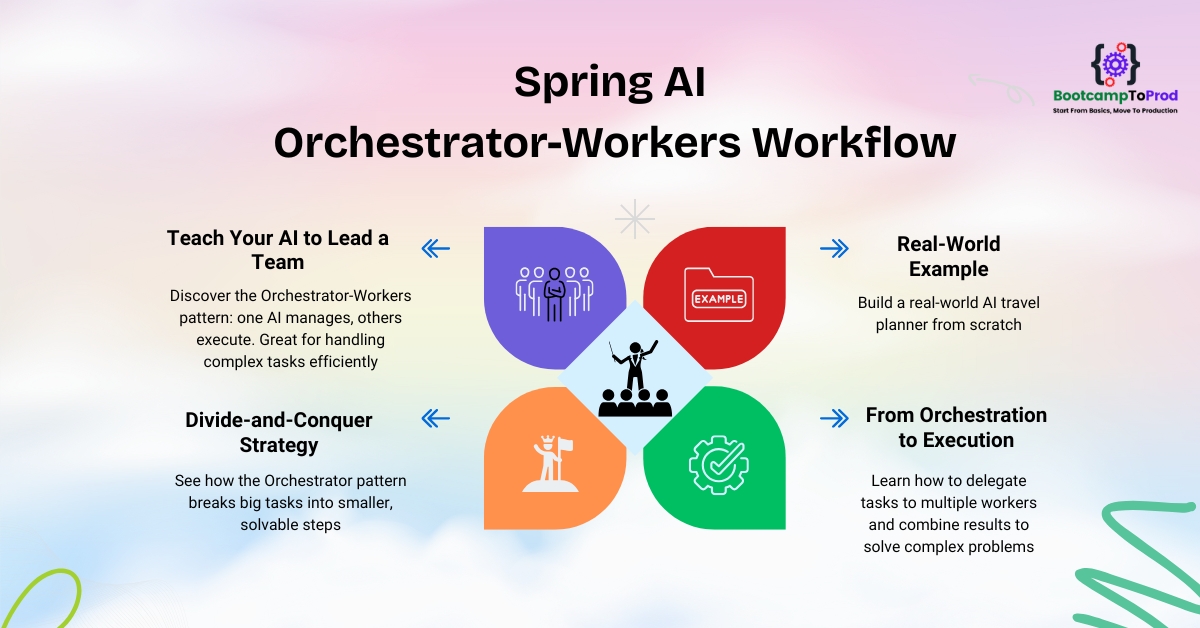
Today, we’re diving into another powerful pattern: the Orchestrator-Workers Workflow. This pattern allows us to build AI systems that can analyze a complex problem, break it down into smaller, manageable subtasks, and delegate them to specialized “worker” agents.
2. What is the Orchestrator-Workers Workflow Pattern?
Imagine you’re a project manager leading a team of specialists. A client gives you a complex request, like “build a new marketing website.” You don’t just hand the entire request to one person. Instead, you (the manager) analyze the request and break it down:
- “I need a UI/UX designer to create the mockups.”
- “I need a copywriter to write the content.”
- “I need a backend developer to set up the CMS.”
- “I need a frontend developer to build the site.”
You delegate these subtasks to the right specialists. Once they’re done, you gather their work and assemble the final product.
The Orchestrator-Workers workflow pattern works exactly the same way, but with LLMs. It consists of three key components:
- The Orchestrator: This is a “manager” LLM. Its only job is to analyze the initial, complex user request and break it down into a list of smaller, distinct subtasks. It determines what needs to be done.
- The Workers: These are specialized LLMs (or functions that call LLMs) that receive a single, focused subtask from the orchestrator. Each worker is an expert at its specific job. They focus on how to do one part of the overall task.
- The Synthesizer: This is the final step where the outputs from all the workers are collected and combined into a single, cohesive response for the user.
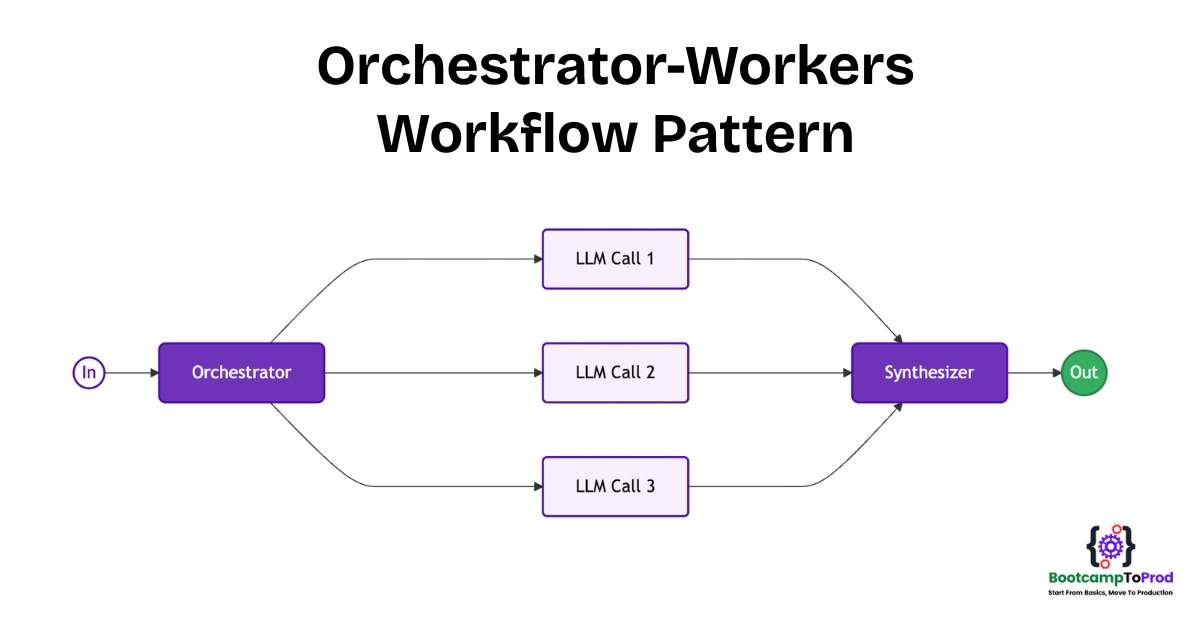
The key difference between the Orchestrator-Workers workflow pattern and the Parallelization pattern is its dynamism. In the Parallelization pattern, we pre-define the tasks to be run in parallel. In the Orchestrator-Workers workflow pattern, the Orchestrator LLM decides the tasks at runtime based on the user’s specific input. This makes it incredibly flexible and powerful for handling tasks where you can’t predict the exact steps needed beforehand.
3. When to Use the Orchestrator-Workers Workflow Pattern?
The Orchestrator-Workers workflow pattern excels in scenarios where:
- Task complexity requires dynamic decomposition
- Subtasks cannot be predicted upfront (like travel preferences that vary by person)
- Different specialized approaches are needed for the same problem
- Adaptive problem-solving is required
- You need multiple perspectives on a single task
4. Real-World Example: AI-Powered Travel Itinerary Planner
Let’s build a Smart Travel Itinerary Planner that can create comprehensive travel plans for any destination. When a user provides their travel preferences, our system will:
- Orchestrator analyzes the travel request and determines what aspects need planning (accommodations, activities, dining, transportation, etc.)
- Workers create specialized recommendations for each aspect of the trip
- Synthesizer combines all outputs into a complete, day-by-day travel itinerary
⚙️ Project Structure & Setup
Below is the folder structure of our Spring Boot application:
spring-ai-orchestrator-workers-workflow
├── src
│   └── main
│       ├── java
│       │   └── com
│       │       └──bootcamptoprod
│       │               ├── controller
│       │               │   └── TravelController.java
│       │               ├── service
│       │               │   └── TravelPlanningService.java
│       │               ├── workflow
│       │               │   └── TravelOrchestratorWorkflow.java
│       │               ├── dto
│       │               │   └── TravelRequest.java
│       │               │   └── TravelItinerary.java
│       │               │   └── OrchestratorAnalysis.java
│       │               │   └── PlanningTask.java
│       │               ├── SpringAiOrchestratorWorkersWorkflowApplication.java
│       └── resources
│           └── application.yml
└── pom.xml
Explanation:
SpringAiOrchestratorWorkersWorkflowApplication.java: The main entry point that starts the Spring Boot application.TravelController.java: REST controller exposing the/api/travel/planendpoint to receive user requests.TravelPlanningService.java: The service layer that bridges the controller and the core workflow logic.TravelOrchestratorWorkflow.java: The core class containing the Orchestrator-Workers pattern logic and prompts.TravelRequest.java: DTO representing the user’s initial travel planning request.TravelItinerary.java: DTO representing the final, synthesized travel plan returned to the user.PlanningTask.java: DTO representing a single subtask generated by the orchestrator for a worker.OrchestratorAnalysis.java: DTO that maps to the structured JSON output from the Orchestrator LLM.application.yml: Spring AI configurationpom.xml: Maven dependencies
Let’s set up our project with the necessary dependencies and configurations.
Step 1: Add Maven Dependencies
Add below dependencies to pom.xml file.
<dependencies>
    <!-- Spring Boot Web for building RESTful web services -->
    <dependency>
        <groupId>org.springframework.boot</groupId>
        <artifactId>spring-boot-starter-web</artifactId>
    </dependency>

    <!-- OpenAI Model Support – configureable for various AI providers (e.g. OpenAI, Google Gemini) -->
    <dependency>
        <groupId>org.springframework.ai</groupId>
        <artifactId>spring-ai-starter-model-openai</artifactId>
    </dependency>

    <!-- Logbook Integration – useful for logging Spring AI request and response details -->
    <dependency>
        <groupId>org.zalando</groupId>
        <artifactId>logbook-spring-boot-starter</artifactId>
        <version>3.12.1</version>
    </dependency>

<dependencyManagement>
    <dependencies>
        <!-- Spring AI bill of materials to align all spring-ai versions -->
        <dependency>
            <groupId>org.springframework.ai</groupId>
            <artifactId>spring-ai-bom</artifactId>
            <version>${spring-ai.version}</version>
            <type>pom</type>
            <scope>import</scope>
        </dependency>
    </dependencies>
</dependencyManagement>
In this configuration:
spring-boot-starter-web:Enables us to build a web application with REST endpointsspring-ai-starter-model-openai:Provides integration with OpenAI’s API (though we’ll configure it for Google Gemini). It includes the ChatClient for making AI calls and auto-configuration for easy setup.logbook-spring-boot-starter:Adds logging for all HTTP requests and responses. In our example, it helps us see that multiple AI calls are made in parallel by showing each request and its response.spring-ai-bom:ThedependencyManagementsection uses Spring AI’s Bill of Materials (BOM) to ensure compatibility between Spring AI components. By importing the BOM, you don’t need to manually specify versions for each Spring AI artifact—it ensures compatibility and prevents version conflicts automatically.
Step 2: Configure Application Properties
Now, let’s configure our application and add configuration related to AI using application.yml.
spring:
  application:
    name: spring-ai-orchestrator-workers-workflow

  # AI configurations
  ai:
    openai:
      api-key: ${GEMINI_API_KEY}
      base-url: https://generativelanguage.googleapis.com/v1beta/openai
      chat:
        completions-path: /chat/completions
        options:
          model: gemini-2.0-flash-exp

logging:
  level:
    org.zalando.logbook.Logbook: TRACE
📄 Configuration Overview
This configuration focuses on AI integration with Google’s Gemini model via the Spring AI OpenAI starter:
👉 AI (OpenAI Starter) Settings:
- api‑key: Your secret key for authenticating with the AI service. Keep this safe and out of source control.
- base‑url: Overrides the default OpenAI endpoint so requests go to Google’s Gemini API instead.
- completions‑path: The REST path for chat-based completions—appended to the base URL when making requests.
- model: Chooses which AI model to call (e.g.
gemini-2.0-flash-exp). This determines the capabilities and response style you’ll get back.
Make sure to set the GEMINI_API_KEY environment variable with your actual Google Gemini API key before running the application.
👉 Logging Configuration
- Logbook Trace Level: Sets Logbook to the TRACE level, which logs full details of every HTTP request and response.
🤖 Google Gemini APIs are great for proof-of-concept (POC) projects since they offer limited usage without requiring payment. For more details, check out our blog, where we dive into how Google Gemini works with OpenAI and how to configure it in case of our Spring AI application.
Step 3: Define the Data Transfer Objects (DTOs)
Before we write our workflow logic, it’s crucial to define the data structures that will carry information through our system. We will use Java Records for their conciseness and immutability. These DTOs ensure that the data flowing from the API, between our LLM calls, and back to the user is clean, structured, and type-safe.
1️⃣ Define the User Input DTO
First, we define the data structure that will capture the user’s input from the API. This is the simplest DTO and serves as the entry point for our data flow.
package com.bootcamptoprod.dto;

public record TravelRequest(
        String destination,
        Integer numberOfDays,
        String budgetRange, // e.g., "budget", "mid-range", "luxury"
        String travelStyle, // e.g., "adventure", "relaxation", "cultural", "family"
        String groupSize,   // e.g., "solo", "couple", "family", "group"
        String specialInterests // e.g., "food", "history", "nature", "nightlife"
) {
}
Explanation:
- Purpose: This record serves as a structured container for all the critical details of a user’s travel plan. By breaking the request down into distinct fields, we eliminate ambiguity and provide our AI with high-quality, organized data right from the start.
2️⃣ Define the Orchestrator’s Output DTO
This DTO is arguably the most important piece of our data modeling. It is designed to perfectly capture the structured output we will request from our Orchestrator LLM. By defining this record, we are essentially creating a contract for the AI: “When you analyze the user’s request, you must provide your response in this exact JSON format.” This enables Spring AI to automatically and reliably convert the LLM’s complex response into a clean, type-safe Java object.
package com.bootcamptoprod.dto;

import java.util.List;

public record OrchestratorAnalysis(
        String analysis,        // Understanding of the travel request
        String travelStrategy,  // Overall approach for this trip
        List<PlanningTask> tasks // Specific planning tasks to execute
) {
}Explanation:
- Purpose: This record represents the “mind” of the orchestrator after it has processed the user’s request. It contains not just a plan, but also the reasoning behind it.
3️⃣ Define the Worker’s Task DTO
This record represents a single, well-defined “work order” that the Orchestrator generates and assigns to a specialized Worker. Each PlanningTask is a self-contained instruction, giving the worker all the information it needs to perform its job effectively without needing to understand the entire travel plan. This level of focus is what ensures high-quality, relevant outputs.
package com.bootcamptoprod.dto;

public record PlanningTask(
        String taskType,        // e.g., "accommodation", "activities", "dining"
        String description,     // What this task should accomplish
        String specialization   // Specific focus area for this task
) {
}
Explanation:
- Purpose: This DTO is the fundamental unit of delegation in our workflow. It’s meticulously designed to provide a worker with precise instructions, enabling it to function as a true specialist.
4️⃣ Define the Final Itinerary DTO
This is the final DTO in our workflow. It represents the culmination of the entire process—from the orchestrator’s initial analysis to the detailed work of each specialist worker, and finally to the polished, synthesized plan. This record is structured to deliver a complete, transparent, and highly useful response back to the user through the API.
package com.bootcamptoprod.dto;

import java.util.List;

public record TravelItinerary(
        String destination,
        String travelStrategy,
        String analysis,
        List<String> planningResults, // Results from each worker
        String finalItinerary,        // Combined day-by-day plan
        long processingTimeMs
) {
}Explanation:
- Purpose: This DTO acts as the final “deliverable” of our AI travel agent, packaging every valuable piece of information into a single, cohesive object.
Step 4: Orchestrator-Workers Workflow Implementation
This class is the heart of our application. It’s the central coordinator that implements the full Orchestrator -> Workers -> Synthesizer pattern. It takes the structured user request, orchestrates the entire multi-step AI process, and produces the final, polished travel itinerary. We’ll make it a Spring @Component so it can be easily injected into our service layer.
package com.bootcamptoprod.workflow;

import com.bootcamptoprod.dto.OrchestratorAnalysis;
import com.bootcamptoprod.dto.PlanningTask;
import com.bootcamptoprod.dto.TravelItinerary;
import com.bootcamptoprod.dto.TravelRequest;
import org.springframework.ai.chat.client.ChatClient;
import org.springframework.stereotype.Component;

import java.util.List;
import java.util.concurrent.CompletableFuture;
import java.util.stream.Collectors;

@Component
public class TravelOrchestratorWorkflow {

    private final ChatClient chatClient;

    public TravelOrchestratorWorkflow(ChatClient.Builder chatClientBuilder) {
        this.chatClient = chatClientBuilder.build();
    }

    /**
     * The orchestrator coordinates the end-to-end travel planning workflow.
     */
    public TravelItinerary createTravelPlan(TravelRequest request) {
        long startTime = System.currentTimeMillis();

        // Step 1: Orchestrator analyzes the travel request
        System.out.println("🎯 Orchestrator analyzing travel request for " + request.destination() + "...");

        String orchestratorPrompt = String.format(
                ORCHESTRATOR_PROMPT_TEMPLATE,
                request.destination(),
                request.numberOfDays(),
                request.budgetRange(),
                request.travelStyle() != null ? request.travelStyle() : "general exploration",
                request.groupSize() != null ? request.groupSize() : "general",
                request.specialInterests() != null ? request.specialInterests() : "general sightseeing"
        );

        OrchestratorAnalysis analysis = chatClient.prompt()
                .user(orchestratorPrompt)
                .call()
                .entity(OrchestratorAnalysis.class);

        System.out.println("📋 Travel Strategy: " + analysis.travelStrategy());
        System.out.println("📝 Planning tasks identified: " + analysis.tasks().size());

        // Step 2: Workers handle different aspects of trip planning in parallel
        System.out.println("⚡ Workers creating specialized recommendations...");

        List<CompletableFuture<String>> workerFutures = analysis.tasks().stream()
                .map(task -> CompletableFuture.supplyAsync(() ->
                        executePlanningTask(request, task)))
                .toList();

        // Wait for all workers to complete and collect results
        List<String> planningResults = workerFutures.stream()
                .map(CompletableFuture::join)
                .collect(Collectors.toList());

        // Step 3: Synthesize all recommendations into a final itinerary
        System.out.println("🔧 Synthesizing final travel itinerary...");

        String finalItinerary = synthesizeItinerary(request, analysis, planningResults);

        long processingTime = System.currentTimeMillis() - startTime;
        System.out.println("✅ Travel itinerary completed in " + processingTime + "ms");

        return new TravelItinerary(
                request.destination(),
                analysis.travelStrategy(),
                analysis.analysis(),
                planningResults,
                finalItinerary,
                processingTime
        );
    }

    /**
     * Executes an individual planning task (accommodation, activity, etc.)
     */
    private String executePlanningTask(TravelRequest request, PlanningTask task) {
        System.out.println("🔧 Worker handling: " + task.taskType());

        String workerPrompt = String.format(
                WORKER_PROMPT_TEMPLATE,
                request.destination(),
                request.numberOfDays(),
                task.taskType(),
                task.description(),
                task.specialization(),
                request.budgetRange(),
                request.travelStyle() != null ? request.travelStyle() : "general exploration",
                request.groupSize() != null ? request.groupSize() : "general",
                request.specialInterests() != null ? request.specialInterests() : "general sightseeing"
        );

        return chatClient.prompt()
                .user(workerPrompt)
                .call()
                .content();
    }

    /**
     * Combines all planning task results into a final itinerary
     */
    private String synthesizeItinerary(TravelRequest request, OrchestratorAnalysis analysis,
                                       List<String> planningResults) {
        String combinedResults = String.join("\n\n", planningResults);

        String synthesisPrompt = String.format(
                SYNTHESIZER_PROMPT_TEMPLATE,
                request.destination(),
                request.numberOfDays(),
                analysis.travelStrategy(),
                combinedResults,
                request.numberOfDays()
        );

        return chatClient.prompt()
                .user(synthesisPrompt)
                .call()
                .content();
    }

    // Prompt templates
    private static final String ORCHESTRATOR_PROMPT_TEMPLATE = """
            Think of you as a travel planner. Analyze this travel request and determine what aspects of the trip need to be planned:

            Destination: %s
            Duration: %s days
            Budget: %s
            Travel Style: %s
            Group: %s
            Special Interests: %s

            Based on this information, create a travel strategy and break it down into 3-4 specific planning tasks.
            Each task should handle different aspects of travel (accommodation, activities, dining, transportation).

            Respond in JSON format:
            {
              "analysis": "Your analysis of the destination and traveler preferences",
              "travelStrategy": "Overall strategy for this trip type and destination",
              "tasks": [
                {
                  "taskType": "accommodation",
                  "description": "Find suitable places to stay based on budget and preferences",
                  "specialization": "Focus on location, amenities, and value for the specified budget"
                },
                {
                  "taskType": "activities",
                  "description": "Recommend activities and attractions matching travel style",
                  "specialization": "Focus on experiences that match the travel style and interests"
                }
              ]
            }
            """;

    private static final String WORKER_PROMPT_TEMPLATE = """
            Create travel recommendations based on these requirements:

            Destination: %s
            Trip Duration: %s days
            Planning Focus: %s
            Task Description: %s
            Specialization: %s
            Budget Range: %s
            Travel Style: %s
            Group Type: %s
            Special Interests: %s

            Provide detailed, practical recommendations that travelers can actually use.
            Include specific names, locations, and helpful tips where possible.
            """;

    private static final String SYNTHESIZER_PROMPT_TEMPLATE = """
            Create a comprehensive day-by-day travel itinerary using these planning results:

            Destination: %s
            Duration: %s days
            Travel Strategy: %s

            Planning Results:
            %s

            Combine all the recommendations into a cohesive %s-day itinerary.
            Organize by day and include practical details like timing, locations, and transitions between activities.
            Make it easy to follow and realistic for travelers.
            """;
}
Explanation:
The createTravelPlan public method manages the entire process from start to finish.
- Step 1: The Orchestrator (The “Manager”)
First, we ask our “manager” AI to analyze the user’s request. Using theORCHESTRATOR_PROMPT_TEMPLATE, it acts like a project manager, figuring out what needs to be planned (e.g., hotels, activities, dining) and creating a to-do list. Spring AI then automatically converts the AI’s JSON plan into ourOrchestratorAnalysisobject. - Step 2: The Workers (The “Specialists”)
Next, we give each task from the to-do list to a specialist “worker” AI. The magic here isCompletableFuture, which lets all the workers do their jobs at the same time (in parallel). This is much faster than waiting for them to finish one by one. Each worker uses theWORKER_PROMPT_TEMPLATEto focus on its single task, like finding the best restaurants. - Step 3: The Synthesizer (The “Editor”)
After all the workers have submitted their reports, we hand everything to our “editor” AI. Using theSYNTHESIZER_PROMPT_TEMPLATE, it takes all the separate recommendations and skillfully combines them into a single, beautiful, day-by-day itinerary that’s easy to read.
Finally, the method gathers all the results—the initial analysis, the raw worker reports, and the final polished plan—into the TravelItinerary object to be sent back to the user.
Helper Functions and Prompts
- executePlanningTask(): This is the job description for each Worker. It takes one task from the list and generates a detailed recommendation.
- synthesizeItinerary(): This function performs the Synthesizer’s job, asking the AI to assemble everything into the final plan.
- The Prompts (…_PROMPT_TEMPLATE): These are the most critical part. They are simply the detailed text instructions we give to the AI at each stage to guide its thinking and ensure we get the desired output.
Step 5: Create Service Class
The service layer acts as the clean and simple bridge between our web endpoint (the Controller) and our complex AI logic (the Workflow).
package com.bootcamptoprod.service;

import com.bootcamptoprod.dto.TravelItinerary;
import com.bootcamptoprod.dto.TravelRequest;
import com.bootcamptoprod.workflow.TravelOrchestratorWorkflow;
import org.springframework.stereotype.Service;

@Service
public class TravelPlanningService {

    private final TravelOrchestratorWorkflow orchestratorWorkflow;

    public TravelPlanningService(TravelOrchestratorWorkflow orchestratorWorkflow) {
        this.orchestratorWorkflow = orchestratorWorkflow;
    }

    public TravelItinerary planTrip(TravelRequest request) {
        // Delegate to the workflow for AI processing
        return orchestratorWorkflow.createTravelPlan(request);
    }
}Explanation:
- TravelPlaningService class: Think of this class as the coordinator for our application.
- planTrip(TravelRequest request) method: This method is intentionally simple. Its only job is to delegate the work. It receives the
TravelRequestand immediately passes it along to thecreateTravelPlanmethod in our workflow class, which does all the heavy lifting.
Step 6: Create Controller
This final class is the “front door” to our application. It’s a REST Controller that listens for incoming web requests from the outside world (like a user’s browser or a mobile app) and tells the rest of our application what to do. It handles the communication, making our AI-powered service accessible over the internet.
package com.bootcamptoprod.controller;

import com.bootcamptoprod.dto.TravelItinerary;
import com.bootcamptoprod.dto.TravelRequest;
import com.bootcamptoprod.service.TravelPlanningService;
import org.springframework.http.ResponseEntity;
import org.springframework.web.bind.annotation.PostMapping;
import org.springframework.web.bind.annotation.RequestBody;
import org.springframework.web.bind.annotation.RequestMapping;
import org.springframework.web.bind.annotation.RestController;

@RestController
@RequestMapping("/api/travel")
public class TravelController {

    private final TravelPlanningService travelService;

    public TravelController(TravelPlanningService travelService) {
        this.travelService = travelService;
    }

    @PostMapping("/plan")
    public ResponseEntity<TravelItinerary> createItinerary(@RequestBody TravelRequest request) {
        try {
            TravelItinerary itinerary = travelService.planTrip(request);
            return ResponseEntity.ok(itinerary);
        } catch (IllegalArgumentException e) {
            return ResponseEntity.badRequest().build();
        } catch (Exception e) {
            System.err.println("Error creating travel itinerary: " + e.getMessage());
            return ResponseEntity.internalServerError().build();
        }
    }
}
Explanation:
- TravelController class: This class serves as the REST API entry point for our application. It is responsible for handling incoming HTTP requests, managing responses, and delegating the actual work to the service layer.
- createItinerary method: This endpoint listens for HTTP POST requests at
/api/travel/plan. It receives the user’s travel preferences as a JSON payload, which Spring automatically maps to theTravelRequestDTO. It then forwards this request to the service layer and wraps the finalTravelItineraryin a ResponseEntity to send back to the client. - DTOs (TravelRequest, OrchestratorAnalysis, etc.): As detailed in Step 3, these are the simple data transfer objects that define the structure of our API’s input and output.
Step 7: Application Entry Point
Now, let’s define the main class that boots our Spring Boot app.
package com.bootcamptoprod;

import org.springframework.boot.SpringApplication;
import org.springframework.boot.autoconfigure.SpringBootApplication;
import org.springframework.boot.web.client.RestClientCustomizer;
import org.springframework.context.annotation.Bean;
import org.zalando.logbook.Logbook;
import org.zalando.logbook.spring.LogbookClientHttpRequestInterceptor;

@SpringBootApplication
public class SpringAiOrchestratorWorkersWorkflowApplication {

    public static void main(String[] args) {
        SpringApplication.run(SpringAiOrchestratorWorkersWorkflowApplication.class, args);
    }

    // Enables logging of all outgoing HTTP requests made to the LLM API through Logbook
    @Bean
    public RestClientCustomizer restClientCustomizer(Logbook logbook) {
        return restClientBuilder -> restClientBuilder.requestInterceptor(new LogbookClientHttpRequestInterceptor(logbook));
    }

}
Explanation:
- Main Class to Run the Application:
SpringAiOrchestratorWorkersWorkflowApplicationis the starting point of our application. When you run this class, Spring Boot initializes all components and starts the embedded server. - RestClient Customizer for Logging: We define a
RestClientCustomizerbean that registersLogbookClientHttpRequestInterceptor. This enables automatic logging of all outbound API calls made through Spring’s ChatClient. - Why It Matters: This is especially useful for observing interactions with your configured LLM (like Google Gemini).
5. How Our Orchestrator-Workers Workflow Works Step-by-Step
Let’s walk through the entire journey of a travel request, from the moment a user submits their preferences to receiving a fully detailed itinerary:
- Request Initiation: A user sends a POST request to the
/api/travel/planendpoint. The body of the request contains a JSON object with their travel details like destination, budget, and travel style. - Controller Handling: The
TravelControllerreceives this request. Spring automatically converts the JSON payload into aTravelRequestDTO. The controller then passes this DTO to theTravelPlanningService. - Service Delegation: The
TravelPlanningServiceacts as a clean hand-off point. It receives theTravelRequestand immediately calls thecreateTravelPlanmethod on theTravelOrchestratorWorkflow, entrusting it with the core AI logic. - Orchestrator Analysis (Step 1): The
TravelOrchestratorWorkflowbegins. It sends the user’s preferences to the LLM with a specialized “Orchestrator” prompt. The LLM analyzes the request and returns a structured plan of action—a list of subtasks (e.g., plan accommodations, find activities, suggest restaurants). - Parallel Worker Execution (Step 2): The workflow then delegates each subtask to a “Worker.” Using
CompletableFuture, it triggers a separate LLM call for each task simultaneously. These workers operate in parallel, one finding hotels while another finds restaurants, drastically speeding up the process. - Itinerary Synthesis (Step 3): Once all the workers have completed their individual tasks, the workflow gathers their separate reports. It makes one final “Synthesizer” LLM call, providing all the worker outputs and asking the AI to weave them into a single, cohesive, day-by-day travel plan.
- Response Delivery: The final
TravelItineraryobject, containing the complete plan, is returned up the chain from the workflow to the service, and finally to the controller. The controller wraps it in aResponseEntitywith a 200 OK status and sends it back to the user as the final JSON response.
🖥️ Verify the output
Once your application is running, you can test the Orchestrator-Workers workflow by making a POST request to http://localhost:8080/api/travel/plan with a JSON body containing your travel preferences.
The response will be a complete TravelItinerary JSON object, which includes the raw planningResults from each worker and the polished finalItinerary. To confirm the workflow, check your application logs for the sequence of “🎯 Orchestrator”, “⚡ Workers”, and “🔧 Synthesizing” messages, which proves that the multi-step, parallel process was executed correctly.
curl --location 'http://localhost:8080/api/travel/plan' \
--header 'Content-Type: application/json' \
--data '{
    "destination": "Tokyo, Japan",
    "numberOfDays": 5,
    "budgetRange": "mid-range",
    "travelStyle": "cultural",
    "groupSize": "couple",
    "specialInterests": "food and temples"
  }'
Output:

6. Video Tutorial
If you prefer visual learning, check out our step-by-step video tutorial demonstrating the Spring AI Orchestrator-Workers Workflow Pattern implementation in action.
📺 Watch on YouTube:
7. Source Code
The complete source code for this Spring AI Orchestrator-Workers Workflow example is available on GitHub. You can clone the repository and run it locally to see the Orchestrator Workers Workflow pattern in action.
🔗 Spring AI Orchestrator Workers Workflow Demo App: https://github.com/BootcampToProd/spring-ai-orchestrator-workers-workflow
8. Things to Consider
While this pattern is incredibly powerful, its complexity requires careful planning. Keep these important considerations in mind for a successful implementation:
- Orchestrator Prompt Reliability: The quality of your orchestrator prompt is paramount. It must be exceptionally clear about how to break down tasks and, most importantly, must reliably produce valid JSON. If the orchestrator fails to generate the correct JSON structure, the entire workflow will break.
- Cost and Latency: This pattern is call-intensive (1 orchestrator + N workers + potentially 1 synthesizer). This directly impacts both the financial cost and the total response time. While parallelizing workers helps reduce latency, the monetary cost is cumulative. Always monitor performance and cost.
- Robust Error Handling: What happens if one worker fails while the others succeed? Or if the synthesizer produces a poor result? You need a strategy for partial failures. Implement retries for individual workers or design a fallback that can present the successful results even if one part fails.
- Worker Prompt Design: Each worker prompt should be highly focused on its specific task. Ensure you provide enough context from the original request (like budget or user preferences) to each worker so it can make relevant suggestions, but avoid making the prompts so broad that their outputs overlap.
- The Synthesizer Strategy: The final synthesis step can range from simple string combination to another full LLM call. Using an LLM as a synthesizer produces a more polished and narrative-style output, but it adds another layer of cost and latency. Choose the strategy that best fits your application’s needs.
9. FAQs
How Orchestrator-Workers workflow pattern different from the Parallelization pattern again?
The key difference is dynamism. In Parallelization, you hard-code the list of tasks to be run. In Orchestrator-Workers, an LLM generates the list of tasks at runtime based on the user’s input, making it far more flexible and adaptive.
Can I use different LLM models for the orchestrator and workers?
Absolutely! You can configure multiple ChatClient beans in your Spring configuration, each with different models or settings. Then, you can inject the specific ChatClient you need for the orchestrator versus the workers.
Why not just use one giant prompt to ask the AI to plan the whole trip at once?
For complex tasks, a single, massive prompt can cause an LLM to get confused, miss important details, or generate generic, lower-quality results. By breaking the problem down (“divide and conquer”), each worker can focus on being an expert in one small area (like hotels or dining). This leads to higher-quality, more detailed, and more relevant outputs for each part of the problem, resulting in a better overall plan.
What happens if one of the workers fails? Does the whole request crash?
In our simple example, a single worker failure would stop the process. However, in a real-world, production-grade application, you should build in more resilience. You could wrap the worker calls in try-catch blocks, return a “failed” message for that specific task, and allow the synthesizer to assemble the results from the successful workers. You could also implement retry logic for failed workers.
Isn’t this pattern very slow and expensive because of all the AI calls?
Yes, this pattern is more resource-intensive than a single LLM call. Each call to the orchestrator, workers, and synthesizer adds to the financial cost and the overall time (latency). We significantly reduce the latency by running the workers in parallel. The key is to use this powerful pattern for complex tasks where the value of the detailed, high-quality output justifies the additional resources.
What if one worker’s task depends on the output of another worker?
This is a great question that highlights a limitation of a purely parallel approach. The pattern shown in this article assumes all worker tasks are independent. If Task B needs the result of Task A, you cannot run them in parallel. In that scenario, you would need to combine this pattern with the Spring AI Chain Workflow. You would execute Worker A, get its result, and then use that result as an input for the prompt to execute Worker B.
Is the final “Synthesizer” LLM call always necessary?
No, it’s a design choice based on your needs. You have two main options:
- LLM-based Synthesis (High-Quality): For a more polished, narrative-style output, you can make one final LLM call (the “Synthesizer”) and ask it to weave the raw worker outputs into a coherent story or plan. This provides a premium user experience but adds to the cost and latency.
- Simple Combination (Fast & Cheap): You can use Java code to simply format and combine the raw outputs from the workers, like creating a list or concatenating strings.
10. Conclusion
The Orchestrator–Workers workflow changes how we use LLMs: instead of one big prompt, we create a team of “agents” that split up and tackle different parts of a problem. This lets our AI handle complex or unpredictable tasks more like a group of people working together. With this pattern, you can build truly “smart” apps that think through a plan, divide the work, and then bring it all together. As you explore Spring AI, view this approach as a key building block for creating powerful, next‑generation AI applications.
11. Learn More
Interested in learning more?
Spring AI Routing Workflow: Intelligent Request Routing with LLM-Powered Classification
Add a Comment