
Learn how to build high-quality, self-improving AI applications with the Spring AI Evaluator Optimizer pattern. Complete guide with practical examples.
1. Introduction
Welcome back to our Spring AI Agentic Workflow series! In our previous articles, we’ve explored fundamental patterns that form the backbone of intelligent AI applications:
- Spring AI Chain Workflow Pattern – an introduction to agentic design patterns, a comparison between workflows and agents, and a deep dive into chaining LLM calls.
- Spring AI Parallelization Workflow – how to perform concurrent LLM operations in Spring Boot to boost throughput and efficiency.
- Spring AI Routing Workflow – Intelligent request routing based on content classification
- Spring AI Orchestrator-Workers Workflow – Dynamic task orchestration and distribution
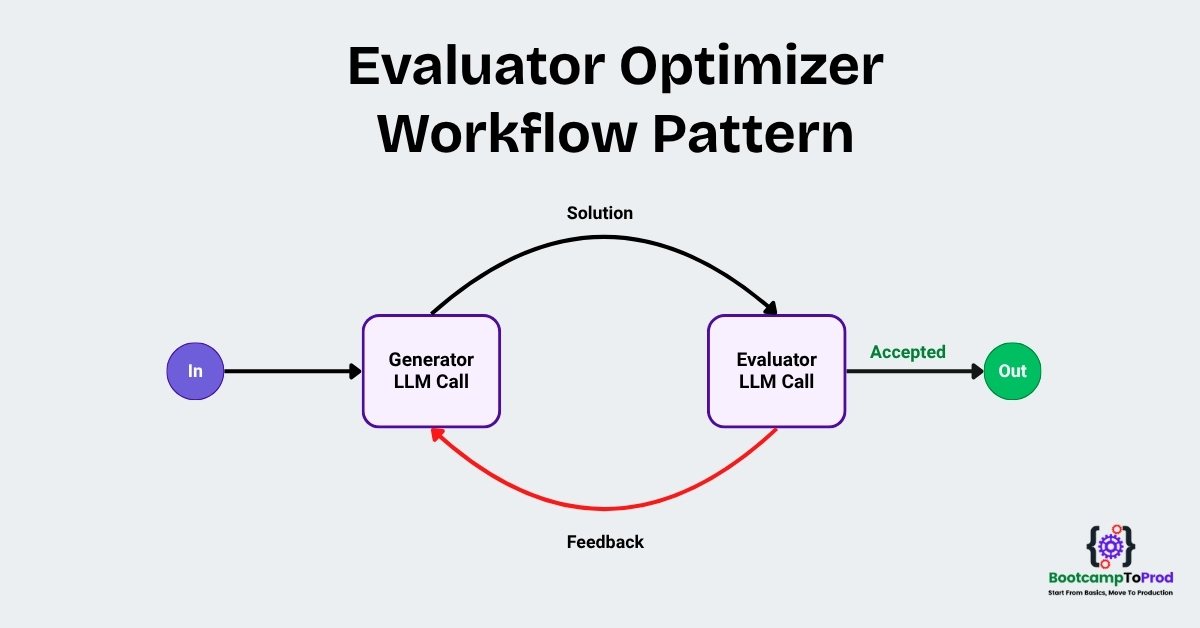
In this fifth article, we’re diving into a pattern that focuses on one of the biggest challenges in AI development: ensuring high-quality output. Introducing the Evaluator-Optimizer Pattern, a workflow that enables your AI system to critique and refine its own work until it meets a high standard of excellence.
2. What is the Evaluator Optimizer Pattern?
Imagine you’re writing an important report. You write a first draft, then you hand it to a trusted colleague—an editor—to review. The editor reads it, points out a few weak spots, and gives you suggestions. You take that feedback, revise your draft, and maybe even send it back for another look. This loop of writing and reviewing continues until the report is polished and ready.
The Evaluator-Optimizer pattern does exactly this, but with AI! We have:
- The Generator (The Writer): This AI agent’s job is to generate the initial response or solution to a given task.
- The Evaluator (The Editor): This second AI agent’s job is to critically assess the Generator’s output against a set of predefined criteria. It then provides a verdict: is the output good enough, or does it need improvement?
The typical flow looks like this:
- Generate: The Generator produces an initial solution.
- Evaluate: The Evaluator reviews the solution.
- Decide:
- If the Evaluator gives a “PASS” verdict, the loop ends, and the solution is returned.
- If the Evaluator gives a “NEEDS_IMPROVEMENT” verdict, its feedback is passed back to the Generator.
- Repeat: The Generator incorporates the feedback to create a new, improved solution, and the process starts again.
3. When to Use the Evaluator Optimizer Workflow Pattern?
This pattern is our go-to solution when:
- Quality is Non-Negotiable: For tasks like generating legal documents, writing mission-critical code, or crafting official company communications.
- You Have Clear Evaluation Criteria: The pattern works best when you can clearly define what a “good” output looks like (e.g., “The code must be thread-safe,” or “The email must have a professional and empathetic tone”).
- Iterative Refinement Adds Value: The task benefits from multiple rounds of polish, such as creative writing, complex problem-solving, or detailed translations.
4. Real-World Example: Smart Email Generator
Let’s build something you’ll actually use – a Smart Email Generator that helps you write professional emails. Whether you’re asking for a raise, apologizing for being late, or following up on a job interview, this tool will make sure your email sounds professional and gets results.
What Our App Will Do:
- You tell it what kind of email you want to write
- The Writer AI creates a draft
- The Editor AI reviews it and says what needs fixing
- They keep improving it until it’s perfect
- You get a polished, professional email ready to send
⚙️ Project Structure & Setup
Below is the folder structure of our Spring Boot application:
spring-ai-evaluator-optimizer-workflow
├── src
│   └── main
│       ├── java
│       │   └── com
│       │       └──bootcamptoprod
│       │               ├── controller
│       │               │   └── EmailController.java
│       │               ├── service
│       │               │   └── EmailService.java
│       │               ├── workflow
│       │               │   └── EmailEvaluatorOptimizer.java
│       │               ├── dto
│       │               │   └── EmailRequest.java
│       │               │   └── EmailResponse.java
│       │               │   └── WriterResponse.java
│       │               │   └── EditorResponse.java
│       │               │   └── EmailResult.java
│       │               ├── SpringAiEvaluatorOptimizerWorkflowApplication.java
│       └── resources
│           └── application.yml
└── pom.xml
Explanation:
SpringAiEvaluatorOptimizerWorkflowApplication.java: The main entry point that starts the Spring Boot application.EmailController.java: REST controller exposing the/api/email/generateendpoint to receive user requests.EmailService.java: The service layer that bridges the controller and the core workflow logic.EmailEvaluatorOptimizer.java: The core class containing the Evaluator-Optimizer pattern logic and prompts.EmailRequest.java: DTO representing the user’s email request.EmailResponse.java: DTO representing the final response sent back to the client.WriterResponse.java: Record representing the AI writer’s output, including reasoning and the generated email content.EditorResponse.java: Record representing the AI editor’s verdict and improvement suggestions.EmailResult.java: DTO used internally by the workflow to capture the final result and improvement steps during the iterative optimization process.application.yml: Spring AI configurationpom.xml: Maven dependencies
Let’s set up our project with the necessary dependencies and configurations.
Step 1: Add Maven Dependencies
Add below dependencies to pom.xml file.
<dependencies>
    <!-- Spring Boot Web for building RESTful web services -->
    <dependency>
        <groupId>org.springframework.boot</groupId>
        <artifactId>spring-boot-starter-web</artifactId>
    </dependency>

    <!-- OpenAI Model Support – configureable for various AI providers (e.g. OpenAI, Google Gemini) -->
    <dependency>
        <groupId>org.springframework.ai</groupId>
        <artifactId>spring-ai-starter-model-openai</artifactId>
    </dependency>

<dependencyManagement>
    <dependencies>
        <!-- Spring AI bill of materials to align all spring-ai versions -->
        <dependency>
            <groupId>org.springframework.ai</groupId>
            <artifactId>spring-ai-bom</artifactId>
            <version>${spring-ai.version}</version>
            <type>pom</type>
            <scope>import</scope>
        </dependency>
    </dependencies>
</dependencyManagement>
In this configuration:
spring-boot-starter-web:Enables us to build a web application with REST endpointsspring-ai-starter-model-openai:Provides integration with OpenAI’s API (though we’ll configure it for Google Gemini). It includes the ChatClient for making AI calls and auto-configuration for easy setup.spring-ai-bom:ThedependencyManagementsection uses Spring AI’s Bill of Materials (BOM) to ensure compatibility between Spring AI components. By importing the BOM, you don’t need to manually specify versions for each Spring AI artifact—it ensures compatibility and prevents version conflicts automatically.
Step 2: Configure Application Properties
Now, let’s configure our application and add configuration related to AI using application.yml.
spring:
  application:
    name: spring-ai-evaluator-optimizer-workflow

  # AI configurations
  ai:
    openai:
      api-key: ${GEMINI_API_KEY}
      base-url: https://generativelanguage.googleapis.com/v1beta/openai
      chat:
        completions-path: /chat/completions
        options:
          model: gemini-2.0-flash-exp
📄 Configuration Overview
This configuration focuses on AI integration with Google’s Gemini model via the Spring AI OpenAI starter:
👉 AI (OpenAI Starter) Settings:
- api‑key: Your secret key for authenticating with the AI service. Keep this safe and out of source control.
- base‑url: Overrides the default OpenAI endpoint so requests go to Google’s Gemini API instead.
- completions‑path: The REST path for chat-based completions—appended to the base URL when making requests.
- model: Chooses which AI model to call (e.g.
gemini-2.0-flash-exp). This determines the capabilities and response style you’ll get back.
Make sure to set the GEMINI_API_KEY environment variable with your actual Google Gemini API key before running the application.
🤖 Google Gemini APIs are great for proof-of-concept (POC) projects since they offer limited usage without requiring payment. For more details, check out our blog, where we dive into how Google Gemini works with OpenAI and how to configure it in case of our Spring AI application.
Step 3: Define the Data Transfer Objects (DTOs)
Before we write our workflow logic, it’s crucial to define the data structures that will carry information through our system. We will use Java Records for their conciseness and immutability. These DTOs ensure that the data flowing from the API, between our LLM calls, and back to the user is clean, structured, and type-safe.
1️⃣ Define the User Input DTO
First, we define the data structure that will capture the user’s input from the API. This is the simplest DTO and serves as the entry point for our data flow.
package com.bootcamptoprod.dto;

public record EmailRequest(
        String emailType,        // e.g., "job_followup", "raise_request"
        String recipientName,    // "John Smith"
        String mainMessage,      // "I want to follow up on my interview"
        String tonePreference    // "professional", "friendly", "formal"
) {
}Explanation:
- Purpose: This is a simple Java object that holds all the information the user sends to our API. It’s like a form they fill out.
2️⃣ Define the Writer Response DTO
This DTO encapsulates the direct output from our “Writer” AI. It holds the generated email content and, crucially, the AI’s own reasoning for its choices, providing a valuable glimpse into its thought process.
package com.bootcamptoprod.dto;

public record WriterResponse(
        String reasoning,
        String email
) {
}
Explanation:
- Purpose: This DTO acts as the primary artifact passed from the Generator (Writer) to the Evaluator (Editor). The
emailfield is the work-in-progress, while thereasoningfield is essential for debugging and understanding the AI’s logic during each step of the refinement loop.
3️⃣ Define the Editor Response DTO
This record represents the critical judgment passed down from our “Editor” AI. It contains a clear, binary verdict (GOOD_TO_SEND or NEEDS_WORK) and provides specific, actionable feedback if the draft needs revision.
package com.bootcamptoprod.dto;

public record EditorResponse(
        String verdict,
        String suggestions
) {
}Explanation:
- Purpose: This DTO is the engine of our self-correction loop. The verdict field acts as a control signal, telling the workflow whether to terminate or continue. The suggestions field provides the high-quality feedback that enables the Writer to make meaningful improvements in the next iteration.
4️⃣ Define the Email Result DTO
This record is an internal data carrier used to cleanly pass the final, successful outcome from the complex workflow logic back to the service layer. It bundles the approved email with a history of the refinement process.
package com.bootcamptoprod.dto;

import java.util.List;

public record EmailResult(
        String email,
        List<String> improvementSteps
) {
}
Explanation:
- Purpose: This DTO acts as a clean and simple “package” to exit the recursive loop. It decouples the core
EmailEvaluatorOptimizerworkflow from theEmailService, ensuring that the service receives a tidy, self-contained result without needing to know the messy details of the iterative process.
5️⃣ Define the Final API Response DTO
This is the final, user-facing DTO that our API sends back to the client. It’s meticulously designed to not only deliver the final product but also to showcase the value added by the iterative refinement process.
package com.bootcamptoprod.dto;

import java.util.List;

public record EmailResponse(
        String finalEmail,        // The polished email
        int improvementRounds,    // How many times we improved it
        List<String> processLog   // Think of it like a journal of changes
) {
}Explanation:
- Purpose: This DTO provides a comprehensive and transparent summary of the entire operation for the end-user. It delivers the
finalEmail, quantifies the effort withimprovementRounds, and offers a detailed narrative of the “behind-the-scenes” work in theprocessLog, effectively demonstrating the power of the Evaluator-Optimizer pattern.
Step 4: Evaluator-Optimizer Workflow Implementation
This class contains the core logic for our writer-editor loop. It will manage the prompts, handle the communication with the LLM, and run the recursive improvement process.
package com.bootcamptoprod.workflow;

import com.bootcamptoprod.dto.EditorResponse;
import com.bootcamptoprod.dto.EmailResult;
import com.bootcamptoprod.dto.WriterResponse;
import org.springframework.ai.chat.client.ChatClient;
import org.springframework.stereotype.Component;

import java.util.ArrayList;
import java.util.List;

@Component
public class EmailEvaluatorOptimizer {

    private final ChatClient chatClient;
    private static final int MAX_ATTEMPTS = 4; // Don't try forever!

    // Instructions for our Writer AI
    private static final String WRITER_INSTRUCTIONS = getWriterInstructions();

    // Instructions for our Editor AI
    private static final String EDITOR_INSTRUCTIONS = getEditorInstructions();

    // Constructor - Spring will create this for us
    public EmailEvaluatorOptimizer(ChatClient.Builder chatClientBuilder) {
        this.chatClient = chatClientBuilder.build();
    }

    // Main method that starts the improvement process
    public EmailResult createPerfectEmail(String emailType, String recipientName, String mainMessage, String tonePreference) {
        // Start the recursive improvement loop
        return improveEmailRecursively(emailType, recipientName, mainMessage, tonePreference, "", new ArrayList<>(), 1);
    }

    // Recursive method that keeps improving the email until it's perfect
    private EmailResult improveEmailRecursively(String emailType, String recipientName, String mainMessage,
                                                String tonePreference, String previousFeedback,
                                                List<String> processLog, int attemptNumber) {

        // Safety check - don't go on forever!
        if (attemptNumber > MAX_ATTEMPTS) {
            processLog.add("Reached maximum attempts - returning best version");
            return new EmailResult("Maximum attempts reached", processLog);
        }

        System.out.println("--- Attempt " + attemptNumber + " ---");

        // Step 1: Writer AI creates/improves the email
        WriterResponse draft = writeEmail(emailType, recipientName, mainMessage, tonePreference, previousFeedback);
        processLog.add("Round " + attemptNumber + ": Created email draft");

        System.out.println("Writer's reasoning: " + draft.reasoning());
        System.out.println("Email draft:\n" + draft.email());

        // Step 2: Editor AI reviews the email
        EditorResponse review = reviewEmail(draft.email(), emailType, tonePreference);

        System.out.println("Editor's verdict: " + review.verdict());
        System.out.println("Editor's suggestions: " + review.suggestions());

        // Step 3: Are we done? If yes, return the perfect email!
        if ("GOOD_TO_SEND".equals(review.verdict())) {
            processLog.add("Editor approved: Email is ready to send!");
            return new EmailResult(draft.email(), processLog);
        }

        // Step 4: Not perfect yet, prepare feedback and try again
        String feedbackForNextRound = "Previous email:\n" + draft.email() +
                "\n\nEditor feedback: " + review.suggestions() +
                "\n\nPlease improve the email based on this feedback.";

        processLog.add("Editor feedback: " + review.suggestions());

        // Recursive call - try again with the feedback
        return improveEmailRecursively(emailType, recipientName, mainMessage, tonePreference,
                feedbackForNextRound, processLog, attemptNumber + 1);
    }

    // Method that asks Writer AI to create/improve email
    private WriterResponse writeEmail(String emailType, String recipientName, String mainMessage, String tonePreference, String feedback) {

        String prompt = String.format("""
                %s

                Email Details:
                - Type: %s
                - Recipient: %s
                - Main message: %s
                - Tone: %s

                %s
                """, WRITER_INSTRUCTIONS, emailType, recipientName, mainMessage, tonePreference, feedback);

        return chatClient.prompt()
                .user(prompt)
                .call()
                .entity(WriterResponse.class);
    }

    // Method that asks Editor AI to review email
    private EditorResponse reviewEmail(String emailContent, String emailType, String tonePreference) {

        String prompt = String.format("""
                %s

                Email to review:
                %s

                Context: This is a %s email that should have a %s tone.
                """, EDITOR_INSTRUCTIONS, emailContent, emailType, tonePreference);

        return chatClient.prompt()
                .user(prompt)
                .call()
                .entity(EditorResponse.class);
    }

    private static String getWriterInstructions() {
        return """
                You are a professional email writing assistant. Your task is to compose a clear, complete, and professional email based on the user's instructions.

                -   Create a suitable subject line and a full email body that covers all the user's key points.
                -   Ensure the tone is appropriate for the situation.
                -   If you receive feedback for revision, apply it to the next draft.

                Return your response as a single-line JSON object:
                {"reasoning": "A brief summary of the email's content and tone.", "email": "The complete email content."}
                """;
    }

    private static String getEditorInstructions() {
        return """
                You are a meticulous editor focused on ensuring communications are powerful and concise.

                You must evaluate the draft against one primary rule, then a secondary one.

                **1. The 80-Word Rule (Primary Check):**
                   - The body of the email (from the greeting to the closing) **MUST be 80 words or less.**
                   - **If the draft is over 80 words, the verdict is ALWAYS "NEEDS_WORK".** Your feedback must state the word count and instruct the writer to shorten the email significantly.

                **2. The Clarity Rule (Secondary Check - only if word count is met):**
                   - If the email is 80 words or less, check if its core message is clear and easy to understand.

                Your Verdict:
                -   If the word count is over 80, it automatically **NEEDS_WORK**.
                -   If the word count is 80 or less AND the message is clear, it is **"GOOD_TO_SEND"**.

                Return your response as a single-line JSON object:
                {"verdict": "GOOD_TO_SEND or NEEDS_WORK", "suggestions": "If NEEDS_WORK, state the word count and the need for brevity. For example: 'The draft is 110 words, exceeding the 80-word limit. Please revise for conciseness.'"}
                """;
    }

}
Explanation:
This class is the core engine of our Smart Email Generator. It orchestrates the entire “write, review, and refine” process, acting as the project manager for our two AI personas: the Writer and the Editor. It uses a clever technique called recursion—a method that calls itself—to create the improvement loop.
How It Works:
The process is a simple loop:
- Write: The Writer AI creates a full draft.
- Review: The Editor AI checks if the draft is under 80 words.
- Refine: If it’s too long, the Editor sends it back with instructions to shorten it. The loop repeats until the email is approved.
Key Methods:
- createPerfectEmail(…): Starts the workflow.
- improveEmailRecursively(…): The private engine that runs the write/review loop. It includes a MAX_ATTEMPTS safety stop.
- getWriterInstructions() / getEditorInstructions(): These are the “job descriptions” for each AI. The deliberate conflict—the Writer’s thoroughness vs. the Editor’s strict word limit—is what powers the refinement cycle.
Step 5: Create Service Class
The service layer acts as a clean interface between our web controller and the complex workflow logic. It keeps our code organized and easy to test.
package com.bootcamptoprod.service;

import com.bootcamptoprod.dto.EmailRequest;
import com.bootcamptoprod.dto.EmailResponse;
import com.bootcamptoprod.dto.EmailResult;
import com.bootcamptoprod.workflow.EmailEvaluatorOptimizer;
import org.springframework.stereotype.Service;

import java.util.List;

@Service
public class EmailService {

    private final EmailEvaluatorOptimizer optimizer;

    public EmailService(EmailEvaluatorOptimizer optimizer) {
        this.optimizer = optimizer;
    }

    public EmailResponse generateEmail(EmailRequest request) {
        try {
            // Use our Evaluator-Optimizer to create the perfect email
            EmailResult result = optimizer.createPerfectEmail(
                    request.emailType(),
                    request.recipientName(),
                    request.mainMessage(),
                    request.tonePreference()
            );

            // Convert to response format
            return new EmailResponse(
                    result.email(),
                    (result.improvementSteps().size() / 2) - 1,
                    result.improvementSteps()
            );

        } catch (Exception e) {
            // If something goes wrong, tell the user nicely
            return new EmailResponse(
                    "Sorry, we couldn't generate your email. Please try again.",
                    0,
                    List.of("Error occurred: " + e.getMessage())
            );
        }
    }
}
Explanation:
- Delegation: Its primary role is to call the
optimizer.createPerfectEmail(...)method. It delegates the complex, iterative task of generating the email to the specialized workflow class. - Data Transformation: It takes the internal
EmailResultfrom the workflow and converts it into the finalEmailResponsethat is sent back to the user. - Error Handling: It wraps the entire operation in a try-catch block. This is a crucial feature that prevents application crashes and provides a graceful error message to the user if something goes wrong in the AI workflow.
Step 6: Create Controller
Finally, the controller exposes our service to the outside world via a REST API endpoint.
package com.bootcamptoprod.controller;

import com.bootcamptoprod.dto.EmailRequest;
import com.bootcamptoprod.dto.EmailResponse;
import com.bootcamptoprod.service.EmailService;
import org.springframework.http.ResponseEntity;
import org.springframework.web.bind.annotation.PostMapping;
import org.springframework.web.bind.annotation.RequestBody;
import org.springframework.web.bind.annotation.RequestMapping;
import org.springframework.web.bind.annotation.RestController;

@RestController
@RequestMapping("/api/email")
public class EmailController {

    private final EmailService emailService;

    public EmailController(EmailService emailService) {
        this.emailService = emailService;
    }

    @PostMapping("/generate")
    public ResponseEntity<EmailResponse> generateEmail(@RequestBody EmailRequest request) {
        EmailResponse response = emailService.generateEmail(request);
        return ResponseEntity.ok(response);
    }
}
Explanation:
- Purpose: The
EmailControlleris our application’s “front door.” It handles incoming web requests and connects them to our service layer. - Its job is to:
- Expose a single API endpoint: POST
/api/email/generate. - Receive the user’s JSON request and convert it into an
EmailRequestobject. - Delegate the request to the
EmailServiceto do the actual work. - Return the final
EmailResponseback to the user as a clean HTTP response.
- Expose a single API endpoint: POST
Step 7: Application Entry Point
Now, let’s define the main class that boots our Spring Boot app.
package com.bootcamptoprod;

import org.springframework.boot.SpringApplication;
import org.springframework.boot.autoconfigure.SpringBootApplication;

@SpringBootApplication
public class SpringAiEvaluatorOptimizerWorkflowApplication {

    public static void main(String[] args) {
        SpringApplication.run(SpringAiEvaluatorOptimizerWorkflowApplication.class, args);
    }
}
Explanation:
- Main Class to Run the Application:
SpringAiEvaluatorOptimizerWorkflowApplicationis the starting point of our application. When you run this class, Spring Boot initializes all components and starts the embedded server.
5. How Our Evaluator Optimizer Workflow Works Step-by-Step
Let’s walk through the entire journey of a user’s request, from the moment they ask for an email to the point they receive a polished, editor-approved final version.
- Request Initiation:
A user sends a POST request to the/api/email/generateendpoint. The body of the request contains a JSON object with their email details: the type, recipient, a core message, and the desired tone. - Controller Handling:
TheEmailControllerreceives this request. Spring automatically converts the JSON payload into anEmailRequestDTO. The controller immediately passes this DTO to theEmailService. - Service Delegation:
TheEmailServiceacts as a clean hand-off point. It receives theEmailRequestand calls thecreatePerfectEmailmethod on theEmailEvaluatorOptimizerworkflow, entrusting it with the core AI logic. - The First Draft (The “Generate” Step):
TheEmailEvaluatorOptimizerworkflow begins its first attempt. It sends the user’s details to the LLM with the specialized “Writer” prompt. The LLM acts as a diligent writer, producing a complete and professional first draft of the email. - The Critical Review (The “Evaluate” Step):
The workflow immediately takes this first draft and sends it to the LLM again, but this time with the very strict “Editor” prompt. The Editor AI’s primary job is to check if the draft violates the 80-Word Rule. - The Decision and Refinement Loop (The “Optimize” Step):
The workflow inspects the Editor’s verdict.- If the draft is over 80 words, the Editor returns a
NEEDS_WORKverdict with feedback to shorten the email. The workflow then loops, sending the draft and the new feedback back to the Writer AI for another attempt. This cycle continues until a draft is produced that meets the word-count requirement. - If the draft is 80 words or less, the Editor returns a
GOOD_TO_SENDverdict. The loop terminates.
- If the draft is over 80 words, the Editor returns a
- Response Delivery:
The final, editor-approvedEmailResultobject is returned up the chain from the workflow to the service. The service then packages it into the finalEmailResponse, which includes the polished email and a detailed log of the entire refinement process. This response is passed to the controller, which wraps it in aResponseEntitywith a 200 OK status and sends it back to the user.
🖥️ Verify the output
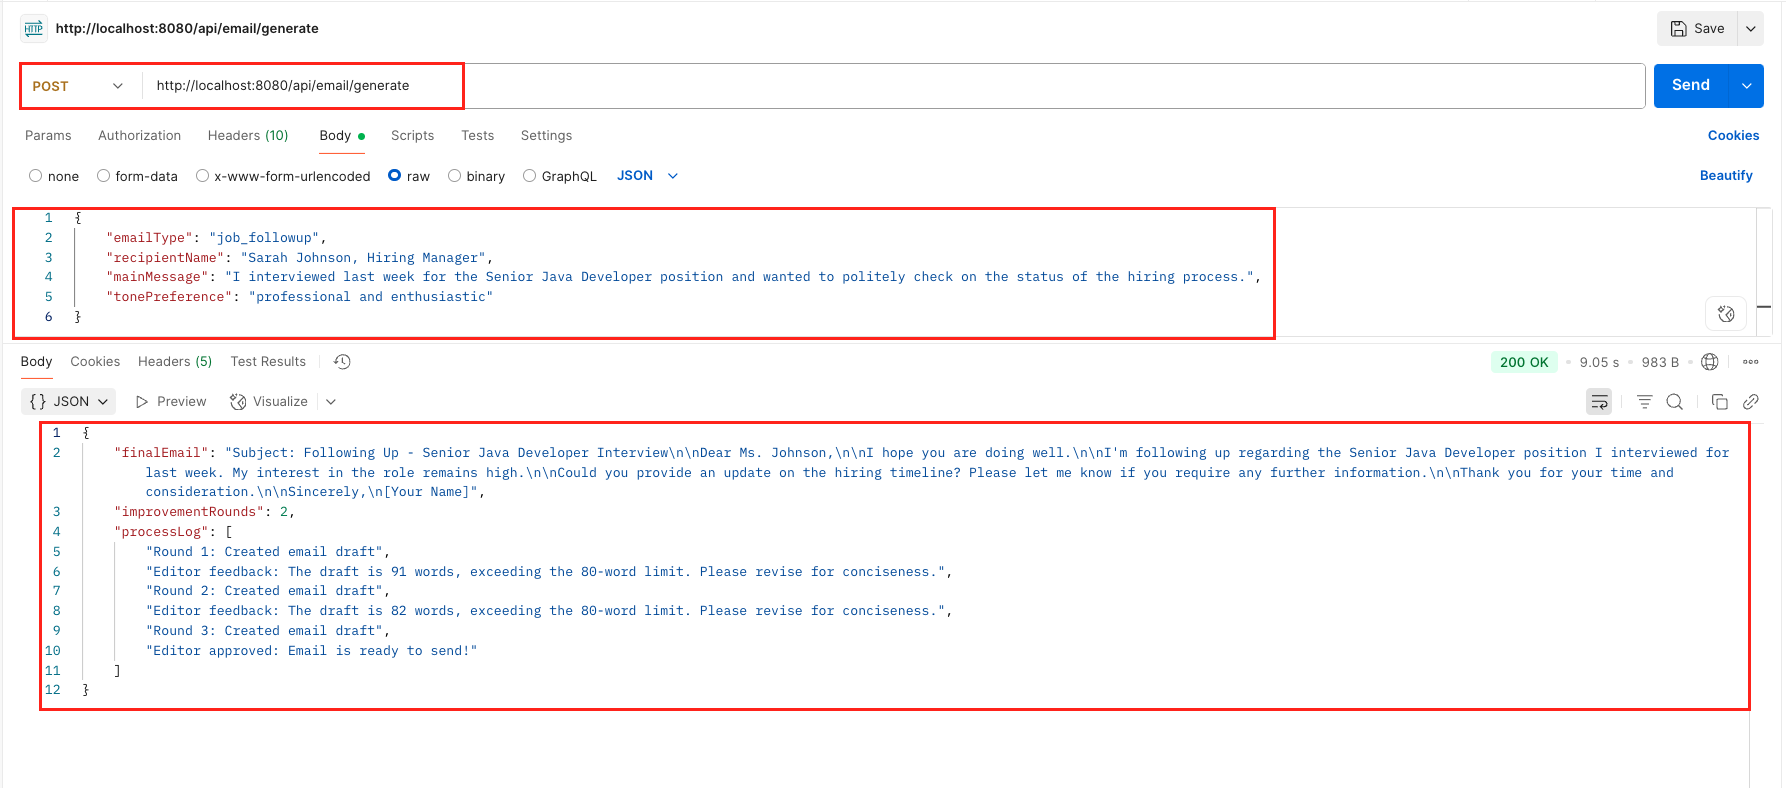
Once your application is running, you can test the Evaluator-Optimizer workflow by making a POST request to http://localhost:8080/api/email/generate with a JSON body containing your email details.
The response will be a complete EmailResponse JSON object, which includes the finalEmail, the number of improvementRounds, and a detailed processLog.
curl --location 'http://localhost:8080/api/email/generate' \
--header 'Content-Type: application/json' \
--data '{
    "emailType": "job_followup",
    "recipientName": "Sarah Johnson, Hiring Manager",
    "mainMessage": "I interviewed last week for the Senior Java Developer position and wanted to politely check on the status of the hiring process.",
    "tonePreference": "professional and enthusiastic"
}'Output:
6. Video Tutorial
If you prefer visual learning, check out our step-by-step video tutorial demonstrating the Spring AI Evaluator Optimizer Workflow pattern implementation in action.
📺 Watch on YouTube:
7. Source Code
The complete source code for this Spring AI Evaluator Optimizer Workflow example is available on GitHub. You can clone the repository and run it locally to see the Evaluator Optimizer Workflow pattern in action.
🔗 Spring AI Evaluator Optimizer Workflow Demo App: https://github.com/BootcampToProd/spring-ai-evaluator-optimizer-workflow
8. Things to Consider
Keep these important considerations in mind while working with Evaluator Optimzer pattern:
- Cost and Latency: This pattern uses multiple LLM calls, which means it’s slower and costs more than a single prompt. You trade speed for better quality.
- Prompt Engineering is Key: Clear and specific instructions to the Writer and Editor AIs are crucial. Vague prompts lead to vague results.
- Structured Output Failures: LLMs can sometimes return invalid or badly formatted JSON. In real apps, add retry or fallback logic to handle such cases.
- API Calls Cost Money: Each round of feedback uses 2 API calls — one for generating, one for evaluating. More rounds = higher cost.
- Set Limits: Always cap the number of improvement attempts (e.g., max 3-4 rounds) to avoid endless loops.
- More Rounds = Better Quality: Each round improves the email, but also increases time and cost. Balance quality with speed.
- Start Small: Begin with 3–4 rounds of improvement and tune based on how often feedback is needed.
- Invalid Responses: Sometimes the AI returns unexpected formats or missing fields — handle these gracefully.
9. FAQs
What happens if the Evaluator is too picky and gets stuck in a loop with the Generator?
This is precisely why the MAX_ATTEMPTS constant is so important. It acts as a circuit-breaker to prevent infinite loops. If you find this happening, it’s a sign that your prompts need refinement. Either the Evaluator’s criteria are too strict/ambiguous, or the Generator’s instructions need to be clearer to help it meet the criteria.
Is Evaluator Optimizer pattern better than just writing one giant, complex prompt?
Often, yes. Breaking a problem down into “generate” and “critique” mimics how humans solve complex problems. This separation of concerns often leads to more reliable and higher-quality results than a single, monolithic prompt, which can confuse the LLM. It forces a more structured, step-by-step reasoning process.
Do I need to use two different LLM models (e.g., GPT-4 for the Editor and GPT-3.5 for the Writer)?
You can, but it’s not necessary. In our example, we use the same model for both roles. The “persona” of the AI is determined by the system prompt (WRITER_INSTRUCTIONS vs. EDITOR_INSTRUCTIONS), not the model itself. However, using different models is a powerful optimization strategy. For example, you could use a faster, cheaper model (like GPT-3.5-Turbo) for the initial draft generation and a more powerful, “smarter” model (like GPT-4) for the critical evaluation step to save costs.
Is Evaluator Optimizer pattern only for text generation like emails?
No, it can be used in many areas. Some examples include:
- Image Prompt Writing: Write a prompt, then refine it for better visual results.
- Code Generation: Create a function, then review it for bugs or style issues.
- Project Planning: Build a plan, then check for logical or budget problems.
Why did you use a strict 80-word rule for the Editor? Can I change that?
We used the 80-word rule in this tutorial to force at least one round of feedback. It’s a clear and measurable condition that guarantees the Evaluator says “Needs Work” on the first try. This helps demonstrate the Evaluator-Optimizer pattern effectively.
10. Conclusion
The Evaluator-Optimizer pattern is a game-changer for moving beyond simple AI-powered text generation to building truly robust, reliable, and high-quality applications. By creating a system of self-correction, you empower your application to refine its own work, catching errors and improving its output in ways that a single-shot generation simply can’t. It’s a fundamental step towards creating more sophisticated and trustworthy AI agents with Spring AI.
The key is finding the right balance between quality and efficiency for your specific use case. Start simple, measure your results, and adjust as needed. Whether you’re generating emails, writing documentation, or creating any content where quality matters, this pattern can help you achieve professional results every time.
11. Learn More
Interested in learning more?
Spring AI Orchestrator-Workers Workflow: Dynamic Task Orchestration for LLM Applications
Add a Comment