Learn LangChain4j basics with this beginner friendly tutorial. Create your first simple chat app for interacting with LLMs.
1. Introduction
LangChain4j is a Java framework that simplifies building applications powered by Large Language Models (LLMs). Think of it as a bridge between your Java application and AI models like OpenAI’s GPT, Claude, or open-source alternatives. Instead of writing complex code to interact with these AI models, LangChain4j provides clean, easy-to-use APIs that handle all the heavy lifting for you.
The goal is simple: make integrating LLMs into Java applications as straightforward as using Spring Data or any other well-designed Java library. If you’ve worked with REST APIs in Spring Boot, you’ll find LangChain4j equally intuitive.
2. Why LangChain4j?
LangChain4j makes it easy to build AI applications in Java. It solves three common problems developers face.
1. One API, Many AI Providers
Every AI provider has a different API. Learning and maintaining all of them is hard.
LangChain4j gives you one common API.
Write your code once and switch between 20+ AI models without changing your business logic.
👉 Think of it like JDBC for AI models.
2. Ready-to-Use AI Building Blocks
Most AI apps need the same things again and again.
LangChain4j provides built-in support for:
- Prompt templates
- Chat memory
- Function calling
- RAG with your own data
- Embeddings and document loaders
👉 Similar to how Spring simplifies Java development, LangChain4j simplifies AI development.
3. Strong Community and Framework Support
LangChain4j comes with:
- Plenty of working examples
- Easy integration with Spring Boot, Quarkus, Micronaut, and Helidon
- An active community that quickly adapts to new AI changes
👉 You’re always building with up-to-date tools.
3. LangChain vs LangChain4j
LangChain and LangChain4j both help you build AI-powered applications, but they are designed for different programming languages and ecosystems.
🐍 LangChain (Python & JavaScript)
- Original framework created for Python & JavaScript developers
- Large ecosystem and wide adoption
- Commonly used by data scientists and ML engineers
- Great for AI-first applications
☕ LangChain4j (Java)
- Built from scratch for Java developers
- Not a direct port of the Python/JS version
- Follows Java conventions and best practices
- Type-safe
- Integrates smoothly with Spring Boot, Quarkus, Micronaut
- Community-driven, open-source project
- Well-suited for enterprise-grade Java applications
4. Low Level vs High Level APIs in LangChain4j
LangChain4j provides two levels of abstraction to suit different needs:
🧩 Low Level APIs
Low level APIs give you direct control over AI model interactions. They’re perfect when you need fine-grained control or want to understand exactly what’s happening under the hood. With low-level APIs, you:
- Directly instantiate and configure AI models
- Manage chat messages manually
- Control request and response handling explicitly
- Have complete flexibility over the interaction flow
Think of low level APIs as using RestTemplate directly instead of declarative REST clients.
🪄 High Level APIs
High level APIs abstract away complexity and let you focus on business logic. They provide:
- AI Services with annotated interfaces (similar to Spring Data repositories)
- Automatic prompt templating
- Memory management for conversations
- Tool/function calling capabilities
- Built-in retry mechanisms and error handling
High level APIs are like using Spring Data JPA where you define an interface, and the framework handles implementation details.
For this tutorial, we’ll use the low level API to build a simple chat application. This will help you understand the fundamentals before exploring high-level abstractions in future articles.
5. Building Your First LangChain4j Application
We will build a simple Spring Boot application that talks to an LLM via OpenRouter. OpenRouter is a platform that gives you a single API to access many models (like DeepSeek, Llama, GPT-4). We will use a free model for this demo!
5.1. Project Structure Overview
Before diving into code, let’s understand our project structure:
langchain4j-getting-started-demo
├── src
│   └── main
│       ├── java
│       │   └── com
│       │       └── bootcamptoprod
│       │               ├── controller
│       │               │   └── ChatController.java       # Handles REST API requests to interact with the LLM
│       │               ├── dto                           # Simple records for data transfer
│       │               │   ├── ChatRequest.java          # Captures the user's input message
│       │               │   └── ChatResponse.java         # Wraps the response received from the LLM
│       │               └── Langchain4jGettingStartedDemoApplication.java # Entry point of our Spring Boot app
│       └── resources
│           └── application.yml                           # API keys, model names, and URL configurations
└── pom.xml                                               # Dependency management and LangChain4j BOM
Structure Breakdown:
Here’s what each component does in our application:
- Langchain4jGettingStartedDemoApplication.java: The standard Spring Boot main class that initializes and starts our entire application.
- ChatController.java: The communication hub. It exposes a REST endpoint that receives user questions and uses the LangChain4j ChatModel to get answers from the AI.
- ChatRequest.java: A simple Java Record that acts as a container for the message sent by the user.
- ChatResponse.java: Another Java Record that holds the final answer generated by the LLM, making it easy to send a JSON response back to the user.
- application.yml: The configuration center. This is where we define which AI model to use (like DeepSeek), provide our API key, and set the base URL for connecting to the model provider.
- pom.xml: The project’s recipe book. It includes the LangChain4j Bill of Materials (BOM) to ensure all AI-related libraries work together perfectly without version conflicts.
5.2. Diving Into the Code
Step 1: Setting Up Maven Dependencies
First, let’s set up our Maven project with all necessary dependencies. The pom.xml file defines our project configuration and required libraries:
<properties>
	<java.version>21</java.version>
	<langchain4j.version>1.10.0</langchain4j.version>
</properties>

<dependencies>
	<!-- Spring Boot Web for REST endpoints -->
	<dependency>
		<groupId>org.springframework.boot</groupId>
		<artifactId>spring-boot-starter-web</artifactId>
	</dependency>
	<!-- LangChain4j OpenAI Spring Boot Starter -->
	<dependency>
		<groupId>dev.langchain4j</groupId>
		<artifactId>langchain4j-open-ai-spring-boot-starter</artifactId>
	</dependency>
</dependencies>

<dependencyManagement>
	<dependencies>
	  <!-- LangChain4j BOM for version management -->
		<dependency>
			<groupId>dev.langchain4j</groupId>
			<artifactId>langchain4j-bom</artifactId>
			<version>${langchain4j.version}</version>
			<type>pom</type>
			<scope>import</scope>
		</dependency>
	</dependencies>
</dependencyManagement>
What’s Important Here:
- langchain4j-open-ai-spring-boot-starter: This is the primary bridge between Spring Boot and the AI world. It handles the heavy lifting of integrating the framework and setting up the communication channels needed to talk to Large Language Models (LLMs) automatically.
- langchain4j-bom: This is the Bill of Materials. Think of it as a master version controller. It ensures that all LangChain4j-related libraries (like core and model providers) are perfectly compatible with each other, so you don’t have to worry about individual version numbers.
- spring-boot-starter-web: This dependency is what allows our application to function as a web service. It provides the necessary tools to create endpoints so our app can receive questions and send back answers.
Step 2: Configure Application Properties
Next, let’s configure our application settings in application.yml. Also, we will configure the AI model connection:
spring:
  application:
    name: langchain4j-getting-started-demo

langchain4j:
  open-ai:
    chat-model:
      base-url: https://openrouter.ai/api/v1            # OpenRouter's API endpoint (compatible with OpenAI API format)
      api-key: ${OPENROUTER_API_KEY}                    # Get your free API key from https://openrouter.ai/
      model-name: tngtech/deepseek-r1t2-chimera:free    # Using DeepSeek's free model via OpenRouter
      log-requests: true                                # Enable logging to see requests
      log-responses: true                               # Enable logging to see responses
📄 Configuration Overview
- spring.application.name: Simply gives our application a name for identification within the Spring ecosystem.
- langchain4j:
- open-ai.chat-model: This section configures the “Chat” capabilities of our AI.
- api-key: This is your “password” for the AI service. It allows the application to securely authenticate with the model provider.
- base-url: Tells our application where to send the requests. Since we are using OpenRouter, we point it to their specific API address.
- model-name: Specifies exactly which “brain” we want to use – in this case, the DeepSeek model provided by OpenRouter.
- log-requests: When set to true, this shows the exact message we send to the AI in our console, which is very helpful for learning and debugging.
- log-responses: This displays the full response we get back from the AI in the console, allowing us to see the metadata and the raw text response.
- open-ai.chat-model: This section configures the “Chat” capabilities of our AI.
💡 Note: Since LangChain4j uses a standardized protocol, switching from OpenRouter to actual OpenAI models is incredibly easy. Simply update these values in your application.yml:
langchain4j:
  open-ai:
    chat-model:
      base-url: https://api.openai.com/v1
      api-key: ${OPENAI_API_KEY}
      model-name: gpt-4o # (or your preferred OpenAI model)
Step 3: Application Entry Point
This is the main class that bootstraps our entire application.
package com.bootcamptoprod;

import org.springframework.boot.SpringApplication;
import org.springframework.boot.autoconfigure.SpringBootApplication;

@SpringBootApplication
public class Langchain4jGettingStartedDemoApplication {

    public static void main(String[] args) {
        SpringApplication.run(Langchain4jGettingStartedDemoApplication.class, args);
    }

}
Explanation:
- This is the standard Spring Boot application entry point. The
@SpringBootApplicationannotation enables auto-configuration, component scanning, and configuration properties. LangChain4j’s Spring Boot starter automatically configures theChatModelbean based on ourapplication.ymlsettings.
Step 4: Create Data Transfer Object (DTOs)
Let’s create records to handle incoming requests and outgoing responses:
package com.bootcamptoprod.dto;

public record ChatRequest(String message) {
}
Purpose: A simple Java Record that captures the user’s input message. It serves as the starting point of our conversation, holding the raw text (like “What is LangChain4j?”) that we want to send to the AI model for processing.
package com.bootcamptoprod.dto;

public record ChatResponse(String message) {
}
Purpose: This record acts as a structured container for the AI’s reply. Once the model generates an answer, we wrap it in this object to ensure the response sent back to the user is organized and easy for client-side applications to read.
Step 5: Creating the REST Controller
Now, let’s create the REST controller that ties everything together:
package com.bootcamptoprod.controller;

import com.bootcamptoprod.dto.ChatRequest;
import com.bootcamptoprod.dto.ChatResponse;
import dev.langchain4j.model.chat.ChatModel;
import org.springframework.web.bind.annotation.PostMapping;
import org.springframework.web.bind.annotation.RequestBody;
import org.springframework.web.bind.annotation.RequestMapping;
import org.springframework.web.bind.annotation.RestController;

@RestController
@RequestMapping("/api/v1")
public class ChatController {

    private final ChatModel chatModel;

    public ChatController(ChatModel chatModel) {
        this.chatModel = chatModel;
    }

    @PostMapping("/chat")
    public ChatResponse chatWithContext(@RequestBody ChatRequest request) {
        String aiResponse = chatModel.chat(request.message());
        return new ChatResponse(aiResponse);
    }
}
What’s Important Here:
- The Front Door: This controller acts as the entry point for our application. It provides a REST API endpoint (POST /api/v1/chat) that allows any external tool, like Postman or a frontend app, to talk to our AI logic.
- ChatModel (The Engine): Injected automatically by Spring, this interface is the “brain” of our operation. It represents the connection we configured in our application.yml.
- Single Method Logic: The chat method is where the interaction happens. It performs three simple steps:
- Receives the user’s message from the ChatRequest.
- Sends that message to the LLM using chatModel.chat().
- Wraps the AI’s reply into a ChatResponse and sends it back to the user.
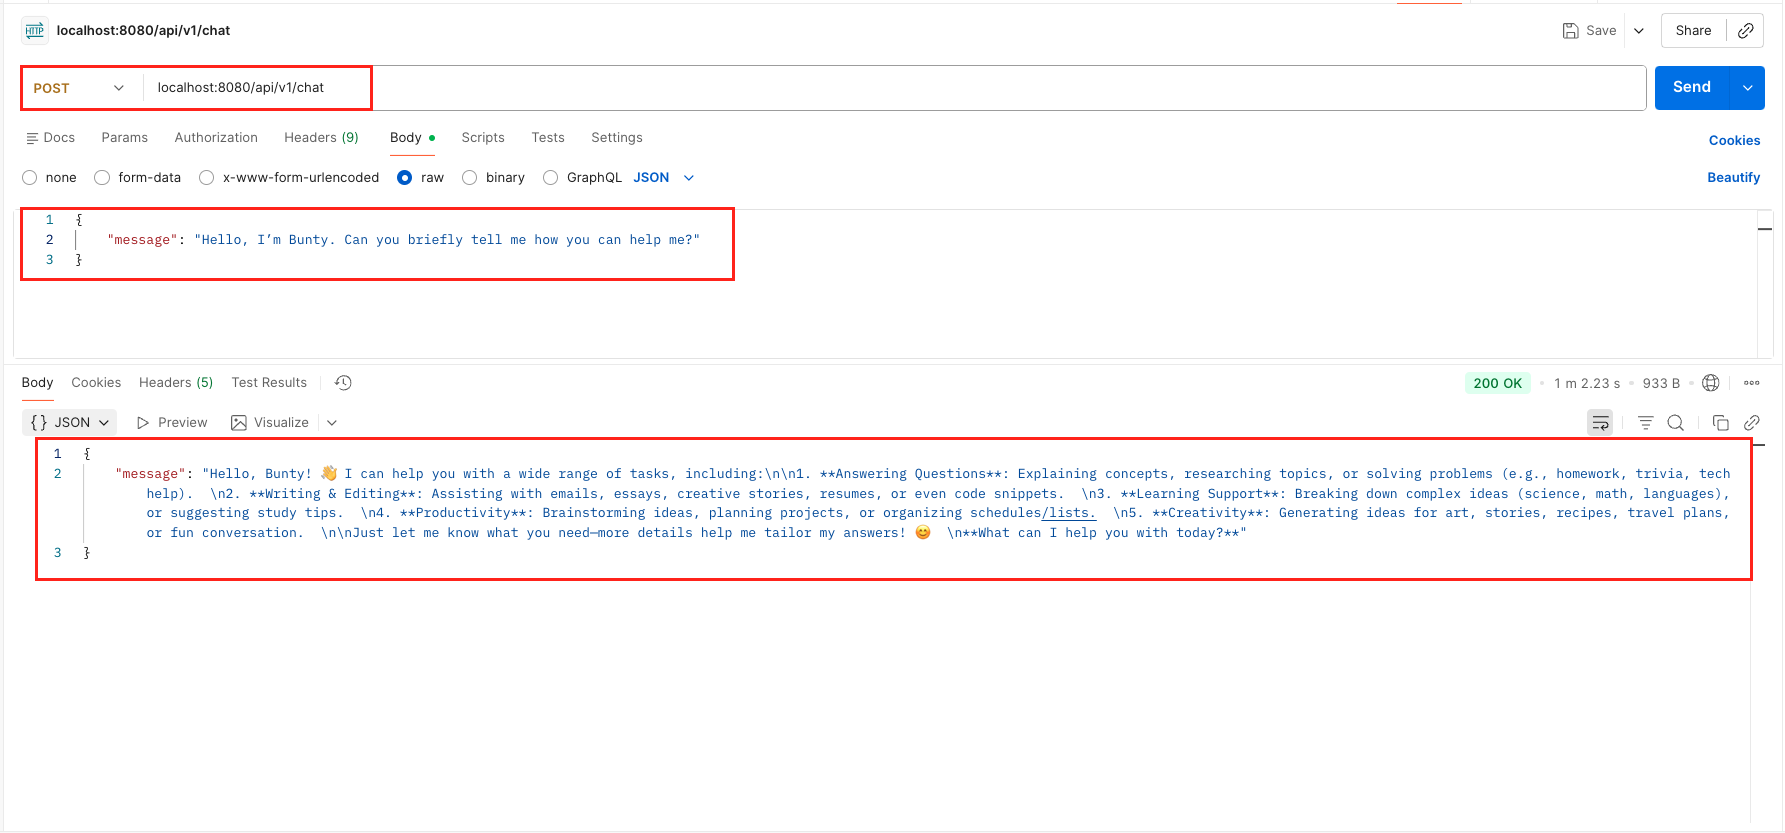
6. Testing the Application
- Get an API Key: Go to OpenRouter and generate a free API key.
- Run the App: Set
OPENROUTER_API_KEYenvironment variable and run the Spring Boot app. - Send a Request: Use Postman or cURL:
curl 'localhost:8080/api/v1/chat' \
--header 'Content-Type: application/json' \
--data '{
    "message": "Explain dependency injection in simple terms"
}'
Output:
7. Understanding the Chat Workflow
Let’s trace exactly what happens when you send a message like: “Tell me a fun fact about Java.”
- Request Reception: The REST controller receives your POST request containing the
ChatRequestobject. - Message Extraction: The controller extracts the raw text message from the record.
- ChatModel Activation: The
chatModel.chat()method is called. This is where LangChain4j takes over the communication logic. - Protocol Translation: Behind the scenes, LangChain4j translates your Java string into a standardized JSON format (OpenAI protocol) that LLM providers understand.
- External Communication: The library makes a secure network call to the OpenRouter API (as configured in our YAML).
- LLM Reasoning: The “Brain” (DeepSeek) receives the prompt, analyzes it, and generates a fun fact about Java.
- Response Capture: LangChain4j receives the raw JSON response from the server and automatically extracts the text answer, filtering out the technical metadata you don’t need.
- Object Mapping: Our code takes that plain string response and wraps it inside our
ChatResponseJava record. - JSON Response: The controller sends the structured JSON response back to your client.
8. Understanding the Console Logs
Because we enabled log-requests: true and log-responses: true in our application.yml, LangChain4j provides a “peek behind the curtain.” This is incredibly useful for developers to understand how the library translates your Java code into a web request that the AI understands.
1. The Request Log
When you call chatModel.chat(), LangChain4j sends a structured HTTP POST request:
2026-01-10T02:35:51.667+05:30  INFO 2175 --- [langchain-demo] [nio-8080-exec-1] d.l.http.client.log.LoggingHttpClient    : HTTP request:
- method: POST
- url: https://openrouter.ai/api/v1/chat/completions
- headers: [Authorization: Bearer sk-or-***], [User-Agent: langchain4j-openai], [Content-Type: application/json]
- body: {
  "model" : "nex-agi/deepseek-v3.1-nex-n1:free",
  "messages" : [ {
    "role" : "user",
    "content" : "Hello, I’m Bunty. Can you briefly tell me how you can help me?"
  } ],
  "stream" : false
}What’s happening here?
- The URL: Notice it’s hitting the /chat/completions endpoint.
- The Messages Array: Your simple string message is wrapped into a “user role” object. This tells the AI that this specific text is coming from the human user.
- The Authorization: LangChain4j automatically injects your API Key into the headers so you don’t have to manually handle security tokens.
2. The Response Log
Once the AI finishes “thinking,” it sends back a detailed JSON response:
2026-01-10T02:36:53.826+05:30  INFO 2175 --- [langchain-demo] [nio-8080-exec-1] d.l.http.client.log.LoggingHttpClient    : HTTP response:
- status code: 200
- body:
{
  "id": "gen-1767992751-ZZuYyT4oombDI1WXpVDx",
  "provider": "Chutes",
  "model": "tngtech/deepseek-r1t2-chimera:free",
  "object": "chat.completion",
  "created": 1767992752,
  "choices": [
    {
      "logprobs": null,
      "finish_reason": "stop",
      "native_finish_reason": "stop",
      "index": 0,
      "message": {
        "role": "assistant",
        "content": "Hello, Bunty! 👋 I can help you with a wide range of tasks, including...",
        "reasoning_details": [
          {
            "format": "unknown",
            "index": 0,
            "type": "reasoning.text",
            "text": "Okay, Bunty wants to know how I can help, and they mentioned being brief. So first, I need to cover the main areas where I assist people. Common use cases include answering questions, explaining concepts, solving problems, assisting with writing, and supporting learning or creativity..."
          }
        ]
      }
    }
  ],
  "usage": {
    "prompt_tokens": 22,
    "completion_tokens": 418,
    "total_tokens": 440,
    "cost": 0,
    "is_byok": false,
    "prompt_tokens_details": {
      "cached_tokens": 0,
      "audio_tokens": 0,
      "video_tokens": 0
    },
    "cost_details": {
      "upstream_inference_cost": null,
      "upstream_inference_prompt_cost": 0,
      "upstream_inference_completions_cost": 0
    },
    "completion_tokens_details": {
      "reasoning_tokens": 314,
      "image_tokens": 0
    }
  }
}What’s happening here?
- The Content: This is the actual text that our ChatController returns to the user.
- The Reasoning Field: (Specifically for models like DeepSeek-R1) You can actually see the AI’s “internal thought process” here! It explains how it decided to answer Bunty briefly and use bullet points.
- The Usage Section: This shows exactly how many “tokens” were used. This is how AI providers calculate your costs.
- Filtering: LangChain4j automatically filters out all this technical JSON metadata and gives you just the content string when you call the
.chat()method.
By looking at these logs, you can see that LangChain4j is acting as a highly efficient translator between your clean Java objects and complex AI web APIs.
9. Video Tutorial
For a complete step-by-step walkthrough, check out our video tutorial where we build the LangChain4j Getting Started Demo from scratch. We demonstrate how you can integrate powerful LLMs into your Spring Boot application and have a real-time conversation with the AI through our custom chat endpoint!
📺 Watch on YouTube:
10. Source Code
The full source code for our LangChain4j Getting Started Demo is available on GitHub. Clone the repo, set your OPENROUTER_API_KEY as an environment variable, and launch the Spring Boot application to see the AI in action!
🔗 LangChain4j Getting Started Demo: https://github.com/BootcampToProd/langchain4j-getting-started-demo
11. Things to Consider
- API Keys Security: Never hardcode API keys in your source code. Use environment variables or secret management services like AWS Secrets Manager or Azure Key Vault.
- Rate Limiting: Free models often have rate limits. Implement proper error handling and use paid models for production applications.
- Cost Management: While we’re using free models here, actual OpenAI or Claude APIs can get expensive. Always set usage limits in your provider dashboard, monitor consumption, and implement cost tracking in your application.
- Response Time: AI model responses can take several seconds. Consider implementing asynchronous processing for better user experience.
- Error Handling: Network issues, invalid API keys, or model unavailability can cause failures. Implement robust error handling with fallback mechanisms.
- Context Window: Each model has a maximum context length. For long conversations, implement context window management to avoid errors.
- Modular Design: LangChain4j’s modular structure means you only include what you need. Don’t add all integrations—just the ones you’ll actually use to keep your dependencies lean.
12. FAQs
Is LangChain4j an official port of LangChain?
No. It is an independent, community-driven project designed to be “Java-native.”
Can I use it with Ollama (Local AI)?
Yes! LangChain4j has starters for Ollama, Azure OpenAI, Anthropic, and many more.
Why use the BOM?
LangChain4j has many modules (core, models, embeddings). The BOM ensures all these modules work together without version conflicts.
Can I use LangChain4j with existing Spring Boot applications?
Yes! Just add the LangChain4j dependencies to your existing project. The auto-configuration won’t interfere with your current setup. It integrates seamlessly.
How is LangChain4j different from calling OpenAI API directly?
LangChain4j provides abstractions for memory management, prompt templating, tool calling, document processing, vector store integration, and switching between different AI providers—all with consistent APIs. It’s like using Spring Data JPA vs raw JDBC.
Can I use LangChain4j without Spring Boot?
Yes! LangChain4j core works independently. Spring Boot starters just make integration easier. You can use it with plain Java, Quarkus, Micronaut, Helidon, or any other framework.
How do I switch from one AI provider to another?
Simply change the dependency (e.g., from langchain4j-open-ai-spring-boot-starter
to langchain4j-anthropic-spring-boot-starter) and update your configuration properties. Your application code using ChatModel remains unchanged – that’s the power of unified APIs!
13. Conclusion
LangChain4j is a true game-changer for the Java ecosystem. It bridges the gap between enterprise-grade Java and the latest AI innovations, allowing us to build intelligent and scalable applications with ease. While this chat endpoint is just our first step, it demonstrates how seamlessly the framework integrates with Spring Boot to handle AI interactions. Having such a powerful tool in our toolkit allows us to innovate and experiment with AI capabilities faster than ever before. In our upcoming articles, we will move beyond the basics to explore advanced features like AI Services, Conversation Memory, and MCP. The potential for AI is vast – stay tuned as we continue this journey together!
14. Learn More
Interested in learning more?
Build MongoDB MCP Client with Embabel Framework
Add a Comment