
Discover how to integrate Google Gemini with Spring AI to access free AI models for POC development.
1. What is Spring AI and Why Should You Care?
Spring AI makes it simple for Java developers to add artificial intelligence to their applications. Instead of dealing with different AI providers’ complex systems, Spring AI gives you one consistent interface. This means you can easily switch between AI providers or use multiple AI models in the same application without major code changes.
2. The Quest for Free AI APIs: A Common Challenge
When starting with AI, especially for Proof of Concepts (POCs), accessing free or low-cost APIs is crucial. Platforms like OpenRouter emerged as helpful resources, offering free access to a variety of models, including some from Google like ‘google/gemini-2.0-flash-lite-preview-02-05:free’. This allowed developers to experiment and explore the capabilities of different LLMs without significant upfront investment.
3. A Bump in the Road: Free Models and Tool Support
However, the landscape of free AI APIs can be dynamic. A challenge we encountered was the removal of the free ‘google/gemini-2.0-flash-lite-preview-02-05:free’ model from OpenRouter that supported function calling or tools. This made it difficult to explore advanced use cases like Model Context Protocol (MCP) integration, which requires the model to execute functions. Other free models on the platform had issues with the Spring AI library, making experimentation even harder.
4. The Solution: Leveraging Google’s Free Gemini APIs
Fortunately, there’s a direct and powerful solution: we can use Google’s own Gemini APIs directly. These give us access to cutting-edge models like “Gemini 2.5 Pro Experimental 03-25” and “Gemini 2.0 Flash Experimental” for free (with usage limits).
Important: These free Gemini APIs are different from Google Cloud Vertex AI. Vertex AI requires a Google Cloud project and costs money, while the basic Gemini APIs are free to use without setting up a billing account.
All you need is an API key to start building. Just remember that these free APIs have limitations like rate limiting and aren’t recommended for production use. They’re perfect for learning and testing.
5. Google AI vs. Vertex AI: What’s Best for Your Spring Boot Project?
When integrating Gemini models with Spring AI, choosing between Google AI and Vertex AI is a critical decision that impacts cost, features, and scalability. This comparison helps you make the right choice for your specific needs.
Before diving into Spring Boot integration details, let’s understand the key differences between these two Google AI platforms:
| Feature | Google AI Gemini API | Vertex AI Gemini API |
|---|---|---|
| Model Availability | Limited Models | Wide range of models |
| Sign-up Requirements | Google account | Google Cloud account with billing and terms agreement |
| Authentication Method | API key | Google Cloud service account |
| User Interface Playground | Google AI Studio | Vertex AI Studio |
| No-cost Usage Options | Yes, for some models | $300 Google Cloud credit for new users |
| Quota (requests per minute) | Varies by model and plan | Varies by model and region |
| Enterprise Support | No | Yes |
| Enterprise Features | None | Customer-managed encryption keys, VPC support, data residency, access transparency, scalable infrastructure, storage, and more |
Which One Should You Choose?
- For POCs, learning, and development: Go with Google AI Gemini API – it offers free access and simple setup, perfect for trying out Spring AI integration.
- For production and enterprise needs: Vertex AI provides comprehensive features, scalability, and enterprise-grade security that mission-critical applications require.
6. How Spring AI Works with Gemini: OpenAI Compatibility
Here’s the exciting part: Google also provides Gemini APIs that are compatible with OpenAI’s interface. This means you can use Gemini models with the same code structure you might already know from OpenAI.
This compatibility lets us use the spring-ai-openai library to connect with free Gemini models in our Spring Boot applications.
7. Setting Up Google Gemini With Spring: Step-by-Step Guide
Step 1: Get Your Gemini API Key
- Visit the Google AI Studio website
- Sign in with your Google account
- Click “Get API key”
- A new page will open where you’ll find the ‘Create API Key’ option to generate your API key
- Copy and securely store your API key
Step 2: Add Spring AI Dependencies to Your Project
Set up a Spring Boot project with the necessary dependencies in pom.xml:
<dependencies>
    <dependency>
        <groupId>org.springframework.boot</groupId>
        <artifactId>spring-boot-starter-web</artifactId>
    </dependency>
    <dependency>
        <groupId>org.springframework.ai</groupId>
        <artifactId>spring-ai-starter-model-openai</artifactId>
    </dependency>
</dependencies>

<dependencyManagement>
    <dependencies>
        <dependency>
            <groupId>org.springframework.ai</groupId>
            <artifactId>spring-ai-bom</artifactId>
            <version>${spring-ai.version}</version>
            <type>pom</type>
            <scope>import</scope>
        </dependency>
    </dependencies>
</dependencyManagement>These dependencies provide:
- spring-boot-starter-web: Basic web application functionality for creating REST endpoints
- spring-ai-starter-model-openai: This starter simplifies the integration of AI features into your Spring Boot application. It leverages OpenAI compatibility, which, in our case, lets you interact with Google Gemini’s free AI models using the same familiar APIs.
- spring-ai-bom: The
dependencyManagementsection uses Spring AI’s Bill of Materials (BOM) to ensure compatibility between Spring AI components.
Step 3: Configure Application Properties
Open your application.yml file and add the following configurations, replacing <your-gemini-api-key> with the API key you obtained in the step 1:
logging:
  level:
    io:
      modelcontextprotocol:
        client: DEBUG
        spec: DEBUG

spring:
  application:
    name: spring-boot-ai-gemini-integration
  ai:
    openai:
      api-key: "<your-gemini-api-key>"
      base-url: https://generativelanguage.googleapis.com/v1beta/openai
      chat:
        completions-path: /chat/completions
        options:
          model: gemini-2.0-flash-exp
- We are setting the base-url to
https://generativelanguage.googleapis.com/v1beta/openai, which is the endpoint for the Gemini API with OpenAI compatibility. - The chat.completions-path is set to
/chat/completions, aligning with the OpenAI API structure. - Under chat.options.model, you can specify the Gemini model you want to use. Experiment with
gemini-2.5-pro-exp-03-25andgemini-2.0-flash-exp(or other available free models).
Step 4: Creating the ChatClient Configuration
To interact with Google Gemini in a Spring Boot application, you need to configure a chat client using Spring AI. This client enables seamless communication with the AI model, allowing you to send prompts and receive responses dynamically.
Below is the configuration for a basic chat client:
import org.springframework.ai.chat.client.ChatClient;
import org.springframework.ai.tool.ToolCallbackProvider;
import org.springframework.context.annotation.Bean;
import org.springframework.context.annotation.Configuration;

@Configuration
public class ChatClientConfig {
    @Bean
    public ChatClient chatClient(ChatClient.Builder chatClientBuilder) {
        return chatClientBuilder.build();
    }
}Explanation:
This configuration registers a ChatClient as a Spring Bean. The ChatClient.Builder is used to create an instance of the client, which can then be used in the application to send queries and receive responses from Google Gemini. This setup ensures that AI interactions are handled efficiently within the Spring Boot framework.
Step 5: Building a Controller
Let’s create a simple REST controller to interact with the configured Gemini model for basic chat:
import org.springframework.ai.chat.client.ChatClient;
import org.springframework.beans.factory.annotation.Autowired;
import org.springframework.web.bind.annotation.PostMapping;
import org.springframework.web.bind.annotation.RequestBody;
import org.springframework.web.bind.annotation.RequestMapping;
import org.springframework.web.bind.annotation.RestController;

@RestController
@RequestMapping("/chat")
public class ChatController {

    private final ChatClient chatClient;

    @Autowired
    public ChatController(ChatClient chatClient) {
        this.chatClient = chatClient;
    }

    @PostMapping("/ask")
    public String chat(@RequestBody String userInput) {
        return chatClient.prompt(userInput).call().content();
    }
}Our controller:
- Exposes a
/chat/askendpoint that accepts POST requests - Takes the user’s input as the request body
- Then it calls prompt() on the ChatClient, which processes the input and returns the final response.
- Returns the model’s response as a string
When you send a POST request, the controller will forward your message to the Gemini API and return the response.
Step 6: Testing the Implementation
Now, you can run your Spring Boot application and send a POST request to /chat/ask with a body containing your question as a string. The response will be the Gemini model’s answer.
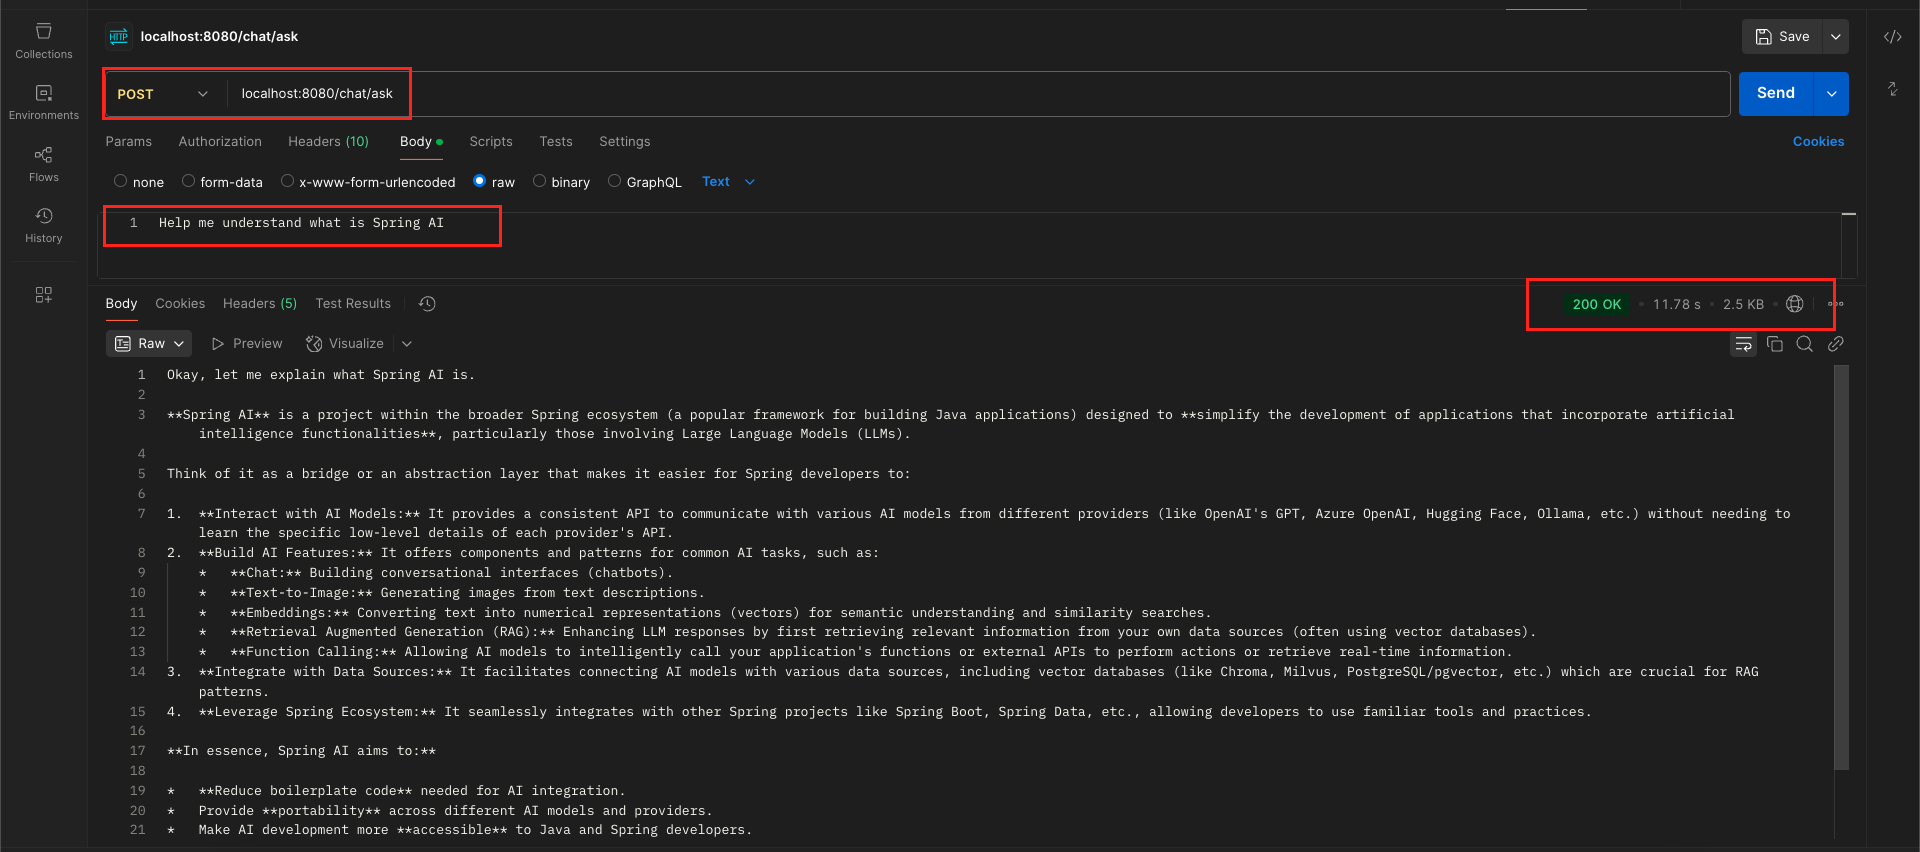
Example: Understanding “Spring AI” with Google Gemini
Let’s say we want to understand what Spring AI is. We can send a POST request to our /chat/ask endpoint, and the chat client will forward our query to the Google Gemini LLM, returning an AI-generated response.
curl --location 'localhost:8080/chat/ask' \
--header 'Content-Type: text/plain' \
--data 'Help me understand what is Spring AI'Output:
8. Adding Advanced Tool Features with MCP
The real power of LLMs comes with their ability to interact with external tools and data. Let’s explore how to enable this using Spring AI’s Model Context Protocol (MCP) with the free Gemini models.
Step 1: Add MCP Client dependency
Add the MCP client dependency to your pom.xml which provides core functionality for connecting to MCP servers
<dependency>
  <groupId>org.springframework.ai</groupId>
  <artifactId>spring-ai-starter-mcp-client</artifactId>
</dependency>
Step 2: Configure MCP Server
Add an MCP server configuration to your application.yml. Replace the paths with those on your system:
logging:
  level:
    io:
      modelcontextprotocol:
        client: DEBUG
        spec: DEBUG

spring:
  application:
    name: spring-boot-ai-gemini-integration
  ai:
    openai:
      api-key: "<your-gemini-api-key>"
      base-url: https://generativelanguage.googleapis.com/v1beta/openai
      chat:
        completions-path: /chat/completions
        options:
          model: gemini-2.0-flash-exp
    mcp:
      client:
        stdio:
          connections:
            filesystem:
              command: "npx"
              args:
                - "-y"
                - "@modelcontextprotocol/server-filesystem"
                - "/Users/username/Desktop"
                - "/Users/username/Downloads"
Replace "/Users/username/Desktop" and "/Users/username/Downloads" with the actual file system path where you want to perform file-related operations.
Step 3: Configure Chat Client with Tools
Now, create a configuration class that sets up ChatClient with the MCP tools:
import org.springframework.ai.chat.client.ChatClient;
import org.springframework.ai.tool.ToolCallbackProvider;
import org.springframework.context.annotation.Bean;
import org.springframework.context.annotation.Configuration;

@Configuration
public class ChatClientConfig {
    @Bean
    public ChatClient chatClient(ChatClient.Builder chatClientBuilder, ToolCallbackProvider tools) {
        return chatClientBuilder.defaultTools(tools).build();
    }
}
This simple configuration does something powerful:
- It injects a
ChatClient.Builderand aToolCallbackProvider - The
ToolCallbackProvidercontains all registered tools, including those from our MCP servers - We register these tools with the ChatClient by calling
defaultTools(tools) - We build and return the configured ChatClient
Spring Boot’s auto-configuration handles the discovery and registration of MCP tools in the background, so we don’t need any additional code for this.
⚡ Important: Spring AI 1.0.0-M7 Introduced Breaking Changes — ToolCallbackProvider Bean Not Found Issue
With the release of Spring AI 1.0.0-M7, major structural changes were introduced, including the renaming of modules for models, vector stores, and MCPs to improve modularity and clarity.
If you encounter an error like:
Description:
Parameter 1 of method chatClientWithToolsSupport in com.bootcamptoprod.config.ChatClientConfig required a bean of type 'org.springframework.ai.tool.ToolCallbackProvider' that could not be found.


Action:
Consider defining a bean of type 'org.springframework.ai.tool.ToolCallbackProvider' in your configuration.
✅ You can resolve this issue by enabling tool callback support explicitly by adding the following configuration property:
spring:
  ai:
    mcp:
      client:
        toolcallback:
enabled: trueThis ensures that a ToolCallbackProvider bean is correctly registered during startup.
Step 4: Create MCP Controller
Create a new controller to demonstrate MCP integration:
import org.springframework.ai.chat.client.ChatClient;
import org.springframework.web.bind.annotation.PostMapping;
import org.springframework.web.bind.annotation.RequestBody;
import org.springframework.web.bind.annotation.RequestMapping;
import org.springframework.web.bind.annotation.RestController;

@RestController
@RequestMapping("/mcp")
public class MCPController {

    private final ChatClient chatClient;

    public MCPController(ChatClient chatClient) {
        this.chatClient = chatClient;
    }

    @PostMapping("/interact")
    public String interactWithMcp(@RequestBody String userInput) {
        return chatClient.prompt(userInput).call().content();
    }
}Our controller:
- Exposes a
/mcp/interactendpoint that accepts POST requests - Takes the user’s input as the request body
- Then it calls prompt() on the ChatClient, which processes the input and returns the final response.
- Returns the model’s response as a string
When you send a POST request, the controller will forward your message to the Gemini API and return the response.
Step 5: Testing the Implementation
With this configuration, when you send a request to the /mcp/interact endpoint with a prompt like “List the folders in my Desktop directory”, Spring AI will:
- Recognize the need for a tool to fulfill the request.
- Utilize the configured FileSystem MCP server.
- The MCP server will execute the command to list the folders.
- The results will be sent back to the Gemini model.
- Gemini will process the information and generate a natural language response based on the tool output.
curl --location 'localhost:8080/mcp/interact' \
--header 'Content-Type: text/plain' \
--data 'List the folders in my Desktop directory'
Output:

- You can also try prompts like “Create a file named ‘hello.txt’ in my allowed ‘Desktop’ directory with the content ‘This is a test.’
9. Source Code
You can find the example implementation discussed in this blog on our GitHub:
- Spring Boot AI Gemini Integration Example: View on GitHub
10. Things to Consider
- API Key Security: Never commit your API key in your code. Use environment variables if required.
- Rate Limiting: Be careful not to exceed the free tier limits.
- Error Handling: Add proper error handling for API failures.
- Model Capabilities: Different Gemini models have different strengths. Experiment to find the best one for you.
- Production Readiness: The free tier is great for POCs, but for production, consider using Gemini Vertex AI APIs for better reliability and scalability.
11. FAQs
Is this approach production-ready?
No. While great for development and testing, use Google Cloud Vertex AI for production.
Why use the spring-ai-openai library?
Google made their Gemini APIs compatible with OpenAI’s interface, so this library works well.
How many requests can I make with the free tier?
The rate limits vary depending on the Gemini model you use. It’s best to check the specific limits in the Google AI Studio documentation for each model.
12. Conclusion
Thanks to Spring AI and Google’s OpenAI-compatible Gemini APIs, integrating AI features into your Java applications is straightforward and developer-friendly. You can experiment with free models, even using advanced features like tool integration through MCP. While perfect for learning and testing, remember to consider Google Cloud Vertex AI when you’re ready for production.
13. Learn More
Interested in learning more?
Building an MCP Client with Spring Boot AI: A Beginner’s Guide
Add a Comment