
Discover Model Context Protocol (MCP) in simple terms! Learn its benefits, architecture, use cases, and how to configure it in Claude Desktop App.
1. Introduction
The Model Context Protocol (MCP) is emerging as an exciting way to streamline interactions between AI models and the external tools they rely on. If you’re new to AI and agent-based systems, this guide will walk you through what MCP is, its benefits, architecture, and use cases—all in an easy-to-understand language. We’ll also include a practical demo to show you MCP in action!
2. What is Model Context Protocol?
Model Context Protocol (MCP) is a communication protocol designed to simplify how large language models (LLMs) and AI systems interact with various resources and external tools. Think of it as a universal language or set of rules that enables various AI systems to share context, information, and capabilities.
In simpler terms:
- Without MCP: Your AI tools work in isolation, like separate islands that can’t easily share information
- With MCP: Your AI tools can work together as a team, sharing information and capabilities
At its core, MCP is like an API (Application Programming Interface) specifically designed for AI models. It defines how models can request and receive information from each other, creating a more connected and powerful AI ecosystem.
Analogy: Imagine plugging in a USB device to your computer. Just like a USB standardizes connections so that any device can communicate effortlessly with your system, the Model Context Protocol (MCP) standardizes how AI models interact with various tools and resources.
3. Background: Why Was It Introduced?
MCP was introduced by Anthropic (the creators of Claude) in November 2024 as an open standard. They recognized a critical problem in the AI ecosystem: each AI system was like an island, unable to easily communicate with other systems or access external tools and data sources.
Before MCP, developers had to create custom integrations for each AI model and each external system they wanted to connect. This was like needing a different type of charger for every electronic device you own—inefficient and frustrating.
MCP solves this by creating a standardized way for:
- AI models to communicate with each other
- AI models to use external tools and resources
- Applications to interact with multiple AI models
Think of MCP as creating a common language that all AI systems can speak, regardless of who built them or how they work internally.
4. Benefits of MCP
The benefits of MCP are similar to when USB was introduced for hardware devices:
For Developers:
- Plug-and-Play Integration: Connect any MCP-compatible model to your application without custom code for each
- Reduced Development Time: Build once, connect to many different AI models
- Future-Proofing: Your applications can easily adopt newer, better models as they become available
- Composability: Mix and match capabilities from different AI systems
- Simplified Debugging: Standard protocol means standard ways to test and troubleshoot
For End Users:
- More Powerful Applications: Access multiple specialized AI capabilities in a single interface
- Smoother Experience: No switching between different tools for different AI tasks
- Greater Functionality: AI systems that can take actions in the real world, not just generate text
- Personalization: Applications can more easily adapt to your specific needs by combining models
- Reliability: If one model is unavailable, applications can fall back to alternatives
For the AI Ecosystem:
- Innovation Acceleration: Developers can focus on new capabilities instead of basic connectivity
- Specialization: Models can excel at specific tasks while working together on complex problems
- Compatibility: Different companies’ AI systems can interoperate without special agreements
- Accessibility: Smaller companies can more easily compete by focusing on specialized capabilities
5. Real-World Use Cases for MCP
MCP solves real problems by connecting AI systems to each other and to external tools. Here are some practical examples:
1. Smart Coding Assistant
Problem: Developers need to write code, understand existing codebases, fix bugs, and commit changes—requiring constant context switching between tools.
MCP Solution: An integrated coding assistant that can:
- Understand your codebase through file system access
- Generate code based on natural language descriptions
- Run and debug the code to ensure it works
- Commit changes directly to your repository
- All from within your IDE through a single interface
Example in Action: A developer types “Add error handling to the user registration function and commit the changes” in their IDE. The MCP-powered assistant analyzes the codebase, adds appropriate try/catch blocks, tests the changes, and commits them to Git—all without the developer switching contexts.
2. Intelligent Research Assistant
Problem: Researchers need to search for information across multiple sources, analyze data, generate visualizations, and write reports—tasks typically requiring multiple specialized tools.
MCP Solution: A research assistant that can:
- Search the internet for relevant information
- Access and analyze datasets
- Generate appropriate visualizations
- Summarize findings in well-formatted reports
- All through natural language interactions
Example in Action: A researcher asks “Analyze the climate data from the attached CSV, create a temperature trend visualization, and prepare a summary of key findings.” The assistant processes the data, creates charts, identifies trends, and produces a formatted report with insights—tasks that would normally require jumping between spreadsheet software, visualization tools, and word processors.
3. Customer Support Automation
Problem: Support agents need to access customer information, troubleshoot issues, update records, and provide personalized assistance—often requiring multiple systems.
MCP Solution: A support assistant that can:
- Look up customer information in CRM systems
- Access knowledge bases for troubleshooting
- Update tickets and customer records
- Generate personalized response emails
- All through a single conversational interface
Example in Action: An agent types “Help me resolve John Smith’s billing issue from ticket #45678.” The assistant retrieves the customer record, accesses the billing system, identifies the problem, suggests a solution, and prepares an email response.
4. Document Workflow Automation
Problem: Legal and business professionals need to review, analyze, extract information from, and take action on complex documents—a time-consuming process.
MCP Solution: A document assistant that can:
- Read and understand uploaded documents
- Extract key information and clauses
- Compare against standard templates
- Flag potential issues or missing information
- Generate response documents
- All through natural language commands
Example in Action: A legal professional uploads a contract and asks “Review this for non-standard clauses and prepare a response addressing the payment terms.” The assistant analyzes the document, identifies unusual clauses, compares payment terms to standards, and drafts a response document—saving hours of manual review.
6. MCP’s Core Concepts and Capabilities
Understanding MCP requires familiarity with these key concepts:
6.1. Resources
Resources are the fundamental building blocks in MCP—they represent capabilities that can be accessed through the protocol.
Types of resources include:
a. Models – AI systems that can process and generate text:
- Large Language Models like Claude or GPT
- Specialized models for specific domains or tasks
- Each with its own capabilities and limitations
b. Tools – External systems that models can use to:
- Retrieve information (search engines, databases)
- Perform actions (file operations, API calls)
- Interact with the outside world
c. Contexts – Shared information that persists across interactions:
- Conversation history
- User preferences
- Session data
- File contents
6.2. Prompts
In MCP, prompts are structured messages sent to models. They include:
- Content: The actual message or instruction
- Context: Additional information for the model
- Tools: Available external capabilities
- Parameters: Settings for how the model should respond
6.3. Sampling
Sampling controls how models generate responses:
- Temperature: Controls randomness (0.0 = deterministic, 1.0 = creative)
- Top-p: Limits token selection to most likely options (nucleus sampling)
- Max tokens: Sets the maximum length of the response
- Stop sequences: Strings that will cause generation to stop
These parameters allow fine-tuning the model’s output for different tasks.
6.4. Transport
Transport defines how information moves between MCP components:
- Authentication: Methods for securing connections
- HTTP/REST: For basic request-response interactions
- WebSockets: For streaming responses and real-time updates
- Message formats: JSON structures for requests and responses
7. MCP Architecture
The Model Context Protocol (MCP) architecture consists of four main components that work together seamlessly to provide AI capabilities to applications:

7.1. Host Application
This is the user-facing application that leverages AI capabilities:
- Provides the interface where users interact with AI systems
- Examples include Claude Desktop, AI-enhanced IDEs like Cursor, and web-based LLM interfaces
- Initiates connections to needed capabilities through the embedded MCP client
- Displays results and manages the user experience
Think of the Host Application as the storefront that users directly interact with.
7.2. MCP Client
This component is embedded within host applications and handles:
- Translating between the host application’s needs and MCP’s standardized format
- Managing connections with MCP servers
- Requesting permissions from users when external tools need to be accessed
- Processing responses from servers and feeding them back to the host application
The MCP Client functions as a bridge between the user-facing application and the external capabilities.
7.3. MCP Server
This is the component that integrates with external data sources:
- Connects to specific external systems (GitHub, databases, weather services, etc.)
- Exposes standardized interfaces to interact with these external systems
- Handles the logic required to transform MCP requests into external system calls
- Manages authentication and connections to external resources
Think of MCP Servers as specialized adapters that connect the MCP ecosystem to specific external systems.
7.4. MCP Tools
These are specialized components that perform specific tasks:
- Tools refer to the executable functions or methods that MCP servers expose for clients to invoke.
- Provide specific callable methods with defined inputs and outputs (e.g., “getWeather”, “readFile”)
- Are exposed by MCP servers for clients to access through standardized interfaces
- Enable AI applications to perform specific actions on external systems
Each tool is like a skilled specialist that gets called in when their specific expertise is needed.
Think of MCP Tools as the API functions that the server offers—each tool is a distinct operation that allows the client to interact with external data or services.
The Model Context Protocol creates a standardized way for all these components to communicate, ensuring they work together effectively to provide powerful AI capabilities to applications.
8. How MCP Components Work Together
When you interact with an MCP-enabled application like Claude Desktop, here’s what happens:
8.1. Initial Setup and Discovery
- Connection Initialization: When the host application starts, its MCP client connects to configured MCP servers.
- Capability Discovery: The client asks each server “What capabilities do you offer?” and receives information about available tools.
- Registration: The client registers these tools, making them available to the AI.
8.2. Processing a User Request
Let’s say you ask, “What’s the weather in Tokyo today?”:
- Need Recognition: The AI model in the host application analyzes your question and recognizes it needs external information not in its training data.
- Tool Selection: The AI model identifies which specific tool (e.g., “getWeather”) it needs to fulfill your request.
- Permission Request: The host application displays a prompt asking if you want to allow access to the external tool.
- Request Transmission: Once approved, the MCP client sends a standardized request to the appropriate MCP server, specifying the tool to invoke.
- Tool Execution: The MCP server executes the requested tool, which retrieves data from the external weather service.
- Response Return: The MCP server receives the tool’s output and formats it into a standardized response for the MCP client
- Response Delivery to Model: The MCP client delivers the external data to the host application, which feeds it to the AI model.
- Response Generation: The AI model generates a response incorporating the external data.
- Display to User: The host application displays the AI model’s final response to the end user in its interface.
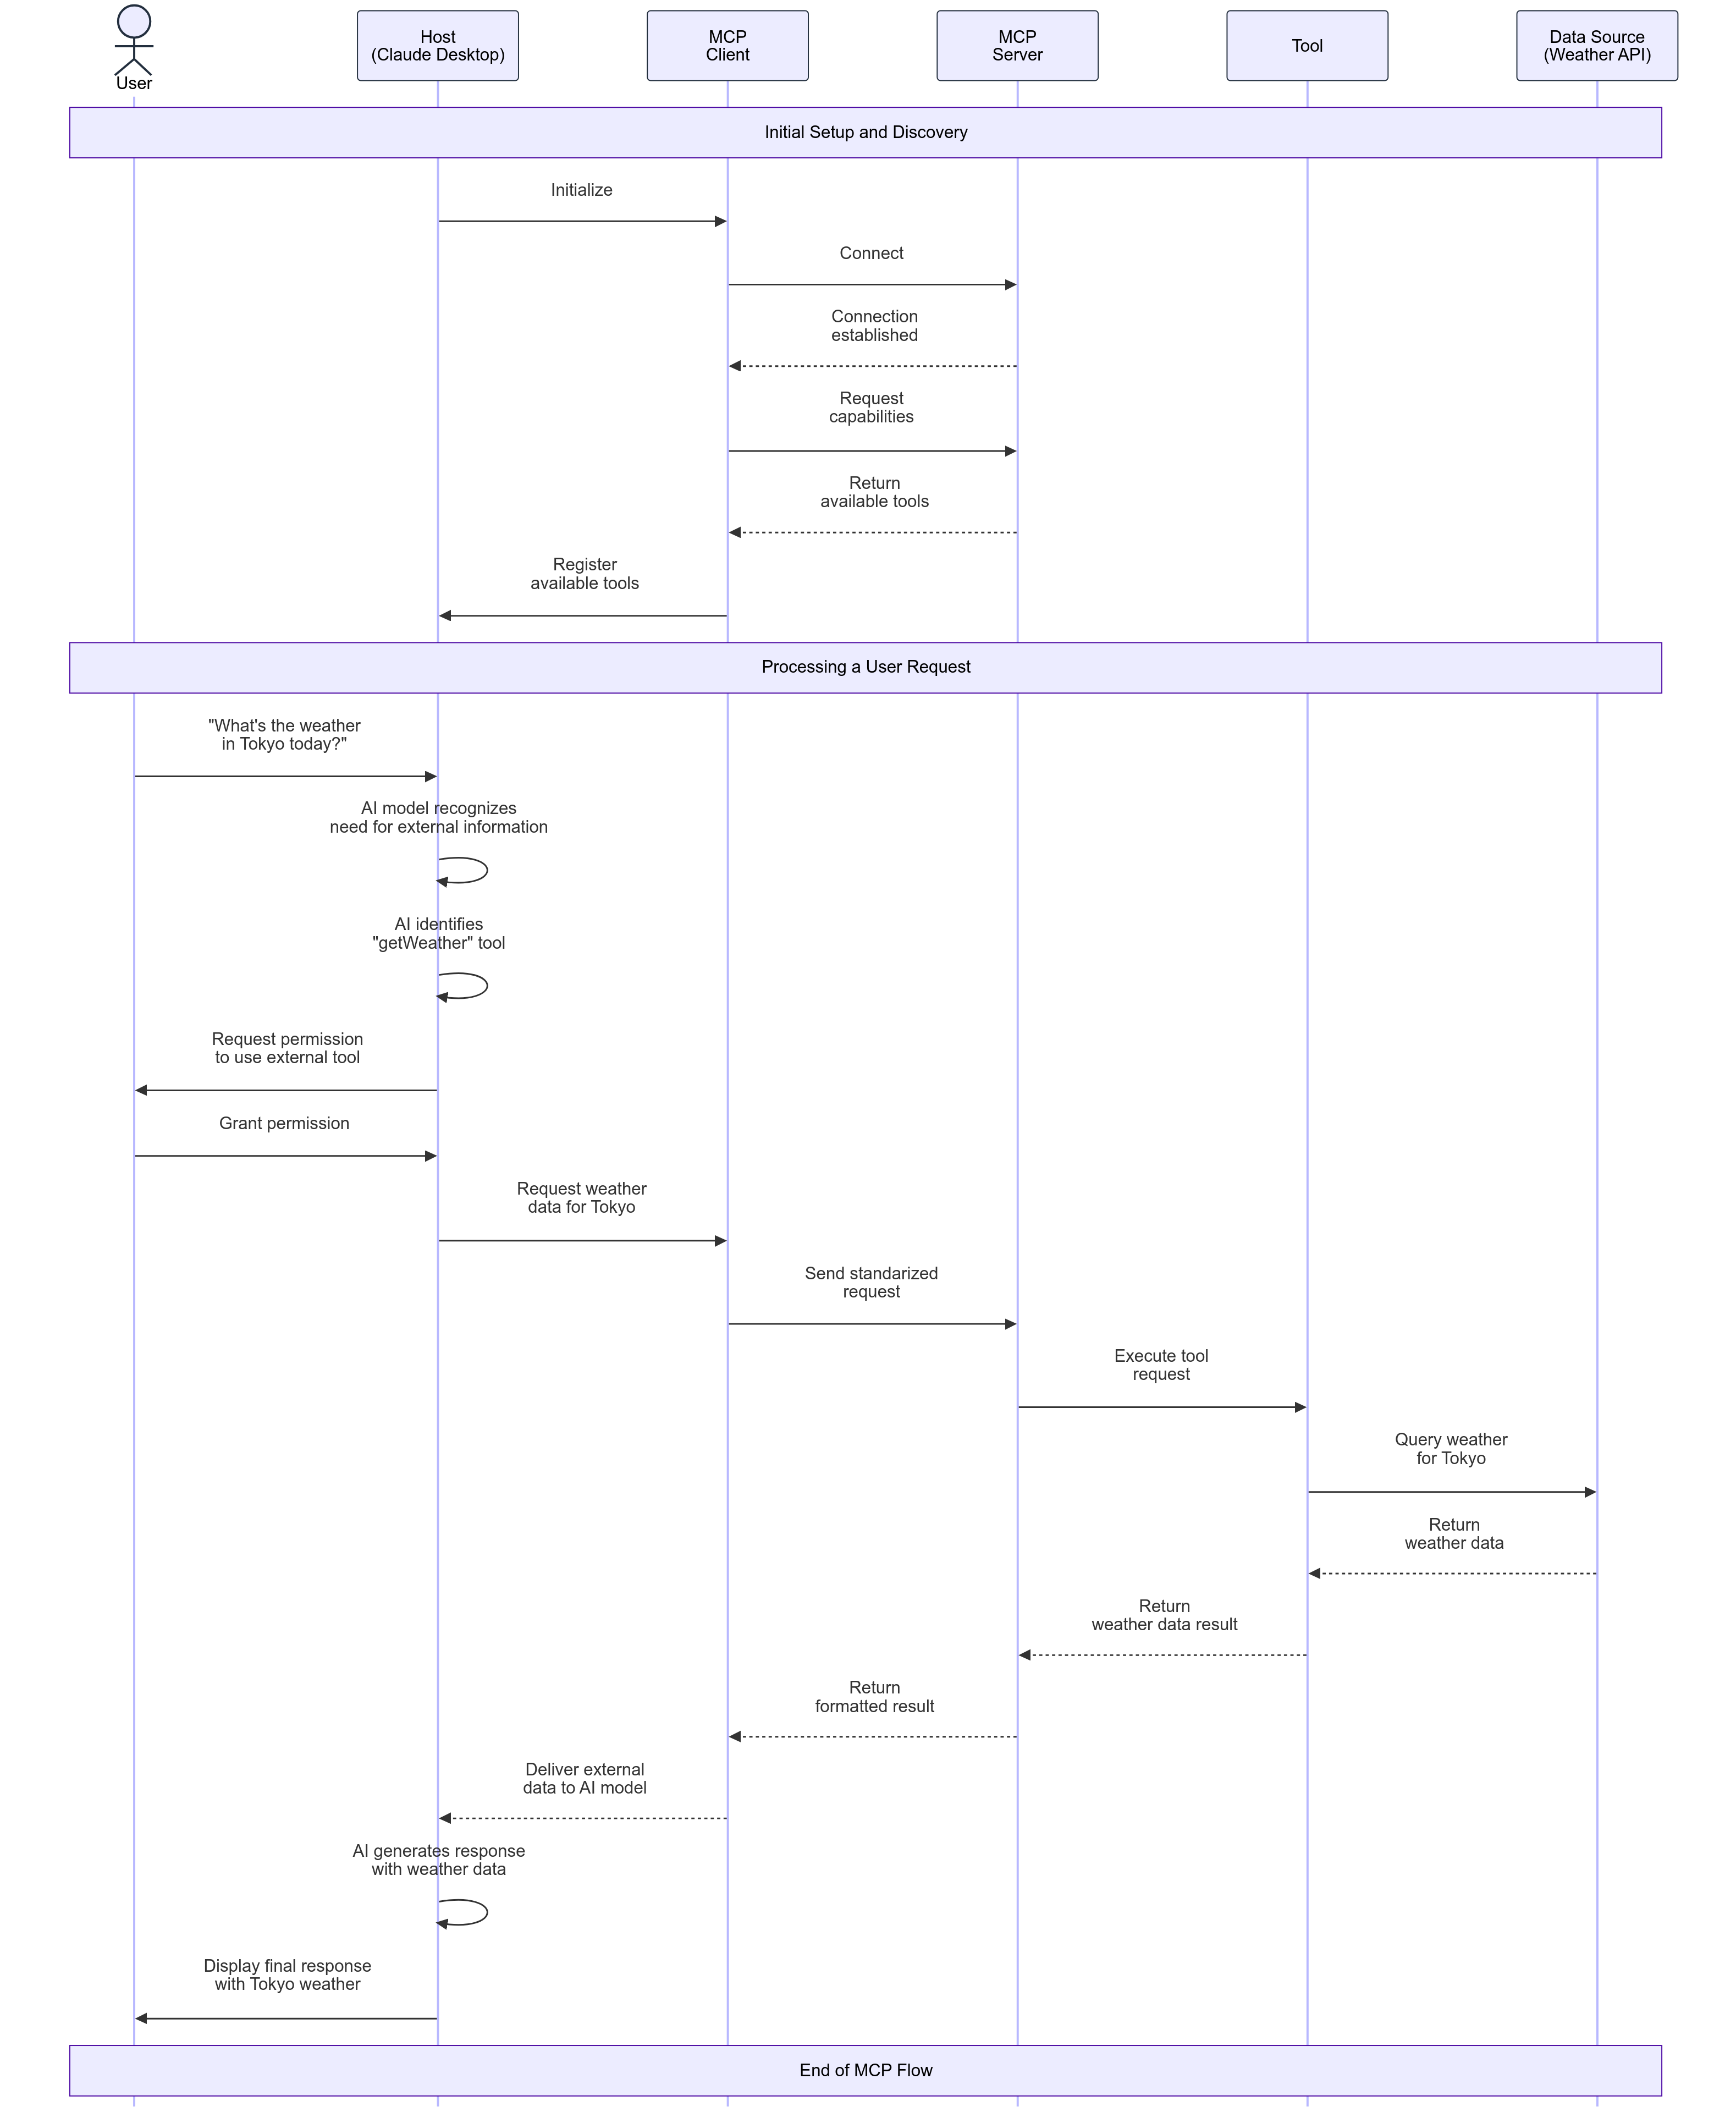
This entire process happens in seconds, creating a seamless experience where the AI application appears to have knowledge beyond its training data. The standardized protocol ensures that different components from various developers can work together effectively, extending the AI’s capabilities through a secure, structured ecosystem.
9. Configuring MCP in Claude Desktop (MacOS)
Let’s go through the steps to configure MCP servers in Claude Desktop.
- Download and install Claude Desktop from Anthropic’s website.
- Launch Claude Desktop and sign in with your credentials.
- In the menu bar, click on “Claude” and select “Settings” from the drop-down menu.
- Navigate to the “Developer” section and click the “Edit Config” button.
- This will open the folder wherein the Claude MCP server configuration file is present named “claude_desktop_config.json“
- Edit this file to add or modify the required MCP server configurations.

10. Example 1: Setting Up IntelliJ MCP Server and Creating a Health Endpoint Using Claude Desktop
In this example, we’ll install the MCP Server plugin in IntelliJ, configure it within Claude Desktop, and demonstrate how to create a new health endpoint using MCP integration.
1. Installing the MCP Server Plugin in IntelliJ
To enable MCP capabilities in IntelliJ, we need to install the MCP Server plugin.
Steps:
- Open IntelliJ and navigate to File > Settings > Plugins > Marketplace.
- In the search bar, type “MCP Server” and install the plugin.
- Plugin link: MCP Server Plugin
- Once installed, restart IntelliJ for the changes to take effect.
2. Configuring IntelliJ MCP Server in Claude Desktop
After installing the plugin, we need to configure Claude Desktop to recognize the IntelliJ MCP Server.
Steps:
- Open the “claude_desktop_config.json” file in a text editor.
- Add below mentioned configuration.
- Save the file and restart the Claude Desktop app.
{
  "mcpServers": {
    "jetbrains": {
      "command": "npx",
      "args": [
        "-y",
        "@jetbrains/mcp-proxy"
      ]
    }
  }
}3. Verifying MCP Server Installation in Claude Desktop
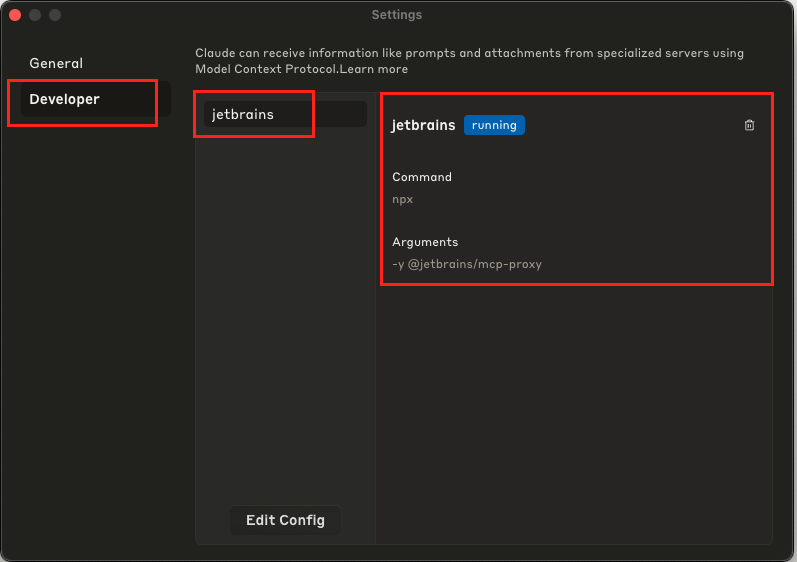
Once configured, we can verify that the IntelliJ MCP Server is running.
Method 1: Using Developer Settings
- In Claude Desktop, go to Menu Bar > Claude > Settings > Developer.
- You should see the “jetbrains” server listed.
- Clicking on it will show the status as “running”, along with the command and arguments specified in the JSON configuration file.
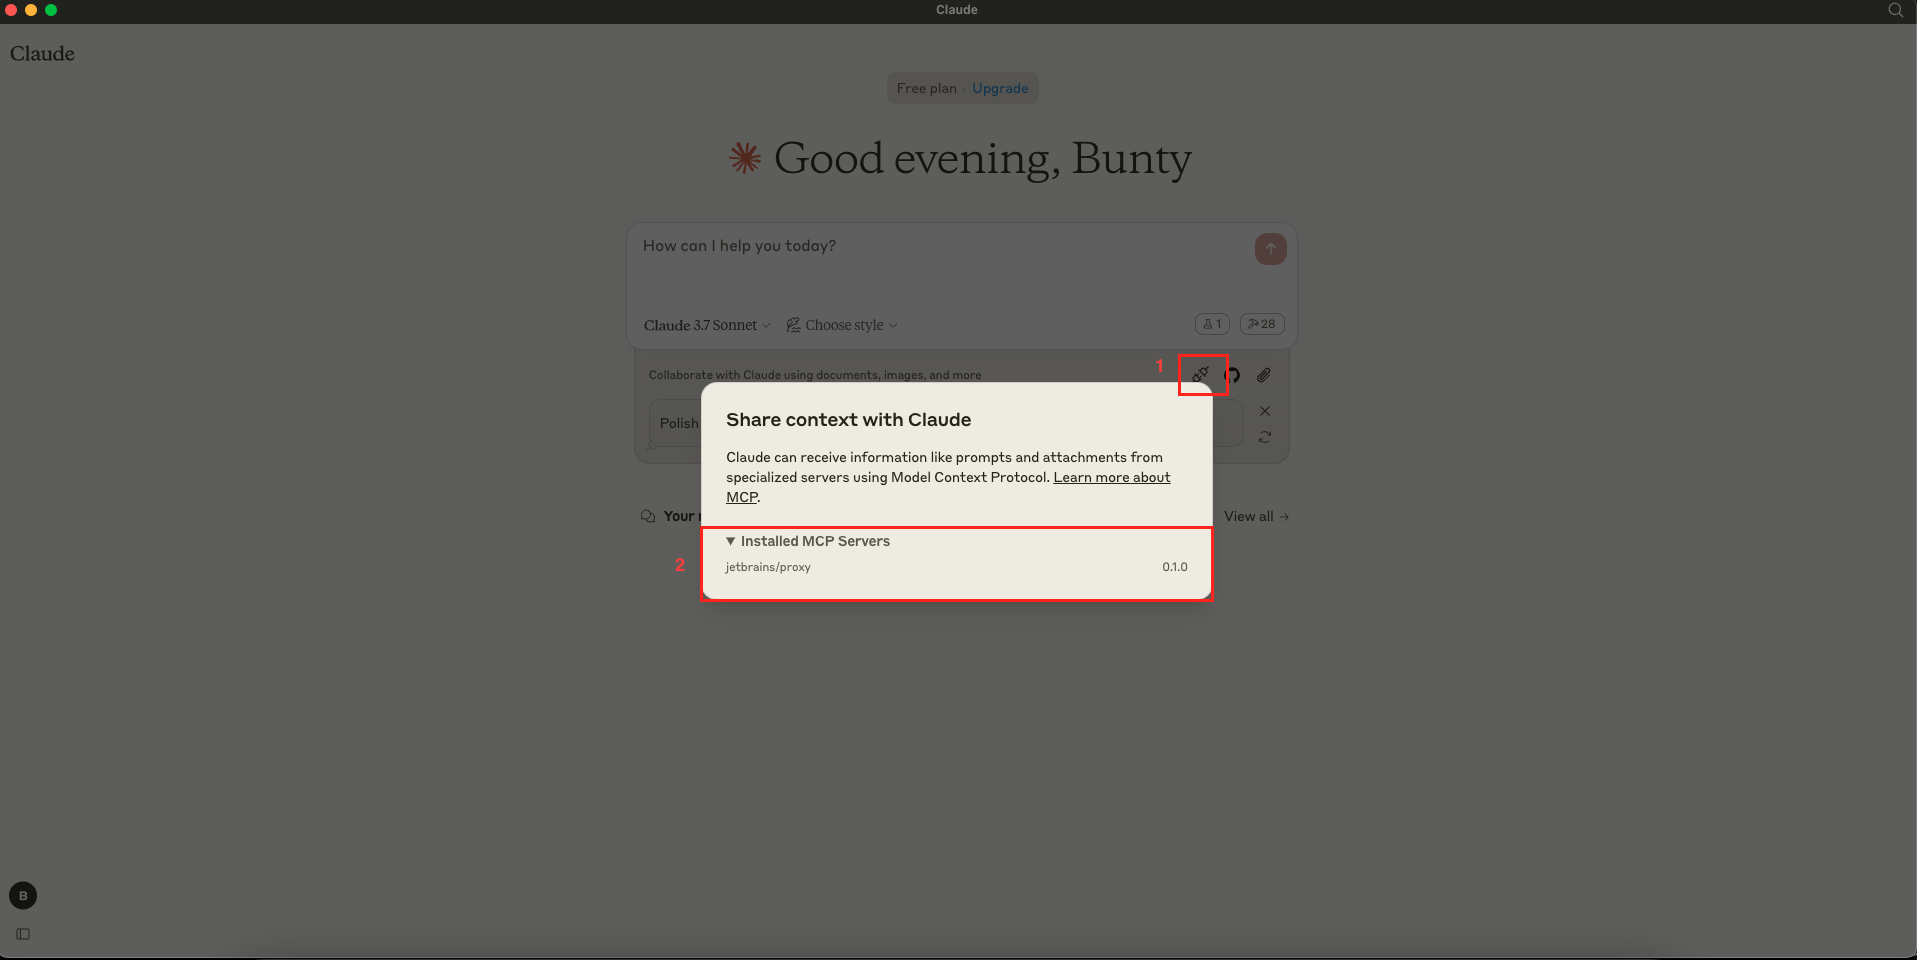
Method 2: Using Chat Window
- Open the Claude Desktop chat window.
- Look for an icon with a plug symbol.
- Hovering over it will display “Attach from MCP”.
- Clicking on it will show a dropdown labeled “Installed MCP Servers”.
- Expanding the dropdown should list “jetbrains/proxy”, confirming successful installation.
4. Checking Available MCP Tools
- In the Claude Desktop chat window, locate the hammer icon.
- Hovering over it will show “X MCP tools available” (where X is the number of available tools).
- Clicking the hammer icon will display a list of all available tools, along with descriptions and their associated MCP servers.

5. Creating a Health Endpoint in Existing Spring Boot Project Using Claude Desktop
Now, we will import a simple Spring Boot Hello World project into IntelliJ and use Claude Desktop to add a basic health check endpoint. We will also ask Claude to run a Maven clean install to ensure that our build remains stable.
You can find the project on GitHub: 🔗 Spring Boot 3 Hello World
Steps:
- Clone the repository and open it in IntelliJ.
- Open the Claude Desktop chat window and type the below-mentioned prompt.
- Claude will start adding the necessary code to your project. While generating the code, it may prompt you for permissions to create and insert the required files. You can grant access by clicking “Allow for This Chat.”
- Once the code is added and Maven clean install runs successfully, you can start the Spring Boot application and verify the output by hitting the newly added health check endpoint.
Prompt
In our ‘spring-boot-3-hello-world’ IntelliJ project, add a simple health check controller and endpoint that returns “Application is running” and then run ‘mvn clean install’ to ensure the build is stable.
Output: MCP in Action Demo
In this video, you will see how Claude and our IntelliJ MCP Server worked together seamlessly. During the implementation, Claude requested the necessary permissions to perform various operations. It utilized available tools to analyze the project, list files, retrieve file contents, create new files, and execute commands via the terminal.
Once the Maven clean install was completed, we manually verified the changes by reviewing the newly added endpoint, started the application, and then checked the output by hitting the health endpoint via the browser.
11. Example 2: Using GitHub MCP Server to Create a New Branch, Add a New Controller and Push Changes
In this section, we’ll use our existing Spring Boot Hello World project. The GitHub MCP Server will create a new branch, add an MCPController with a GET endpoint that returns “Hello MCP”, commit the changes, and push them to the remote repository. This process involves generating a GitHub Personal Access Token, configuring the GitHub MCP Server in Claude Desktop, and then instructing Claude to make the required changes.
You can find the project on GitHub: 🔗 Spring Boot 3 Hello World
Note: While the Claude Desktop app offers native GitHub integration, in this demo we are using the MCP server to illustrate how MCP works.
1. Generate a GitHub Personal Access Token
- Go to GitHub Settings, then click on Developer settings > Personal access tokens.
- Select which repositories you want to give access to—Public, All, or Specific ones.
- Create a token:
- Use the repo scope for full access to private repositories.
- Use public_repo if you only need access to public repositories.
- Configure appropriate permissions related to the Repository and Account.
- Once the token is generated, copy it and save it somewhere safe!
2. Configure the GitHub MCP Server in Claude Desktop App
- Open your Claude Desktop configuration file (“claude_desktop_config.json”).
- You can keep your existing servers as they are and simply add the new GitHub MCP server configuration. Add the below configuration for the GitHub MCP Server
- Replace
<YOUR_GITHUB_TOKEN>with your GitHub Personal Access Token. - Save the file and restart the Claude Desktop app.
- Verify that the GitHub MCP Server status is “running” and check the available tools, as described in Example 1.
{
  "mcpServers": {
    "github": {
      "command": "npx",
      "args": [
        "-y",
        "@modelcontextprotocol/server-github"
      ],
      "env": {
        "GITHUB_PERSONAL_ACCESS_TOKEN": "<YOUR_GITHUB_TOKEN>"
      }
    }
  }
}3. Instruct Claude Desktop to Create a New Controller and Push Changes
- Open the Claude Desktop chat window and instruct it with the below-mentioned prompt.
- Claude Desktop, using the GitHub MCP server, will perform the required actions like creating the new branch, adding the controller, committing the changes, and pushing them to the remote repository.
Prompt
Our existing Spring Boot GitHub project is located at ‘/Users/bunty/Github/BuntyRaghani/spring-boot-3-hello-world’. Create a new branch named ‘feature/mcp_demo’, add a simple controller named MCPController with a GET endpoint that returns “Hello MCP”, commit the changes, and push the branch to the remote repository.
4. Verify the Changes
- Open your browser and navigate to the GitHub repository.
- Confirm that a new branch named “feature/mcp_demo” exists and contains the MCPController with the GET endpoint returning “Hello MCP”.
Output:
In this video, you’ll see how Claude and our GitHub MCP Server seamlessly work together to automate your version control workflow. Claude leverages various tools to perform the following operations:
• Create a new branch
• Retrieve file contents
• Create or update files as required
Once the changes are pushed, we manually verified the update by pulling the changes into our existing project in IntelliJ and then confirming the modifications via the browser.
12. Things to Consider
If you’re just getting started with MCP, keep these practical considerations in mind:
- Start with Simple Integrations: Begin by connecting one model to one tool before building complex workflows.
- Understanding Latency: Multiple model calls and tool interactions can increase response time.
- Monitoring Usage: Keep track of API calls and resource consumption, especially when using commercial models.
- Handling Failures: Plan for scenarios where a model or tool might be unavailable.
- Testing Thoroughly: Ensure interactions between models and tools work as expected to avoid unexpected outcomes.
- Privacy Considerations: Be mindful of what information is shared across different systems.
- Use Trusted MCP Servers: Ensure that the MCP servers you use come from reliable sources or developers.
- Limit Permissions: Instead of granting full directory access, restrict MCP servers to only the necessary directories or files.
By following these guidelines, you can enhance the security, efficiency, and reliability of your MCP-powered workflows.
13. FAQs
Do I need to know programming to use MCP?
For basic usage of MCP-enabled applications like Claude Desktop, no programming knowledge is needed. To create custom integrations or workflows, some programming experience is helpful.
How does MCP improve workflow integration?
By standardizing communication between AI models and external systems, MCP reduces the need for custom connectors and speeds up development.
14. Conclusion
MCP is transforming how AI systems interact by standardizing communication between models and external tools, much like how USB simplified device connections. This standardization allows developers to focus on building features rather than dealing with integration challenges. For beginners, learning MCP provides a strong foundation that will remain relevant as AI evolves. Start small, experiment, and explore how different models and tools can work together to solve real-world problems. The future of AI lies in specialized systems collaborating through protocols like MCP, making AI more powerful and efficient than ever before.
15. Learn More
Interested in learning more?
Spring Boot Validate API Requests and Responses with Atlassian Swagger Request Validator
Add a Comment