Learn how to use LangChain4j with Docker to run and connect local LLMs, including step-by-step setup and examples for building local AI apps.
1. Introduction
Welcome back to our LangChain4j series! In our previous articles, we explored the basics of LangChain4j, understood the ChatModel interface, learned how to get structured outputs, and implemented ChatModel listeners to monitor our AI interactions. Today, we’re taking an exciting step toward running AI models completely on your own machine using Docker.
In this fifth installment, we’ll learn how to connect LangChain4j to local Large Language Models (LLMs) running inside Docker. This approach gives you complete control over your AI infrastructure, eliminates API costs, ensures data privacy, and lets you work offline. Whether you’re building prototypes, testing AI features, or want to avoid external API dependencies, running local LLMs is a game-changer.
By the end of this article, you’ll have a fully functional Spring Boot application that communicates with a local LLM running in Docker, all configured through simple properties files. Let’s dive in!
2. Why Run LLMs Locally with Docker?
Before we jump into the code, let’s understand why you might want to run LLMs locally:
- Cost Savings: Cloud-based AI APIs charge per request. Running models locally eliminates these ongoing costs, especially useful during development and testing.
- Data Privacy: Your sensitive data never leaves your machine. This is critical for applications handling confidential information or operating in regulated industries.
- Offline Capability: Work without internet connectivity. Perfect for development environments with restricted network access.
- Complete Control: Choose any open-source model, customize configurations, and avoid vendor lock-in.
- Faster Iteration: No network latency means quicker response times during development.
Docker makes this even better by providing consistent, isolated environments that are easy to set up and tear down.
3. Understanding Docker Desktop Model Runner
Docker Desktop now includes a fantastic feature called Docker Model Runner that simplifies running AI models locally. This built-in capability allows you to download, manage, and run various LLM models directly from Docker Desktop’s interface.
3.1. What is Docker Model Runner?
Docker Model Runner is a feature in Docker Desktop (version 4.20 and later) that provides an easy way to run AI models. It handles all the complexity of model serving, exposing a standardized OpenAI-compatible API that tools like LangChain4j can connect to seamlessly.
Think of it as your personal AI server running right on your desktop/laptop, without needing to understand complex model serving frameworks or configurations.
4. How to Download and Run Models in Docker Desktop
Step 1: Download a Model
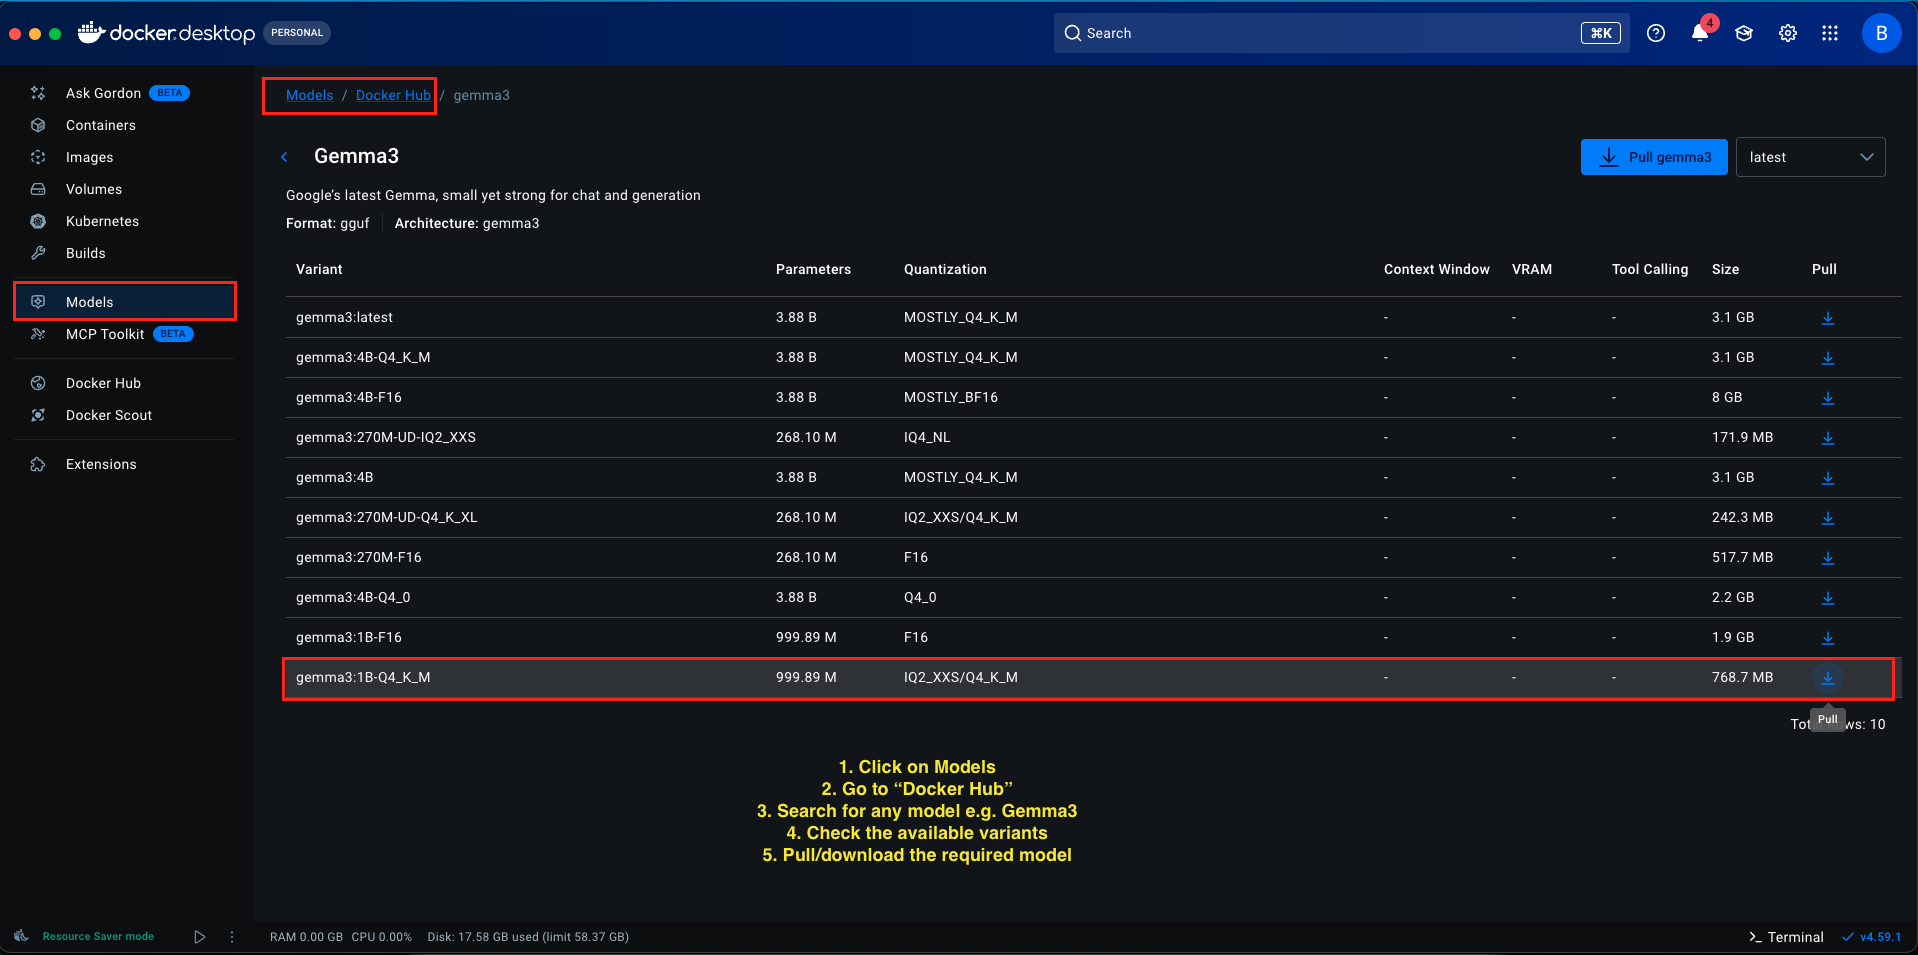
- In Docker Desktop, look for the Models section in the left sidebar
- Click on Models and click on “Docker Hub” to open the model library You’ll see a list of available models (Llama, Gemma, Phi, and others).
- For this tutorial, we’ll use Gemma 3 1B (a lightweight model perfect for testing)
- Find gemma3:1B-Q4_K_M in the list Click the Pull button next to it
- Wait for the download to complete (size varies by model, usually a few gigabytes)
The model identifier we’ll use is: docker.io/gemma3:1B-Q4_K_M
Step 2: Testing the Model in Docker Desktop
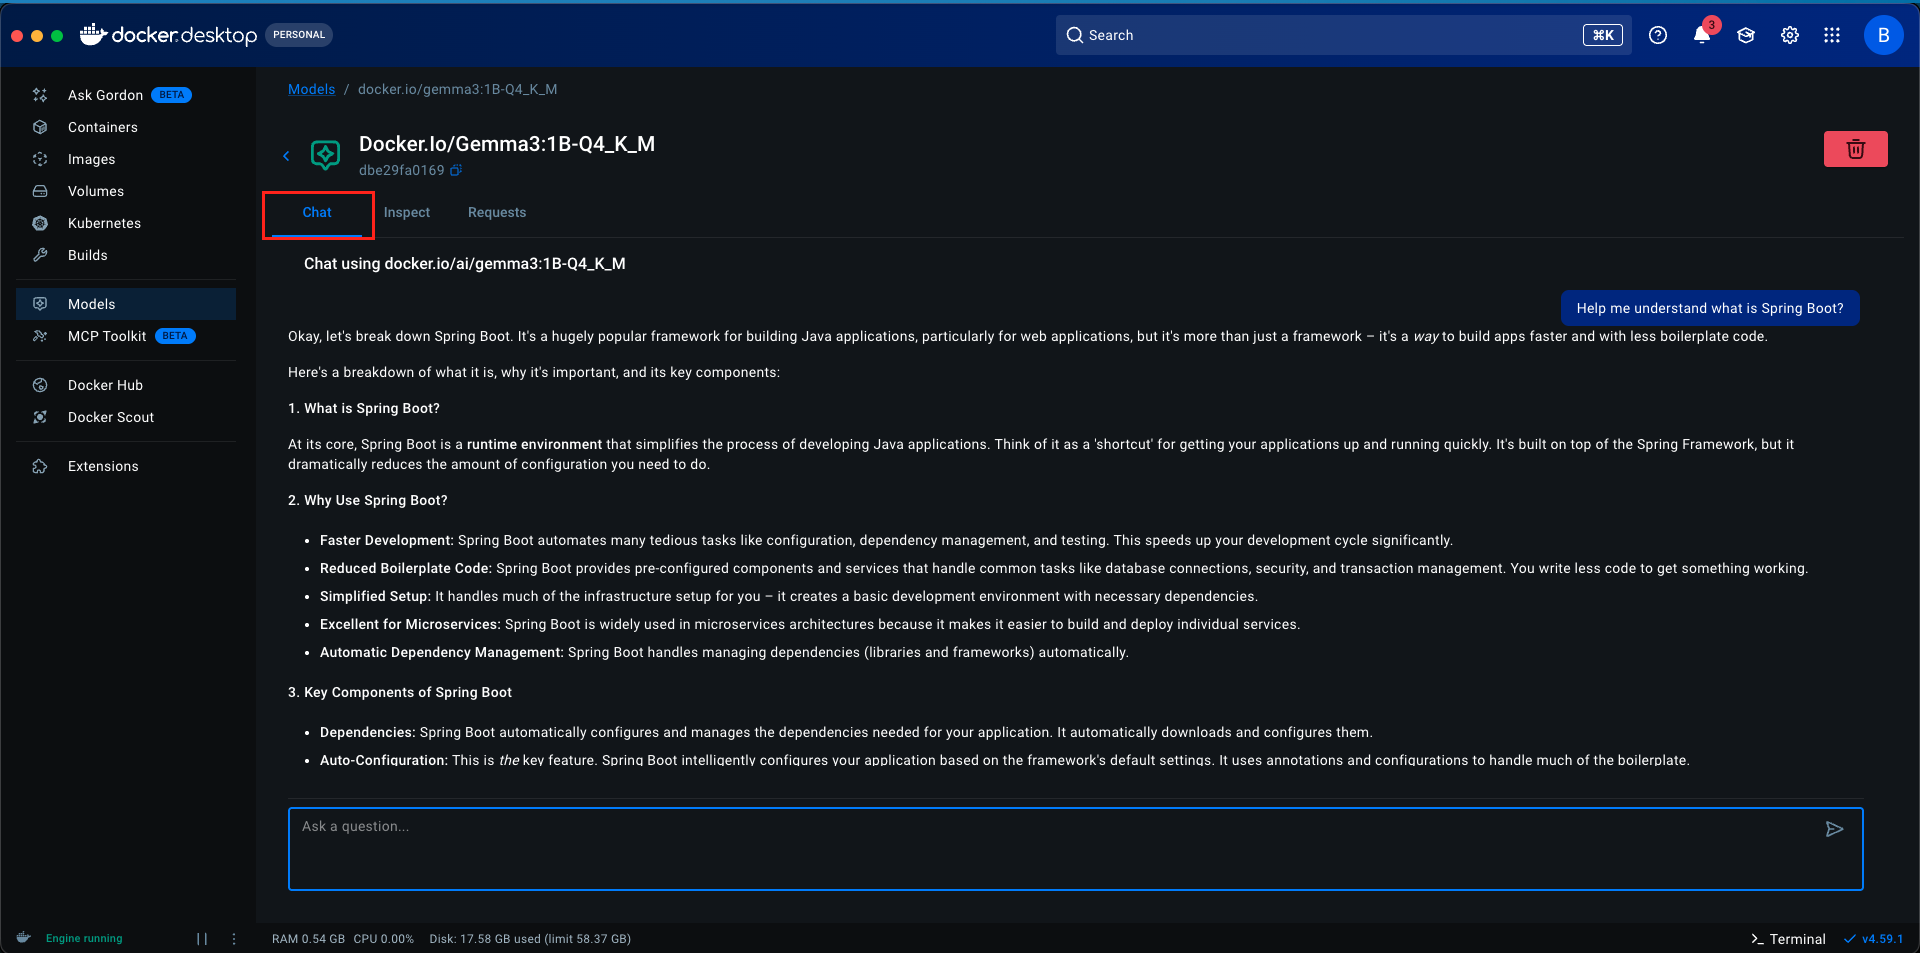
Once your model is downloaded, Docker Desktop provides a built-in chat interface where you can interact with the model directly:
- Navigate to the Models section in Docker Desktop
- Find your downloaded model (gemma3:1B-Q4_K_M)
- Click on the model. You’ll see a Chat tab
- Type a message like “Hello, how are you?” and press Enter The model will respond directly within Docker Desktop
This is great for quick testing and verifying that your model works correctly. However, for integrating with LangChain4j and building applications, we need to expose the model via APIs, which brings us to the next crucial step.
Step 3: Enable Host-Side TCP Support
By default, Docker models run in isolation and aren’t accessible from your host machine’s applications. To allow our Spring Boot application (or any application on your host) to communicate with the model, we need to enable network access.
Here’s how to enable API access:
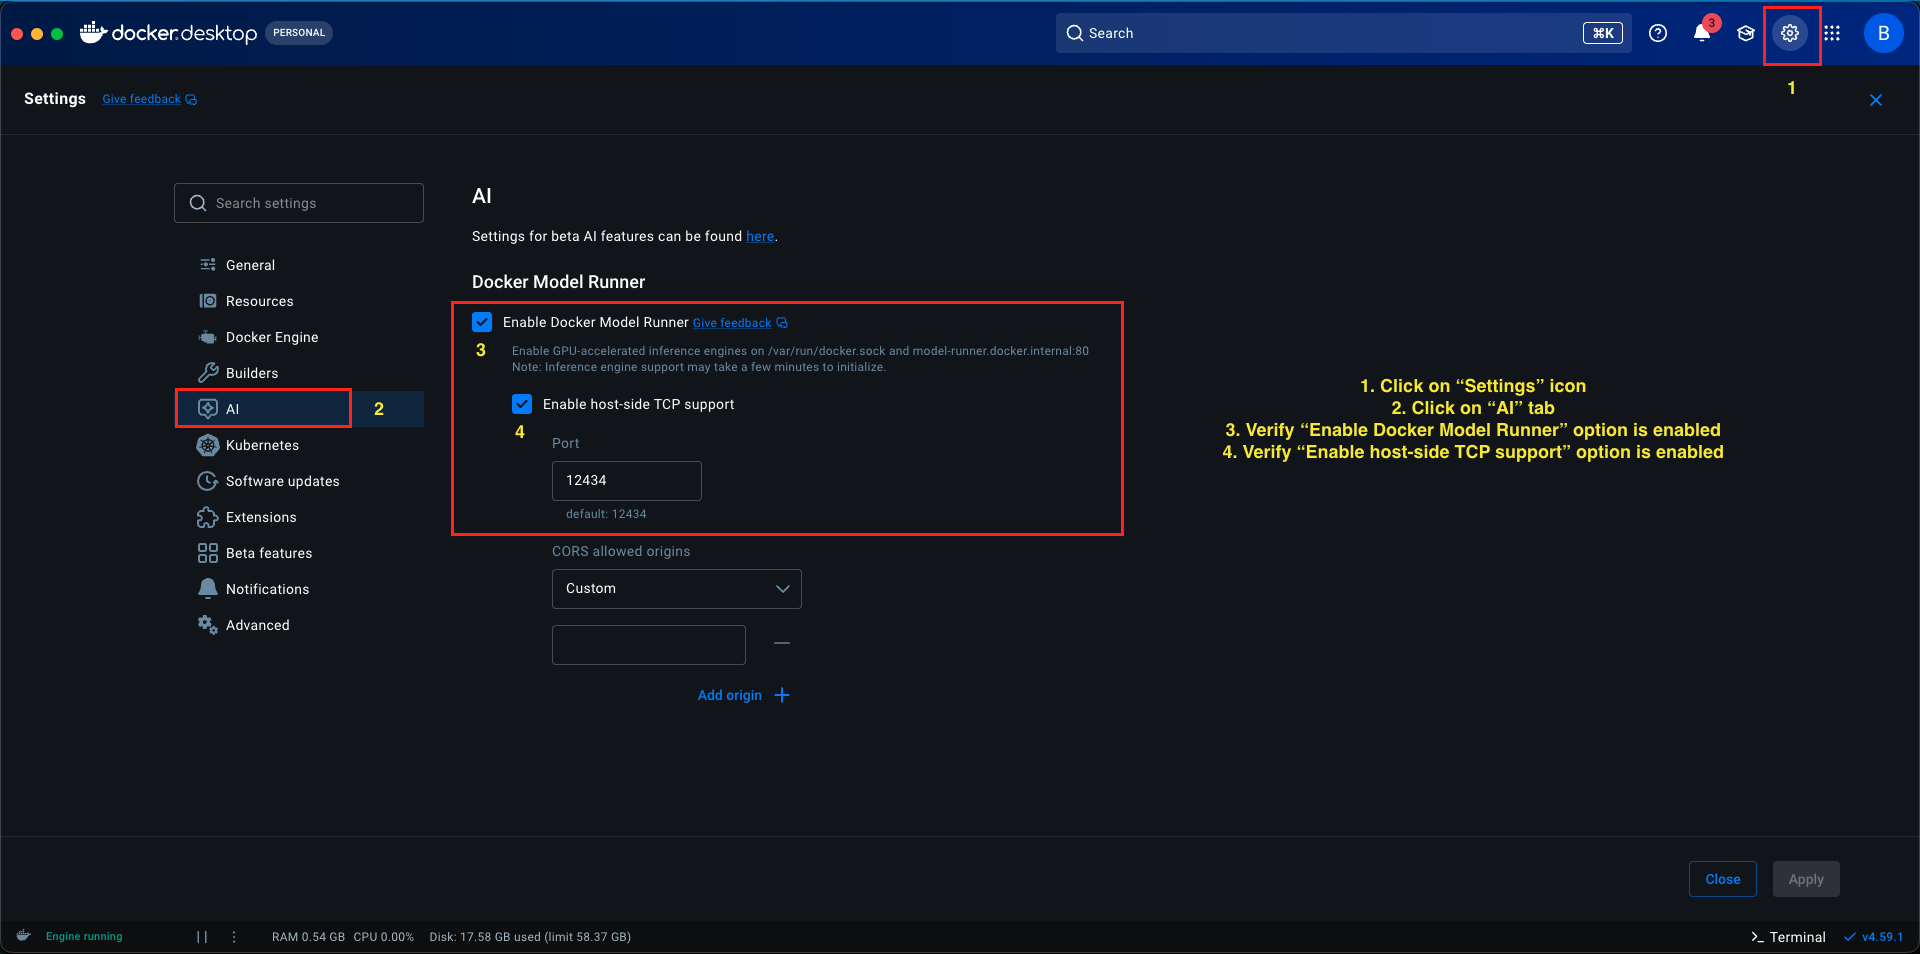
- In Docker Desktop, go to Settings (gear icon)
- Navigate to AI section in the left sidebar
- Ensure “Enable Docker Model Runner” option is enabled
- Look for the option Enable host-side TCP support
- Check/Enable this option
- You’ll notice a Port field showing 12434 (this is the default port for Docker Model Runner)
- Click Apply
Why is this important?
Without enabling host-side TCP support, your Docker models remain completely isolated within Docker’s internal network. Enabling this feature does two critical things:
- Exposes the model’s API on your host machine’s localhost (127.0.0.1)
- Binds it to port 12434, making it accessible to any application running on your computer, including our Spring Boot application
Think of it like opening a door between Docker’s isolated environment and your local machine. The model now listens on http://localhost:12434, and any application can send HTTP requests to this address to interact with the model.
Port 12434 Explained:
Port 12434 is Docker Model Runner’s standard port for serving model APIs. When you enable host-side TCP support, Docker automatically:
- Starts an API server inside the container
- Maps it to port 12434 on your host machine
- Exposes an OpenAI-compatible endpoint at
http://localhost:12434/engines/llama.cpp/v1
This is the URL we’ll configure in our Spring Boot application to connect LangChain4j to the local model.
After enabling host-side TCP support, let’s verify everything is working:
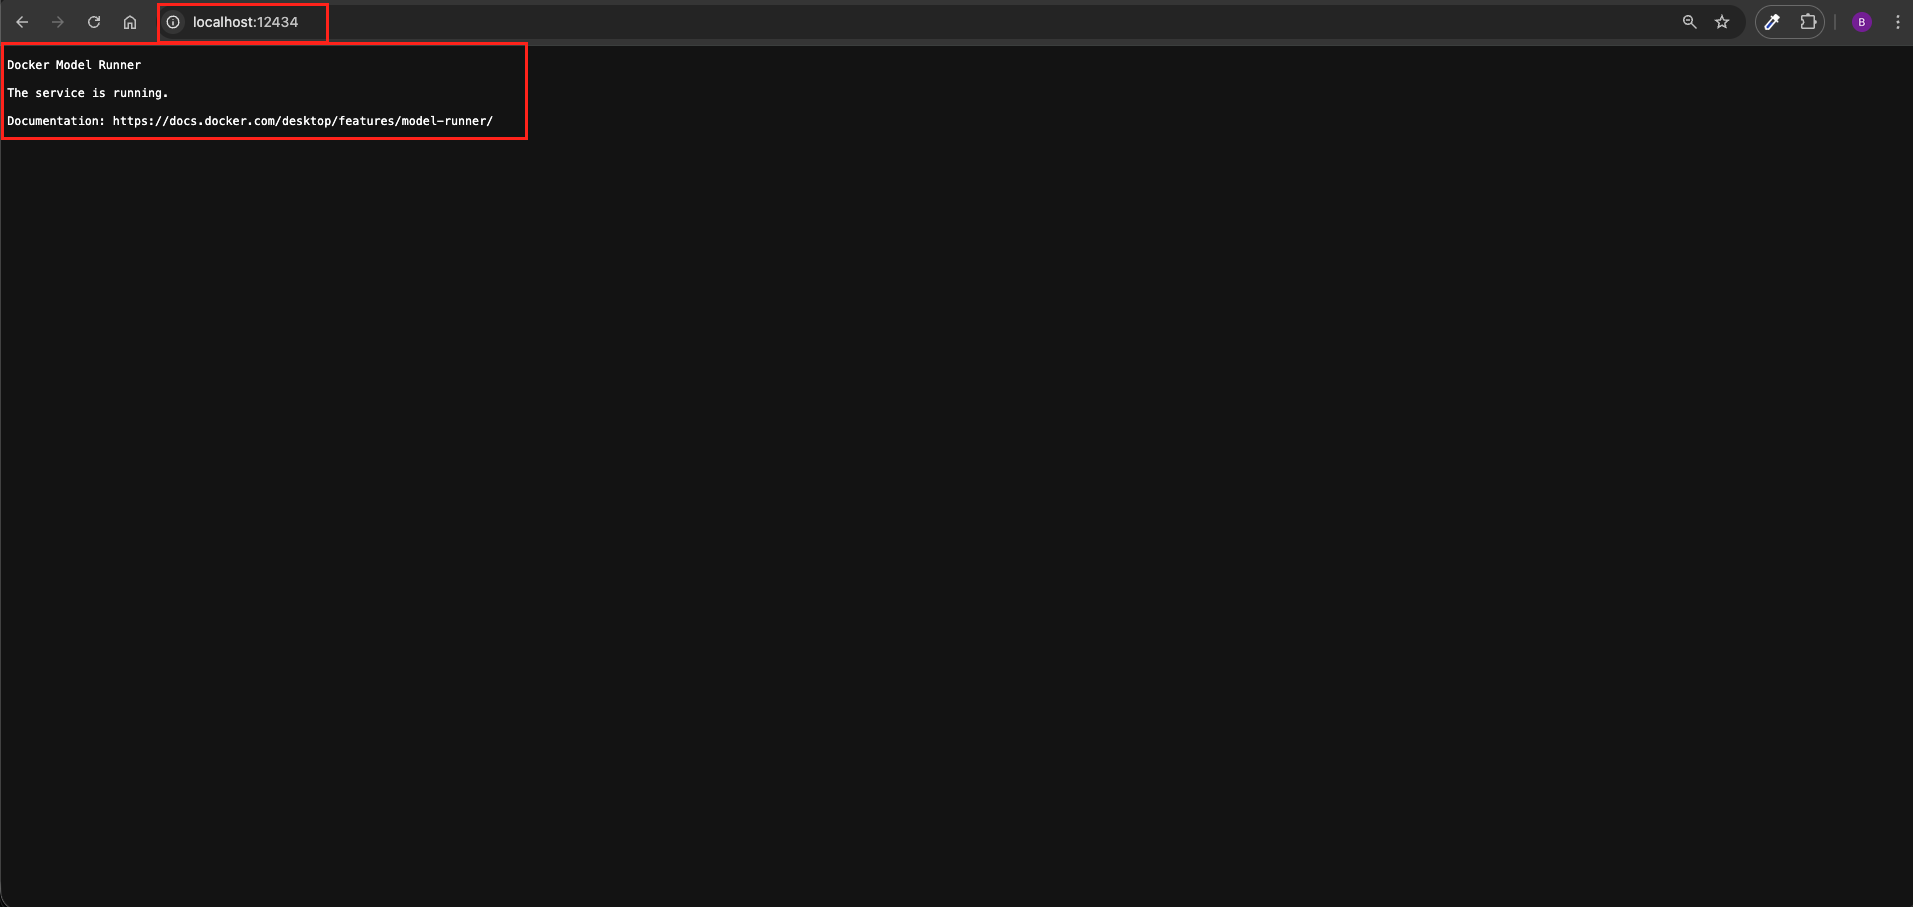
- Open your web browser
- Navigate to or run:
http://localhost:12434 - You should see a basic response or status page indicating the Docker model runner is running
If you get a response, it means the API is accessible and ready for integration!
5. Understanding Model Loading and On-Demand Behavior
One fascinating aspect of Docker Model Runner is its intelligent model loading mechanism. Let’s understand how it works:
5.1. On-Demand Loading
When you download a model in Docker Desktop, it’s stored on disk but not immediately loaded into memory. The model only loads into RAM when it receives its first request. This is called “lazy loading” or “on-demand loading.”
5.2. Automatic Startup
Here’s something interesting you don’t need to manually start the model container in Docker Desktop. When your Spring Boot application sends its first request to http://localhost:12434, Docker Model Runner automatically:
- Detects the incoming request
- Identifies which model you’re requesting (based on the ‘model-name’ in your configuration)
- Loads the model into memory
- Processes the request
- Returns the response
6. How long does the model stay in memory?
Docker Model Runner loads models on demand when a request is received and immediately performs inference. Once loaded, the model remains in memory until one of two things happens:
- Another model is requested: the currently loaded model may be unloaded to make room for the new one
- Inactivity timeout is reached: if no requests arrive within the pre-defined timeout (currently 5 minutes), the model is automatically unloaded from memory
This behavior ensures efficient memory usage while keeping inference fast for repeated requests within the active window. Subsequent requests after unloading will trigger the model loading process again.
7. Building LangChain4j with Docker Demo Application
We are building a Simple Local Chat Application that demonstrates the core capability of running AI entirely offline using LangChain4j.
The application serves a single, specific purpose: Bridging LangChain4j to a Local Docker Model. The application has a straightforward flow:
- LangChain4j Client: It takes the user’s message and sends it to the local model instead of the cloud.
- Docker Model Runner: It listens on port 12434, receives the message, and uses the AI model (like gemma3) to generate a response.
The result is a clean, private chat loop where LangChain4j sends a user’s prompt directly to the Docker container and retrieves the generated response instantly.
7.1. Project Structure Overview
Here’s our complete project structure for better understanding:
langchain4j-chatmodel-docker-demo
├── src
│   └── main
│       ├── java
│       │   └── com
│       │       └── bootcamptoprod
│       │           ├── controller
│       │           │   └── ChatController.java          #  REST Endpoint
│       │           └── Langchain4jChatmodelDockerDemoApplication.java
│       └── resources
│           └── application.yml                           # Model configuration
└── pom.xml                                               # Dependency management
Key Components:
- pom.xml: Defines our project dependencies including Spring Boot and LangChain4j
- application.yml: Contains all configuration for connecting to our Docker-hosted LLM
- Main Application Class: Bootstraps our Spring Boot application
- ChatController: Exposes a REST API endpoint to interact with the local LLM
7.2. Diving Into the Code
Let’s walk through each file in detail, understanding what each component does.
Step 1: Setting Up Maven Dependencies
First, let’s set up our Maven project with all necessary dependencies. The pom.xml file defines our project configuration and required libraries:
<properties>
	<java.version>21</java.version>
	<langchain4j.version>1.11.0</langchain4j.version>
</properties>

<dependencies>
	<!-- Spring Boot Web for REST endpoints -->
	<dependency>
		<groupId>org.springframework.boot</groupId>
		<artifactId>spring-boot-starter-web</artifactId>
	</dependency>
	<!-- LangChain4j OpenAI Spring Boot Starter -->
	<dependency>
		<groupId>dev.langchain4j</groupId>
		<artifactId>langchain4j-open-ai-spring-boot-starter</artifactId>
	</dependency>
</dependencies>

<dependencyManagement>
	<dependencies>
	  <!-- LangChain4j BOM for version management -->
		<dependency>
			<groupId>dev.langchain4j</groupId>
			<artifactId>langchain4j-bom</artifactId>
			<version>${langchain4j.version}</version>
			<type>pom</type>
			<scope>import</scope>
		</dependency>
	</dependencies>
</dependencyManagement>
What’s Important Here:
- spring-boot-starter-web: Provides all the essential components for building REST APIs, including embedded Tomcat server and web MVC capabilities.
- langchain4j-open-ai-spring-boot-starter: The key dependency that auto-configures LangChain4j’s ChatModel. You might wonder why we’re using the OpenAI starter for a local model. The answer is simple: Docker Model Runner exposes an OpenAI-compatible API, so we can use the same integration and just point it to our local Docker instance instead of OpenAI’s cloud servers.
- langchain4j-bom: A Bill of Materials (BOM) that manages all LangChain4j dependency versions consistently, preventing version conflicts.
Step 2: Configure Application Properties
Next, let’s configure our application settings in application.yml. Also, we will configure the AI model connection:
spring:
  application:
    name: langchain4j-chatmodel-docker-demo

langchain4j:
  open-ai:
    chat-model:
      base-url: http://localhost:12434/engines/llama.cpp/v1    # Connects to the LLM running inside Docker
      api-key: "does-not-matter"                               # Placeholder key (required by LangChain4j ignored by local model)
      model-name: docker.io/gemma3:1B-Q4_K_M                   # Target model identifier (must match the loaded model in your Docker)
      log-requests: true                                       # Enable logging to see requests (useful for debugging)
log-responses: true # Enable logging to see responses (useful for debugging)📄 Configuration Overview
- spring.application.name: Simply gives our application a name for identification within the Spring ecosystem.
- langchain4j:
- open-ai.chat-model: This section configures the “Chat” capabilities of our AI.
- api-key: While LangChain4j requires this property, local Docker models don’t need authentication. We use a placeholder value like “does-not-matter” to satisfy the framework’s validation. It’s ignored by the local model server.
- base-url: This is the most important property! Instead of pointing to OpenAI’s servers, we’re pointing to our local Docker container at
http://localhost:12434/engines/llama.cpp/v1. This URL only works because we enabled host-side TCP support in Docker Desktop. Without that setting, port 12434 wouldn’t be accessible from our Spring Boot application. - model-name: Specifies which model to use. This must exactly match the model identifier from Docker Desktop. In our case,
docker.io/gemma3:1B-Q4_K_Mtells Docker which model to route our requests to. When your application sends a request, Docker Model Runner reads this identifier and loads the corresponding model (if not already loaded). - log-requests: When set to true, this shows the exact message we send to the AI in our console, which is very helpful for learning and debugging.
- log-responses: This displays the full response we get back from the AI in the console, allowing us to see the metadata and the raw text response.
- open-ai.chat-model: This section configures the “Chat” capabilities of our AI.
Step 3: Application Entry Point
This is the main class that bootstraps our entire application.
package com.bootcamptoprod;

import org.springframework.boot.SpringApplication;
import org.springframework.boot.autoconfigure.SpringBootApplication;

@SpringBootApplication
public class Langchain4jChatmodelDockerDemoApplication {

    public static void main(String[] args) {
        SpringApplication.run(Langchain4jChatmodelDockerDemoApplication.class, args);
    }

}
Explanation:
- This is a standard Spring Boot application class annotated with
@SpringBootApplication. This single annotation enables component scanning, auto-configuration, and property support. When you run this class, Spring Boot starts the embedded web server, scans for components (like our ChatController), and automatically configures the LangChain4j ChatModel bean based on our application.yml properties. No manual configuration needed, Spring Boot handles everything!
Step 4: The controller
package com.bootcamptoprod.controller;

import dev.langchain4j.model.chat.ChatModel;
import org.springframework.beans.factory.annotation.Autowired;
import org.springframework.http.ResponseEntity;
import org.springframework.web.bind.annotation.PostMapping;
import org.springframework.web.bind.annotation.RequestBody;
import org.springframework.web.bind.annotation.RequestMapping;
import org.springframework.web.bind.annotation.RestController;

import java.util.LinkedHashMap;
import java.util.Map;

@RestController
@RequestMapping("/api/v1")
public class ChatController {

    @Autowired
    private ChatModel chatModel;

    @PostMapping("/chat")
    public ResponseEntity<Map<String, Object>> simpleChat(@RequestBody Map<String, String> request) {

        // Extract user message from the incoming request
        String userMessage = request.get("message");

        // Sends prompt to the Docker-hosted model and gets the string response
        String response = chatModel.chat(userMessage);

        // Wrap response in a simple JSON structure
        Map<String, Object> result = new LinkedHashMap<>();
        result.put("aiResponse", response);

        return ResponseEntity.ok(result);
    }
}Code Summary:
- This REST controller exposes a
/api/v1/chatendpoint that accepts POST requests. The@Autowired ChatModelis automatically injected by Spring Boot based on our configuration. - When a request arrives with a message, we simply extract it, pass it to
chatModel.chat(), and return the AI’s response wrapped in JSON. - The beauty here is that we’re using the exact same ChatModel interface we learned about in our second article. The only difference is that instead of calling OpenAI’s servers, our requests go to the local Docker container on port 12434. The abstraction remains consistent, making it easy to switch between local and cloud models by just changing configuration!
- The
LinkedHashMapensures our JSON response maintains property order, making the API output predictable and easier to read.
8. Testing the Application
- Verify Model Setup: Ensure Docker Desktop is running, you have download the required model and also, Host-Side TCP Support is enabled in Docker Desktop.
- Start Your Application: Run your Spring Boot application using Maven
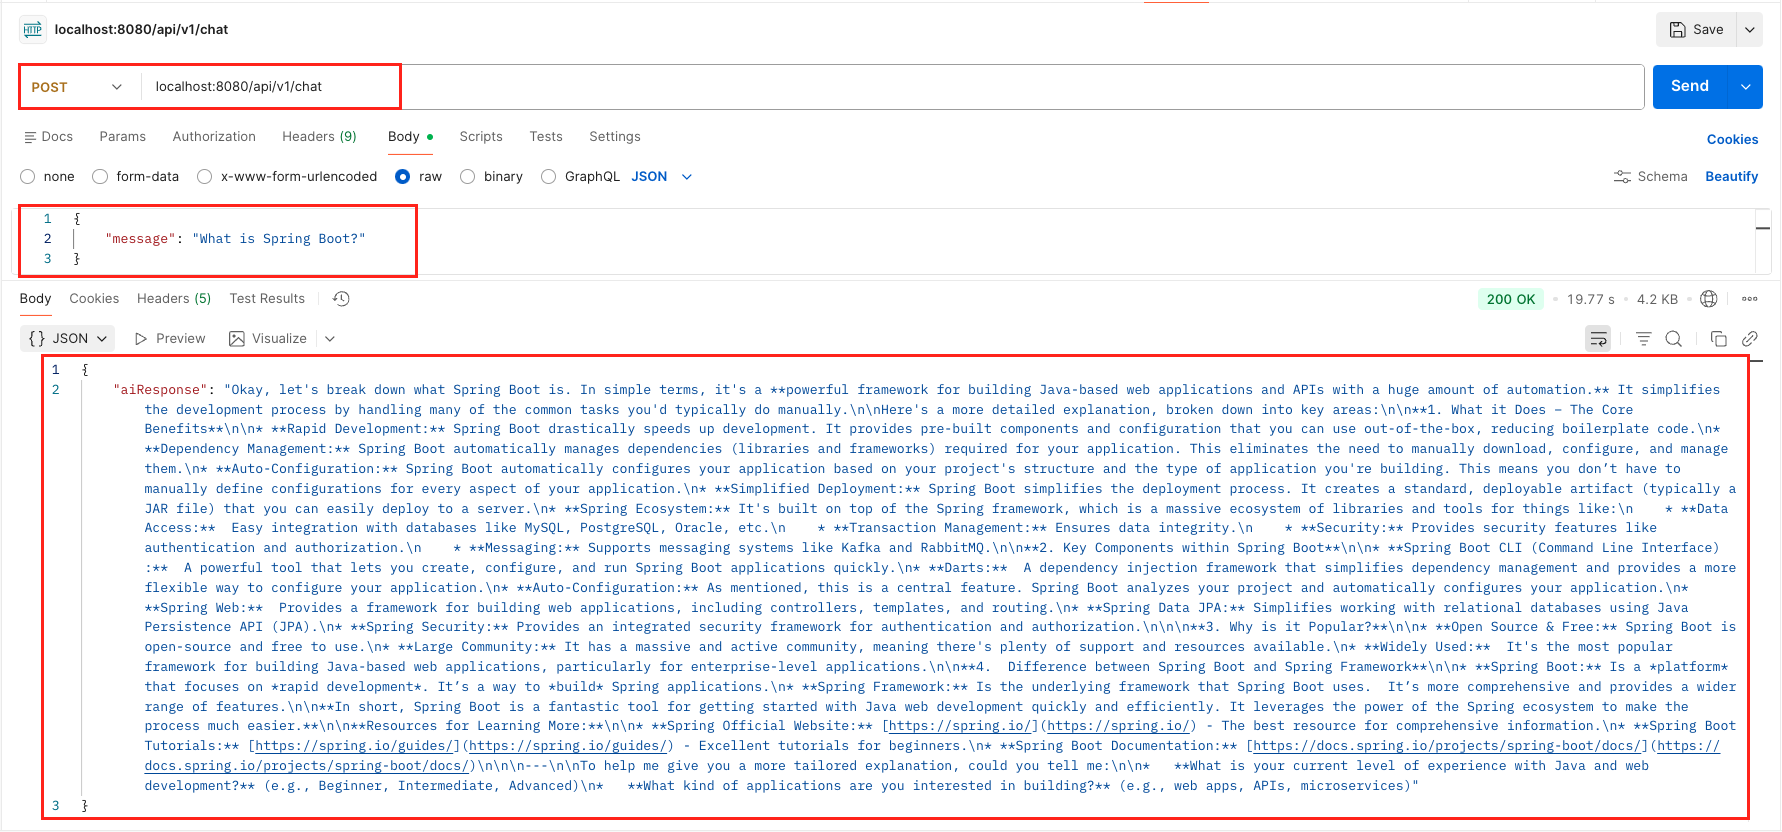
mvn spring-boot:run - Send a Request: Use Postman or cURL:
curl -X POST http://localhost:8080/api/v1/chat \
  -H "Content-Type: application/json" \
  -d '{
    "message": "What is Spring Boot?"
  }'
Output:
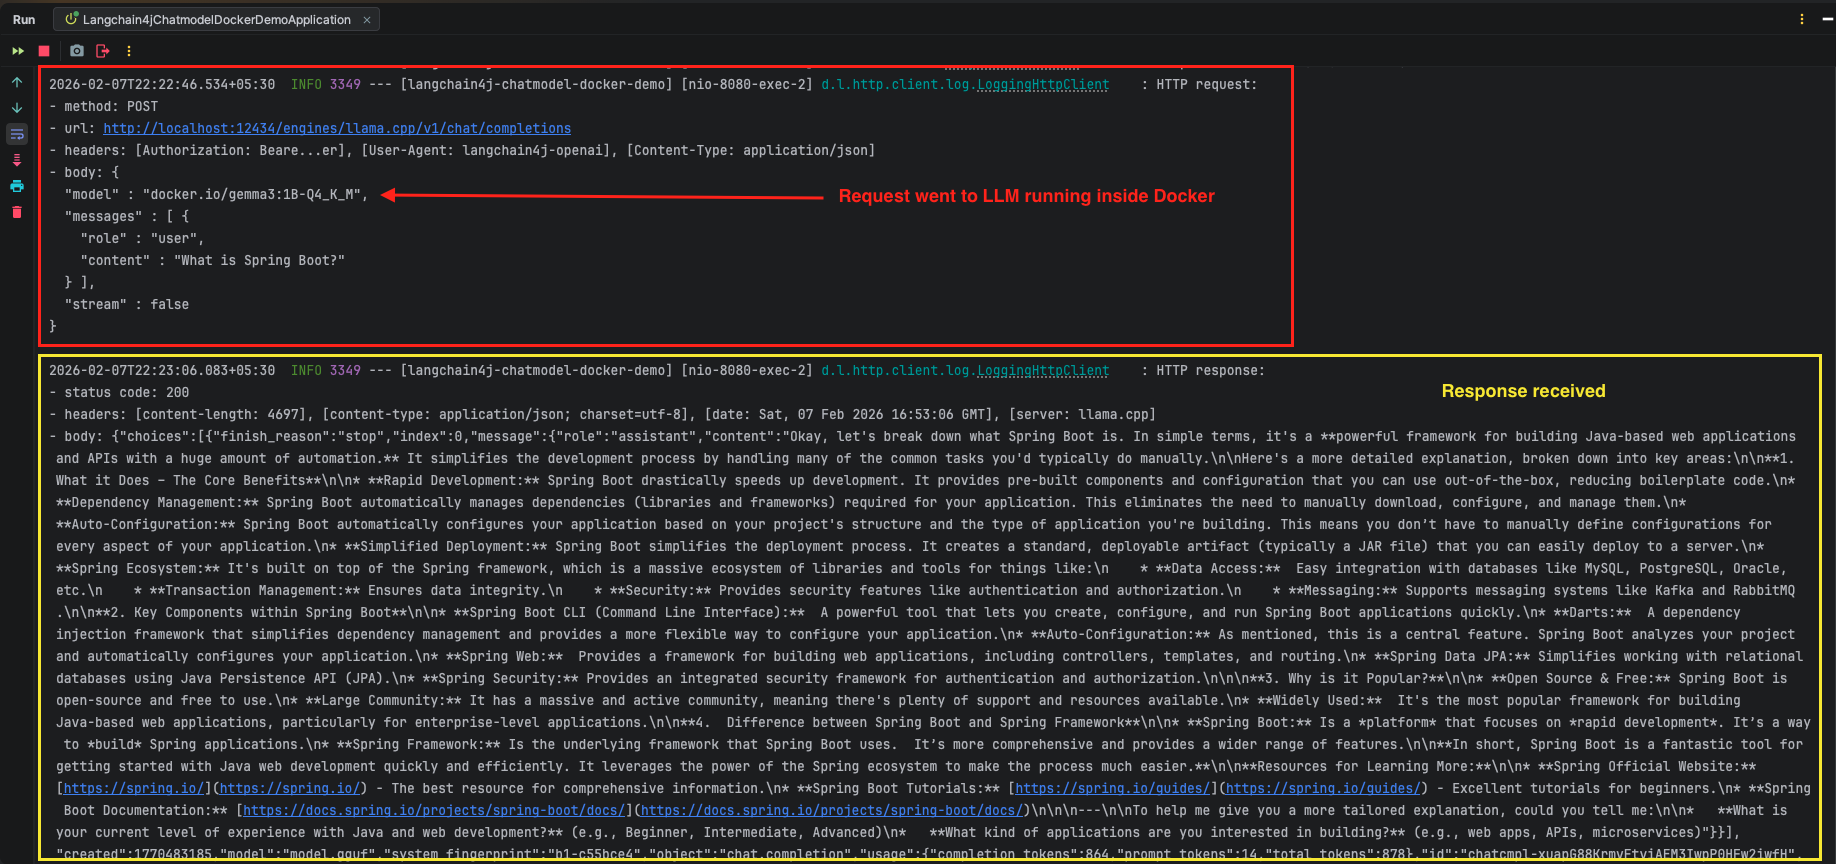
Important: This first request might take 15-30 seconds because:
- Docker Model Runner detects the request
- Loads the Gemma 3 model into memory (if not already loaded)
- Initializes the inference engine
- Processes your question
- Returns the response
9. Video Tutorial
For a complete step-by-step walkthrough, check out our video tutorial where we connect LangChain4j to a local LLM running in Docker from scratch. We demonstrate how to enable the Docker Model Runner, download the gemma3 model, and configure LangChain4j to communicate directly with your machine instead of the cloud!
📺 Watch on YouTube:
10. Source Code
The full source code for our LangChain4j ChatModel Docker Demo project is available on GitHub. Clone the repo, ensure your Docker Model Runner is active on port 12434, and launch the application to start chatting with your local AI immediately!
🔗 LangChain4j ChatModel Docker Demo: https://github.com/BootcampToProd/langchain4j-chatmodel-docker-demo
11. Things to Consider
When connecting LangChain4j to a local LLM running in Docker, keep these important points in mind:
- Model Size and Performance: Smaller models like Gemma 3 1B are fast but less capable than larger models. Choose based on your use case and available system resources.
- Memory Requirements: LLMs require significant RAM. Ensure your Docker Desktop has enough memory allocated. Check Docker Desktop Settings > Resources > Memory to adjust allocation.
- Host-Side TCP Support is Critical: Without enabling this setting, your application cannot communicate with Docker models. If you’re getting errors, double-check that host-side TCP support is enabled in Docker Desktop settings.
- First Request Latency: Always account for cold start time (10-30 seconds) when the model first loads. For production applications, consider sending a “warmup” request when your application starts to pre-load the model.
- Model Timeout Period: After inactivity (typically 5 minutes), Docker unloads the model to free memory. Your next request will experience cold start latency again.
- API Key Validation: Even though we use a placeholder API key, don’t remove the property entirely. LangChain4j’s validation requires it to be present.
- Model Updates: When you update or change models in Docker Desktop, remember to update the
model-nameproperty in your application.yml to match exactly. - Port Conflicts: If port 12434 is already occupied by another application, Docker Model Runner will not start correctly. In such cases, configure Docker Model Runner to use a different available port.
12. FAQs
Can I use other models besides Gemma?
Absolutely! Docker Desktop supports various models including GPT OSS, Llama, Phi, Mistral, Kimi, GLM, and others. Just download your preferred model from the Models section and update the model-name property to match the model identifier.
Do I need internet connectivity to run this?
Once you’ve downloaded the model, you can run completely offline. The initial model download requires internet, but afterwards, everything runs locally without any external network dependencies.
Why use the OpenAI starter for a local model?
Docker Model Runner exposes an OpenAI-compatible API, which means we can reuse the same integration code. This makes switching between local and cloud providers seamless – just change the base URL and API key!
How do I switch from local to cloud OpenAI?
Simply change the base-url to OpenAI’s endpoint (https://api.openai.com/v1) and provide your actual OpenAI API key. The rest of your code remains unchanged – that’s the power of LangChain4j’s abstraction!
Why does my first request take so long?
This is the cold start time where Docker loads the model from disk into RAM. Once loaded, the model stays in memory (typically for 5 minutes of inactivity), and subsequent requests are much faster. This is normal behavior for on-demand model loading.
How do I check if a model is currently loaded in memory?
Simply run docker model ps in your terminal. This command lists the active model name, the backend (like llama.cpp), and when it was last used by your application.
How do I manually unload a model to free up RAM?
You can unload a specific model by running docker model unload <model-name> (e.g., docker model unload gemma3:1B-Q4_K_M). Alternatively, run docker model unload --all to immediately stop all running models and clear the memory.
13. Conclusion
By integrating LangChain4j with Docker’s Local LLM, you have effectively created a zero-cost, private AI development environment. You are no longer dependent on cloud providers, API credits, or internet connectivity to build and test intelligent Java applications. This setup is more than just a cool trick; it creates a powerful “sandbox” where you can prototype freely. Since LangChain4j abstracts the underlying complexity, the code you wrote today for a local 1B model will work almost seamlessly if you decide to switch to OpenAI in production later. You now have the best of both worlds: local control for development and cloud compatibility for deployment.
14. Learn More
Interested in learning more?
LangChain4j ChatModel Listeners: A Complete Guide
Add a Comment