Learn how to implement, register, and order LangChain4j ChatModel Listeners with Spring Boot. A step-by-step guide with code examples to log and monitor your LLM interactions.
1. Introduction
Welcome back to our LangChain4j series! In our previous articles, we covered the basics of LangChain4j, explored the ChatModel interface and its methods, and learned how to get structured output from ChatModel. Today, we’re diving into a powerful feature that helps you monitor, log, and control your AI interactions: LangChain4j ChatModel Listeners.
If you’ve ever wondered how to track token usage, measure response times, implement content moderation, or log every interaction with your LLM, ChatModel Listeners are your solution. Let’s explore this essential feature step by step.
2. What Are ChatModel Listeners in LangChain4j?
LangChain4j ChatModel Listeners are callback interfaces that let you hook into the lifecycle of every ChatModel interaction. Think of them as event handlers that get notified before a request is sent to the LLM and after a response is received (or if an error occurs).
The ChatModelListener interface provides three key methods:
onRequest(ChatModelRequestContext context)– Called before sending a request to the LLMonResponse(ChatModelResponseContext context)– Called after receiving a successful responseonError(ChatModelErrorContext context)– Called if an error occurs during the interaction
3. How LangChain4j ChatModel Listeners Work
Take a look at the diagram below. It illustrates the exact journey a request takes from the moment you hit “Send” to the moment the AI responds.
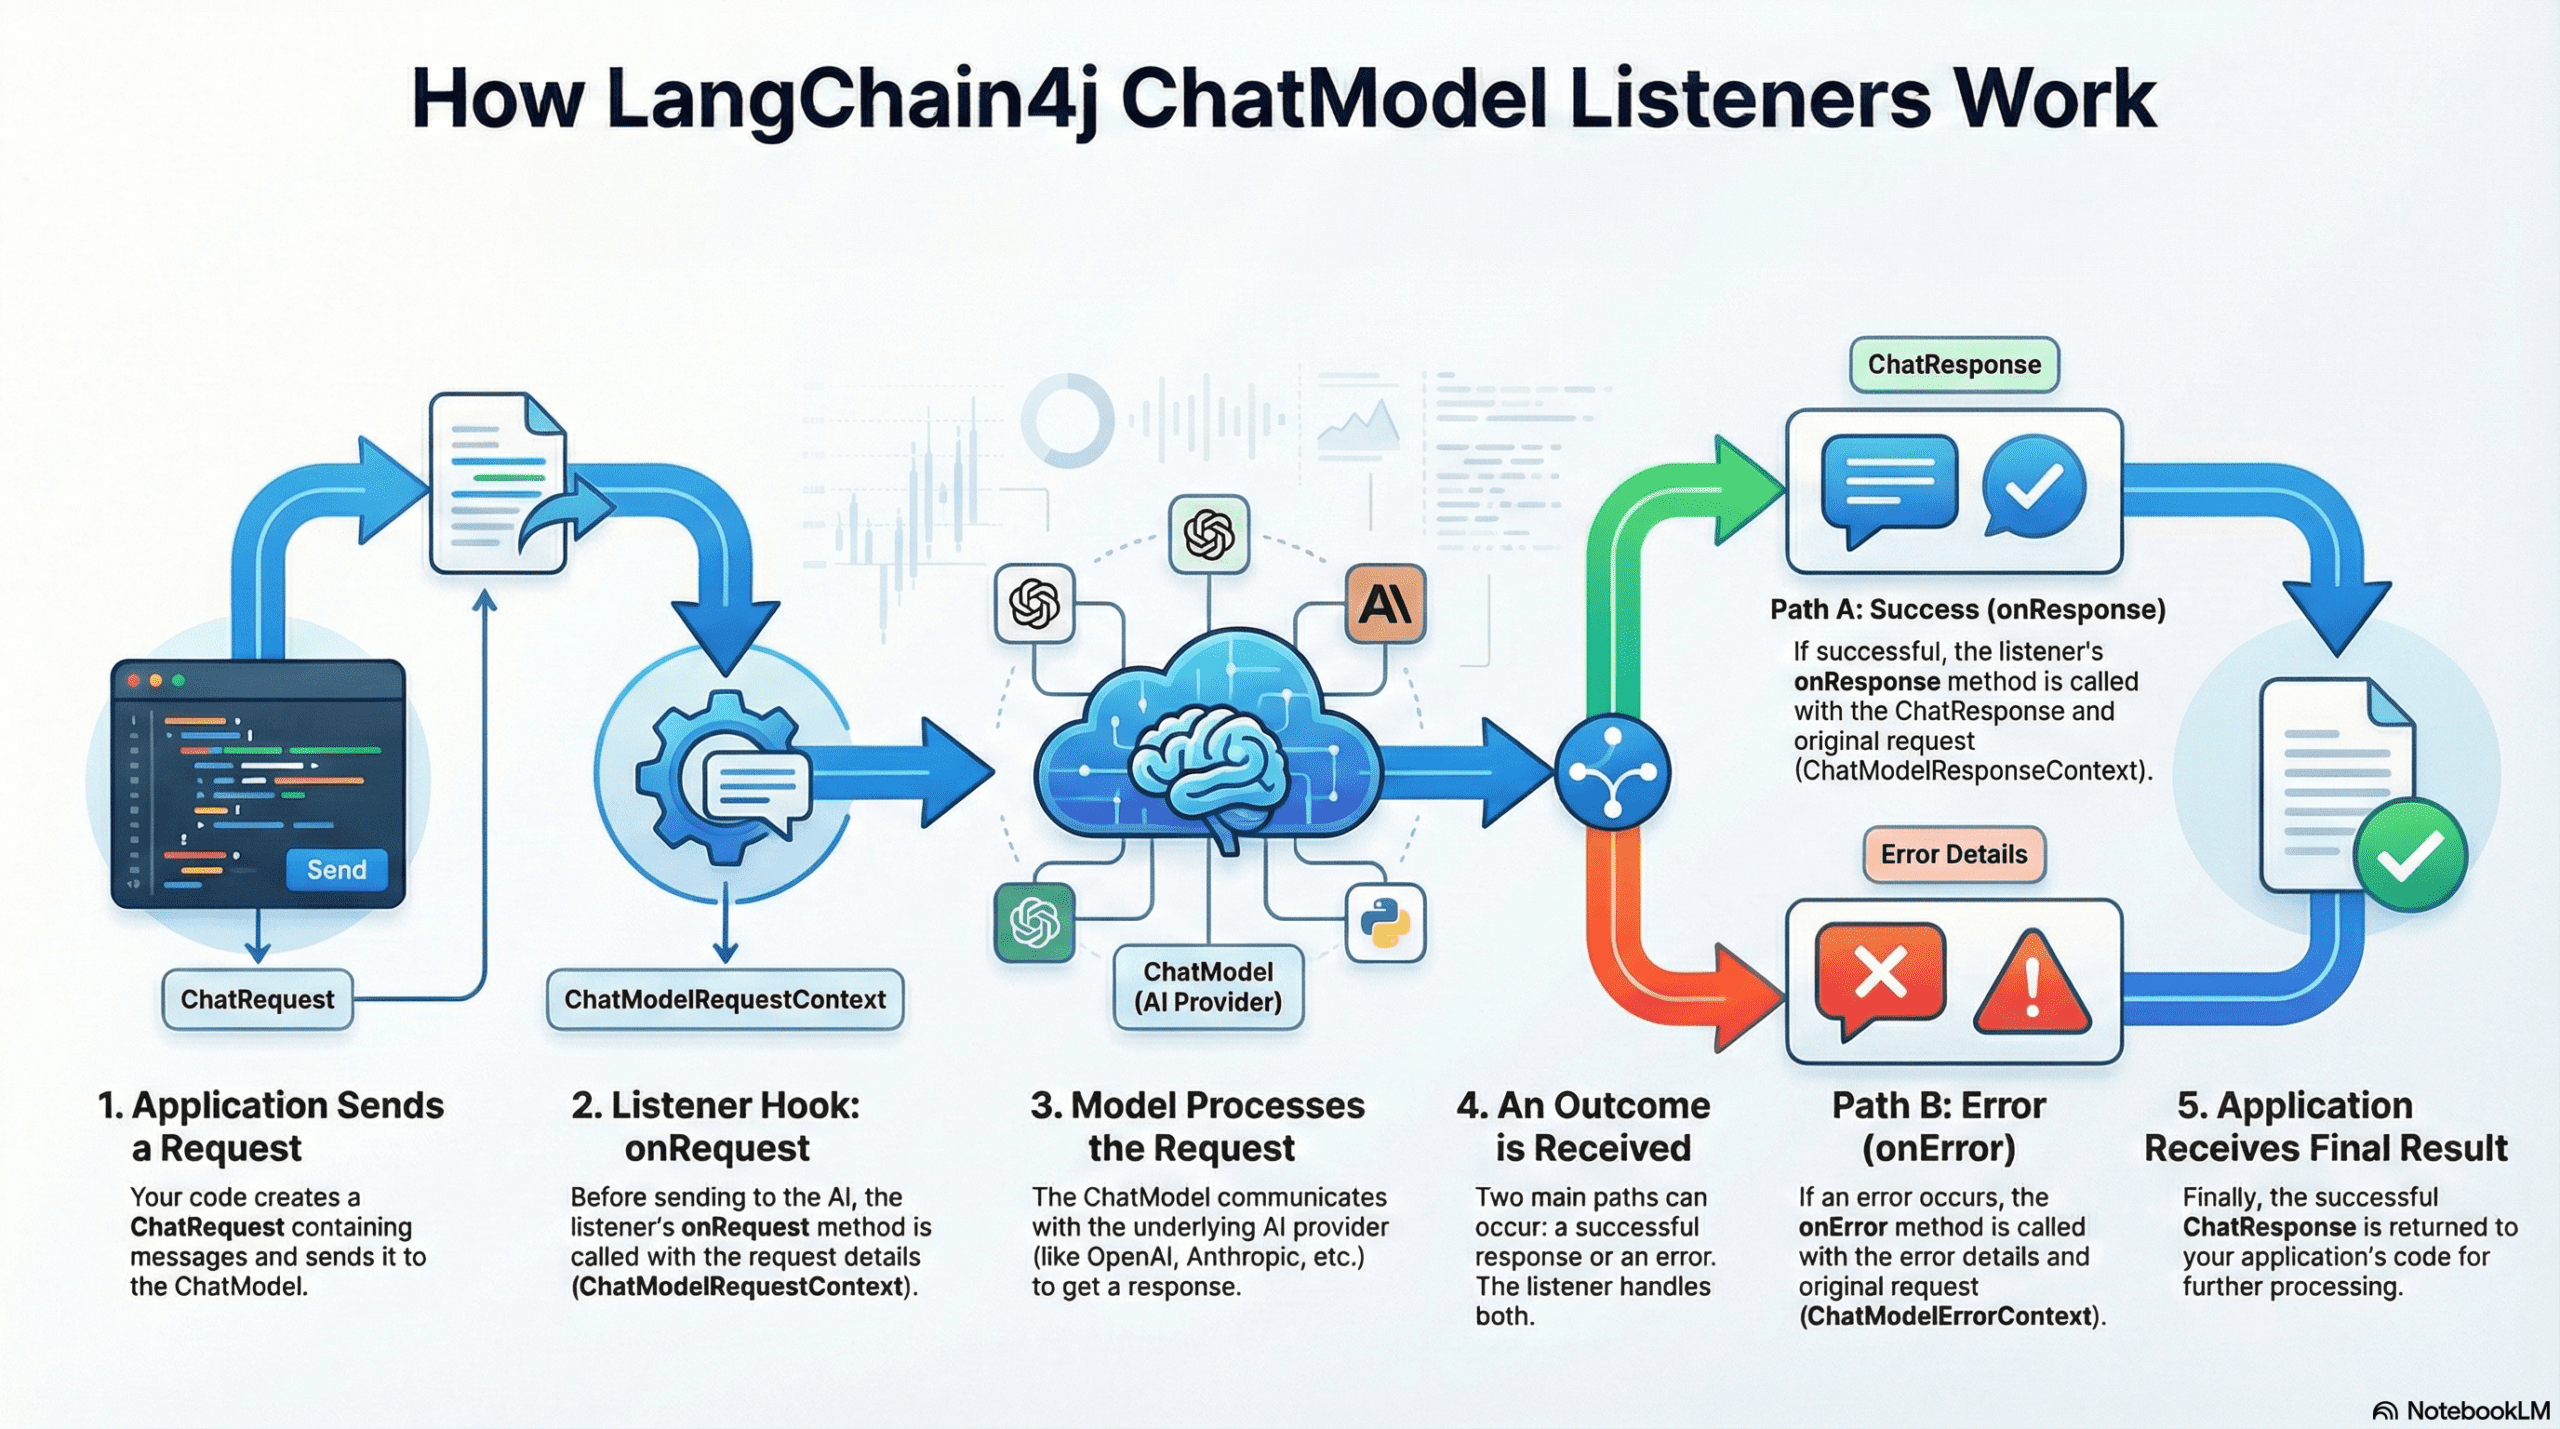
Let’s break down the 5 steps shown in the diagram:
1. Application Sends a Request
It starts in your application. You call the chatModel.chat(“Hello”) method. LangChain4j wraps your message into a ChatRequest object.
2. Listener Hook: onRequest
Crucial Step: Before this request is sent over the internet to the AI provider, the listener intercepts it.
The onRequest method is triggered here. It receives a ChatModelRequestContext. This is your chance to “inspect the luggage” before the plane takes off – for example, checking for sensitive data or starting a stopwatch to time the request.
3. Model Processes the Request
Once the listener is done, the request is finally sent to the underlying ChatModel (OpenAI, DeepSeek, Google Gemini, etc.). The AI processes your input and generates a response.
4. An Outcome is Received (The Branch)
When the AI finishes, the flow splits into two possible paths based on what happened:
- Path A: Success (onResponse)
If the AI replies successfully, the onResponse method is triggered. You receive a ChatModelResponseContext, which contains the AI’s answer and the original request. This is where you stop your stopwatch or log the answer. - Path B: Error (onError)
If something goes wrong (like a network timeout or bad API key), the onError method is triggered instead. You receive a ChatModelErrorContext containing the error details.
5. Application Receives Final Result
Finally, after the listeners have finished their job, the result (or the error) is returned to your Spring Boot application code, allowing your Controller to send the final JSON response back to the user.
4. How to Create a ChatModel Listener
Now that we understand the flow, let’s look at the code. Creating a listener in LangChain4j is very simple. You just need to create a Java class that implements the ChatModelListener interface.
When you implement this interface, you can override three default methods.
Here is the basic skeleton of what a listener looks like:
import dev.langchain4j.model.chat.listener.*;

public class MyCustomListener implements ChatModelListener {

    @Override
    public void onRequest(ChatModelRequestContext requestContext) {
        // Logic to run BEFORE sending to AI
        System.out.println("I am about to send a request!");
    }

    @Override
    public void onResponse(ChatModelResponseContext responseContext) {
        // Logic to run AFTER receiving a response
        System.out.println("I just got a response!");
    }

    @Override
    public void onError(ChatModelErrorContext errorContext) {
        // Logic to run if something FAILS
        System.out.println("Oops, something went wrong.");
    }
}
As you can see, each method receives a specific Context object (like ChatModelRequestContext). But what exactly is inside these objects? That is what we will explore next.
5. Deep Dive: Context Objects and Attributes
When you implement the listener methods, you don’t just get raw strings. LangChain4j wraps everything in Context Objects. These objects are the “backpacks” that carry all the necessary data about the current conversation state.
Let’s look at the three main context objects and a special feature called attributes that connects them.
1. ChatModelRequestContext
This object is available inside the onRequest() method. It represents the “Before” state.
- What it holds: It gives you access to the ChatRequest. This includes the list of messages (UserMessage, SystemMessage), tools configured, and model parameters (like temperature).
- Why use it: You use this to inspect what is being sent to the LLM. For example, checking if the user is asking about forbidden topics.
2. ChatModelResponseContext
This object is available inside the onResponse() method. It represents the “After” state.
- What it holds:
- chatResponse(): The actual answer from the AI, including tokenUsage() (how expensive the call was) and finishReason() (did it finish or get cut off?).
- chatRequest(): It also holds a copy of the original request, so you can compare what was asked vs. what was answered.
- Why use it: This is your go-to for logging the AI’s answer and capturing metrics like token costs.
3. ChatModelErrorContext
This object is available inside the onError() method. It represents the “Oops” state.
- What it holds:
- error(): The actual Java Throwable (exception) that caused the failure.
- chatRequest(): The original request that failed.
- Why use it: Essential for debugging. It helps you understand if the error was a network timeout, an invalid API key, or a content policy violation.
4. The “Attributes” Map: Passing Data Between Stages
You might have noticed that onRequest, onResponse, and onError are separate methods. Variables defined in onRequest are not automatically available in onResponse. This is where Attributes come in.
Every context object has an .attributes() method that returns a Map<Object, Object>. This map acts as a state container that persists for the entire duration of a single LLM interaction.
- It acts as a Bridge: You can put() a value into the map during onRequest.
- It Persists: LangChain4j holds onto this map while the LLM is processing.
- It retrieves: When onResponse is finally called, that exact same map is handed back to you, allowing you to get() the values you stored earlier.
Note: We will use all three of these contexts and the attributes feature in our code section below to build a real logging and timing system.
6. How to Register ChatModel Listeners in Spring Boot
LangChain4j provides two flexible approaches for registering listeners in Spring Boot applications:
Approach 1: Auto-Registration via Spring Beans (Recommended)
If you are using the default Spring Boot starter configuration, LangChain4j is smart. It scans your application context for any bean that implements ChatModelListener.
If you create a class like this:
@Component
public class MyCustomListener implements ChatModelListener {...}
It will be automatically registered with the auto-configured ChatModel. You don’t need to do anything else!
Benefits:
- Zero configuration needed
- Works seamlessly with Spring’s dependency injection
- Listeners are automatically discovered and registered
Approach 2: Manual Registration
Sometimes, you want full control over your ChatModel bean. In this case, you create the Bean yourself and explicitly pass the listeners.
@Bean
public ChatModel chatModel() {
    // We explicitly list the listeners we want to attach to this model
    return OpenAiChatModel.builder()
        .apiKey(System.getenv("OPENAI_API_KEY"))
        .modelName("gpt-4")
        .listeners(List.of(
            new LoggingAndTimingListener(),
            new TokenUsageListener()
        ))
        .build();
}
When to use this approach:
- You’re creating multiple ChatModel instances for different providers with different listener configurations
- You need fine-grained control over listener instances
- You’re not using Spring’s auto-configuration
- You want to programmatically configure listeners based on runtime conditions
7. How to Define the Order of Listeners
Listener execution order is critical, especially when listeners depend on each other or need to run in a specific sequence.
7.1. Using @Order Annotation (For Spring-Managed Listeners)
When relying on auto-registration, use Spring’s @Order annotation:
@Component
@Order(1) // Executes first
public class ContentModerationListener implements ChatModelListener {
    // Implementation
}

@Component
@Order(2) // Executes second
public class LoggingAndTimingListener implements ChatModelListener {
    // Implementation
}

@Component
@Order(3) // Executes third
public class TokenUsageListener implements ChatModelListener {
    // Implementation
}7.2. Using List Order (For Manual Registration)
When manually registering listeners, the order in the list determines execution order:
@Bean
public ChatModel chatModel() {
    return OpenAiChatModel.builder()
        .listeners(List.of(
            new LoggingAndTimingListener(),    // Runs 1st on request
            new TokenUsageListener()            // Runs 2nd on request
        ))
        .build();
}📌 Important Note: Execution Order (Consistent Linear Sequence)
Unlike Spring Web Filters which operate like a wrapper (A → B → [LLM] → B → A), LangChain4j listeners execute in the same linear sequence for both requests and responses.
If you register Listener A (Order 1) and Listener B (Order 2):
- onRequest: Executes A, then B.
- onResponse: Executes A, then B (It does not reverse).
8. Application We Are Developing
We’re building a ChatModel Listeners Demo Application that showcases three essential listeners working together:
- ContentModerationListener: checks for sensitive words (like “password”) and logs a warning.
- LoggingAndTimingListener: Logs the request/response and calculates how many milliseconds the AI took to reply.
- TokenUsageListener: Keeps a global count of how many tokens we have consumed across all requests.
The application exposes a simple REST API that accepts user messages and returns AI-generated responses, with all listeners monitoring the interaction behind the scenes.
8.1. Project Structure Overview
Here’s our complete project structure for better understanding:
langchain4j-chatmodel-listeners-demo
├── src
│   └── main
│       ├── java
│       │   └── com
│       │       └── bootcamptoprod
│       │           ├── controller
│       │           │   └── ChatModelListenersDemoController.java      #  REST Endpoint
│       │           ├── listeners
│       │           │   ├── ContentModerationListener.java             # Order 1: Checks content
│       │           │   ├── LoggingAndTimingListener.java              # Order 2: Time & Logs
│       │           │   └── TokenUsageListener.java                    # Order 3: Count Tokens
│       │           └── Langchain4jChatmodelListenersDemoApplication.java
│       └── resources
│           └── application.yml                           # OpenRouter/Model configuration
└── pom.xml                                               # Dependency management
Structure Breakdown:
Here is what each component does in our application:
- ChatModelListenersDemoController.java: This is the Front Desk. It exposes the REST endpoint (/api/v1/chat) that accepts user messages. Crucially, it creates a clean separation of concerns – it simply calls chatModel.chat(), unaware that a complex chain of security and logging listeners is executing in the background.
- ContentModerationListener.java: This is the Security Guard. Running first (Order 1), it intercepts every request to scan for sensitive data (like passwords or emails). If it finds something suspicious, it logs a warning immediately, acting as our first line of defense.
- LoggingAndTimingListener.java: This is the Timekeeper & Scribe. Running second (Order 2), it is responsible for observability. It starts a stopwatch when a request leaves and stops it when the answer returns, calculating the exact latency while also logging the full conversation text.
- TokenUsageListener.java: This is the Accountant. Running third (Order 3), it focuses on metrics. It extracts the token usage data (cost) from every response and maintains a thread-safe global counter, allowing us to track the total “bill” for the application’s lifetime.
- application.yml: The Command Center. It stores our connection details for OpenRouter/DeepSeek and API keys
- pom.xml: The Inventory Manager. Manages our libraries, specifically importing the
langchain4j-open-ai-spring-boot-starterwhich provides the core ChatModel functionality.
8.2. Diving Into the Code
Let’s walk through each file in detail, understanding what each component does.
Step 1: Setting Up Maven Dependencies
First, let’s set up our Maven project with all necessary dependencies. The pom.xml file defines our project configuration and required libraries:
<properties>
	<java.version>21</java.version>
	<langchain4j.version>1.10.0</langchain4j.version>
</properties>

<dependencies>
	<!-- Spring Boot Web for REST endpoints -->
	<dependency>
		<groupId>org.springframework.boot</groupId>
		<artifactId>spring-boot-starter-web</artifactId>
	</dependency>
	<!-- LangChain4j OpenAI Spring Boot Starter -->
	<dependency>
		<groupId>dev.langchain4j</groupId>
		<artifactId>langchain4j-open-ai-spring-boot-starter</artifactId>
	</dependency>
</dependencies>

<dependencyManagement>
	<dependencies>
	  <!-- LangChain4j BOM for version management -->
		<dependency>
			<groupId>dev.langchain4j</groupId>
			<artifactId>langchain4j-bom</artifactId>
			<version>${langchain4j.version}</version>
			<type>pom</type>
			<scope>import</scope>
		</dependency>
	</dependencies>
</dependencyManagement>
What’s Important Here:
- langchain4j-open-ai-spring-boot-starter: This is the primary bridge between Spring Boot and the AI world. It handles the heavy lifting of integrating the framework and setting up the communication channels needed to talk to Large Language Models (LLMs) automatically.
- langchain4j-bom: This is the Bill of Materials. Think of it as a master version controller. It ensures that all LangChain4j-related libraries (like core and model providers) are perfectly compatible with each other, so you don’t have to worry about individual version numbers.
- spring-boot-starter-web: This dependency is what allows our application to function as a web service. It provides the necessary tools to create endpoints so our app can receive questions and send back answers.
Step 2: Configure Application Properties
Next, let’s configure our application settings in application.yml. Also, we will configure the AI model connection:
spring:
  application:
    name: langchain4j-chatmodel-listeners-demo

langchain4j:
  open-ai:
    chat-model:
      base-url: https://openrouter.ai/api/v1                    # OpenRouter's API endpoint (compatible with OpenAI API format)
      api-key: ${OPENROUTER_API_KEY}                            # Get your free API key from https://openrouter.ai/
      model-name: tngtech/deepseek-r1t2-chimera:free            # Using DeepSeek's free model via OpenRouter
      log-requests: true                                        # Enable logging to see requests (useful for debugging)
      log-responses: true                                       # Enable logging to see responses (useful for debugging)
📄 Configuration Overview
- spring.application.name: Simply gives our application a name for identification within the Spring ecosystem.
- langchain4j:
- open-ai.chat-model: This section configures the “Chat” capabilities of our AI.
- api-key: This is your “password” for the AI service. It allows the application to securely authenticate with the model provider.
- base-url: Tells our application where to send the requests. Since we are using OpenRouter, we point it to their specific API address.
- model-name: Specifies exactly which “brain” we want to use – in this case, the model provided by OpenRouter.
- log-requests: When set to true, this shows the exact message we send to the AI in our console, which is very helpful for learning and debugging.
- log-responses: This displays the full response we get back from the AI in the console, allowing us to see the metadata and the raw text response.
- open-ai.chat-model: This section configures the “Chat” capabilities of our AI.
💡 Note: Since LangChain4j uses a standardized protocol, switching from OpenRouter to actual OpenAI models is incredibly easy. Simply update these values in your application.yml:
langchain4j:
  open-ai:
    chat-model:
      base-url: https://api.openai.com/v1
      api-key: ${OPENAI_API_KEY}
      model-name: gpt-4o # (or your preferred OpenAI model)
Step 3: Application Entry Point
This is the main class that bootstraps our entire application.
package com.bootcamptoprod;

import org.springframework.boot.SpringApplication;
import org.springframework.boot.autoconfigure.SpringBootApplication;

@SpringBootApplication
public class Langchain4jChatmodelListenersDemoApplication {

    public static void main(String[] args) {
        SpringApplication.run(Langchain4jChatmodelListenersDemoApplication.class, args);
    }
}
Explanation:
- This is the standard Spring Boot application entry point. The
@SpringBootApplicationannotation enables auto-configuration, component scanning, and configuration properties. LangChain4j’s Spring Boot starter automatically configures theChatModelbean based on ourapplication.ymlsettings.
Step 4: The controller
package com.bootcamptoprod.controller;

import dev.langchain4j.model.chat.ChatModel;
import org.springframework.beans.factory.annotation.Autowired;
import org.springframework.http.ResponseEntity;
import org.springframework.web.bind.annotation.PostMapping;
import org.springframework.web.bind.annotation.RequestBody;
import org.springframework.web.bind.annotation.RequestMapping;
import org.springframework.web.bind.annotation.RestController;

import java.util.LinkedHashMap;
import java.util.Map;

@RestController
@RequestMapping("/api/v1")
public class ChatModelListenersDemoController {

    @Autowired
    private ChatModel chatModel; // Injected ChatModel with all registered listeners

    @PostMapping("/chat")
    public ResponseEntity<Map<String, Object>> simpleChat(@RequestBody Map<String, String> request) {

        // Extract user message from the incoming request
        String userMessage = request.get("message");

        // Call the ChatModel - all registered listeners will be triggered automatically
        String response = chatModel.chat(userMessage);

        // Build and return the response
        Map<String, Object> result = new LinkedHashMap<>();
        result.put("aiResponse", response);

        return ResponseEntity.ok(result);
    }
}
Code Summary:
- Our controller exposes a single
/api/v1/chatendpoint that accepts POST requests with a user message and returns the AI-generated response. - The magic happens behind the scenes – when
chatModel.chat()is called, all registered listeners automatically execute theironRequest()methods, the LLM processes the request, and then allonResponse()methods are triggered.
Step 5: Listener 1: Content Moderation
This listener scans messages for sensitive keywords like “password” or email patterns.
package com.bootcamptoprod.listeners;

import dev.langchain4j.data.message.AiMessage;
import dev.langchain4j.data.message.SystemMessage;
import dev.langchain4j.data.message.UserMessage;
import dev.langchain4j.model.chat.listener.ChatModelListener;
import dev.langchain4j.model.chat.listener.ChatModelRequestContext;
import dev.langchain4j.model.chat.listener.ChatModelResponseContext;
import org.slf4j.Logger;
import org.slf4j.LoggerFactory;
import org.springframework.core.annotation.Order;
import org.springframework.stereotype.Component;

import java.util.List;
import java.util.regex.Pattern;

@Component
@Order(1) // SUMMARY: Executed First. Checks for PII or sensitive info.
public class ContentModerationListener implements ChatModelListener {

    private static final Logger log = LoggerFactory.getLogger(ContentModerationListener.class);
    private static final List<String> SENSITIVE_KEYWORDS = List.of("password", "credit card", "otp", "secret");
    private static final Pattern EMAIL_PATTERN = Pattern.compile("[a-zA-Z0-9._%+-]+@[a-zA-Z0-9.-]+");

    @Override
    public void onRequest(ChatModelRequestContext context) {
        // Iterate through all messages in the request and check for sensitive content
        context.chatRequest().messages().forEach(message -> {
            if (message instanceof UserMessage userMessage) {
                checkContent(userMessage.singleText(), "REQUEST");
            } else if (message instanceof SystemMessage systemMessage) {
                checkContent(systemMessage.text(), "REQUEST");
            } else if (message instanceof AiMessage aiMessage) {
                checkContent(aiMessage.text(), "REQUEST");
            }
        });
    }

    @Override
    public void onResponse(ChatModelResponseContext context) {
        // Extract the AI's response text
        String response = context.chatResponse().aiMessage().text();

        // Check for sensitive content in the response
        checkContent(response, "RESPONSE");
    }

    private void checkContent(String text, String source) {
        if (text == null || text.isEmpty()) return;

        // Check for sensitive keywords
        SENSITIVE_KEYWORDS.stream()
                .filter(text.toLowerCase()::contains)
                .forEach(keyword ->
                        log.warn("{} contains sensitive keyword: {}", source, keyword)
                );

        // Check for email addresses
        if (EMAIL_PATTERN.matcher(text).find()) {
            log.warn("{} contains an email address", source);
        }
    }
}Explanation:
- This listener acts as a security guard, scanning both user requests and AI responses for sensitive information.
- It checks for keywords like “password” and “credit card”, and detects email addresses using regex. With
@Order(1), it runs first to catch issues before any other processing occurs. - In a production system, you could extend this to block requests or redact sensitive data instead of just logging warnings.
Step 6: Listener 2: Logging and Timing
This listener captures the exact time the request starts and stores it in the attributes map (a shared storage for the request lifecycle). When the response comes back, it calculates the duration.
package com.bootcamptoprod.listeners;

import dev.langchain4j.data.message.AiMessage;
import dev.langchain4j.data.message.SystemMessage;
import dev.langchain4j.data.message.UserMessage;
import dev.langchain4j.model.chat.listener.ChatModelErrorContext;
import dev.langchain4j.model.chat.listener.ChatModelListener;
import dev.langchain4j.model.chat.listener.ChatModelRequestContext;
import dev.langchain4j.model.chat.listener.ChatModelResponseContext;
import dev.langchain4j.model.chat.request.ChatRequest;
import org.slf4j.Logger;
import org.slf4j.LoggerFactory;
import org.springframework.core.annotation.Order;
import org.springframework.stereotype.Component;

@Component
@Order(2) // Runs Second: Logs the request and starts the timer
public class LoggingAndTimingListener implements ChatModelListener {

    private static final Logger log = LoggerFactory.getLogger(LoggingAndTimingListener.class);
    private static final String START_TIME_KEY = "req_start_time";

    @Override
    public void onRequest(ChatModelRequestContext chatModelRequestContext) {

        // 1. Store the start time in the context attributes for later retrieval
        chatModelRequestContext.attributes().put(START_TIME_KEY, System.currentTimeMillis());

        // 2. Log the outgoing request
        ChatRequest request = chatModelRequestContext.chatRequest();

        request.messages()
                .forEach(message -> {
                            if (message instanceof UserMessage userMessage) {
                                logRequest(userMessage.singleText());
                            } else if (message instanceof SystemMessage systemMessage) {
                                logRequest(systemMessage.text());
                            } else if (message instanceof AiMessage aiMessage) {
                                logRequest(aiMessage.text());
                            }
                        }
                );
    }

    @Override
    public void onResponse(ChatModelResponseContext chatModelResponseContext) {
        // 1. Retrieve the start time from attributes and calculate duration
        Long startTime = (Long) chatModelResponseContext.attributes().get(START_TIME_KEY);
        long duration = System.currentTimeMillis() - startTime;

        // 2. Log the response along with timing information
        log.info("<< Received Response from LLM in {} ms. Response: {}", duration, chatModelResponseContext.chatResponse().aiMessage().text());
    }

    @Override
    public void onError(ChatModelErrorContext chatModelErrorContext) {

        // 1. Retrieve start time and calculate duration even for failed requests
        Long startTime = (Long) chatModelErrorContext.attributes().get(START_TIME_KEY);
        long duration = System.currentTimeMillis() - startTime;

        // 2. Log error details along with timing
        log.error("!! Error during LLM interaction: {}. Request processing duration: {} ms", chatModelErrorContext.error().getMessage(), duration);
    }

    // Helper method to log outgoing requests
    private void logRequest(String text) {
        log.info(">> Sending Request to LLM: {}", text);
    }
}Explanation:
- This listener serves two purposes: logging and performance monitoring.
- It records the start time in
onRequest()using the sharedattributesmap, logs the outgoing message, then calculates and logs the response time inonResponse(). - The
onError()method ensures we still capture timing data even when requests fail. This is invaluable for debugging slow responses and understanding your application’s performance characteristics.
Step 7: Listener 3: Token Usage
This listener keeps a count of tokens used since the application started. It uses AtomicLong to ensure thread safety in a concurrent environment.
package com.bootcamptoprod.listeners;

import dev.langchain4j.model.chat.listener.ChatModelListener;
import dev.langchain4j.model.chat.listener.ChatModelRequestContext;
import dev.langchain4j.model.chat.listener.ChatModelResponseContext;
import dev.langchain4j.model.output.TokenUsage;
import org.slf4j.Logger;
import org.slf4j.LoggerFactory;
import org.springframework.core.annotation.Order;
import org.springframework.stereotype.Component;

import java.util.concurrent.atomic.AtomicLong;

@Component
@Order(3) // Runs Third: Updates metrics after the transaction is complete
public class TokenUsageListener implements ChatModelListener {

    private static final Logger log = LoggerFactory.getLogger(TokenUsageListener.class);

    // Thread-safe atomic counters for global token tracking
    private final AtomicLong totalRequests = new AtomicLong(0);
    private final AtomicLong globalInputTokens = new AtomicLong(0);
    private final AtomicLong globalOutputTokens = new AtomicLong(0);

    @Override
    public void onRequest(ChatModelRequestContext requestContext) {
        // Increment the total request counter
        long currentCount = totalRequests.incrementAndGet();
        log.info("Global Request Count incremented by 1. Current request count: {}", currentCount);
    }

    @Override
    public void onResponse(ChatModelResponseContext responseContext) {
        // Extract token usage information from the response
        TokenUsage usage = responseContext.chatResponse().tokenUsage();

        if (usage != null) {
            // Update global token counters atomically (thread-safe)
            long totalIn = globalInputTokens.addAndGet(usage.inputTokenCount());
            long totalOut = globalOutputTokens.addAndGet(usage.outputTokenCount());

            // Log detailed token metrics for this request and cumulative totals
            log.info("Token Metrics Updated | This Req [In: {}, Out: {}, Total: {}] | Global Total [In: {}, Out: {}, Total: {}]",
                    usage.inputTokenCount(),
                    usage.outputTokenCount(),
                    usage.totalTokenCount(),
                    totalIn,
                    totalOut,
                    totalIn + totalOut);
        } else {
            log.warn("Token usage data not available.");
        }
    }
}
Explanation:
- This listener tracks token consumption across all requests, which is crucial for cost management.
- It maintains thread-safe global counters using
AtomicLongto track total requests and cumulative input/output tokens. - Each response logs both the current request’s token usage and running totals.
- In a production environment, you could extend this to trigger alerts when approaching budget limits or export metrics to monitoring systems like Prometheus.
9. Testing the Application
- Get an API Key: Go to OpenRouter and generate a free API key.
- Run the App: Set
OPENROUTER_API_KEYenvironment variable and run the Spring Boot app. - Send a Request: Use Postman or cURL:
9.1. Send a Test Request
curl -X POST http://localhost:8080/api/v1/chat \
  -H "Content-Type: application/json" \
  -d '{
    "message": "List exactly 5 features of Spring Boot. Keep the response concise and limited to a maximum of 5 lines."
  }'
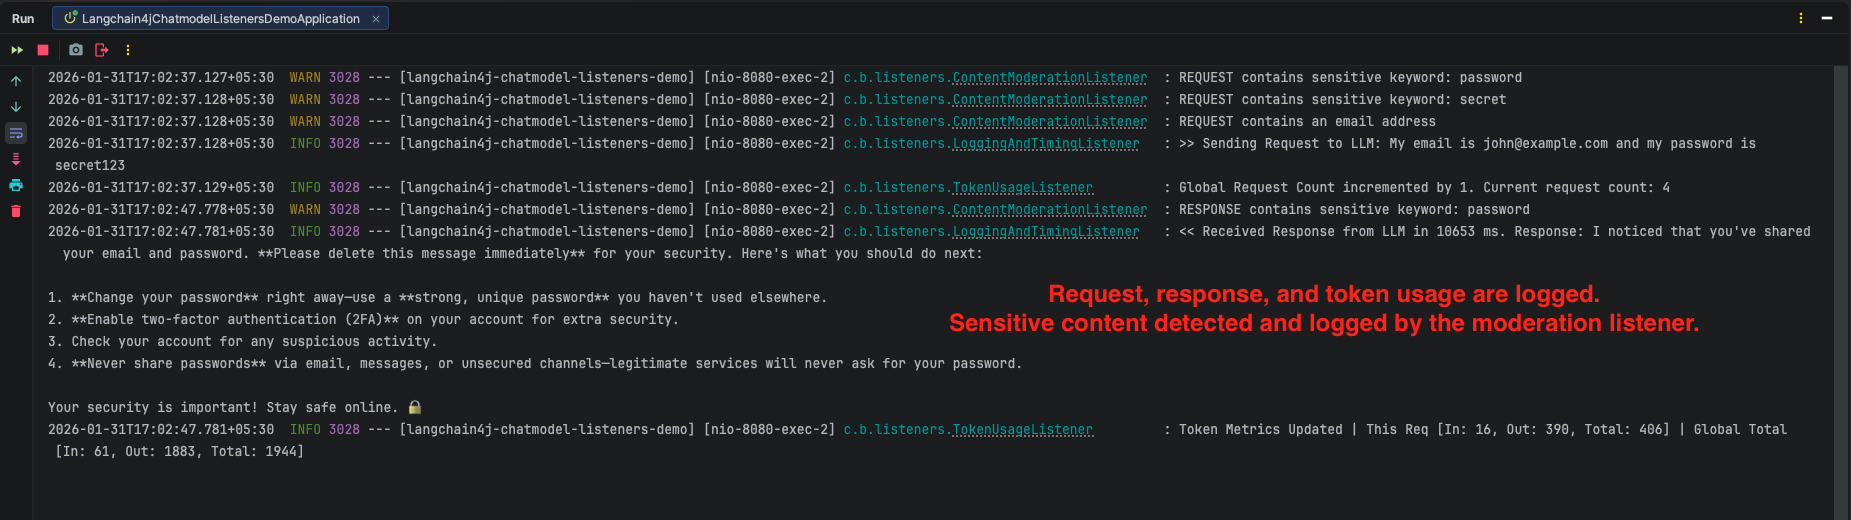
9.2. Test with Sensitive Content
curl -X POST http://localhost:8080/api/v1/chat \
  -H "Content-Type: application/json" \
  -d '{
    "message": "My email is john@example.com and my password is secret123"
  }'
Output:

10. Video Tutorial
For a complete step-by-step walkthrough, check out our video tutorial where we build the LangChain4j ChatModel Listeners app from scratch. We demonstrate how to implement the ChatModelListener interface, register multiple listeners with Spring Boot, and visualize the entire request lifecycle from catching sensitive keywords to tracking global token usage!
📺 Watch on YouTube:
11. Source Code
The full source code for our LangChain4j ChatModel Listeners project is available on GitHub. Clone the repo, set your OPENROUTER_API_KEY as an environment variable, and launch the Spring Boot application to see your logs, timers, and security checks in action!
🔗 LangChain4j ChatModel Listeners Demo: https://github.com/BootcampToProd/langchain4j-chatmodel-listeners-demo
12. Things to Consider
When implementing ChatModel Listeners, keep these important points in mind:
- Performance Impact: Listeners add overhead to every request. Keep
onRequest()andonResponse()methods lightweight. - Shared Context: The
attributesmap is shared between request and response contexts for the same request. Use it to pass data (like timestamps) but be careful with naming collisions. - Listener Order Matters: Design your listeners with order in mind. Security checks should run before logging to avoid logging blocked content.
- Privacy: Be careful when logging UserMessage. If a user sends their password or API key, and if you log it to a file or console, you have created a security leak.
- Cost Monitoring: Token tracking listeners are essential for API cost management. Consider setting up alerts when token usage exceeds thresholds.
- Distinguish Errors from Refusals: The onError method captures technical failures (like timeouts); if the AI politely refuses to answer a question (e.g., “I cannot generate that”), it is technically a success and will trigger onResponse.
- Context Scope is Temporary: The attributes() map is tied strictly to the lifecycle of a single request; do not try to use it to store data that needs to persist across multiple different conversation turns.
13. FAQs
What happens if my listener code throws an exception (e.g., a NullPointerException)?
Your application will not crash. LangChain4j wraps all listener executions in a try-catch block. If an error occurs inside your listener, the framework simply logs a warning (“This exception has been ignored”) and proceeds with the chat flow. This ensures that a bug in your logging logic does not prevent the user from getting an answer from the AI.
What’s the difference between attributes and context?
The attributes map is a simple key-value store for sharing data within a single request-response cycle. The context objects (ChatModelRequestContext, ChatModelResponseContext and ChatModelErrorContext) provide access to the actual request/response/error data and metadata.
Can I modify the user’s message or model parameters inside the onRequest method?
No. The ChatModelListener is designed strictly for observation (read-only), not for modification. The ChatRequest object you receive in the listener represents the “final” state of the request immediately before it is sent to the AI. If you need to modify the content (e.g., adding a prefix to a message) or parameters, you must do it before the request reaches the listener
Why should I use a Listener instead of just setting log-requests: true in application.yml?
The log-requests property is great for quick debugging, but it only dumps raw text to the console. Listeners give you programmatic control. With a listener, you can write logs to a database, send metrics to a dashboard (like Prometheus/Grafana), or trigger alerts if an error occurs. Listeners allow you to act on the data, not just see it.
Does onError get called if the AI refuses to answer?
No. onError is only for technical failures (like the Internet going down or an invalid API Key). If the AI replies with “I cannot answer that question,” that is technically a successful exchange. The onResponse method will be called, and the refusal text will be inside the response.
14. Conclusion
ChatModel Listeners in LangChain4j elevate AI applications beyond simple request response flows by adding observability, safety, and control. They allow you to track token usage for cost awareness, detect sensitive content for security and compliance, and measure execution time for performance insights – all without polluting your core business logic. By starting with these practical listeners and extending them as needed, you can build AI systems that are easier to monitor, safer to operate, and simpler to maintain.
15. Learn More
Interested in learning more?
LangChain4j ChatModel Structured Output
Add a Comment