Learn Embabel framework basics with this beginner-friendly guide. Discover GOAP planning, core concepts, and build your first AI agent.
1. Introduction
Have you ever wondered how to build intelligent applications that can think, plan, and execute tasks autonomously? Enter the Embabel framework – a powerful yet beginner-friendly solution that brings AI agent capabilities to your Spring Boot applications. In this comprehensive guide, we’ll explore what Embabel is, why it matters, and how you can build your first intelligent agent in minutes.
2. What is the Embabel Framework?
The Embabel framework is designed to simplify the creation of intelligent, goal-oriented AI agents on the JVM platform. Created by Rod Johnson, the original creator of the Spring Framework, Embabel brings a structured and type-safe approach to building AI agents. It’s built on top of Spring AI, leveraging the power of the Spring ecosystem to create a robust foundation for intelligent automation.
Think of it as a smart assistant builder for your Java applications. Instead of writing complex if-else logic or manually orchestrating AI calls, Embabel allows you to define goals and actions, and the framework intelligently plans the execution path using sophisticated planning algorithms.
3. What Problems Does Embabel Solve?
Integrating Large Language Models (LLMs) into applications is exciting, but it comes with a significant challenge, especially for business-critical systems: reliability.
❌ The “One Nine Problem” of Raw LLMs
Raw LLMs are incredibly powerful, but they aren’t always consistent. They are often about 90% accurate, which is called the “One Nine Problem.” For personal use, like asking a chatbot for a recipe, a 90% success rate is perfectly fine. If it makes a mistake, you can just ask again.
However, in a business context, a 90% success rate is a recipe for disaster. Imagine a complex business workflow with multiple steps, each relying on an LLM. If each step has a 1 in 10 chance of failing, the probability of the entire workflow completing successfully plummets. Using raw LLMs in the enterprise is like building a bridge that might fail 1 in 10 times — it’s simply unreliable.
✅ The Embabel Solution: Control and Reliability
Embabel is designed to solve this reliability problem by bringing structure and predictability to AI development. Instead of just sending a huge prompt to an LLM and hoping it does the right thing, Embabel takes a more engineered approach.
Here’s how Embabel tackles the issue:
- Deterministic Planning: Embabel doesn’t just “hope” the AI figures things out. It breaks down large, complex tasks into a series of smaller, manageable actions. It then uses a deterministic GOAP (Goal-Oriented Action Planning) planner to create a predictable, step-by-step plan to achieve the goal. This gives you a clear, explainable path from start to finish.
- Increased Reliability: By breaking a big task into smaller actions, the scope for error at each step is significantly reduced. This fine-grained control allows the system to be far more reliable and easier to debug than a single, monolithic call to an LLM.
- Cost-Effectiveness: Not all tasks require the most powerful (and expensive) AI model. Embabel’s action-based structure makes it easy to mix and match different LLMs. You can use a cheap, fast model for simple tasks like data extraction and a more powerful, expensive model for complex reasoning, optimizing both cost and performance.
- Built for Testability: A huge advantage of the Embabel approach is that each action can be unit-tested in isolation, often without even needing to make a real call to an LLM. This is a game-changer for developers, as it allows you to build robust, well-tested AI features that you can trust.
- Seamless Enterprise Integration: Embabel is built for the JVM, ensuring it integrates smoothly with your existing enterprise Java and Kotlin applications. You can leverage your existing codebase, domain models, and infrastructure without having to venture into a completely different tech stack.
In short, Embabel brings traditional software engineering discipline to the world of generative AI, transforming LLMs from unpredictable creative tools into reliable components for building enterprise-grade applications.
4. Advantages of Using the Embabel Framework
- Sophisticated Planning: Embabel goes beyond simple, sequential execution. It uses a true planning step, powered by a non-LLM AI algorithm, to dynamically figure out the best sequence of actions to achieve a goal.
- Spring Boot Native – Seamlessly integrates with the Spring ecosystem.
- Declarative Approach – Define agents and actions using simple annotations.
- Multi-Model Support – Ability to combine different models, allowing you to use local, cost-effective, or private models for specific tasks instead of relying on a single large model.
- Built-in Observability – Comprehensive logging to understand the flow.
- Type-Safe – Leverages Java’s strong typing for reliable AI responses.
5. Core Concepts: Understanding Embabel’s Building Blocks
Before diving into code, let’s understand the fundamental concepts that make Embabel work.
- Agent: An autonomous entity that performs tasks. In Embabel, an agent encapsulates a set of actions and uses them to achieve goals.
- Action: A step that an agent can take. These are the fundamental building blocks of an agent’s behavior.
- Goal: The desired outcome that an agent is trying to achieve.
- Condition: Criteria that are assessed before executing an action or determining if a goal has been met.
- Domain Model: Domain Model consists of objects underpinning the flow and informing Actions, Goals, and Conditions. These are your business objects that flow between actions
- Plan: A sequence of actions dynamically formulated by the system to achieve a goal.
- Blackboard: The Blackboard serves as the shared memory system that maintains state throughout the agent process execution. Think of it as a shared workspace where actions read inputs and write outputs.
- Tools: Tools extend the raw capabilities of an LLM by letting it interact with the outside world. On its own, a language model can only generate responses from its training data and context window. When tools are present, the LLM interprets the user request, plans steps, and then delegates certain tasks to tools in a loop. This lets the model alternate between reasoning (“what needs to be done?”) and acting (“which tool can do it?”).
6. The GOAP Algorithm: Embabel’s Secret Sauce
At the heart of Embabel’s intelligent planning capabilities lies the GOAP (Goal-Oriented Action Planning) algorithm. Instead of following a rigid, predefined script that you have to code, GOAP allows an agent to dynamically figure out the best sequence of steps to achieve a goal. It’s what makes Embabel agents feel less like simple programs and more like intelligent problem-solvers.
GOAP works by considering four key things:
- The Goal: What is the desired final outcome?
- The World State: What information do we have right now? (e.g., user input, data from a database).
- Available Actions: What are the possible steps the agent can take?
- Action Effects: How does each action change the world state?
Based on these factors, the GOAP planner formulates a plan—a sequence of actions to get from the current state to the goal state. What makes this incredibly powerful is that Embabel doesn’t just create one plan and stick to it. It re-evaluates and re-plans after every single action, making it highly adaptive to new information and unexpected outcomes.
The GPS Analogy: Your AI’s Navigation System
The best way to understand GOAP is to think of it as a sophisticated GPS navigation system for your AI agent. It doesn’t follow a single, rigid map; it dynamically finds the best path to a destination.
Let’s break down a typical car journey using a GPS to see how this works.
Step 1: Set Your Destination (The Goal)
- First, you tell the GPS where you want to go by entering a destination address. This is the Goal. It’s the final, desired outcome of the journey.
Step 2: Analyze the Starting Point (The World State)
- Before calculating a route, the GPS assesses the current situation. It checks your precise starting location, the time of day, and pulls in real-time data about traffic, known road closures, and speed limits. This is the World State—a snapshot of all current conditions.
Step 3: Plan the Initial Route (The First Plan)
- With the goal and the world state understood, the GPS calculates what it thinks is the best route. It presents this as a series of turn-by-turn directions. This is the Initial Plan, a sequence of actions designed to get you from A to B.
Step 4: Start Driving (Execution)
- You put the car in gear and begin your journey, following the first instruction, like “Turn right in 200 feet.” This is Execution, the process of carrying out one step of the plan.
Step 5: Reroute Around Obstacles (Replanning)
- This is where the real intelligence happens. While you’re driving, the GPS detects a sudden traffic jam or an unexpected road closure ahead. It doesn’t force you to stick to the original plan. Instead, it instantly recalculates a new, better route from your current location. This is Replanning, the ability to adapt to new information and formulate a new plan on the fly.
Step 6: Arrive at Your Destination (Goal Achievement)
- By continuously executing steps and replanning as needed, the GPS successfully guides you around all obstacles until you hear, “You have arrived at your destination.” This is Goal Achievement, the successful completion of the plan.
This is precisely how Embabel works. It sets a goal, creates a plan, executes one step, and then re-evaluates the situation to create a new plan for the next step. This continuous cycle makes Embabel agents incredibly adaptive and resilient, allowing them to navigate complex tasks with the same dynamic intelligence as a GPS navigating a busy city.
The OODA Loop: The Rhythm of Intelligence
This continuous process of re-planning is effectively an OODA Loop (Observe, Orient, Decide, Act). After each action, the agent:
- Observe: Checks what has changed in its available data.
- Orient: Understands the new state and what new actions are now possible.
- Decide: Creates a new plan based on these current conditions.
- Act: Executes the next action in the new plan.
7. Key GOAP Benefits
- Flexibility: Just like GPS can find multiple routes to your destination, GOAP can find different action sequences to achieve the same goal.
- Adaptability: If one route is blocked (an action fails), both GPS and GOAP automatically find alternative paths.
- Efficiency: Both optimize for the best path considering costs (GPS considers time/distance, GOAP considers action costs and values).
- Dynamic Planning: Neither requires you to pre-program every possible route – they figure it out based on current conditions.
8. Building Your First Embabel Application: Meeting Summarizer
Let’s build a practical application that summarizes meeting transcripts, extracts key points, and identifies action items. We’ll walk through each component step-by-step.
⚙️ Project Structure & Setup
Below is the folder structure of our Spring Boot application:
embabel-shell-demo-meeting-summarizer-agent
├── src
│   └── main
│       ├── java
│       │   └── com
│       │       └── bootcamptoprod
│       │               ├── agent
│       │               │   └── MeetingSummarizerAgent.java
│       │               ├── config
│       │               │   └── ConfigureGoogleGeminiModels.java
│       │               ├── dto
│       │               │   └── MeetingSummary.java
│       │               │   └── KeyPoints.java
│       │               │   └── ActionItems.java
│       │               └── EmbabelShellMeetingSummarizerApplication.java
│       └── resources
│           └──application.yml
└── pom.xml
Understanding the Project Structure
Here is a quick breakdown of the key files and packages in our project and what each one does:
- MeetingSummarizerAgent.java: This is the heart of our application. It’s the agent class where we define our goal and the individual Action methods (findKeyPoints, findActionItems, createSummary) that the agent can perform to achieve that goal.
- dto package (ActionItems.java, KeyPoints.java, MeetingSummary.java): This directory holds our Data Transfer Objects (DTOs). These are simple Java record classes that define the structure of our data, such as the final summary, and are used by the agent to pass information between actions.
- ConfigureGoogleGeminiModels.java: This is a Spring
@Configurationclass responsible for setting up and providing the LLM (in this case, Google Gemini) that our agent will use to process information. We will be using free model from Google Gemini due to which we have added this configuration. If you are using OpenAI or Anthrophic you can configure theOPENAI_API_KEYorANTHROPIC_API_KEYenvironment variables. - EmbabelShellMeetingSummarizerApplication.java: The main class that boots up our Spring Boot application. It contains the crucial
@EnableAgentsannotation which tells Embabel to find and activate our MeetingSummarizerAgent. - application.properties: Our configuration file. This is where we set the default LLM for Embabel to use (gemini-2.0-flash-exp) and configure logging levels for easier debugging.
- pom.xml: The Maven project file. It manages all our project’s dependencies, including the most important one for this project:
embabel-agent-starter-shell, which provides all the core Embabel agent and shell functionalities.
Let’s set up our project with the necessary dependencies and configurations.
Step 1: Add Maven Dependencies
Every Spring Boot project starts with the pom.xml file. This is where we tell Maven which libraries our project needs to function.
<properties>
	<java.version>21</java.version>
	<embabel-agent.version>0.2.0-SNAPSHOT</embabel-agent.version>
</properties>

<dependencies>
	<dependency>
		<groupId>com.embabel.agent</groupId>
		<artifactId>embabel-agent-starter-shell</artifactId>
		<version>${embabel-agent.version}</version>
	</dependency>
	<dependency>
		<groupId>org.springframework.boot</groupId>
		<artifactId>spring-boot-starter-actuator</artifactId>
	</dependency>
</dependencies>

<repositories>
	<repository>
		<id>embabel-releases</id>
		<url>https://repo.embabel.com/artifactory/libs-release</url>
		<releases>
			<enabled>true</enabled>
		</releases>
		<snapshots>
			<enabled>false</enabled>
		</snapshots>
	</repository>
	<repository>
		<id>embabel-snapshots</id>
		<url>https://repo.embabel.com/artifactory/libs-snapshot</url>
		<releases>
			<enabled>false</enabled>
		</releases>
		<snapshots>
			<enabled>true</enabled>
		</snapshots>
	</repository>
</repositories>
In this configuration:
- This Maven configuration sets up our Spring Boot project with Java 21.
- The key dependency here is
embabel-agent-starter-shell, which brings in all the necessary components to create a shell-based Embabel application. This will also bring thespring-aidependencies that are required for our application. - We’ve configured two custom repositories (release and snapshot) to fetch Embabel artifacts.
- The Actuator dependency adds health checks and metrics endpoints for production monitoring.
Step 2: Configure Application Properties
Next, let’s configure our application properties:
spring:
  application:
    name: embabel-shell-demo-meeting-summarizer-agent

embabel:
  models:
    defaultLlm: gemini-2.0-flash-exp

logging:
  level:
    com.embabel: DEBUG
org.springframework.ai: DEBUG📄 Configuration Overview
- This YAML configuration tells Embabel to use Google’s Gemini 2.0 Flash as the default language model.
- The logging section enables DEBUG-level logs for both Embabel framework components and Spring AI integration, which helps us understand what’s happening under the hood during development.
Step 3: Application Entry Point
This is the main class that bootstraps our entire application.
package com.bootcamptoprod;

import com.embabel.agent.config.annotation.EnableAgents;
import com.embabel.agent.config.annotation.LoggingThemes;
import org.springframework.boot.SpringApplication;
import org.springframework.boot.autoconfigure.SpringBootApplication;

@SpringBootApplication
@EnableAgents(
        loggingTheme = LoggingThemes.STAR_WARS
)
public class EmbabelShellMeetingSummarizerApplication {

    public static void main(String[] args) {
        SpringApplication.run(EmbabelShellMeetingSummarizerApplication.class, args);
    }
}
Explanation:
- This is our Spring Boot application entry point.
- The
@EnableAgentsannotation activates Embabel’s agent framework capabilities. This annotation scans for agent definitions and registers them with the Spring context automatically. - The
loggingTheme = LoggingThemes.STAR_WARSparameter adds fun, themed logging output to make debugging more engaging (you’ll see Star Wars-themed log messages!).
Step 4: Create Data Transfer Object (DTOs)
Let’s create our request model using Java records:
package com.bootcamptoprod.dto;

import java.util.List;

public record MeetingSummary(
    List<String> keyPoints,
    List<String> actionItems
) {}
Explanation:
This Java record represents the final output of our agent – a complete meeting summary containing both key discussion points and action items.
package com.bootcamptoprod.dto;

import java.util.List;

public record KeyPoints(
    List<String> points
) {}
Explanation:
This record holds the key discussion points extracted from a meeting transcript. Each point represents an important topic or decision discussed during the meeting. The AI will populate this structure with human-readable bullet points.
package com.bootcamptoprod.dto;

import java.util.List;

public record ActionItems(
    List<String> actionItemsWithNames
) {}
Explanation:
This record stores action items identified in the meeting, including responsible persons and deadlines when mentioned. The AI extracts tasks that require follow-up and formats them as clear, actionable statements.
Step 5: AI Model Configuration
This configuration class is responsible for creating a bean for our Google Gemini model.
package com.bootcamptoprod.config;

import com.embabel.agent.api.models.OpenAiCompatibleModelFactory;
import com.embabel.common.ai.model.Llm;
import com.embabel.common.ai.model.PerTokenPricingModel;
import io.micrometer.observation.ObservationRegistry;
import org.jetbrains.annotations.NotNull;
import org.springframework.beans.factory.annotation.Value;
import org.springframework.context.annotation.Bean;
import org.springframework.context.annotation.Configuration;

import java.time.LocalDate;

@Configuration
public class ConfigureGoogleGeminiModels extends OpenAiCompatibleModelFactory {

    public ConfigureGoogleGeminiModels(@NotNull ObservationRegistry observationRegistry,
                                       @Value("${GOOGLE_GEMINI_API_KEY}") String apiKey) {
        super(
            "https://generativelanguage.googleapis.com",  // Base URL
            apiKey,                                       // API key reference
            "/v1beta/openai/chat/completions",            // Chat Completion path
            null,                                         // Embeddings path
            observationRegistry                           // Metrics registry
        );
    }

    @Bean
    Llm gemini2lash() {
        return openAiCompatibleLlm(
            "gemini-2.0-flash-exp",               // Model identifier
            new PerTokenPricingModel(0, 0),       // Pricing (free tier)
            "Google Gemini",                      // Provider name
            LocalDate.of(2025, 1, 1)              // Knowledge cutoff date
        );
    }
}Explanation:
- This configuration class registers Google Gemini as an AI model provider.
- By extending
OpenAiCompatibleModelFactory, we leverage Gemini’s OpenAI-compatible API. - The constructor configures the base URL and endpoint for Gemini’s API.
- The
@Value("${GOOGLE_GEMINI_API_KEY}")annotation injects your API key, which you must provide as an environment variable when running the application. - The
gemini2Flash()bean method creates a model instance with zero pricing (useful for free tier or internal tracking) and metadata about the model. - The
ObservationRegistryintegration enables automatic metrics collection for model usage.
NOTE: We will be using free model from Google Gemini due to which we have added this configuration class. If you are using OpenAI or Anthrophic you can directly configure the OPENAI_API_KEY or ANTHROPIC_API_KEY environment variables. In that case, this class will not be required.
Step 6: The Meeting Summarizer Agent
This is where we define our AI agent and its capabilities.
package com.bootcamptoprod.agent;

import com.embabel.agent.api.annotation.AchievesGoal;
import com.embabel.agent.api.annotation.Action;
import com.embabel.agent.api.annotation.Agent;
import com.embabel.agent.api.common.OperationContext;
import com.embabel.agent.domain.io.UserInput;
import com.example.summarizer.dto.ActionItems;
import com.example.summarizer.dto.KeyPoints;
import com.example.summarizer.dto.MeetingSummary;
import org.slf4j.Logger;
import org.slf4j.LoggerFactory;

@Agent(
    name = "meeting-summarizer-agent",
    description = "Summarizes a meeting transcript with actionable and key insights.",
    version = "1.0.0",
    beanName = "meetingSummarizerAgent"
)
public class MeetingSummarizerAgent {

    private static final Logger log = LoggerFactory.getLogger(MeetingSummarizerAgent.class);

    @Action
    public KeyPoints findKeyPoints(UserInput userInput, OperationContext context) {
        log.info("[MeetingSummarizerAgent] Starting extraction of key points from transcript.");

        KeyPoints result = context.ai()
            .withDefaultLlm()
            .createObject(
                """
                Read the following meeting transcript carefully and identify the main
                discussion points. Summarize them into clear, concise bullet points,
                highlighting key decisions and topics discussed. For each point, include
                the name of the responsible person or team if mentioned in the transcript:
                %s
                """.formatted(userInput.getContent()),
                KeyPoints.class
            );

        log.info("[MeetingSummarizerAgent] Extracted key points: {}", result.points());
        return result;
    }

    @Action
    public ActionItems findActionItems(UserInput userInput, OperationContext context) {
        log.info("[MeetingSummarizerAgent] Starting extraction of action items from transcript.");

        ActionItems result = context.ai()
            .withDefaultLlm()
            .createObject(
                """
                Read the following meeting transcript and extract all action items
                assigned, mentioning responsible persons and deadlines if available:
                %s
                """.formatted(userInput.getContent()),
                ActionItems.class
            );

        log.info("[MeetingSummarizerAgent] Extracted action items: {}", result.actionItemsWithNames());
        return result;
    }

    @Action
    @AchievesGoal(description = "Summarize a meeting transcript into clear key points and assigned action items with responsible person and deadlines if available")
    public MeetingSummary createSummary(KeyPoints keyPoints, ActionItems actionItems) {
        log.info("[MeetingSummarizerAgent] Composing final meeting summary.");

        MeetingSummary summary = new MeetingSummary(
            keyPoints.points(),
            actionItems.actionItemsWithNames()
        );

        log.info("[MeetingSummarizerAgent] Meeting summary created: {}", summary);
        return summary;
    }
}Explanation:
This is the heart of our application – the intelligent agent.
- @Agent: This annotation marks the class as an Embabel agent, providing metadata like its name and description.
- @Action: This annotation designates methods that the agent can perform.
- findKeyPoints and findActionItems: These actions take the user’s input(the meeting transcript in our case), which Embabel automatically wraps in a UserInput object (we’ll explore this UserInput class in the “Handling User Input” section below), and use the default LLM to extract the key points and action items, respectively.
- @AchievesGoal: This annotation indicates that the createSummary action is the ultimate goal of this agent. Embabel’s GOAP planner will work to find a path to this goal.
- createSummary: This action takes the KeyPoints and ActionItems (which will be the outputs of the previous actions) and combines them into the final MeetingSummary.
- OperationContext: It provides access to AI models through a fluent API (
context.ai().withDefaultLlm().createObject()), which handles prompt execution and response parsing automatically. The createObject method is a powerful feature of Embabel that automatically maps the LLM’s response to our specified DTO.
9. Testing the Application
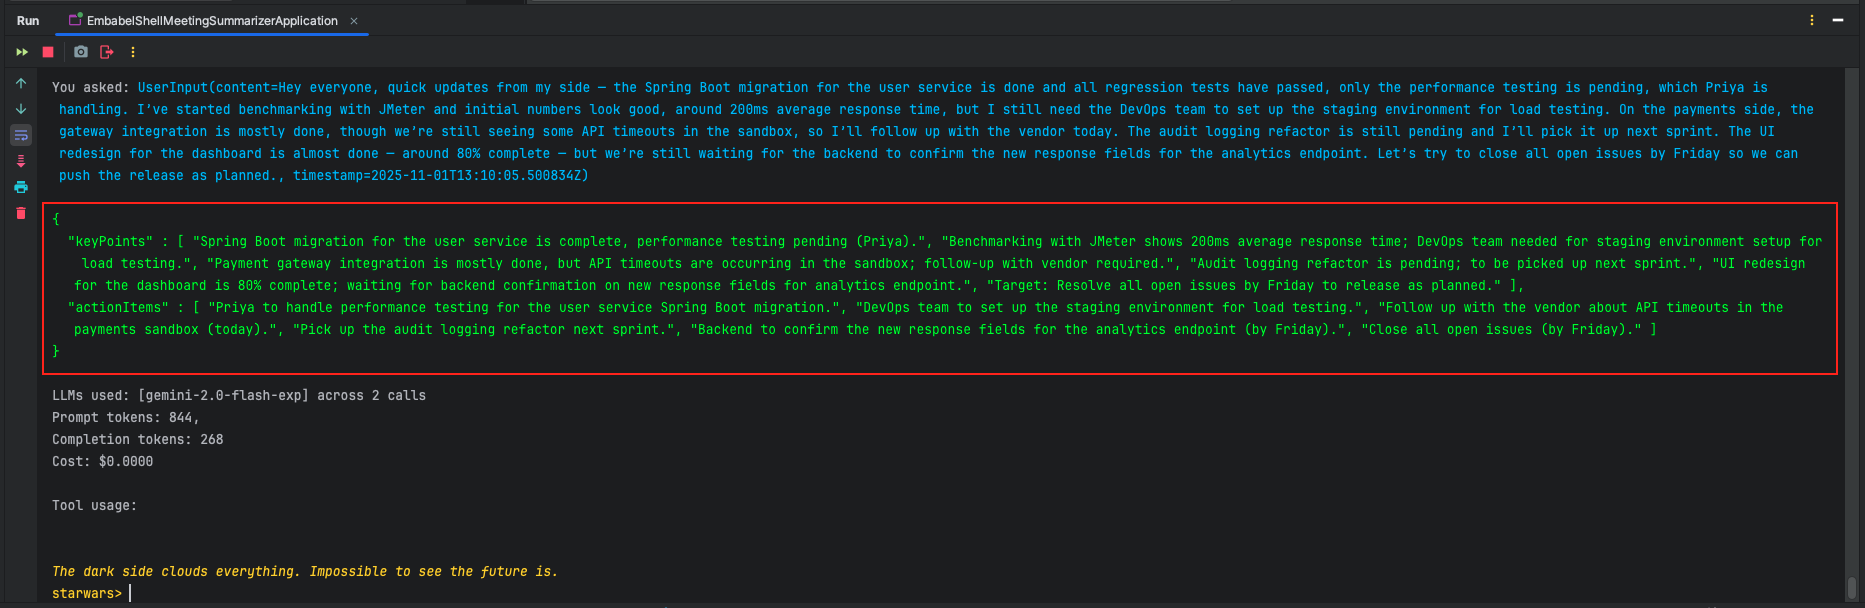
Start the Spring Boot application. Once the application is started, you can provide input to the application using the execute command or its convenient shortcut, x. Simply paste your meeting transcript inside quotes, like this:
starwars> x "Hey everyone, quick updates from my side — the Spring Boot migration for the user service is done and all regression tests have passed, only the performance testing is pending, which Priya is handling. I’ve started benchmarking with JMeter and initial numbers look good, around 200ms average response time, but I still need the DevOps team to set up the staging environment for load testing. On the payments side, the gateway integration is mostly done, though we’re still seeing some API timeouts in the sandbox, so I’ll follow up with the vendor today. The audit logging refactor is still pending and I’ll pick it up next sprint. The UI redesign for the dashboard is almost done — around 80% complete — but we’re still waiting for the backend to confirm the new response fields for the analytics endpoint. Let’s try to close all open issues by Friday so we can push the release as planned."
The Embabel framework will then:
- Recognize the user’s intent to summarize the transcript.
- Identify the createSummary method as the goal (due to
@AchievesGoalannotation). - Use the GOAP planner to determine that it first needs to execute findKeyPoints and findActionItems.
- Execute these actions, passing the user’s input to them.
- Take the outputs of these actions and pass them to the createSummary method.
- Finally, it will print the resulting MeetingSummary to the console.
Looking at our method signatures:
public KeyPoints findKeyPoints(UserInput userInput, ...)  // Needs UserInput
public ActionItems findActionItems(UserInput userInput, ...)  // Needs UserInput
public MeetingSummary createSummary(KeyPoints keyPoints, ActionItems actionItems)  // Needs both
Embabel’s planner works backward:
- To produce MeetingSummary → needs createSummary() action
- createSummary() requires KeyPoints and ActionItems
- To get KeyPoints → needs findKeyPoints() action
- To get ActionItems → needs findActionItems() action
- Both require UserInput → must be provided by user
Execution with Replanning:
After each action completes, the agent reassesses what’s possible based on available data objects. If any of the actions fails, GOAP might find an alternative path or report failure.
Once the request processing is completed, the output would look something like this:
10. Handling User Input: The UserInput Object
When you interact with an Embabel agent, how does it know what you’ve typed? Embabel provides helpful, built-in domain objects to handle common scenarios, and UserInput is a perfect example.
Instead of just passing a raw String around, Embabel encapsulates the user’s message(in our case meeting transcript) into a UserInput object. This class is straightforward but powerful, containing two key pieces of information:
- content: This field holds the actual text that the user provided.
- timestamp: This field automatically records the exact moment the input was received, which can be very useful for logging and auditing.
When you submit your meeting transcript via the execute or x command in the shell, Embabel automatically takes your string and maps it to a UserInput object. This object is then placed on the blackboard, making it available as the starting point for the agent’s plan. As you can see in our MeetingSummarizerAgent, the findKeyPoints and findActionItems methods both accept a UserInput parameter, allowing them to access the transcript you provided and begin the summarization process.
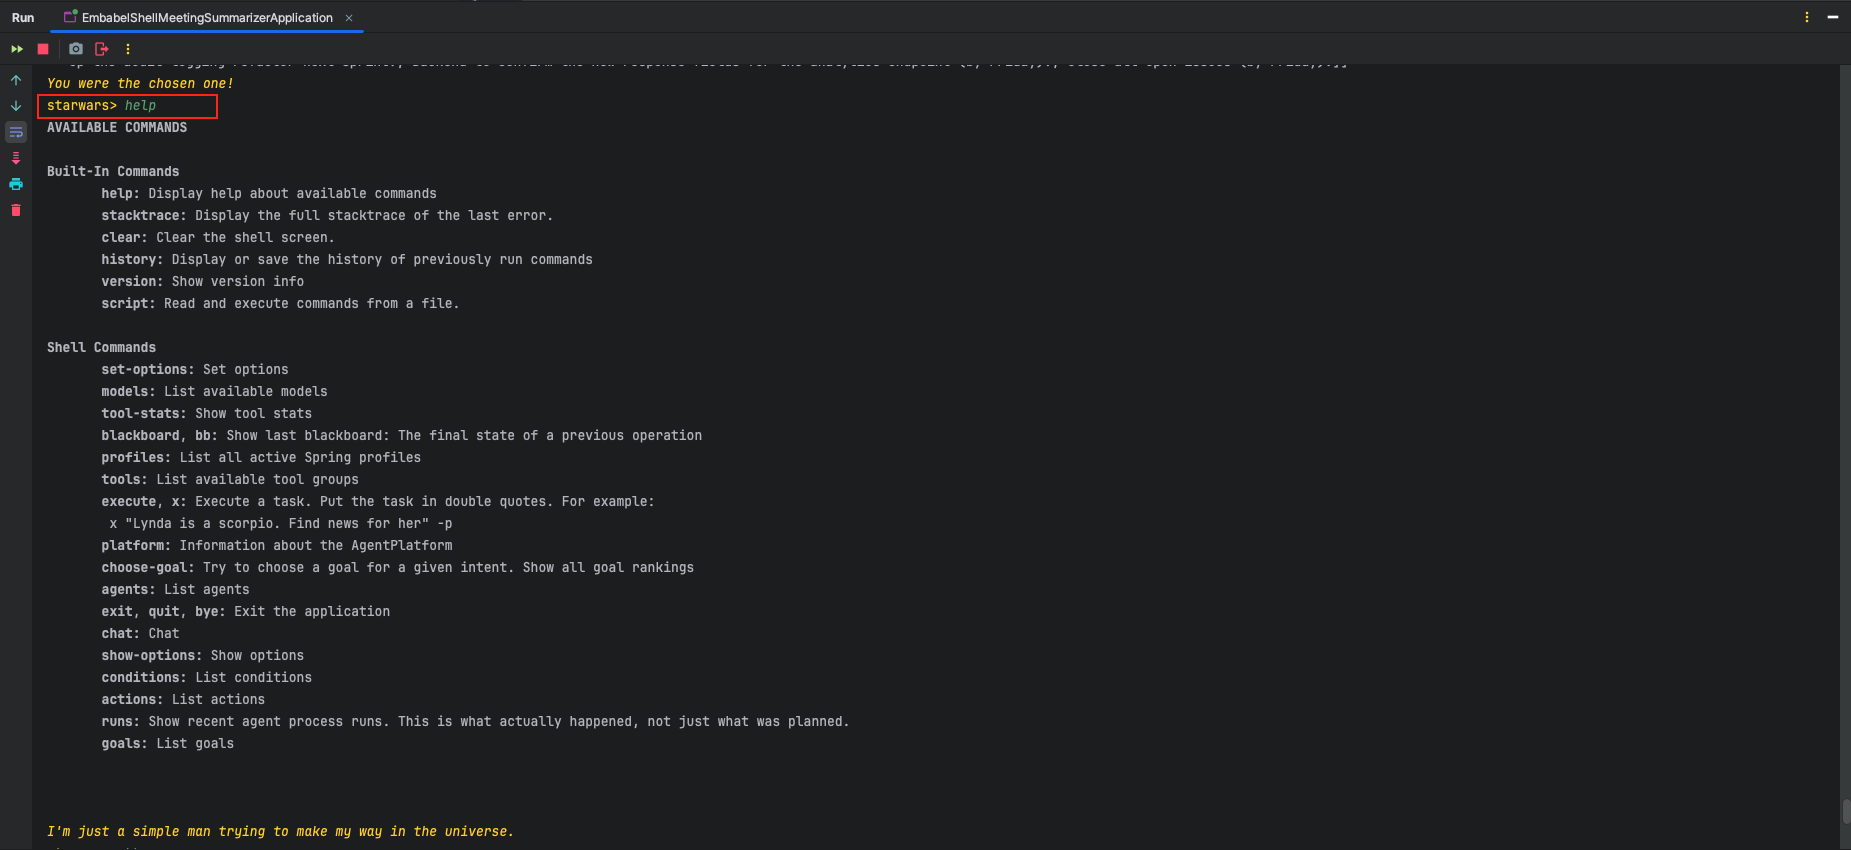
11. Exploring the Embabel Shell: More Than Just ‘Execute’
The Embabel shell is a powerful tool for interacting with and debugging your agents. While the execute (or x) command is what you’ll use most often, there are many other commands available, some of which are specific to Embabel.
To see a full list of what’s available, simply type help and press enter.
Example: Inspecting the Agent’s Workspace with ‘blackboard’
One of the most useful debugging commands is blackboard (or its shortcut bb). The blackboard is the agent’s workspace for a given operation. It holds all the data related to the task, including the initial user input and the results of each action the agent performs.
You can simply type blackboard to see the final state of the agent’s workspace.
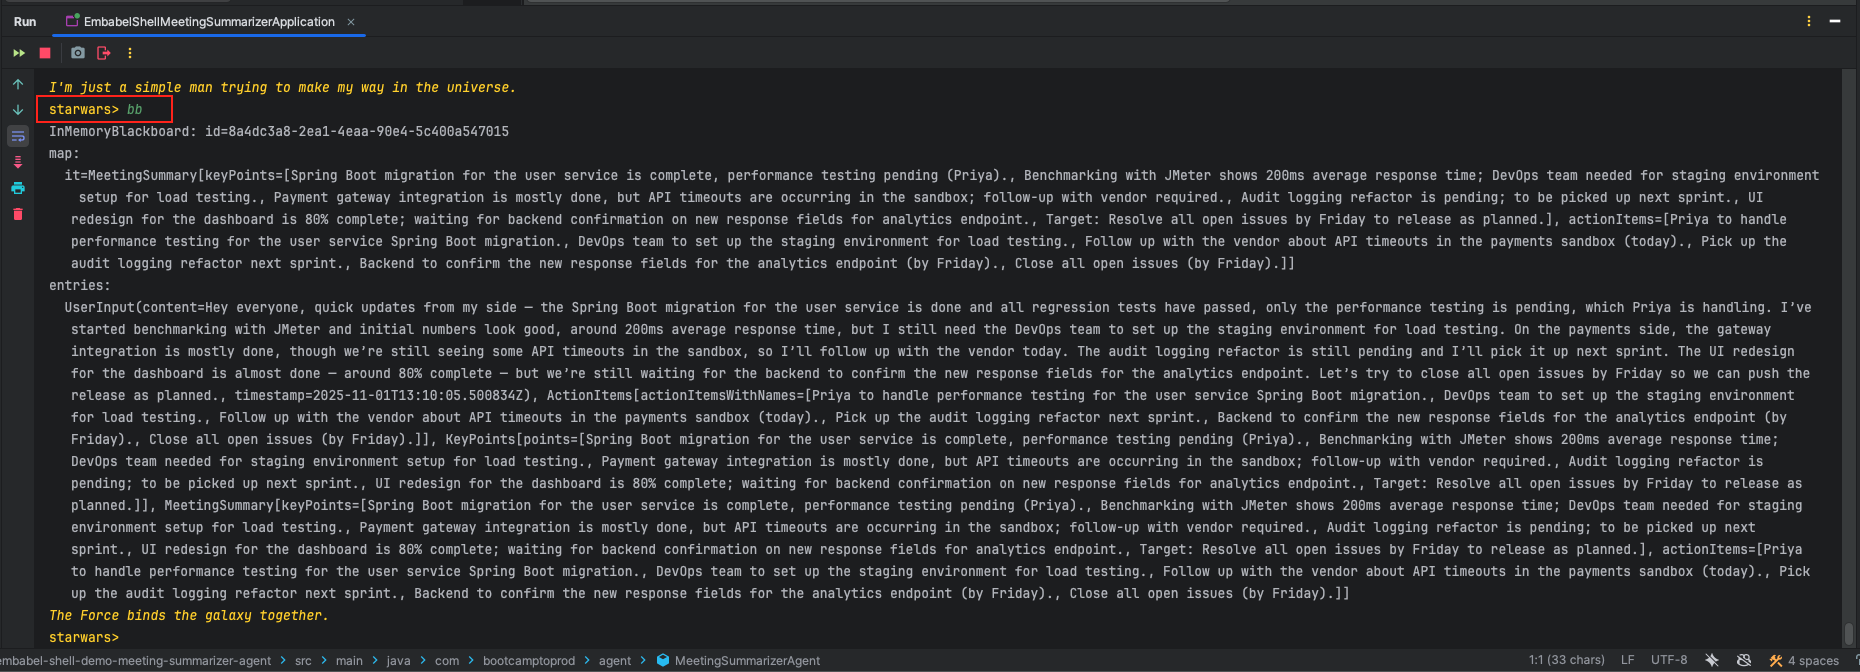
As you can see, the blackboard contains everything from the initial UserInput to the intermediate ActionItems and KeyPoints, and finally, the resulting MeetingSummary. This makes it an invaluable tool for understanding how your agent processed the information and reached its conclusion.
12. Video Tutorial
If you’re a visual learner, our step-by-step video tutorial is the perfect companion to this guide. It walks you through building the intelligent meeting summarizer from scratch, showing you exactly how to leverage the power of the Embabel framework to create a reliable, goal-driven AI agent in your Spring Boot application.
📺 Watch on YouTube:
13. Source Code
The complete source code for this Embabel meeting summarizer agent is available on our GitHub. Cloning the repository is the best way to see the concepts we’ve discussed—like the agent, actions, and goal-oriented planning—come to life. Just add your Google Gemini API key, run the application, and you can experiment with the interactive shell to see firsthand how Embabel intelligently plans and executes the summarization task.
🔗 Embabel Shell Demo: https://github.com/BootcampToProd/embabel-shell-demo-meeting-summarizer-agent
14. Things to Consider
When creating agents using Embabel framework, keep these important factors in mind:
- API Keys and Security: Never hardcode API keys in your code. Use environment variables or secure vaults like AWS Secrets Manager or HashiCorp Vault. In production, rotate keys regularly.
- Model mapping: Ensure your
ConfigureGoogleGeminiModelsuses correct endpoints, API keys, and model names. - Costs & per-token model selection: Track token usage and choose cheaper/smaller models for low-risk tasks.
- Model Selection: Different models have different strengths. Gemini Flash is fast and cost-effective, but for complex reasoning, consider GPT-5 or Claude. Embabel makes switching models very easy.
- Testing: Use Embabel’s test utilities to mock AI responses during unit tests. This reduces API costs during development.
15. FAQs
Can I use multiple AI models in the same agent?
Absolutely! Embabel supports multi-model architectures. You can specify different models for different actions using context.ai().withLlm(“specific-model-name”)
Can I create agents without the shell interface?
Yes. The shell interface is just one way to interact with Embabel agents — you can also expose them via REST APIs, which we’ll explore in our upcoming tutorials.
How do I debug when an agent doesn’t behave as expected?
Enable DEBUG logging to see the complete planning and execution flow. Embabel logs every step. The Star Wars logging theme also makes logs more readable!
Can I use other LLMs besides Google Gemini?
Absolutely! Embabel is designed to be model-agnostic. You can configure it to work with various LLMs, including those from OpenAI, Anthropic, and even locally running models.
16. Conclusion
The Embabel framework opens up a new world of possibilities for Java developers looking to harness the power of AI. Its intuitive, goal-oriented approach, combined with the robustness of the Spring ecosystem, provides a solid foundation for building intelligent and reliable AI agents. By following the principles and the example outlined in this guide, you’re well on your way to creating your own sophisticated AI-powered applications in Java. So, go ahead, give Embabel framwork a try, and start building the future of intelligent automation on the JVM.
17. Learn More
Interested in learning more?
Spring AI Text-to-Speech Streaming with ElevenLabs: Instant Audio Playback
Add a Comment