Learn how to enable and configure Gzip compression in your Spring Boot application to improve performance. A step-by-step guide with examples.
1. Introduction
Performance optimization is crucial for user experience and efficiency. One effective way to enhance performance is by using Gzip compression to reduce the size of data sent from your server to clients. In this guide, we’ll explore how to enable and configure Gzip compression in a Spring Boot application. We’ll cover the basics, provide step-by-step instructions, and include practical examples to help you get started.
2. What is Gzip Compression?
Gzip compression is a widely-used method for reducing the size of data exchanged over the internet. It works by compressing data into a more compact format, which leads to faster data transfer times and reduced bandwidth usage. Since Gzip is a lossless compression algorithm, the original data can be perfectly restored after decompression, ensuring that no information is lost during the process.
Originally developed for file compression and decompression, Gzip is commonly used in web development to compress HTTP responses sent from the server to the client. By reducing the amount of data that needs to be transferred, Gzip compression helps to achieve quicker load times and enhanced performance for web applications. This makes it an essential tool for improving user experience and optimizing network efficiency.
3. Why Use Gzip Compression in Spring Boot?
Using Gzip compression in Spring Boot offers several advantages:
- Improved Performance: Gzip compression reduces the size of HTTP responses sent from the server to the client. This results in faster page load times and reduced bandwidth consumption, which improves overall application performance and responsiveness.
- Bandwidth Efficiency: By compressing data, Gzip reduces the amount of data transferred over the network. This is particularly beneficial for users on slower internet connections or mobile devices, as it speeds up data transmission without compromising content quality.
- SEO Benefits: Faster loading times due to Gzip compression can positively impact search engine rankings. Search engines like Google consider page speed as a factor in their ranking algorithms, so faster-loading pages can potentially improve SEO performance.
- Cost Savings: Reduced bandwidth usage can lead to lower costs, especially in scenarios where bandwidth usage is metered or limited.
- Easy Implementation in Spring Boot: Spring Boot provides convenient configurations and utilities to enable Gzip compression with minimal effort. It integrates seamlessly with existing Spring applications, making it straightforward to implement and manage.
4. Disadvantages of Gzip Compression
While Gzip compression offers significant benefits, it also comes with a few potential disadvantages:
- Increased CPU Usage: Compressing and decompressing data can increase CPU usage, which might impact server performance.
- Not Always Beneficial for Small Files: Compression overhead might not be worth it for very small files.
- Compatibility Issues: Some older clients or proxies might not handle Gzip compression properly.
5. Enabling Gzip Compression in Spring Boot
To enable Gzip compression in your Spring Boot application, add the following properties to your application.properties or application.yml file:
server.compression.enabled: Enables or disables compression. The default value is false.server.compression.mime-types: Specifies a comma-separated list of MIME types that should be compressed. The default values are text/html, text/xml, text/plain, text/css, text/javascript, application/javascript, application/json, application/xml.server.compression.min-response-size: Sets the minimum response size (in bytes) that should be compressed. The default value is 2048 (2KB).server.compression.excluded-user-agents: Specifies a comma-separated list of user agents for which responses should not be compressed. There is no default value.
Example using application.properties:
server.compression.enabled=true
server.compression.mime-types=application/json,application/xml,text/html,text/xml,text/plain,text/css,text/javascript,application/javascript
server.compression.min-response-size=2048
server.compression.excluded-user-agents=MSIE 6.0,UCBrowser
Example using application.yml:
server:
  compression:
    enabled: true
    mime-types: application/json,application/xml,text/html,text/xml,text/plain,text/css,text/javascript,application/javascript
    min-response-size: 2048
    excluded-user-agents: MSIE 6.0,UCBrowser
These settings configure Spring Boot to compress specified MIME types (such as text/html, text/xml, etc.) with responses larger than 2048 bytes. Additionally, the configuration excludes compressing responses for user agents like MSIE 6.0 and UCBrowser, specified under server.compression.excluded-user-agents. Adjust these properties according to your application’s specific requirements and traffic patterns to optimize performance effectively.
6. Example: Spring Boot Application with Gzip Compression
Let’s create a simple Spring Boot application to demonstrate Gzip compression.
In this Spring Boot application, we have configured Gzip compression to optimize the transmission of large responses. Let’s break down the components and configurations:
GzipController.java
This defines a REST controller with a single endpoint /large-response that returns a large string response repeated one million times. This simulates a large data payload that benefits from compression.
import org.springframework.web.bind.annotation.GetMapping;
import org.springframework.web.bind.annotation.RestController;

@RestController
public class GzipController {

    @GetMapping("/large-response")
    public String getLargeResponse() {
        return "Hello, World! ".repeat(1000000);
    }
}
application.properties:
This configures Spring Boot to compress specified MIME types (text/plain, application/json, application/xml, etc.) for responses larger than 100 bytes.
server.compression.enabled=true
server.compression.mime-types=application/json,application/xml,text/html,text/xml,text/plain,text/css,text/javascript,application/javascript
server.compression.min-response-size=100
7. Testing Our Spring Boot Application with Gzip Compression
To verify the effectiveness of Gzip compression, we’ll use a browser’s network tab to inspect the response sizes with and without compression enabled.
Step-by-Step Testing
- Run Your Spring Boot Application: Start your Spring Boot application that includes Gzip compression configuration.
- Open Browser Developer Tools:
- Open your browser’s developer tools (usually by pressing F12 or right-clicking and selecting “Inspect”).
- Navigate to the “Network” tab.
- Access the Endpoint: Navigate to
http://localhost:8080/large-responsein your browser. - Verify Payload Size and Response Headers:
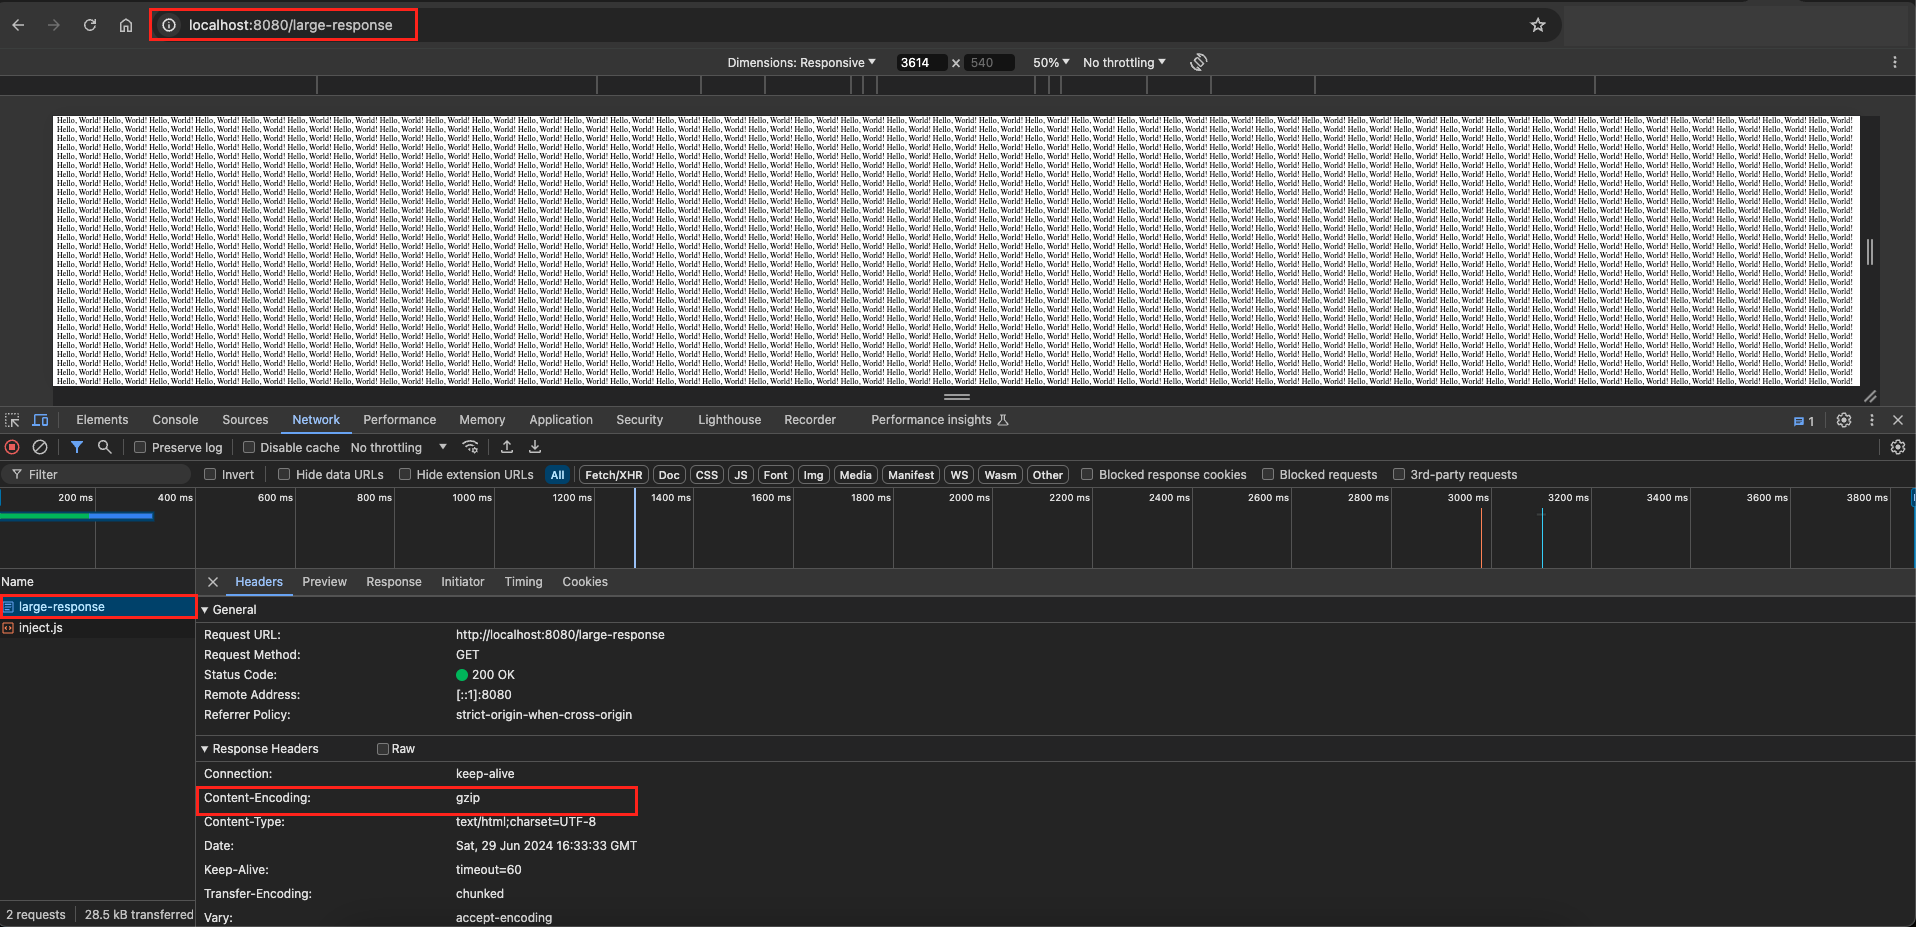
- Select the request for /large-response in the network tab.
- Under the “Response Headers” section, look for Content-Encoding: gzip. This header indicates that the response is compressed using Gzip.
Output:
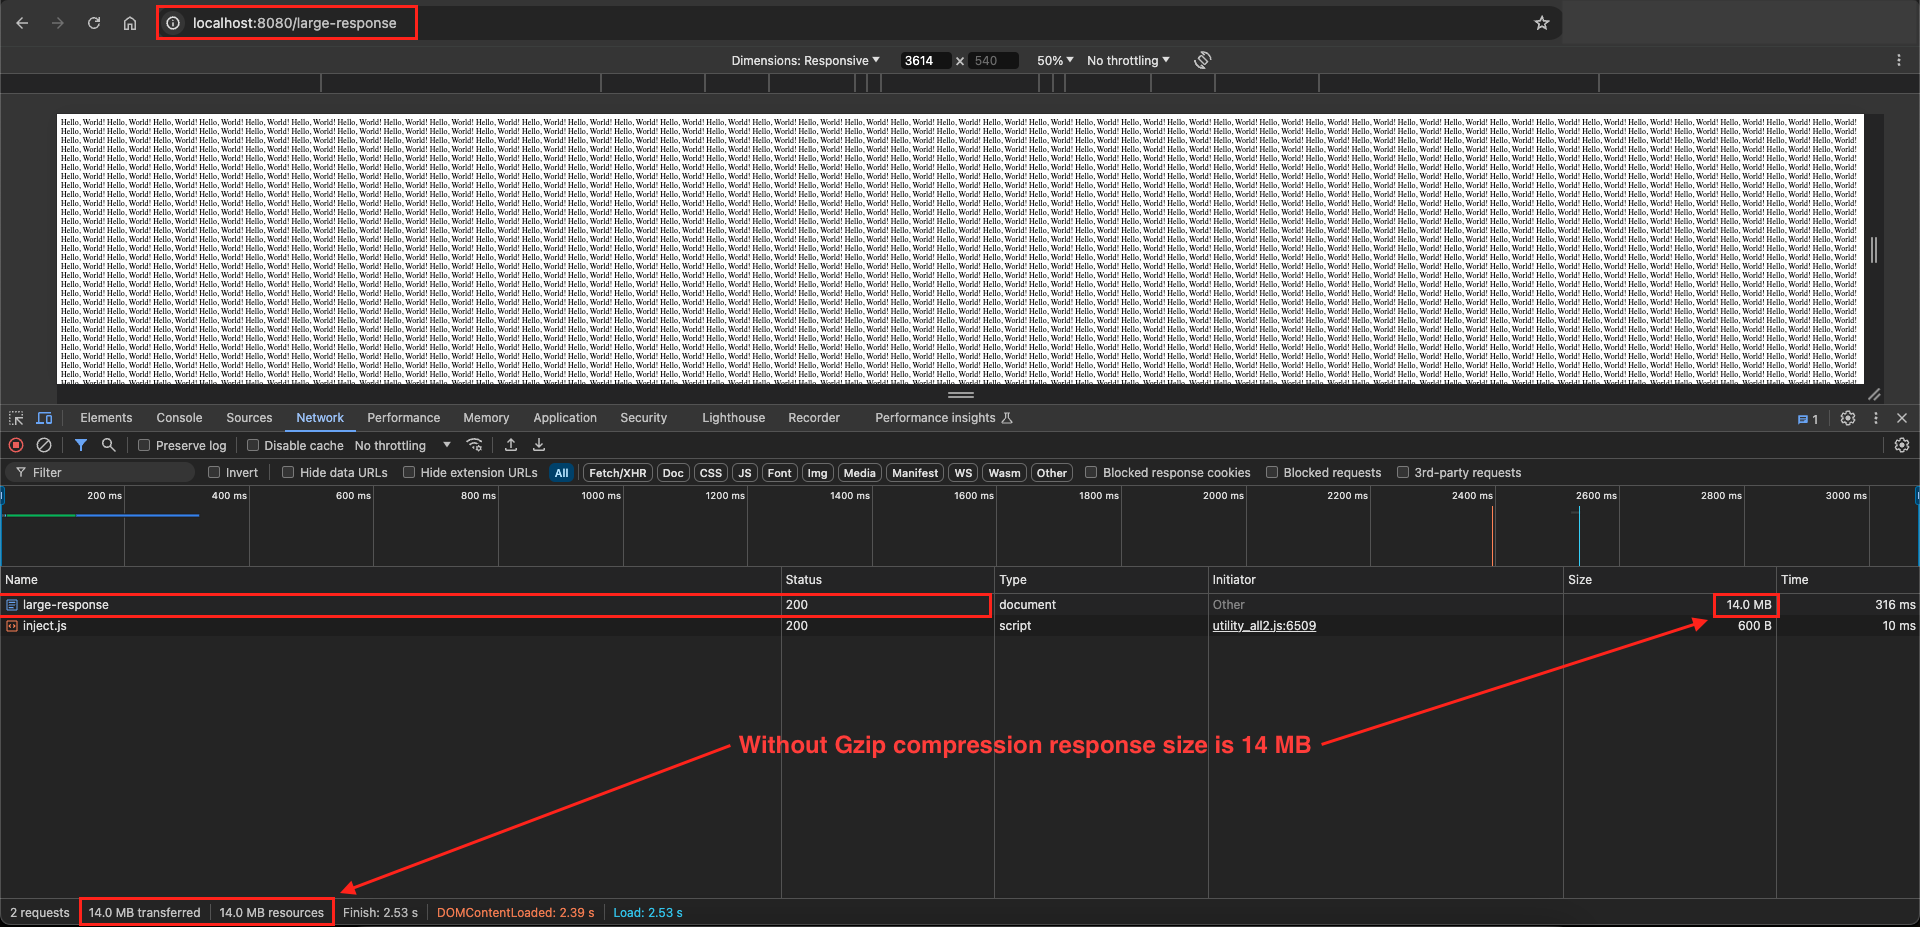
Compare response sizes in screenshots with and without Gzip compression enabled. Verify the presence of the ‘Content-Encoding: gzip’ header in the ‘Response Headers’ section to confirm successful compression.

8. Testing Tip
When testing with tools like Postman, you might find that the payload size appears the same whether the response is compressed or not. This can happen because some tools automatically decompress the response for you. To accurately measure the difference in payload size, you can compare the raw response sizes using tools that display both compressed and decompressed sizes, such as browser developer tools.
9. Source Code
The complete source code of the above example can be found here.
10. Things to Consider
Here are some important considerations to keep in mind when working with Gzip compression:
- Performance Impact: While Gzip compression improves network performance by reducing bandwidth usage, it also adds CPU overhead for compressing and decompressing data. Ensure your server has sufficient CPU resources to handle compression, especially under heavy load.
- Compatibility: Although most modern browsers and clients support Gzip compression, ensure that older browsers and legacy clients in your user base can handle compressed responses correctly. Test thoroughly across different user agents.
- Minimum Response Size: Setting a minimum response size for compression (e.g., server.compression.min-response-size) helps avoid unnecessary CPU overhead for small responses that may not benefit from compression.
- Excluded User Agents: Use the server.compression.excluded-user-agents property to exclude specific user agents (browsers or clients) from receiving compressed responses. This can be useful for debugging or if certain clients have known issues with compressed content.
- Testing and Monitoring: Thoroughly test your application with and without Gzip compression enabled to measure its impact on response times and CPU usage. Use monitoring tools to track server performance metrics before and after enabling compression.
- Dynamic Content: Be aware that dynamically generated content, such as responses from APIs that vary in size or content type, may not always benefit from Gzip compression. Evaluate the trade-offs and monitor performance metrics when applying compression to dynamic content.
- Deployment Considerations: Ensure that Gzip compression is correctly configured in all environments (development, testing, production) to maintain consistent behavior and performance across deployments.
- SEO and Analytics: While faster load times from compression can improve SEO rankings and user experience, ensure that analytics tools accurately measure page load times, including the effects of compression.
- Compression Algorithms: Spring Boot uses standard Gzip compression. Consider exploring other compression algorithms like Brotli for potentially better compression ratios, although browser support may vary.
11. FAQs
What are the benefits of using Gzip compression?
Gzip compression reduces the size of the response data, leading to faster load times, reduced bandwidth usage, and an improved user experience.
How do I enable Gzip compression in a Spring Boot application?
To enable Gzip compression in Spring Boot, you can set the server.compression.enabled property to true in your application.properties or application.yml file. Additionally, configure server.compression.mime-types to specify which MIME types should be compressed.
What are the default MIME types that Spring Boot compresses?
By default, Spring Boot compresses MIME types such as application/json, application/xml, text/html, text/xml, text/plain, text/css, text/javascript, and application/javascript. You can customize this list using the server.compression.mime-types property.
How does Gzip compression affect server performance in Spring Boot applications?
While Gzip compression reduces bandwidth usage, it also adds CPU overhead for compressing and decompressing data. Ensure your server has sufficient CPU resources to handle compression, especially under heavy traffic.
How to test if Gzip compression is working in Spring Boot application?
You can verify Gzip compression by inspecting the response headers using browser developer tools. Look for the Content-Encoding: gzip header in the network tab, which indicates that the response is compressed.
12. Conclusion
Enabling Gzip compression in the Spring Boot application is a straightforward way to improve performance and reduce bandwidth usage. By following the steps outlined in this guide, you can easily configure Gzip compression and start seeing the benefits. Remember to test thoroughly to ensure compatibility and optimal performance.
Add a Comment