
Explore Agentic Design Patterns with a deep dive into the Spring AI Chain Workflow. Learn with a real-world example, perfect for reliable AI integration.
1. Introduction
Building intelligent applications with AI has never been more accessible, thanks to Spring AI and its powerful agentic design patterns. Whether you’re a beginner or an experienced developer, understanding these patterns will help you create more reliable and maintainable AI-powered applications.
In this comprehensive guide, we’ll explore Spring AI’s five key agentic design patterns and then dive deep into building a real-world application using the Chain Workflow pattern.
2. An Introduction to Agentic Design Patterns
Artificial Intelligence — especially tools like Large Language Models (LLMs) — is changing the way we build software. With Spring AI, Java developers can easily bring AI into their Spring applications without needing to be machine learning experts.
But to really take advantage of AI, it’s important to understand how to organize and manage interactions with these models. That’s where Agentic Design Patterns come in — they give us a set of blueprints for how to build smart, structured AI features.
3. Workflows vs. Agents: What’s the Difference?
Before we dive into the patterns, let’s quickly talk about two key ideas in agent-based systems:
- Workflows are like guided tours. Everything follows a clear path, defined in code by the developer. They’re great when you need things to work the same way every time — predictable and reliable.
- Agents, on the other hand, are more like free spirits. They decide how to use tools and what steps to take, based on the task at hand. This gives them more flexibility, but it can also make their behavior harder to predict.
In most business and enterprise settings, workflows are often the better choice because they’re easier to control, debug, and maintain. That’s why Spring AI focuses heavily on supporting workflow-based patterns.
4. A Glimpse into Agentic Design Patterns
Spring AI offers a set of powerful workflow patterns that help you structure how AI (LLMs) behave in your applications. These patterns give you more control, making your AI systems easier to manage and more reliable.
Here’s a quick overview of the main workflow patterns Spring AI supports:
- 🔗 Chain Workflow: This breaks a big task into smaller, easy-to-handle steps. Each step builds on the result of the previous one. (We’ll take a closer look at this one in this blog!)
- ⚡ Parallelization Workflow: Instead of doing one thing at a time, this pattern lets the AI tackle multiple parts of a task at once — then it brings all the results together. It’s great for speed and efficiency, especially when tasks don’t depend on each other.
- 🧭 Routing Workflow: Based on the type of question or context, the AI decides which specialized handler or response path to take. It’s like sending customer questions to the right department.
- 🧑💼 Orchestrator-Workers: Here, one main AI (the orchestrator) breaks down a complex task and assigns smaller pieces to different “worker” AIs or tools. It’s like having a project manager coordinating a team.
- 🔁 Evaluator-Optimizer: This one mimics how humans refine their work. One AI creates a response, and another reviews it, gives feedback, and asks for improvements. This loop continues until the result is good enough.
Spring AI makes it easy to implement these workflows using its chat model and tool execution features, handling most of the heavy lifting behind the scenes.
5. Deep Dive: Spring AI Chain Workflow Pattern
The Chain Workflow pattern simplifies complex problems by dividing them into sequential, manageable steps. Imagine you have a complex problem. Instead of trying to solve it with one massive, complicated instruction to an LLM, you break it down into a series of smaller, focused steps. Each step uses an LLM, and the output from one step feeds directly into the next.
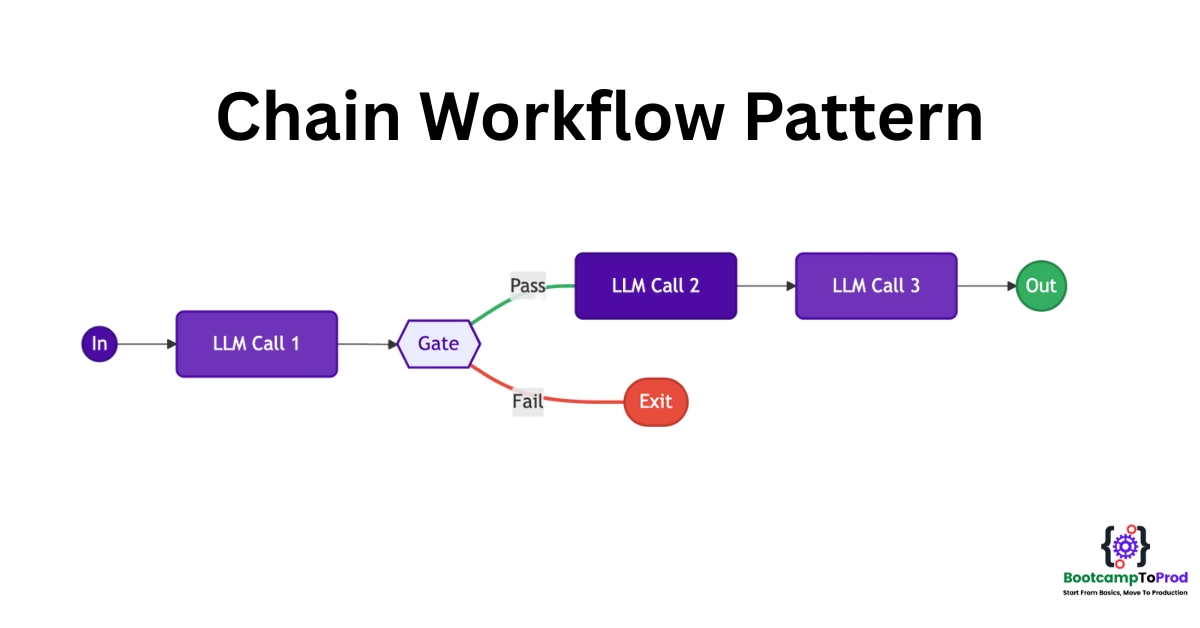
📌 When to Use:
- Tasks with clear, sequential logic.
- Each step logically builds upon the output of the previous one.
- You need to maintain context and progressively refine information.
- Scenarios where output quality matters more than speed.
- Problems that build step-by-step (e.g., summarizing, refining, classifying).
❓Why Use Chain Workflow:
- Higher Accuracy: Each step can focus on doing one thing really well
- Better Debugging: Easy to identify where things go wrong
- Maintainability: Simple to modify or extend individual steps
- Predictable Results: Clear flow makes outcomes more consistent
6. Building a Real-World Application: Blog Post Generator
Let’s build a Blog Post Generator that takes a topic and creates a complete, well-structured blog post. Our chain will process through these steps:
- Research Phase: Generate key points about the topic
- Structure Phase: Create an outline based on research
- Content Phase: Write the actual blog post
- Polish Phase: Improve readability and add engaging elements
⚙️ Setting Up Spring AI Project
Let’s set up our project with the necessary dependencies and configurations.
Step 1: Add Maven Dependencies
Add these dependencies to pom.xml file:
<dependencies>
    <!-- Spring Boot Web for building RESTful web services -->
    <dependency>
        <groupId>org.springframework.boot</groupId>
        <artifactId>spring-boot-starter-web</artifactId>
    </dependency>

    <!-- OpenAI Model Support – configureable for various AI providers (e.g. OpenAI, Google Gemini) -->
    <dependency>
        <groupId>org.springframework.ai</groupId>
        <artifactId>spring-ai-starter-model-openai</artifactId>
    </dependency>
</dependencies>

<dependencyManagement>
    <dependencies>
        <!-- Spring AI bill of materials to align all spring-ai versions -->
        <dependency>
            <groupId>org.springframework.ai</groupId>
            <artifactId>spring-ai-bom</artifactId>
            <version>${spring-ai.version}</version>
            <type>pom</type>
            <scope>import</scope>
        </dependency>
    </dependencies>
</dependencyManagement>
In this configuration:
spring-boot-starter-web:Enables us to build a web application with REST endpointsspring-ai-starter-model-openai:Provides integration with OpenAI’s API (though we’ll configure it for Google Gemini). It includes the ChatClient for making AI calls and auto-configuration for easy setup.spring-ai-bom:ThedependencyManagementsection uses Spring AI’s Bill of Materials (BOM) to ensure compatibility between Spring AI components. By importing the BOM, you don’t need to manually specify versions for each Spring AI artifact—it ensures compatibility and prevents version conflicts automatically.
Step 2: Configure Application Properties
Now, let’s configure our application and add configuration related to AI using application.yml:
spring:
  application:
    name: spring-ai-chain-workflow

  # AI configurations
  ai:
    openai:
      api-key: ${GEMINI_API_KEY}
      base-url: https://generativelanguage.googleapis.com/v1beta/openai
      chat:
        completions-path: /chat/completions
        options:
          model: gemini-2.0-flash-exp
📄 Configuration Overview
This configuration focuses on AI integration with Google’s Gemini model via the Spring AI OpenAI starter:
👉 AI (OpenAI Starter) Settings
- api‑key: Your secret key for authenticating with the AI service. Keep this safe and out of source control.
- base‑url: Overrides the default OpenAI endpoint so requests go to Google’s Gemini API instead.
- completions‑path: The REST path for chat-based completions—appended to the base URL when making requests.
- model: Chooses which AI model to call (e.g.
gemini-2.0-flash-exp). This determines the capabilities and response style you’ll get back.
Make sure to set the GEMINI_API_KEY environment variable with your actual Google Gemini API key before running the application.
🤖 Google Gemini APIs are great for proof-of-concept (POC) projects since they offer limited usage without requiring payment. For more details, check out our blog, where we dive into how Google Gemini works with OpenAI and how to configure it in case of our Spring AI application.
Step 3: Core Chain Workflow Implementation
Now let’s create our main chain workflow class that uses the for loop logic to process through each step:
import org.springframework.ai.chat.client.ChatClient;
import org.springframework.stereotype.Service;

@Service
public class BlogPostChainWorkflow {

    private final ChatClient chatClient;
    private final String[] systemPrompts;

    /**
     * Constructor that initializes our ChatClient and sets up the chain prompts
     * Spring will automatically inject the ChatClient.Builder
     */
    public BlogPostChainWorkflow(ChatClient.Builder chatClientBuilder) {
        this.chatClient = chatClientBuilder.build();
        this.systemPrompts = initializeChainPrompts();
    }

    /**
     * Main method that processes a topic through our 4-step chain using a for loop
     * Each step's output becomes the input for the next step in the chain
     */
    public String generateBlogPost(String topic) {
        String response = topic; // Start with the user's input topic

        // Process through each step in our chain sequentially
        for (int i = 0; i < systemPrompts.length; i++) {
            System.out.println("Processing Step " + (i + 1) + ": " + getStepName(i));

            // Combine the current step's prompt with the previous step's output
            String input = String.format("%s\n\nInput: %s", systemPrompts[i], response);

            // Send to AI and get the response for this step
            response = chatClient.prompt(input).call().content();

            System.out.println("Completed Step " + (i + 1));
        }

        return response; // Return the final processed result
    }

    /**
     * Initialize our 4-step chain with specific prompts for each phase
     * Each prompt is designed to take the previous step's output and refine it further
     */
    private String[] initializeChainPrompts() {
        return new String[]{
                // Step 1: Research Phase - Generate key points and insights
                """
            You are a research assistant. Given a topic, generate 5-7 key research points
            that would be important to cover in a comprehensive blog post. Focus on:
            - Current trends and developments
            - Common challenges or problems
            - Best practices and solutions
            - Real-world applications

            Format your response as a numbered list with brief explanations for each point.
            Topic to research:
            """,

                // Step 2: Structure Phase - Create a logical outline
                """
            You are a content strategist. Based on the research points provided,
            create a detailed blog post outline with:
            - Compelling title
            - Introduction hook
            - 4-6 main sections with subpoints
            - Conclusion that ties everything together

            Format as a clear outline with headers and bullet points.
            Research points to structure:
            """,

                // Step 3: Content Phase - Write the full blog post
                """
            You are an expert technical writer. Using the outline provided,
            write a complete, engaging blog post (800-1200 words) that:
            - Has a compelling introduction that hooks the reader
            - Explains concepts clearly for beginners
            - Uses practical examples and analogies
            - Includes actionable insights
            - Has smooth transitions between sections
            - Ends with a strong conclusion

            Write in a conversational yet professional tone.
            Outline to expand:
            """,

                // Step 4: Polish Phase - Enhance readability and engagement
                """
            You are an editor specializing in technical content. Review and improve
            the blog post by:
            - Adding engaging subheadings
            - Including relevant analogies or metaphors
            - Improving readability and flow
            - Adding a compelling call-to-action
            - Ensuring the tone is beginner-friendly but authoritative

            Return the polished, final version.
            Blog post to polish:
            """
        };
    }

    /**
     * Helper method to get descriptive names for each step (used for logging)
     * This makes it easier to track which step is currently being processed
     */
    private String getStepName(int stepIndex) {
        return switch (stepIndex) {
            case 0 -> "Research Phase";
            case 1 -> "Structure Phase";
            case 2 -> "Content Creation Phase";
            case 3 -> "Polish & Enhancement Phase";
            default -> "Unknown Step";
        };
    }
}
Explanation
- Overall Purpose & Core Component:
ThisBlogPostChainWorkflowservice class automates blog post creation through a sequential, multi-step Chain Workflow. Its primary tool for interacting with a Large Language Model (LLM) is Spring AI’s ChatClient. - Constructor: Client and Prompt Setup:
The constructor is responsible for setting up the workflow. It receives aChatClient.Builder(injected by Spring) to create a reusableChatClientinstance. It also callsinitializeChainPrompts()to load an array of predefined prompts, where each prompt defines a specific stage of the blog post generation process. - Core Chain Logic (generateBlogPost method):
ThegenerateBlogPost(String topic)method is the heart of the workflow. It takes an initial topic and then sequentially processes it through each prompt defined in thesystemPromptsarray.- Iterative Processing: It uses a for loop to go through each step.
- Dynamic Input Construction: In each step, the input for the LLM is created by combining the current step’s system prompt with the output (response) from the previous step.
- LLM Interaction: The constructed input is sent to the LLM using
chatClient.prompt(input).call().content(). - Output as Next Input: The LLM’s response from the current step becomes the response variable, which then serves as the refined input for the next step in the chain.
- Final Result: After all steps are completed, the method returns the final, fully processed blog post.
- Prompt Definitions (initializeChainPrompts method):
This private helper method defines the actual instructions (prompts) for the LLM at each stage of the chain. The prompts are designed to be sequential, with each one building upon the output of the last: research, structuring, content writing, and polishing. - Logging Utility (getStepName method):
This is a simple helper method that provides a human-readable name for each step index (e.g., “Research Phase” for step 0). This is used primarily for logging purposes, making it easier to track the workflow’s progress through the console.
Step 4: Create Controller
Now, let’s create a REST controller to expose endpoints using which we can generate required type of blog content:
import com.bootcamptoprod.service.BlogPostChainWorkflow;
import org.springframework.web.bind.annotation.PostMapping;
import org.springframework.web.bind.annotation.RequestBody;
import org.springframework.web.bind.annotation.RequestMapping;
import org.springframework.web.bind.annotation.RestController;

@RestController
@RequestMapping("/api/blog")
public class BlogPostController {

    private final BlogPostChainWorkflow chainWorkflow;

    /**
     * Constructor injection - Spring automatically provides our workflow service
     */
    public BlogPostController(BlogPostChainWorkflow chainWorkflow) {
        this.chainWorkflow = chainWorkflow;
    }

    /**
     * Main endpoint to generate blog posts using our chain workflow
     * Accepts a topic as request body and returns the complete generated blog post
     */
    @PostMapping("/generate")
    public String generateBlogPost(@RequestBody String topic) {
        return chainWorkflow.generateBlogPost(topic.trim());
    }

}
Explanation
- Handles Incoming Requests and Returns Results:
Its main job is to listen for POST requests at/api/blog/generate. When a request comes in with a blog topic, the controller takes that topic, passes it to theBlogPostChainWorkflowservice, and then sends back the complete blog post generated by the service as the HTTP response. - API Gateway for Blog Generation:
ThisBlogPostControlleracts as the web entry point for creating blog posts. It exposes an API endpoint that external clients (like a web frontend or another service) can call. - Delegates to the Workflow Service:
The controller itself doesn’t contain the logic for generating blog posts. Instead, it relies on theBlogPostChainWorkflowservice. It receives an instance of this service (via constructor injection) and uses it to do the actual work.
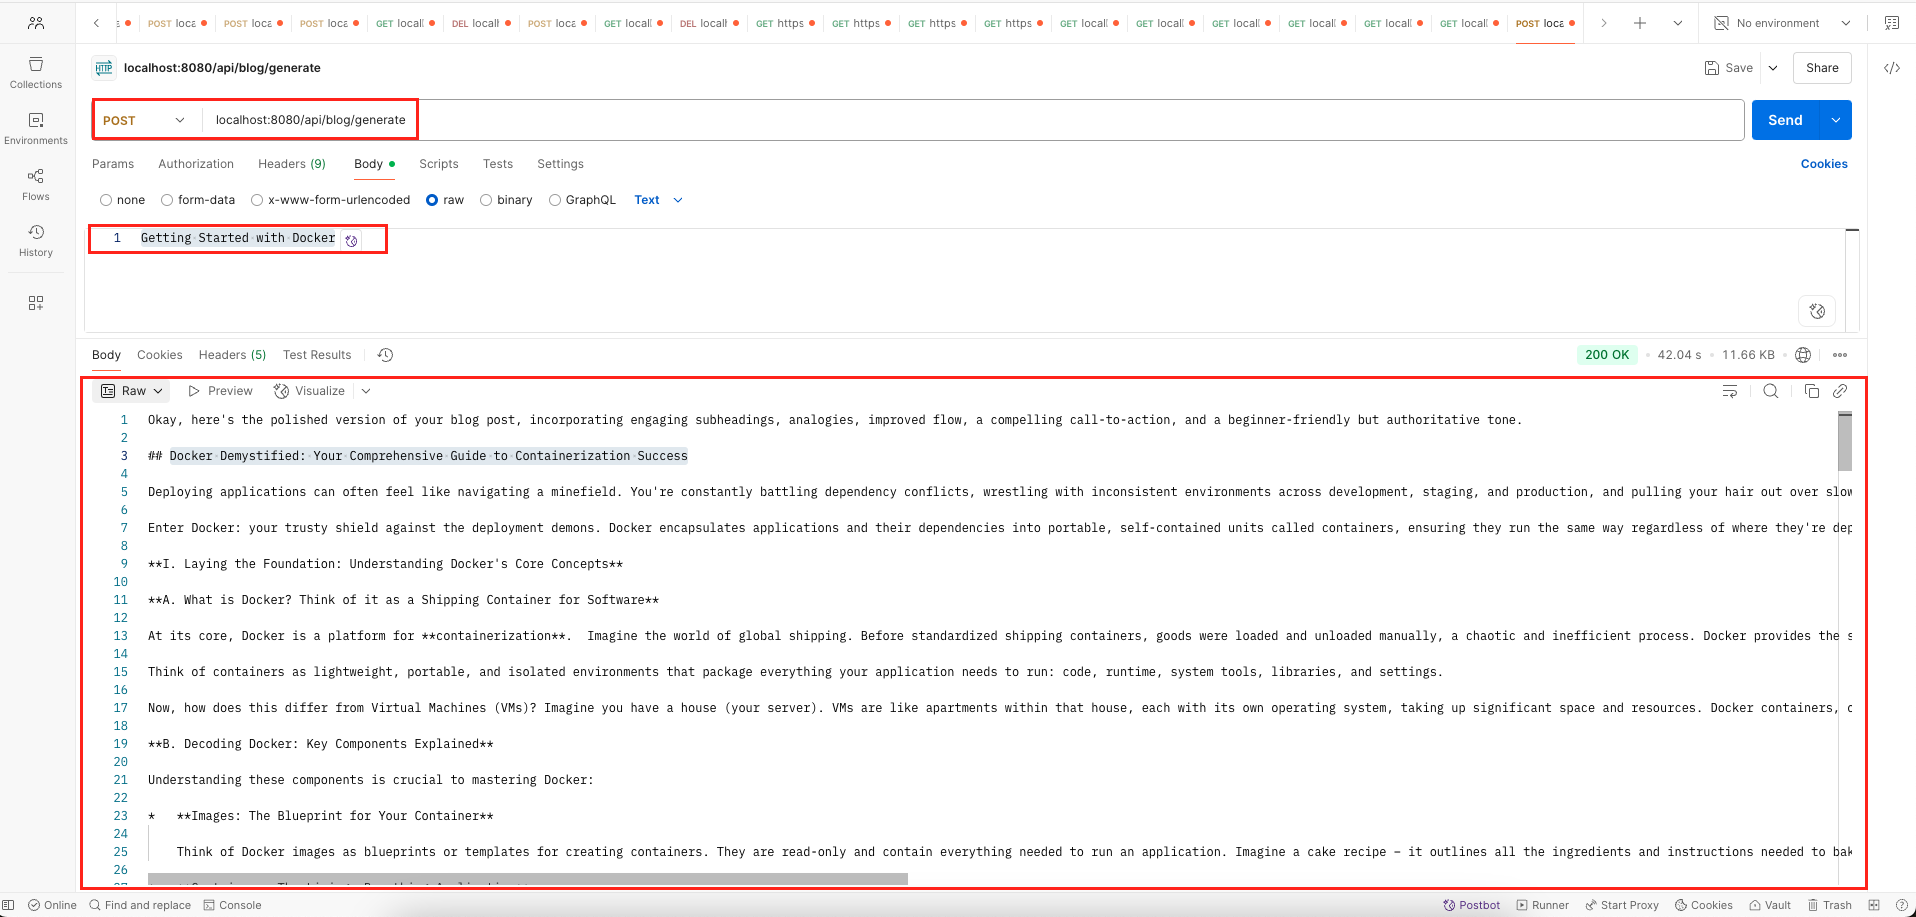
7. How Our Chain Workflow Works Step-by-Step
Let’s trace through exactly what happens when you submit the topic “Getting Started with Docker”:
Initial User Input: “Getting Started with Docker”
Step 1: Research Phase (i=0)
- Current Prompt: Research assistant prompt from
systemPrompts[0] - AI Input: Research prompt + “Getting Started with Docker”
- AI Processing: Analyzes the topic and generates key research points
- AI Output Example:
1. Docker basics and containerization concepts
2. Installation process across different operating systems
3. Key Docker commands for beginners
4. Creating and managing containers
5. Working with Docker images
6. Common use cases and benefits
7. Troubleshooting common issuesResult: This output becomes the new response variable
Step 2: Structure Phase (i=1)
- Current Prompt: Content strategist prompt from
systemPrompts[1] - AI Input: Structure prompt + research points from Step 1
- AI Processing: Creates a logical blog post outline
- AI Output Example:
Title: "Docker Demystified: Your Comprehensive Guide to Containerization Success"

I. Introduction
   - Hook: Why containerization matters
   - What you'll learn

II. What is Docker?
   - Containerization explained
   - Docker vs Virtual Machines

III. Installation Guide
   - Windows installation
   - Mac installation
   - Linux installation

IV. Essential Docker Commands
   - Basic container operations
   - Image management

V. Your First Container
   - Step-by-step example
   - Common pitfalls

VI. Conclusion
   - Next steps
- Additional resourcesResult: This outline becomes the new response variable
Step 3: Content Creation Phase (i=2)
- Current Prompt: Technical writer prompt from
systemPrompts[2] - AI Input: Writing prompt + outline from Step 2
- AI Processing: Expands the outline into a full blog post
- AI Output: Complete 800-1200 word blog post with:
Engaging introduction
Detailed explanations of each section
Code examples and practical tips
Smooth transitions between topics
Strong conclusion
Step 4: Polish & Enhancement Phase (i=3)
- Current Prompt: Editor prompt from
systemPrompts[3] - AI Input: Polish prompt + full blog post from Step 3
- AI Processing: Enhances readability and engagement
- AI Output: Final polished blog post with:
More engaging subheadings
Better analogies and examples
Improved flow and readability
Call-to-action
Beginner-friendly toneFinal Result
The last iteration of the for loop returns the completely processed, high-quality blog post that went through all four refinement stages.
🖥️ Verify the output
When you send a POST request tohttp://localhost:8080/api/blog/generate
with the blog post topic as a plain text string in the request body, the BlogPostController receives this topic and passes it to the BlogPostChainWorkflow service. The service then processes the topic through its multi-step LLM chain (research, outline, content creation, polish).
The controller would then return a plain text string in the HTTP response, which might look something like this (the exact content will vary with each LLM generation):
8. Video Tutorial
If you prefer visual learning, check out our step-by-step video tutorial demonstrating the Spring AI Chain Workflow implementation in action.
📺 Watch on YouTube:
9. Source Code
The complete source code for this Spring AI Chain Workflow example is available on GitHub. You can clone the repository and run it locally to see the chain workflow pattern in action.
🔗 Spring AI Chain Workflow Demo App: https://github.com/BootcampToProd/spring-ai-chain-workflow
10. Things to Consider
When implementing the chain workflow pattern, keep these important considerations in mind:
- Latency: Each step in the chain adds to the total processing time. For very long chains, this can become significant.
- Error Handling: What if one step in the chain fails or produces unexpected output? You’ll need robust error handling and potentially retry mechanisms or fallback logic.
- Prompt Engineering: The quality of each prompt is crucial. Poorly worded prompts can lead to a cascade of suboptimal results.
- Cost: Each LLM call in the chain usually incurs a cost. Longer chains mean more calls.
- Context Management: Ensure that the necessary context from previous steps is effectively passed to subsequent steps. Too much irrelevant context can confuse the LLM, while too little can lead to a loss of continuity.
- Complexity: While chains break down complexity, managing very long and intricate chains can itself become complex.
11. FAQs
Can I modify the prompts in the systemPrompts array?
Absolutely! The array-based approach makes it easy to customize each step. You can modify prompts, add new steps, or even create different prompt sets for different content types.
What if one step produces poor output?
Since each step builds on the previous one, poor output from any step affects all subsequent steps. This is why testing and refining individual prompts is crucial.
Can I skip steps based on the input?
Yes! You can add conditional logic before the for loop to determine which prompts to include in the array, or modify the loop to skip certain indices based on conditions.
Can I run some steps in parallel instead of sequentially?
If steps don’t depend on each other, you’d want to use the Parallelization Workflow pattern instead. Chain workflows are specifically for sequential dependencies where each step needs the previous step’s output.
How do I manage the growing context in a long chain?
Careful prompt engineering is key. For each step, decide precisely what information from previous steps is relevant. You might summarize previous outputs or extract key entities to pass along, rather than the entire raw text from all prior steps. For very complex state management, you might look into more advanced patterns or tools.
Is Spring AI necessary to implement a Chain Workflow?
No, the concept of prompt chaining is a general LLM technique. However, Spring AI significantly simplifies the integration with LLMs in a Spring Boot environment, providing tools like ChatClient, easy configuration, and a familiar Spring programming model.
How is a Chain Workflow different from just giving the LLM one very long, complex prompt?
Using a single complex prompt can make it harder for the LLM to fully understand instructions and limits control over intermediate steps. Chaining improves this by breaking tasks into modular steps, allowing custom logic between calls, using focused prompts for better results, and making debugging easier by pinpointing issues in specific parts of the chain.
12. Conclusion
The Chain Workflow pattern is a simple yet powerful way to work with AI or other complex systems. Instead of trying to do everything in one step, it breaks the task into smaller, connected stages. Each step builds on the previous one, making the process more organized, flexible, and easier to control. This step-by-step method helps create better results and makes it easier to fix or improve specific parts of the workflow later on.
13. Learn More
Interested in learning more?
Spring AI Structured Output: Converting AI Responses into Structured Data
Add a Comment