Learn how to use LangChain4j with LM Studio to run and connect local LLMs, including step-by-step setup and examples for building local AI apps.
1. Introduction
Welcome back to our LangChain4j tutorial series! In our previous articles, we explored the basics of LangChain4j, understood the ChatModel interface, learned how to get structured outputs, implemented ChatModel listeners to monitor our AI interactions, demonstrated running local LLMs in Docker and learned about running local llms inside Ollama.
In this article, we will focus on LM Studio – a popular application that allows you to download and run large language models (LLMs) locally on your machine. We will walk through how to set up LM Studio, download a model, expose it via its OpenAI-compatible REST API, and then connect to it from LangChain4j Spring Boot application.
2. What Is LM Studio?
LM Studio is a free desktop application (available for Windows, macOS, and Linux) that allows you to:
- Browse and download open-source LLMs (like Gemma, Llama, Mistral, etc.) directly
- Run models locally with hardware acceleration (GPU/CPU)
- Chat with models via a built-in chat UI
- Expose models as an API server — using its own API format, OpenAI-compatible format, or Anthropic-compatible format
Think of it as a friendly, visual alternative to running models manually on the command line. It handles model management and inference so you can focus on building your application.
3. LM Studio vs. Ollama – What’s the Difference?
You might wonder: “We already covered Ollama in the previous article – why use LM Studio?”
| Feature | LM Studio | Ollama |
|---|---|---|
| Interface | Desktop GUI | CLI-based |
| Model download | Via built-in model browser | Via ollama pull command |
| API compatibility | OpenAI, LM Studio native, Anthropic | OpenAI compatible |
| Best for | Beginners, visual management | Developers, scripting |
Both tools let you run models locally — it’s mostly a matter of preference!
4. Installing and Setting Up LM Studio
Step 1: Download and Set Up LM Studio
Before writing code, we need to get our local AI server running.
- Download: Go to the LM Studio website and download the installer for your OS (Windows, Mac, or Linux).
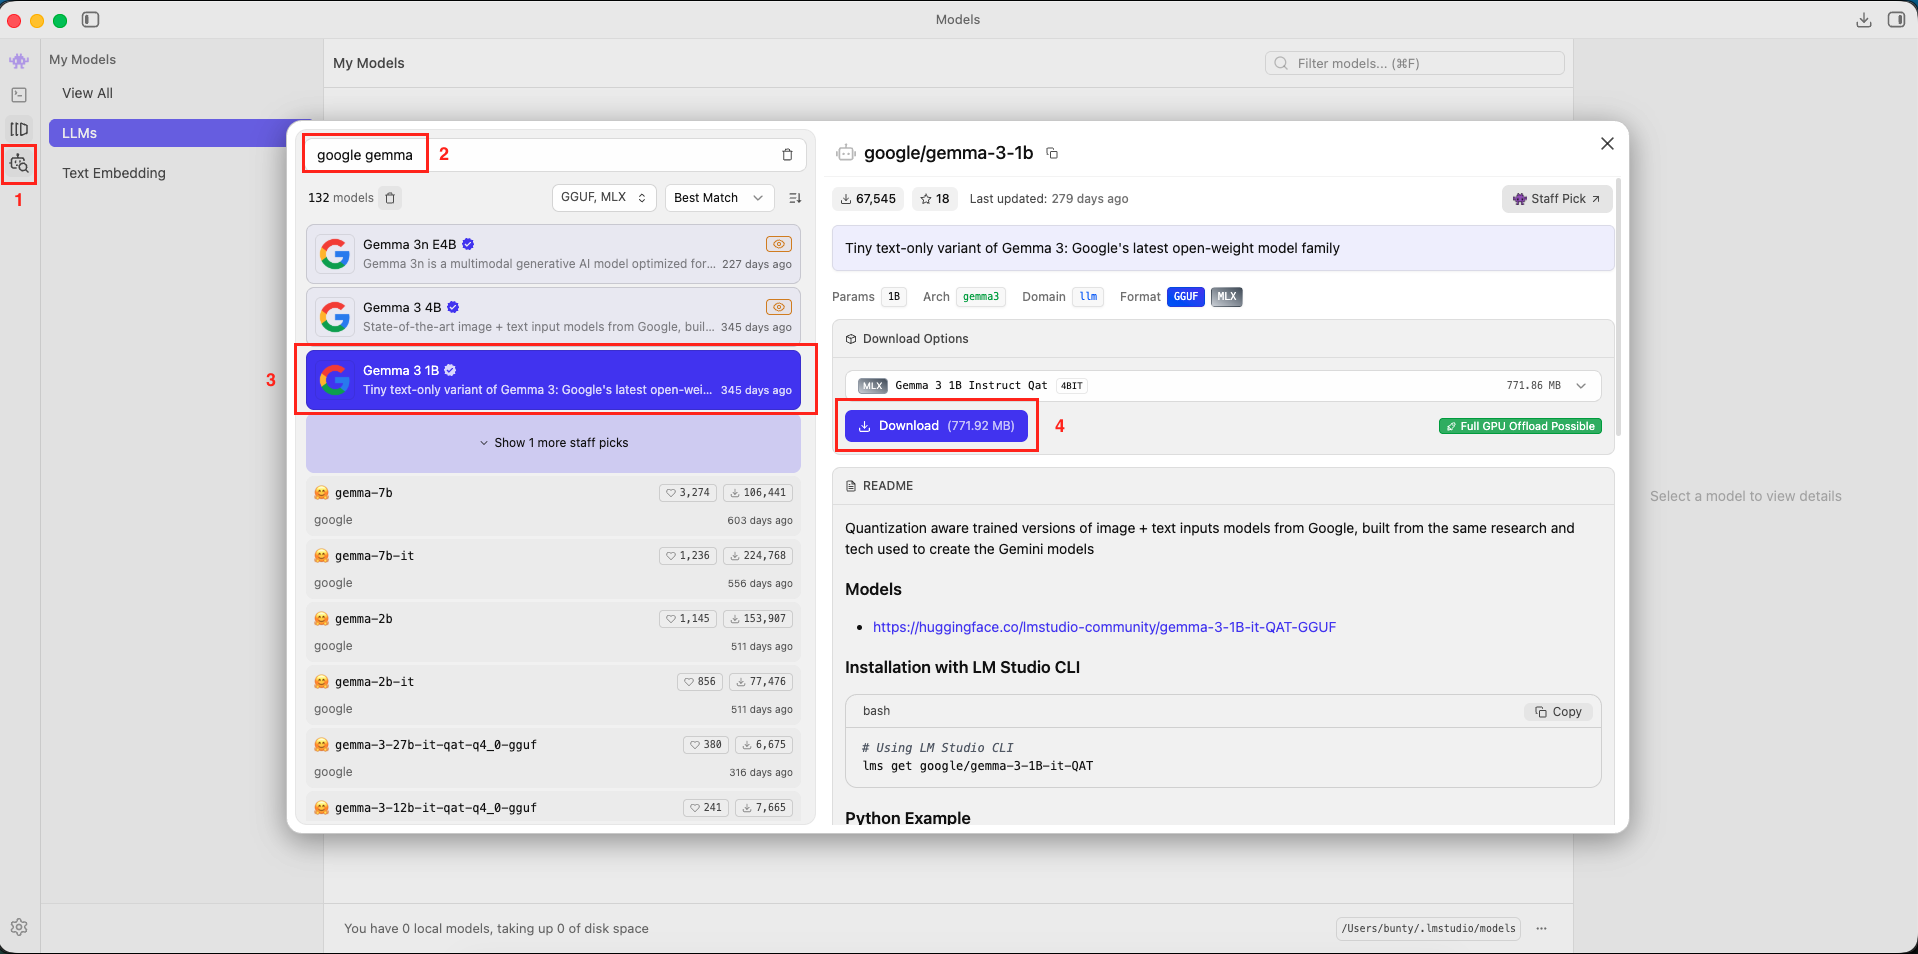
- Search for a Model: Open the application and click the “Magnifying Glass” icon (Model Search).
- Download Gemma: In the search bar, type google gemma 3.
- Look for “google/gemma-3-1b”. This is a small, fast model perfect for testing.
- Click Download button.
- Verify: Once downloaded, go to the “My Models” folder icon to confirm it’s there.
Step 2: Understanding LM Studio REST APIs
To connect our Java app to LM Studio, we need to talk to it over the network. LM Studio exposes a local server that acts like a web API.
LM Studio allows interaction via three API structures:
- Official LM Studio REST API: Their native format.
- OpenAI Compatible API: This mimics the structure of OpenAI (ChatGPT) APIs.
- Anthropic REST API: This mimics the structure of Claude APIs.
We will focus on the OpenAI Compatible API.
Why? LangChain4j has excellent built-in support for OpenAI. Since LM Studio pretends to be OpenAI, we can reuse the standard OpenAiChatModel in LangChain4j to talk to our local machine!
Step 3: Start the LM Studio Server
Before we can talk to our model via API, we need to start the LM Studio local server:
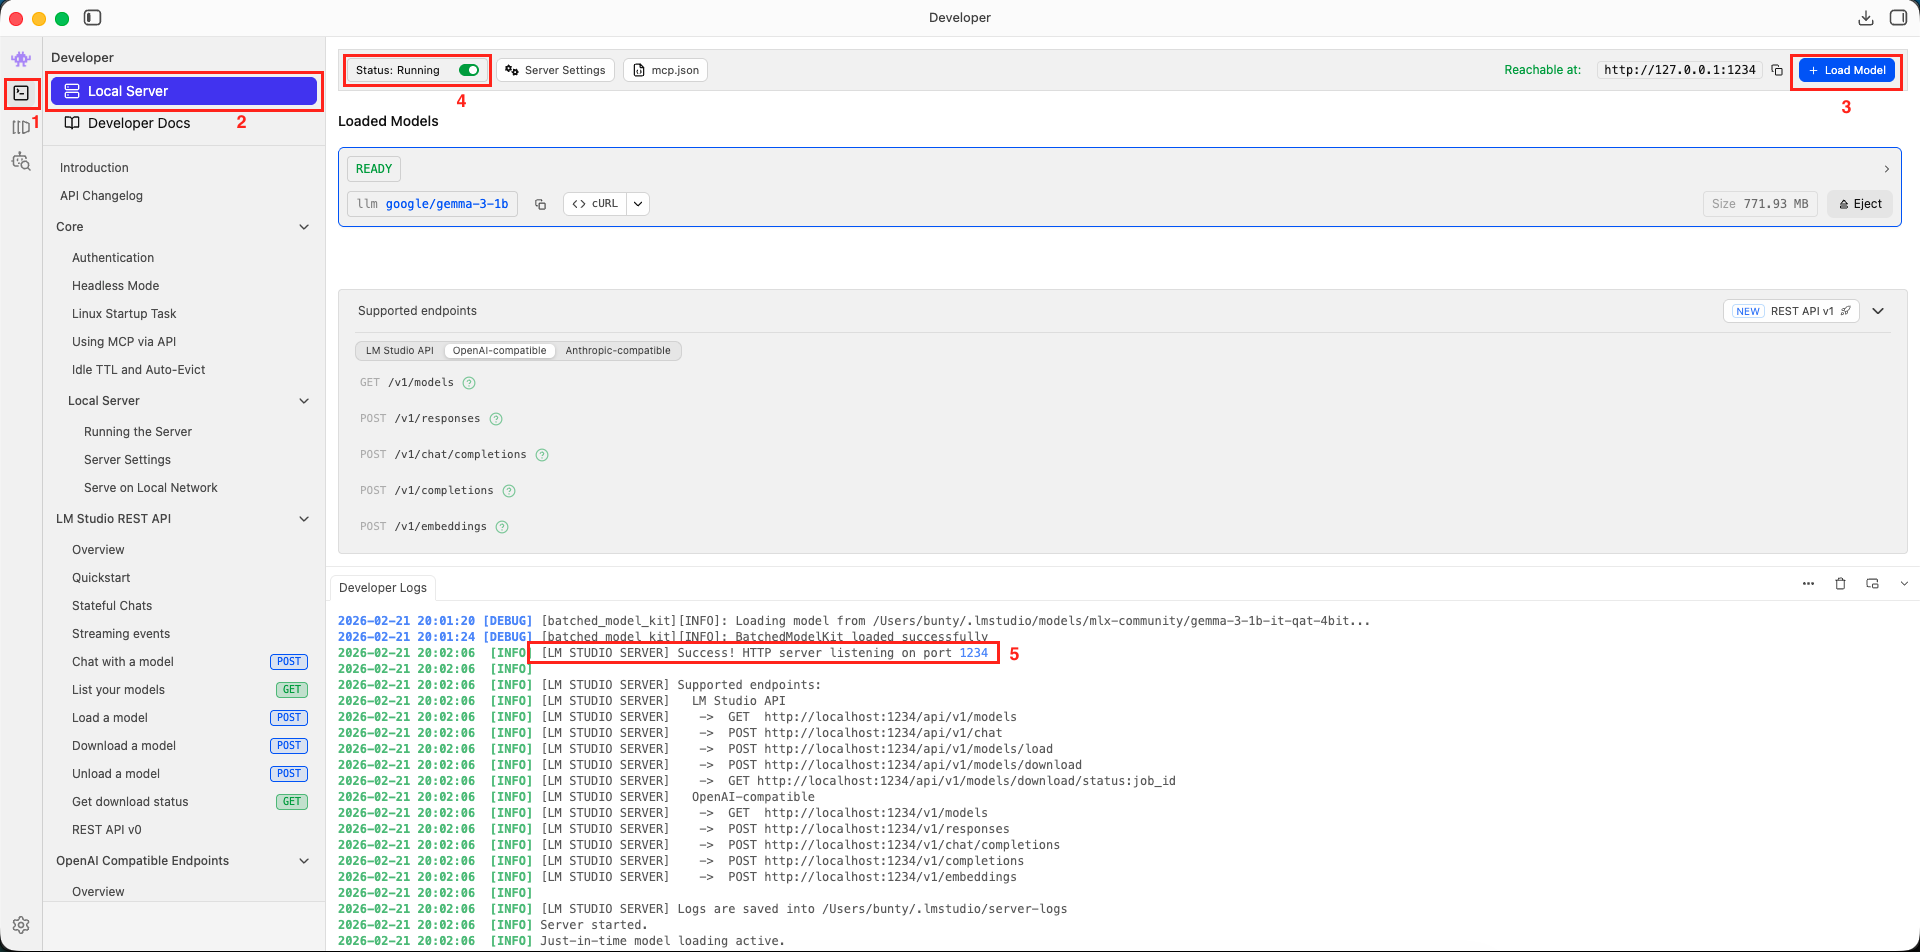
- Open LM Studio
- Click the “Developer” tab in the left sidebar
- Click on “Local Server” option
- Click on “+ Load Model” button and select the model you downloaded
- Click on “Start Server” radio button
You should see a log message like:
[LM STUDIO SERVER] Success! HTTP server listening on port 1234
Once the server is running, you can test it with a quick curl command:
curl http://localhost:1234/v1/chat/completions \
  -H "Content-Type: application/json" \
  -d '{
    "model": "google/gemma-3-1b",
    "messages": [
      { "role": "user", "content": "Hello! What can you do?" }
    ]
  }'
If you get a JSON response with a message from the model – congratulations, your LM Studio server is working! 🎉
5. The Technical Constraint: HTTP 1.1
Here is something critical you need to know before writing any code:
LM Studio’s server currently only supports HTTP version 1.1. It does NOT support HTTP/2.
By default, Java’s built-in HTTP client (HttpClient) may attempt to negotiate HTTP/2, which will cause your requests to LM Studio to fail.
Because of this limitation:
- We must force HTTP/1.1 when configuring our HTTP client
- We cannot configure our ChatModel via
application.propertiesorapplication.yml(the auto-configuration doesn’t expose a way to force HTTP/1.1) - Instead, we will create the
OpenAiChatModelbean programmatically in a Spring@Configurationclass, where we have full control over the HTTP client settings
This is why our setup looks slightly different from the standard property-based configuration you might have seen in earlier articles.
6. Building LangChain4j with LM Studio Demo Application
We are building a Simple Local Chat Application that:
- Accepts a user message via HTTP POST Rest API
- Forwards it to the LM Studio model via LangChain4j
- Returns the AI response as JSON
6.1. Project Structure Overview
Here’s our complete project structure for better understanding:
langchain4j-chatmodel-lmstudio-demo
├── src
│   └── main
│       ├── java
│       │   └── com
│       │       └── bootcamptoprod
│       │           ├── config
│       │           │   └── ApplicationConfig.java        # Chat Model Configuration (Forcing HTTP 1.1)
│       │           ├── controller
│       │           │   └── ChatController.java           #  REST Endpoint
│       │           └── Langchain4jLmstudioDemoApplication.java
│       └── resources
│           └── application.yml                           # Basic Coniguration
└── pom.xml                                               # Dependency management
Key Components:
- pom.xml: Defines our project dependencies, specifically including the
langchain4j-open-ai-spring-boot-starterfor API compatibility and thelangchain4j-http-client-jdkto handle the network connection. - ApplicationConfig.java: Serves as the central configuration hub where we programmatically create the ChatModel, forcing the connection to use HTTP 1.1 and pointing it to the local LM Studio server (localhost:1234).
- Main Application Class: Bootstraps our Spring Boot application.
- ChatController: Exposes a REST API endpoint to accept user prompts and interact with the local LLM served by LM Studio via the configured ChatModel.
6.2. Diving Into the Code
Let’s walk through each file in detail, understanding what each component does.
Step 1: Setting Up Maven Dependencies
First, let’s set up our Maven project with all necessary dependencies. The pom.xml file defines our project configuration and required libraries:
<properties>
	<java.version>21</java.version>
	<langchain4j.version>1.11.0</langchain4j.version>
</properties>

<dependencies>
	<!-- Spring Boot Web for REST endpoints -->
	<dependency>
		<groupId>org.springframework.boot</groupId>
		<artifactId>spring-boot-starter-web</artifactId>
	</dependency>
  <!-- LangChain4j OpenAI Spring Boot Starter -->
	<dependency>
		<groupId>dev.langchain4j</groupId>
		<artifactId>langchain4j-open-ai-spring-boot-starter</artifactId>
	</dependency>
	<!-- JDK HTTP Client for LangChain4j -->
	<dependency>
		<groupId>dev.langchain4j</groupId>
		<artifactId>langchain4j-http-client-jdk</artifactId>
	</dependency>
</dependencies>

<dependencyManagement>
	<dependencies>
	  <!-- LangChain4j BOM for version management -->
		<dependency>
			<groupId>dev.langchain4j</groupId>
			<artifactId>langchain4j-bom</artifactId>
			<version>${langchain4j.version}</version>
			<type>pom</type>
			<scope>import</scope>
		</dependency>
	</dependencies>
</dependencyManagement>
What’s Important Here:
- spring-boot-starter-web: This is our foundation for building a web application. It brings in the embedded Tomcat server and the tools needed to create our REST API endpoint, allowing our Spring Boot app to receive requests.
- langchain4j-open-ai-spring-boot-starter: This is a crucial dependency. Even though we’re talking to LM Studio and not OpenAI directly, LM Studio exposes an OpenAI-compatible API. This starter is designed to format requests exactly how LM Studio expects them, making the integration seamless. It helps Spring Boot auto-configure a ChatModel bean that points to our local LM Studio instance.
- langchain4j-http-client-jdk: This dependency provides LangChain4j with access to the standard Java HTTP client. We use this in our
ApplicationConfigto manually control the HTTP version (forcing HTTP 1.1), which is necessary for LM Studio. - langchain4j-bom: A Bill of Materials (BOM) that acts as a central manager for all LangChain4j library versions. Using this ensures that all LangChain4j dependencies are compatible with each other, preventing tricky versioning issues.
Step 2: Configure Application Properties
Next, let’s configure our application settings in application.yml.
spring:
  application:
    name: langchain4j-chatmodel-lmstudio-demo
📄 Configuration Overview
- spring.application.name: Simply gives our application a name for identification within the Spring ecosystem.
- We only set the application name here. Notice that we do not configure the ChatModel properties here (like
langchain4j.open-ai.chat-model.base-url). As mentioned earlier, this is intentional – we configure the ChatModel programmatically so we can force HTTP/1.1.
Step 3: Application Entry Point
This is the main class that bootstraps our entire application.
package com.bootcamptoprod;

import org.springframework.boot.SpringApplication;
import org.springframework.boot.autoconfigure.SpringBootApplication;

@SpringBootApplication
public class Langchain4jLmstudioDemoApplication {

    public static void main(String[] args) {
        SpringApplication.run(Langchain4jLmstudioDemoApplication.class, args);


    }
}
Explanation:
- This is the standard Spring Boot entry point. The
@SpringBootApplicationannotation enables component scanning, auto-configuration, and configuration properties. Nothing special here – just our app’s starting point.
Step 4: ChatModel Configuration (The Most Important File!)
This is the most critical part. We create the ChatModel bean programmatically to handle the HTTP version issue.
package com.bootcamptoprod.config;

import dev.langchain4j.http.client.jdk.JdkHttpClient;
import dev.langchain4j.model.openai.OpenAiChatModel;
import org.springframework.context.annotation.Bean;
import org.springframework.context.annotation.Configuration;

import java.net.http.HttpClient;

@Configuration
public class ApplicationConfig {

    @Bean
    public OpenAiChatModel chatModel() {

        // Configure underlying JDK HTTP client for LM Studio
        HttpClient.Builder jdkBuilder = HttpClient.newBuilder()
                .version(HttpClient.Version.HTTP_1_1); // Force HTTP/1.1 for LM Studio

        // Build OpenAI-compatible chat model pointing to LM Studio
        return OpenAiChatModel.builder()
                .apiKey("lm-studio") // Any API key value
                .modelName("google/gemma-3-1b") // Model served by LM Studio
                .baseUrl("http://localhost:1234/v1") // LM Studio OpenAI-compatible endpoint
                .httpClientBuilder(
                        JdkHttpClient.builder()
                                .httpClientBuilder(jdkBuilder) // Inject custom HTTP client
                )
                .logRequests(true) // Enable logging to see requests
                .logResponses(true) // Enable logging to see responses
                .build();
    }
}
Code Summary:
- HttpClient.Builder: We create a standard Java HTTP client builder and explicitly call
.version(HttpClient.Version.HTTP_1_1). - apiKey: While LangChain4j requires this property, LM Studio models don’t need authentication by default. We use a placeholder value like “lm-studio” to satisfy the framework’s validation. It’s ignored by the local model server. If required authentication can be enabled inside the LM Studio Local Server Settings and accordingly you can configure the key here.
- baseUrl: We point this to
http://localhost:1234/v1. This tells LangChain4j “Don’t go to api.openai.com, go to my local machine instead.” - httpClientBuilder: We inject our custom HTTP 1.1 client into the LangChain4j builder. This is LangChain4j’s own wrapper around Java’s HTTP client, which can accept the standard builder as input
Think of it as: LangChain4j’s wrapper holds Java’s HTTP client inside it, and we’re customizing the inner one.
Step 5: The controller
package com.bootcamptoprod.controller;

import dev.langchain4j.model.chat.ChatModel;
import org.springframework.http.ResponseEntity;
import org.springframework.web.bind.annotation.PostMapping;
import org.springframework.web.bind.annotation.RequestBody;
import org.springframework.web.bind.annotation.RequestMapping;
import org.springframework.web.bind.annotation.RestController;

import java.util.LinkedHashMap;
import java.util.Map;

@RestController
@RequestMapping("/api/v1")
public class ChatController {

    private final ChatModel chatModel;

    public ChatController(ChatModel chatModel) {
        this.chatModel = chatModel;
    }

    @PostMapping("/chat")
    public ResponseEntity<Map<String, Object>> simpleChat(@RequestBody Map<String, String> request) {

        // Extract user message from request body
        String userMessage = request.get("message");

        // Send prompt to LM Studio model
        String response = chatModel.chat(userMessage);

        // Prepare simple JSON response
        Map<String, Object> result = new LinkedHashMap<>();
        result.put("aiResponse", response);

        return ResponseEntity.ok(result);
    }
}
Code Summary:
- This REST controller exposes a
/api/v1/chatendpoint that accepts POST requests. The ChatModel is injected via constructor injection. - When a request arrives with a message, we simply extract it, pass it to
chatModel.chat(), and return the AI’s response wrapped in JSON. - The ChatModel injected here is not a default, auto-configured bean. It is the specific custom bean we created in
ApplicationConfig.java. Because of this, when the controller callschatModel.chat(), it uses the specific HTTP 1.1 client and URL settings we defined to communicate successfully with LM Studio. - The LinkedHashMap ensures our JSON response maintains property order, making the API output predictable and easier to read.
7. Testing the Application
- Start LM Studio Server: Start LM Studio Local Server and wait for the status indicator to turn green, showing “Status: Running”.
- Start Your Application: Run your Spring Boot application using Maven
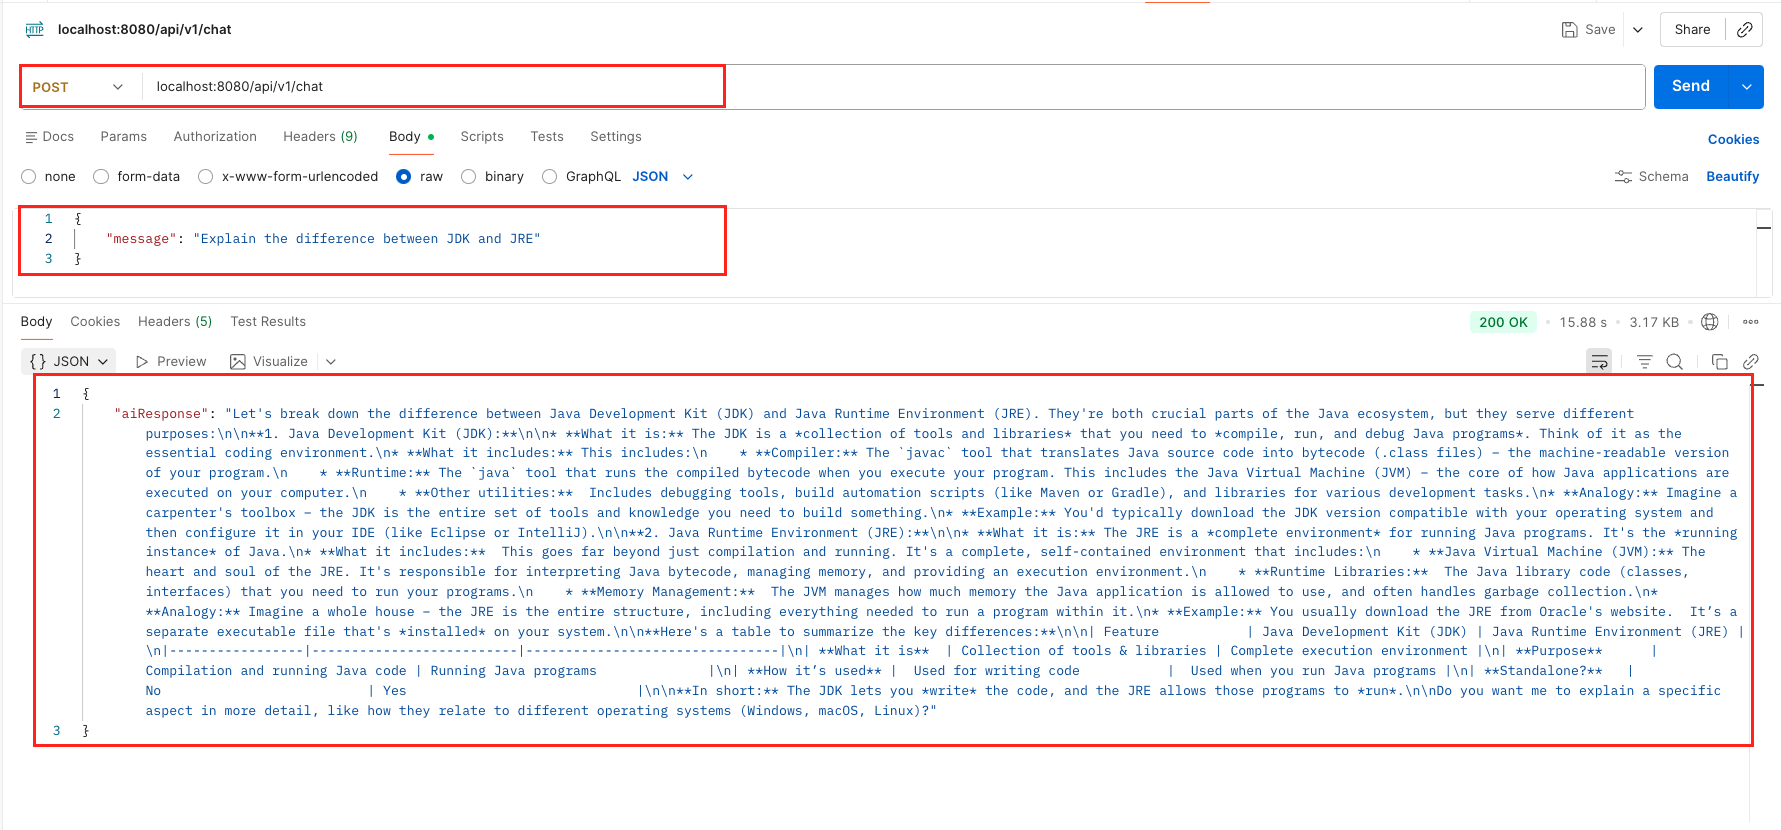
mvn spring-boot:run - Send a Request: Once the application is live, issue a POST request using cURL or Postman to see the local LLM in action:
curl -X POST http://localhost:8080/api/v1/chat \
-H "Content-Type: application/json" \
-d '{
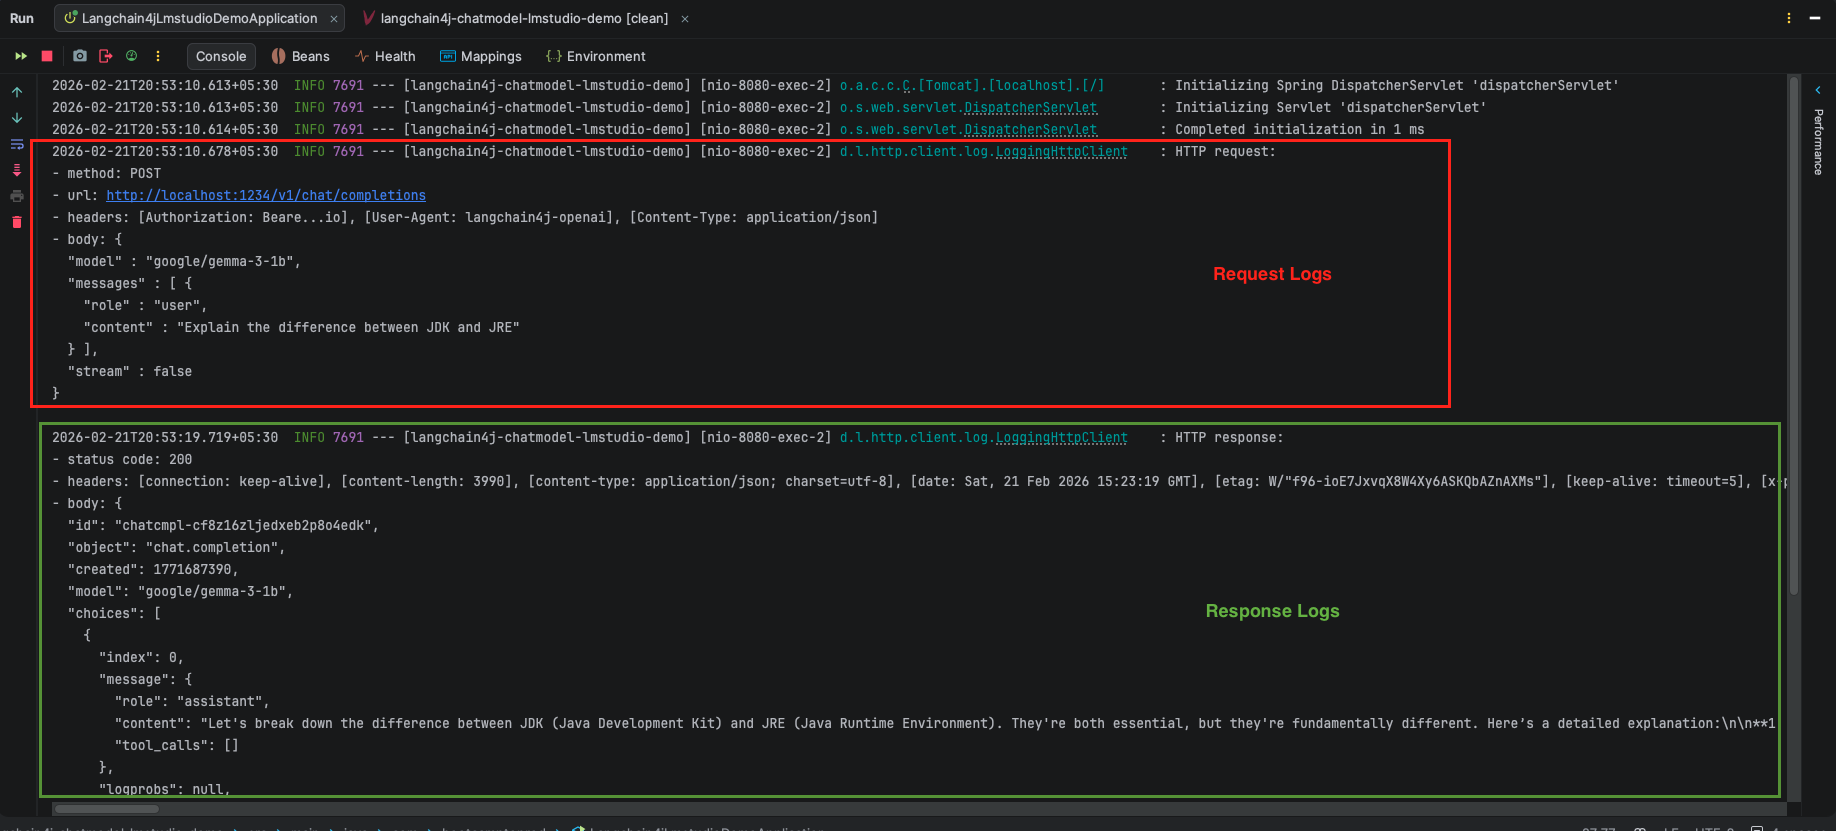
"message": "Explain the difference between JDK and JRE"
}'
Output:
8. Video Tutorial
If you prefer a visual guide, check out our complete step-by-step video tutorial where we build this LangChain4j with LM Studio integration from scratch. We demonstrate exactly how to download and load the google/gemma-3-1b model inside LM Studio, and how to configure Spring Boot to communicate with your local LLMs instead of external cloud APIs!
📺 Watch on YouTube:
9. Source Code
The full source code for this LangChain4j with LM Studio Demo is available on our GitHub repository. You can clone the project, ensure your local LM Studio server is running on port 1234, and launch the application to start chatting with your local llms immediately.
🔗 LangChain4j ChatModel Ollama Demo: https://github.com/BootcampToProd/langchain4j-chatmodel-lmstudio-demo
10. Things to Consider
Before wrapping up, here are some important points to keep in mind when working with LM Studio and LangChain4j:
- LM Studio only supports HTTP/1.1 As we discussed, always force HTTP/1.1 when connecting from Java. If you see connection errors or timeouts, this is often the first thing to check.
- Model must be loaded and server must be running LM Studio’s server only runs when you explicitly start it. If your Spring Boot app starts but can’t connect, ensure the LM Studio server is active and the correct model is loaded.
- Model name must match exactly The
modelNamein yourApplicationConfigmust exactly match the model identifier shown in LM Studio (e.g.,google/gemma-3-1b). A typo here will cause the API to return an error. - Performance depends on your hardware Larger models (7B, 13B parameters) require significant RAM and a decent GPU. For development and testing, stick to smaller models (1B–3B) for faster response times.
- Programmatic config vs. property-based config If LM Studio ever adds HTTP/2 support, you could switch to property-based configuration (
application.yml). Until then, keep the programmatic approach.
11. FAQs
Can I configure this in application.properties instead of Java code?
Technically, yes, but it is risky. The standard Spring Boot configuration does not easily allow you to force HTTP/1.1. Using a Java configuration class (like our ApplicationConfig) is the recommended way to ensure the HTTP client is set up correctly for LM Studio.
Is LM Studio free to use?
Yes! LM Studio is free to download and use for both personal and commercial purposes. It allows you to download and run thousands of open-source models from Hugging Face without paying anything.
Can I use this setup with models other than Gemma?
You can download Llama 3, Mistral, Phi, or any other supported model in LM Studio. Just make sure to load that model in the LM Studio interface. You also need to update the modelName in your Spring Boot app.
Can I see the exact JSON being sent to LM Studio for debugging?
In your ApplicationConfig.java, inside the OpenAiChatModel.builder(), you can add .logRequests(true) and .logResponses(true). This will print the exact request body and headers to your IntelliJ/Eclipse console, which is incredibly helpful for troubleshooting.
I want to access this API from my mobile phone or another computer. Is that possible?
Yes, but there is a specific requirement. By default, LM Studio only talks to localhost (your current computer). To allow outside connections, you must enable “Serve on Local Network” in the LM Studio server settings. Crucially, the other device must be connected to the same Wi-Fi or Local Network (LAN) as your computer. If your phone is on mobile data (4G/5G), it will not be able to reach your local API.
12. Conclusion
Having a private, zero-cost AI running right on your own machine completely changes the way you can experiment with intelligent Java applications. Because you no longer have to worry about expensive API usage limits or sending sensitive data to external cloud servers, you now have the ultimate sandbox to test out new ideas safely. The true beauty of this setup is the seamless abstraction – your code simply talks to a standard interface, completely unaware that the AI brain powering it lives right there on your machine rather than in a massive data center. Grab the complete source code from our GitHub repository, start your local server, and begin interacting with your own private AI instance.
13. Learn More
Interested in learning more?
LangChain4j with Ollama: Connect to Local LLMs
Add a Comment