
Learn how to integrate OpenRouter with Spring AI in your Java Spring Boot application. This guide provides a step-by-step tutorial for using a single API to access multiple LLMs like Claude, Gemini, Llama, OpenAI, and many more.
1. Introduction
The AI landscape is evolving rapidly, with new models such as GPT, Claude, Gemini, and Llama emerging almost weekly. While this gives developers incredible choice, it also creates a significant challenge: each AI provider has its own API, making it difficult to switch between models without rewriting code.
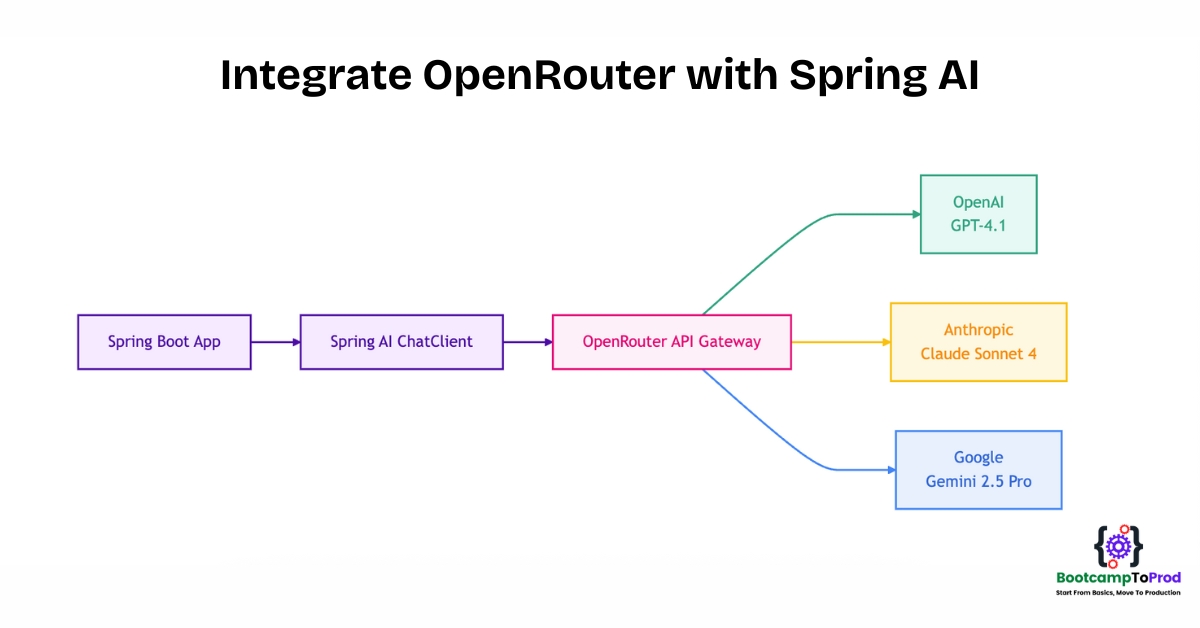
What if you could access hundreds of AI models through a single, unified API? That’s exactly what OpenRouter provides – a universal adapter that lets you seamlessly switch between different AI models without changing your application code.
In this comprehensive guide, we’ll build a Smart Chat Assistant using Spring AI and OpenRouter. This assistant will be able to switch between different AI models with just a configuration change.
2. What is OpenRouter? Your Universal AI Model Adapter
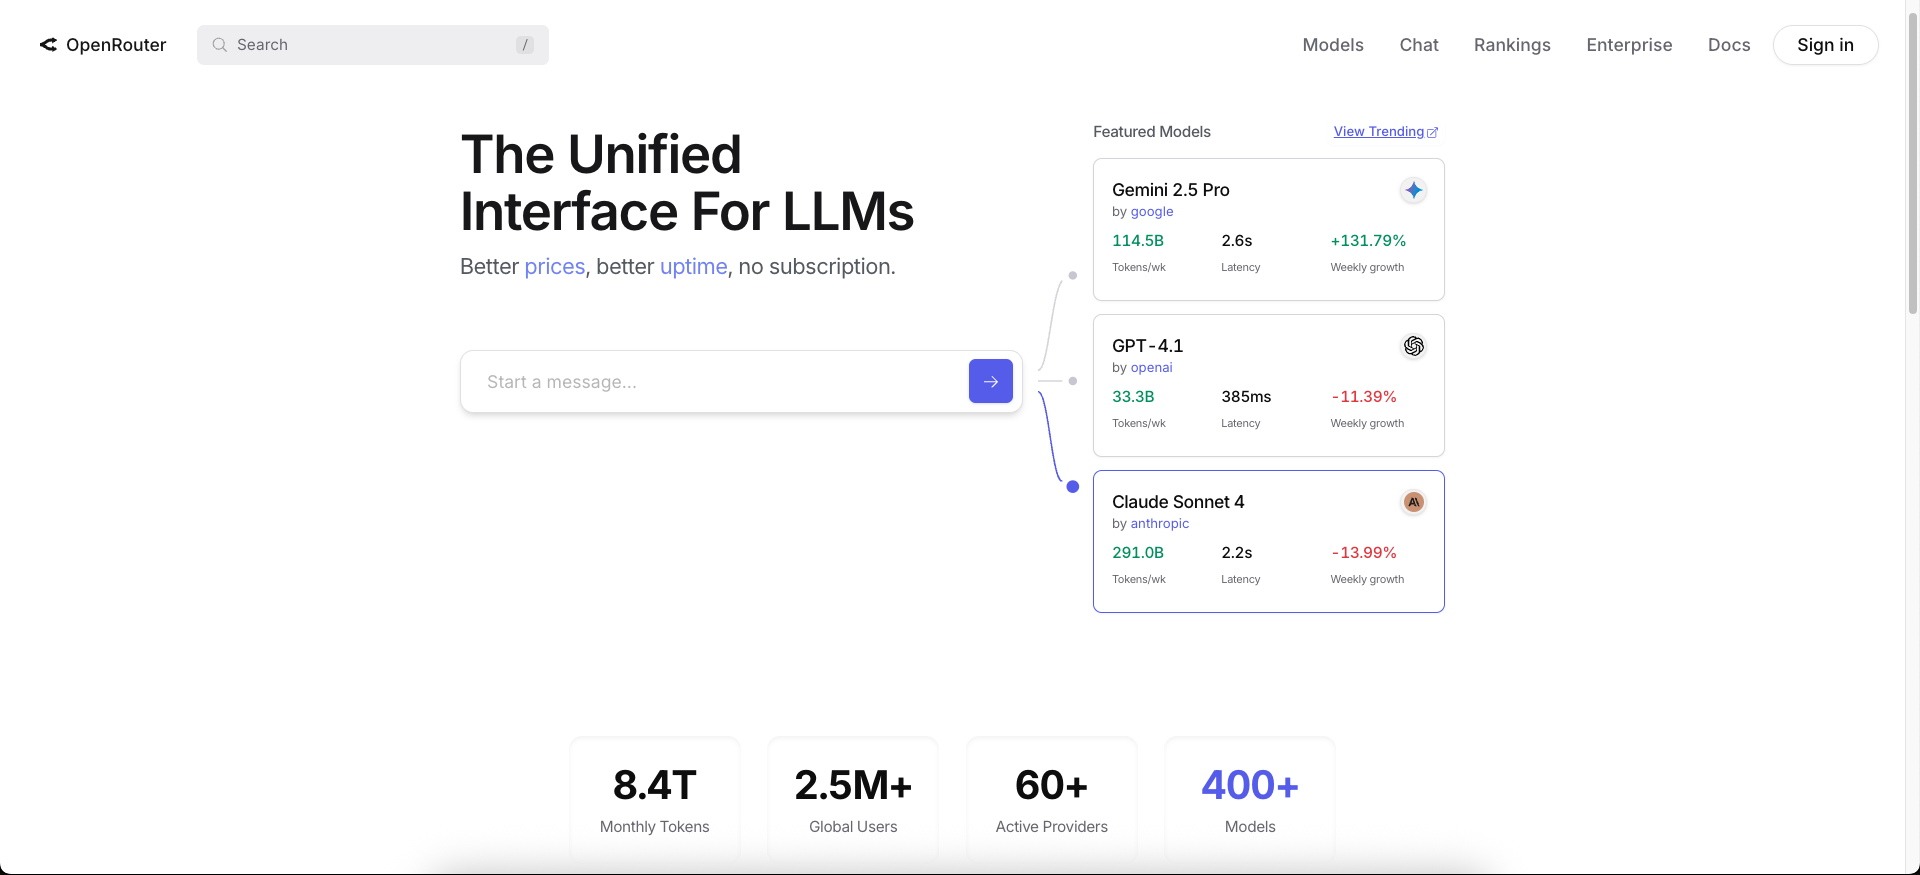
OpenRouter is a unified API gateway that provides access to 400+ AI models from different providers through a single, unified API endpoint. The provided endpoint is compatible with the OpenAI API specification. Instead of managing separate API keys and different client libraries for each AI provider, you can access GPT-4, Claude, Llama, Gemini, and 400+ other models with just one integration.
3. Why Choose OpenRouter?
Using OpenRouter offers several key benefits:
- One API: A single, OpenAI-compatible API format for all models.
- One API Key: A single key to access models from various providers.
- Unified Billing: A single place to manage costs for all the models you use.
- Model Discovery: An easy way to find and compare models, including many free ones perfect for testing.
- Cost Optimization: Choose the best model for your budget and requirements
- Real-time Monitoring: Track usage and costs in a comprehensive dashboard
- Model Flexibility: Switch between models without code changes
4. Getting Your OpenRouter API Key
Before we write any code, you’ll need an OpenRouter API key:
- Sign Up: Go to OpenRouter.ai and click the Sign in button to create a free account. You can sign up using your email address or simply use your GitHub or Google account for quick access.
- Generate a Key: Once logged in, click your account icon in the top right, go to Keys, and click Create API Key.
- Save Your Key: Give your key a name (e.g., spring-ai-poc), click Create, and copy the generated key. Store it securely! You won’t be able to see it again.
5. Finding a Model on OpenRouter
OpenRouter’s catalog is its superpower.
- Navigate to the Models page on the site.
- You’ll see a huge list of models. You can filter them by provider, see their pricing per million tokens, and check their context window size.
- Crucially, you’ll find a selection of free, rate-limited models. These are fantastic for development and proof-of-concepts (POCs). Look for models with a “Free” tag, like
google/gemini-2.0-flash-exp:free.
For our example, we’ll use a free model. Remember the model’s identifier (e.g., google/gemini-2.0-flash-exp:free), as we’ll need it for our configuration.
6. Building Our Smart Chat Assistant by Integrating OpenRouter with Spring AI
We’ll build a simple yet powerful Smart Chat Assistant that demonstrates OpenRouter integration with Spring AI.
⚙️ Project Structure & Setup
Below is the folder structure of our Spring Boot application:
spring-ai-openrouter-integration
├── src
│   └── main
│       ├── java
│       │   └── com
│       │       └──bootcamptoprod
│       │               ├── controller
│       │               │   └── ChatController.java
│       │               ├── service
│       │               │   └── ChatService.java
│       │               ├── dto
│       │               │   └── ChatRequest.java
│       │               │   └── ChatResponse.java
│       │               ├── SpringAiOpenRouterIntegrationApplication.java
│       └── resources
│           └── application.yml
└── pom.xml
Explanation:
SpringAiOpenRouterIntegrationApplication.java: The main entry point that starts the Spring Boot application.ChatController.java: Exposes a single REST endpoint,/api/chat/message, to receive user messages and return AI-generated responses.ChatService.java: Contains the core logic for interacting with theChatClientto send a prompt to OpenRouter and process the reply.ChatRequest.java&ChatResponse.java: Simple record classes that define the JSON structure for API requests and responses.application.yml: Configures Spring AI to use the OpenRouter API endpoint, key, and a specific model.pom.xml: Declares the necessary Maven dependencies for Spring Web and the Spring AI OpenAI starter.
Let’s set up our project with the necessary dependencies and configurations.
Step 1: Add Maven Dependencies
First, let’s set up our Maven project. The key insight here is that OpenRouter uses an OpenAI-compatible API. This means we can use the existing spring-ai-starter-model-openai dependency to communicate with it!
Add below dependencies to pom.xml file.
<dependencies>
    <!-- Spring Boot Web for building RESTful web services -->
    <dependency>
        <groupId>org.springframework.boot</groupId>
        <artifactId>spring-boot-starter-web</artifactId>
    </dependency>

    <!-- OpenAI Model Support – configureable for various AI providers (e.g. OpenAI, Google Gemini) -->
    <dependency>
        <groupId>org.springframework.ai</groupId>
        <artifactId>spring-ai-starter-model-openai</artifactId>
    </dependency>

<dependencyManagement>
    <dependencies>
        <!-- Spring AI bill of materials to align all spring-ai versions -->
        <dependency>
            <groupId>org.springframework.ai</groupId>
            <artifactId>spring-ai-bom</artifactId>
            <version>${spring-ai.version}</version>
            <type>pom</type>
            <scope>import</scope>
        </dependency>
    </dependencies>
</dependencyManagement>
In this configuration:
spring-boot-starter-web:The standard dependency for building web applications in Spring Boot, enabling us to create our@RestControllerto handle incoming HTTP requests.spring-ai-starter-model-openai:This is our key to OpenRouter. Because OpenRouter provides an OpenAI-compatible API, we use this starter to get the auto-configured ChatClient and all the necessary components to communicate with its unified endpoint.spring-ai-bom:This Spring AI Bill of Materials (BOM), located in the<dependencyManagement>section, simplifies our setup. It manages the versions of all Spring AI modules, ensuring they are compatible and preventing potential library version conflicts.
Step 2: Configure Application Properties
Now, let’s configure our application and add configuration related to AI using application.yml.
spring:
  application:
    name: spring-ai-openrouter-integration
  ai:
    openai:
      api-key: ${OPENROUTER_API_KEY}
      # This is the crucial part: we override the base URL to point to OpenRouter.
      base-url: https://openrouter.ai/api
      chat:
        options:
          # Here we specify the model from the OpenRouter website.
          model: google/gemini-2.0-flash-exp:free
📄 Configuration Overview
This application.yml file is the heart of our integration, instructing Spring AI to communicate with OpenRouter instead of the default OpenAI service.
👉 AI (OpenAI Starter) Settings:
- api‑key: Your secret key for authenticating with the AI service. Keep this safe and out of source control.
- base‑url: This is the crucial override. We change the default API endpoint from OpenAI to OpenRouter, redirecting all our AI requests to the OpenRouter gateway.
- model: This property defines which specific model from the vast OpenRouter catalog will process our prompts. Here, we’re using a free model, but you can swap this value to any other model identifier (e.g., anthropic/claude-sonnet-4) to instantly change the AI you’re using.
Make sure to set the OPENROUTER_API_KEY environment variable in your system or IDE for the application to authenticate successfully.
Step 3: Create Data Transfer Objects (DTOs)
These simple Java record classes define the structure of our API’s request and response JSON.
package com.bootcamptoprod.dto;

public record ChatRequest(
        String message  // The user's input message
) {
}
package com.bootcamptoprod.dto;

public record ChatResponse(
        String response // The AI's response message
) {
}
Explanation:
- What they do:
ChatRequestholds the incoming message, andChatResponseholds the outgoing AI reply. - Why they’re needed: They provide a clean, type-safe way to handle JSON data.
- How they fit: The controller uses them to automatically serialize and deserialize the request/response bodies.
Step 4: Create Service Class
This class contains the core logic for interacting with the AI model.
package com.bootcamptoprod.service;

import com.bootcamptoprod.dto.ChatRequest;
import com.bootcamptoprod.dto.ChatResponse;
import org.springframework.ai.chat.client.ChatClient;

public class ChatService {

    private final ChatClient chatClient;

    /**
     * Constructor injection for ChatClient
     * ChatClient.Builder is auto-configured by Spring AI
     */
    public ChatService(ChatClient.Builder chatClientBuilder) {
        this.chatClient = chatClientBuilder.build();
    }

    /**
     * Processes user messages through OpenRouter AI models
     */
    public ChatResponse processMessage(ChatRequest chatRequest) {
        System.out.println("📨 Processing message: " + chatRequest.message());

        try {
            // Send the user's message to the AI model via OpenRouter
            String content = chatClient.prompt()
                    .user(chatRequest.message())  // Set the user's message
                    .call()                       // Make the API call
                    .content();                   // Extract the response content

            System.out.println("✅ AI response received successfully");
            return new ChatResponse(content);

        } catch (Exception e) {
            // Log the error for debugging while providing user-friendly response
            System.err.println("❌ Error processing message: " + e.getMessage());
            return new ChatResponse("Sorry, an error occurred while processing your message. Please try again.");
        }
    }
}
Explanation:
- AI Interaction: The primary function of this class is to communicate with the AI model (via OpenRouter) using the injected Spring AI ChatClient. It acts as the business logic layer, abstracting the AI interaction away from the controller.
- Request-Response Logic: It handles standard, synchronous AI interactions.
- processMessage: This method takes the user’s input from
ChatRequest, uses theChatClientto execute a prompt via.call(), and retrieves the complete AI response using.content(). It returns this content wrapped in aChatResponseand includes error handling for API failures.
- processMessage: This method takes the user’s input from
Step 5: Create Controller
The ChatController acts as the public-facing entry point for our application, exposing our “Smart Chat Assistant” to clients through a simple REST API endpoint.
package com.bootcamptoprod.controller;

import com.bootcamptoprod.dto.ChatRequest;
import com.bootcamptoprod.dto.ChatResponse;
import com.bootcamptoprod.service.ChatService;
import org.springframework.http.ResponseEntity;
import org.springframework.web.bind.annotation.PostMapping;
import org.springframework.web.bind.annotation.RequestBody;
import org.springframework.web.bind.annotation.RequestMapping;
import org.springframework.web.bind.annotation.RestController;

@RestController
@RequestMapping("/api/chat")
public class ChatController {

    private final ChatService chatService;

    public ChatController(ChatService chatService) {
        this.chatService = chatService;
    }

    /**
     * Handles POST requests to /api/chat/message
     * Processes user messages and returns AI responses
     */
    @PostMapping("/message")
    public ResponseEntity<ChatResponse> sendMessage(@RequestBody ChatRequest chatRequest) {
        System.out.println("🔄 Received chat request from client");

        // Process the message through our service
        ChatResponse chatResponse = chatService.processMessage(chatRequest);

        System.out.println("📬 Sending response back to client");
        return ResponseEntity.ok(chatResponse);
    }
}
Explanation:
- Purpose: The
ChatControlleris our application’s “front door.” It is responsible for handling incoming web requests and delegating them to theChatServicefor processing. - Its job is to:
- Expose an API Endpoint: It defines a single POST endpoint at
/api/chat/message, which is the address clients will send their chat requests to. - Receive User Input: It uses the
@RequestBodyannotation to automatically convert the JSON body of the incoming request into aChatRequestDTO, efficiently capturing the user’s message. - Delegate to Service: It calls the
chatService.processMessage()method, passing the user’s request. Once the service returns aChatResponse, the controller wraps it in aResponseEntityand sends it back to the client, completing the request-response cycle.
- Expose an API Endpoint: It defines a single POST endpoint at
Step 6: Application Entry Point
Now, let’s define the main class that boots our Spring Boot app.
package com.bootcamptoprod;

import org.springframework.boot.SpringApplication;
import org.springframework.boot.autoconfigure.SpringBootApplication;

@SpringBootApplication
public class SpringAiOpenRouterIntegrationApplication {
    public static void main(String[] args) {
        SpringApplication.run(SpringAiOpenRouterIntegrationApplication.class, args);
    }
}
Explanation:
- Main Class to Run the Application:
SpringAiOpenRouterIntegrationApplicationis the starting point of our application. When you run this class, Spring Boot initializes all components and starts the embedded server.
7. Testing the OpenRouter Integration with Spring AI
- Run the application: Start the
SpringAiOpenrouterIntegrationApplicationfrom your IDE. - Test with curl: Open a terminal and run the following command:
curl -X POST http://localhost:8080/api/chat/message \
-H "Content-Type: application/json" \
-d '{"message": "What is the capital of India?"}'
Expected Result: You should see a JSON response like this:
{
  "response": "The capital of India is New Delhi. It's located in the northern part of the country and serves as the political and administrative center."
}
8. Monitoring Usage on the OpenRouter Dashboard
One of the useful features of OpenRouter is its dashboard, where you can monitor your API usage in near real-time. After making a few API calls to your application, follow these steps to review your usage statistics:
- Navigate to the Activity page. Once logged in, you can get there in two ways:
- Manually: Click your account icon in the top right and select Activity.
- Directly: Simply go to this URL: https://openrouter.ai/activity
- To see specific data, select the time range by setting the From and To dates.
What You’ll See on the Dashboard
📌 On the dashboard, you will find detailed metrics, including:
- Overall statistics.
- Which models were called
- The number of input and output tokens used.
- The cost incurred for each call (even if it’s $0.00 for free models).
- Throughput information in tokens per second.
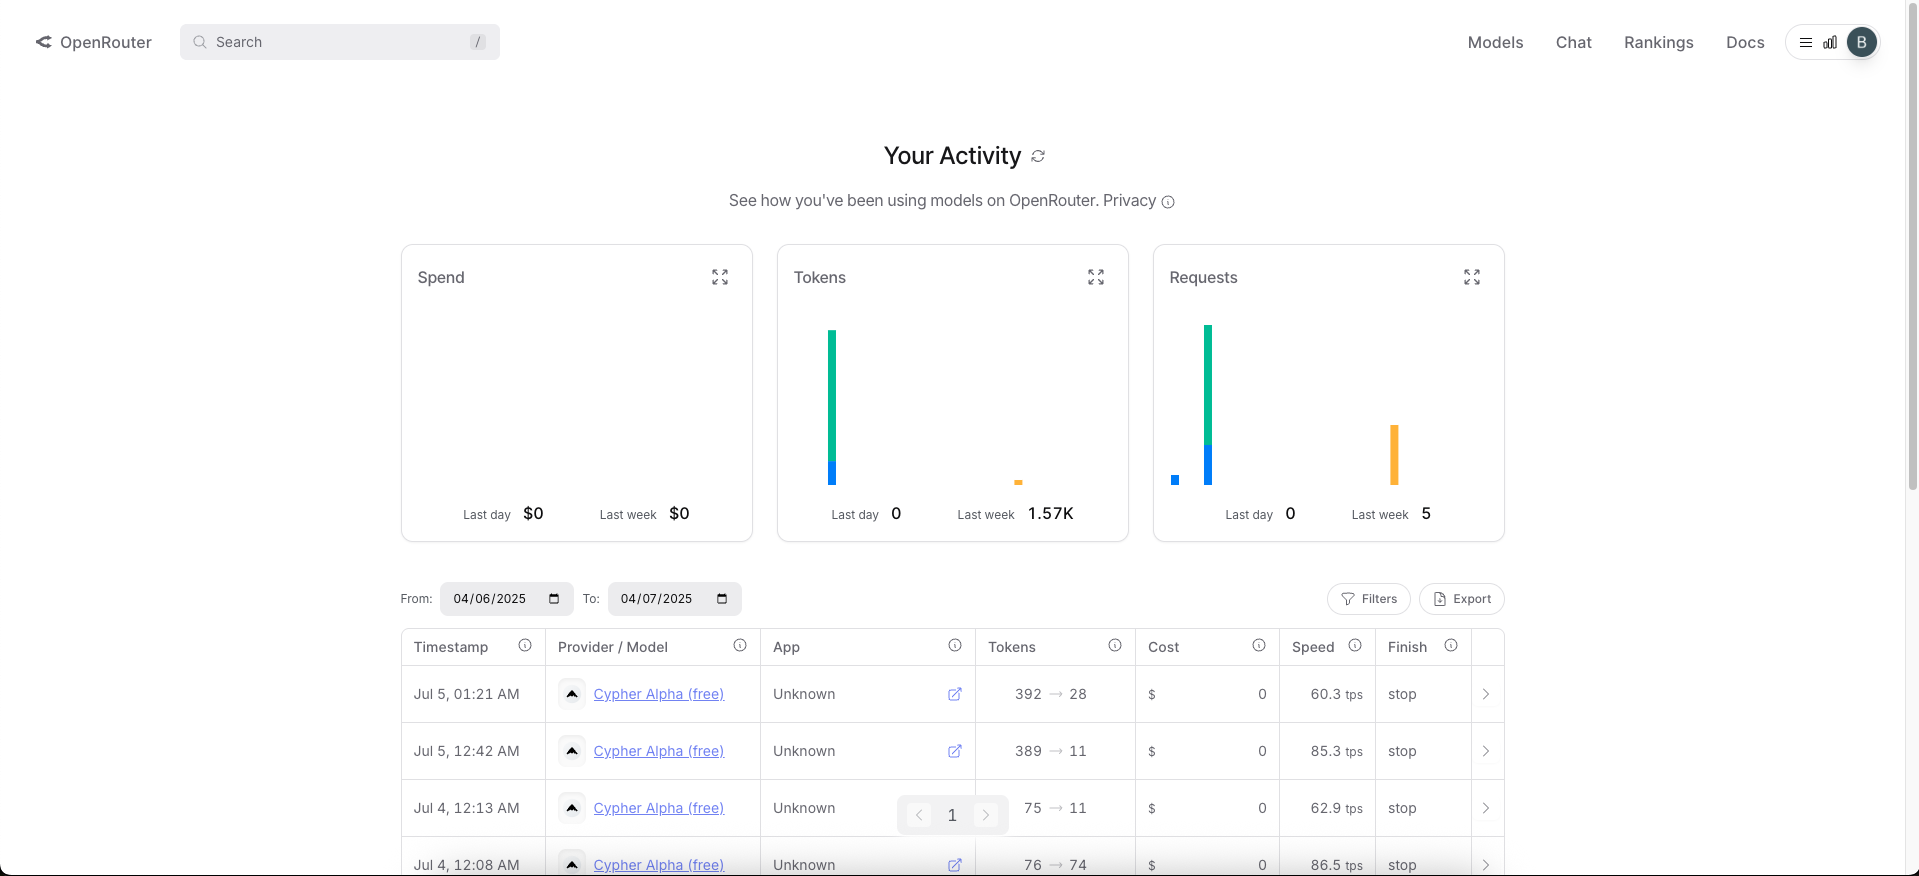
This level of detail is incredibly helpful for tracking expenses, debugging, and understanding model performance.
9. A Note on Free vs. Paid Models
While the free models on OpenRouter are excellent for getting started and for POCs, they come with caveats:
- Rate Limits: Free models have rate limits that restrict the number of requests you can make in a given period. For detailed information on these limits, you can visit the official OpenRouter API documentation here: https://openrouter.ai/docs/api-reference/limits.
- Availability: They are not guaranteed to be available long-term and can be removed without notice.
- Limited Selection: The catalog of free models is relatively small compared to the vast number of powerful, state-of-the-art paid models available on the platform.
For any serious application or production environment, you should switch to a paid model. The process is straightforward:
- Add a payment method to your OpenRouter account and purchase credits.
- For uninterrupted service in production, you can also configure auto top-up.
- Once your account has a credit balance, simply update the model property in your application.yml to a paid model identifier (e.g., openai/gpt-4.1 | google/gemini-2.5-pro | anthropic/claude-sonnet-4).
10. Video Tutorial
If you prefer visual learning, check out our step-by-step video tutorial, which demonstrates the OpenRouter integration with Spring AI.
📺 Watch on YouTube:
11. Source Code
The complete source code for this “Smart Chat Assistant” example, showcasing the integration between Spring AI and OpenRouter, is available on GitHub. You can clone the repository and run it locally to see it in action.
🔗 Spring AI + OpenRouter Demo: https://github.com/BootcampToProd/spring-ai-openrouter-integration
12. Things to Consider
When integrating OpenRouter with Spring AI, keep these important points in mind:
- API Key Security: Never hardcode API keys in your source code. Use environment variables or secure configuration management systems like Spring Cloud Config or HashiCorp Vault.
- Rate Limiting: Different models have different rate limits. Implement proper retry logic and consider using circuit breakers for production applications.
- Data Privacy: OpenRouter acts as a proxy. Understand their data privacy and retention policies before sending sensitive information.
- Error Handling: OpenRouter returns a standard JSON error object for issues like insufficient credits (402) or rate limits (429), often with a corresponding HTTP status code. Your application must parse this error structure to handle failures gracefully; find a complete list on the official API Errors documentation.
- Model Availability: Not every model from every provider is available. Always check the OpenRouter model list first.
- Model Selection Strategy: Consider implementing dynamic model selection based on factors like cost, performance requirements, and current availability.
- Monitoring and Alerting: Set up monitoring for API usage, error rates, and costs. Consider using tools like Spring Boot Actuator and Micrometer for comprehensive monitoring.
- Content Filtering: Implement input validation and content filtering to prevent abuse and ensure compliance with your application’s policies.
- Timeout Configuration: Configure appropriate timeouts for AI API calls, as response times can vary significantly between models and based on request complexity.
- Model Versioning: Keep track of model versions and their capabilities. Some models may be deprecated or updated, affecting your application’s behavior.
13. FAQs
Can I use OpenRouter for free?
Yes, OpenRouter offers several free models that are perfect for development and proof-of-concept. However, for production applications, paid models offer better reliability and performance guarantees.
How do I switch between different AI models?
Simply change the model name in your application.yml configuration. For example, change from openrouter/cypher-alpha:free to openai/gpt-4.1 without any code changes.
How do I handle rate limiting?
Implement retry logic with exponential backoff in your service layer. You can also use Spring Retry annotations or circuit breaker patterns for more robust handling.
How do I monitor my API usage and costs?
OpenRouter provides a comprehensive dashboard where you can track usage, costs, and performance metrics.
Is OpenRouter suitable for production use?
Yes, you can use OpenRouter in production. However, ensure you’re using paid models for reliability, implement proper monitoring, and have fallback strategies in place.
Why use OpenRouter instead of directly using the Google or OpenAI API?
Flexibility. OpenRouter lets you switch between hundreds of models from various providers with a one-line configuration change, without altering your code or managing multiple API keys.
Do I need an OpenAI account to use OpenRouter?
No. You only need an OpenRouter account and API key.
Why are we using the spring-ai-starter-model-openai dependency for OpenRouter?
Because OpenRouter’s API is designed to be compatible with the OpenAI API specification. This allows us to leverage the existing, well-supported Spring AI OpenAI starter to communicate with it.
14. Conclusion
Integrating OpenRouter with Spring AI opens up a world of possibilities for Java developers. With access to 400+ AI models through a single, unified API, you can build sophisticated AI-powered applications without the complexity of managing multiple provider integrations.
The key takeaways from this integration are the flexibility to switch between models, the comprehensive monitoring capabilities, and the ability to start with free models for development before scaling to paid models for production. Whether you’re building a simple chatbot or a complex AI-powered application, this foundation provides the scalability and flexibility you need.
15. Learn More
Interested in learning more?
Spring AI Routing Workflow: Intelligent Request Routing with LLM-Powered Classification
Add a Comment