
Learn how to build a MongoDB MCP server with Java and Embabel. Step-by-step guide to connecting AI agents to your database for queries, inserts, and management.
1. Introduction
Welcome back to the sixth article in the Embabel Framework series! If you’ve been following along, you’ve already seen how powerful the Embabel Framework can be for building AI agents.
We have come a long way from the basics. Here is a quick recap of our journey so far:
- Basics & Shell Agent: We covered the fundamentals and built a meeting summarizer.
- REST API Agents: We learned how to expose our agents over HTTP.
- Decision Making: We explored how to use the Condition annotation to make smart choices.
- First MCP Server: We stepped into the future of AI by building a File Operations MCP server.
- Read here: Embabel Framework: How to Build MCP Server
- Confluence MCP Server: We connected AI to the Confluence Cloud.
Today, we’re taking things further by building a MongoDB MCP Server using Embabel Framework. This is our third MCP server implementation, and it’s going to showcase something really exciting: how AI agents can interact with databases behind the scenes to fulfill your requests.
2. What is a MongoDB MCP Server?
Before we dive into the code, let’s clear up what we are actually building. A MongoDB MCP Server is essentially a bridge that connects AI assistants (like Claude) directly to your MongoDB database.
Think of it this way: MongoDB is where your application’s data lives, stored in collections and documents. While you can access this data using code or database GUI tools, AI assistants cannot natively “talk” to your database to run queries or insert data. That is where MCP (Model Context Protocol) comes in.
The MCP server acts as a translator. It wraps standard database operations—like find(), insertOne(), or listCollections()—into “tools” that the AI understands. When you ask Claude to “Find all users aged 25,” Claude communicates with our MCP server, which translates that natural language request into an actual MongoDB query, executes it, and sends the data back.
Real-World Use Case: Imagine you are a non-technical stakeholder who needs to verify if a new feature is working. Instead of asking a developer to run a SQL or NoSQL query for you, you can simply tell your AI assistant: “Check the ‘orders’ collection and tell me if the order for ‘Order-123’ was created successfully.” The AI uses the MCP server to peek inside the database and confirms the result for you instantly.
3. Prerequisites
Before we begin, make sure you have:
- Java 21 or higher installed
- Maven for dependency management
- Spring Boot knowledge (basic understanding is sufficient)
- MongoDB instance running (can be local or cloud-based like MongoDB Atlas)
- Basic understanding of REST APIs
4. Build MCP Server: MongoDB MCP Server
In this tutorial, we’ll create an MCP server that supports essential MongoDB operations including:
- Listing databases and collections
- Executing simple and complex queries
- Managing indexes
- Creating collections
- Inserting documents
⚙️ Project Structure & Setup
Before we dive into the code, let’s understand how our project is organized:
embabel-mongo-mcp-server
├── src
│   └── main
│       ├── java
│       │   └── com
│       │       └── bootcamptoprod
│       │               ├── config
│       │               │   └── ConfigureOpenRouterModels.java         # LLM configuration (OpenRouter)
│       │               ├── dto                                        # Data Transfer Objects
│       │               │   ├── CollectionRequest.java
│       │               │   ├── ComplexQueryRequest.java
│       │               │   ├── CreateCollectionRequest.java
│       │               │   ├── DbNameRequest.java
│       │               │   ├── InsertDocumentRequest.java
│       │               │   ├── SimpleQueryRequest.java
│       │               │   └── MongoResponse.java
│       │               ├── mcp
│       │               │   └── MongoMcpAgent.java                     # Main MCP agent exposing tools
│       │               ├── service
│       │               │   └── MongoServiceClient.java                # MongoDB service layer
│       │               └── EmbabelMongoMcpServerApplication. java     # Spring Boot main class
│       └── resources
│           └── application.yml                                        # App & Confluence configuration
└── pom.xml                                                            # Maven dependencies
Understanding the Project Structure
Here’s a quick breakdown of what each key file and package does:
- MongoMcpAgent.java: This is the core of our application. It defines the Embabel Agent that exposes our MongoDB capabilities (List Databases, Simple Query, Insert Document, etc.) to the outside world.
- Service package (MongoServiceClient.java): This class handles the “heavy lifting” of communicating with the actual MongoDB database. It uses the standard MongoDB Java Driver to execute commands, ensuring our agent logic stays clean and focused on definitions.
- dto package (SimpleQueryRequest.java, MongoResponse.java, etc.): This directory holds our Data Transfer Objects (DTOs). These are simple Java Records that define the “inputs” and “outputs” for our AI tools.
- EmbabelMongoMcpServerApplication.java: The main class that boots up our Spring Boot application.
- ConfigureOpenRouterModels.java: A Spring @Configuration class responsible for setting up the LLM connection. Even though this is an MCP server, Embabel requires an LLM configuration to initialize the internal agent context. We are using free models via OpenRouter for this demonstration.
- application.yml: Our configuration file. This is where we define the application name, set the default Language Model (LLM), and most importantly, configure the MongoDB URI (using environment variable placeholders) to keep our database credentials secure.
- pom.xml: The Maven project file. It manages all our project’s dependencies. The most important additions here are embabel-agent-starter-mcpserver, which handles the MCP protocol, and spring-boot-starter-data-mongodb, which provides the libraries needed to talk to the database.
Diving Into the Code
Let’s break down each component of our application.
Step 1: Setting Up Maven Dependencies
First, let’s set up our Maven project with all necessary dependencies. The pom.xml file defines our project configuration and required libraries:
<properties>
	<java.version>21</java.version>
	<embabel-agent.version>0.3.0</embabel-agent.version>
</properties>

<dependencies>
	<!-- Spring Boot Web for REST endpoints -->
	<dependency>
		<groupId>org.springframework.boot</groupId>
		<artifactId>spring-boot-starter-web</artifactId>
	</dependency>
	<!-- Spring Boot MongoDB for database connectivity -->
  <dependency>
    <groupId>org.springframework.boot</groupId>
     <artifactId>spring-boot-starter-data-mongodb</artifactId>
  </dependency>
	<!-- Spring Boot Actuator for health checks -->
	<dependency>
		<groupId>org.springframework.boot</groupId>
		<artifactId>spring-boot-starter-actuator</artifactId>
	</dependency>
	<!-- Embabel MCP Server Starter - The magic ingredient! -->
	<dependency>
		<groupId>com.embabel.agent</groupId>
		<artifactId>embabel-agent-starter-mcpserver</artifactId>
		<version>${embabel-agent.version}</version>
	</dependency>
  <!-- OpenAI Compatible Model Support -->
  <dependency>
    <groupId>com.embabel.agent</groupId>
    <artifactId>embabel-agent-starter-openai</artifactId>
    <version>${embabel-agent.version}</version>
  </dependency>
</dependencies>

<dependencyManagement>
	<dependencies>
		<dependency>
			<groupId>com.embabel.agent</groupId>
			<artifactId>embabel-agent-dependencies</artifactId>
			<version>${embabel-agent.version}</version>
			<type>pom</type>
			<scope>import</scope>
		</dependency>
	</dependencies>
</dependencyManagement>

<repositories>
	<repository>
		<id>embabel-releases</id>
		<url>https://repo.embabel.com/artifactory/libs-release</url>
		<releases>
			<enabled>true</enabled>
		</releases>
		<snapshots>
			<enabled>false</enabled>
		</snapshots>
	</repository>
	<repository>
		<id>embabel-snapshots</id>
		<url>https://repo.embabel.com/artifactory/libs-snapshot</url>
		<releases>
			<enabled>false</enabled>
		</releases>
		<snapshots>
			<enabled>true</enabled>
		</snapshots>
	</repository>
</repositories>
What’s Important Here:
- This Maven configuration sets up our Spring Boot project with Java 21.
- The star of the show is
embabel-agent-starter-mcpserver. This starter library does all the heavy lifting. It automatically configures the necessary endpoints (specifically Server-Sent Events or SSE) that allow MCP clients to connect to your Java application and discover the tools we are building. - We have added
spring-boot-starter-data-mongodb. This is essential for this specific project as it provides the official MongoDB Java drivers and Spring Data support, allowing our application to connect to and manipulate the database. - We also included
embabel-agent-starter-openai. You might wonder why we need an LLM dependency if we are just building a server for database tools. Even though our MCP server’s tools are just deterministic Java code, the Embabel framework requires at least one LLM model to be configured to initialize its internal agent context. In our case, we will use this to configure free models from OpenRouter. - We’ve also included custom repositories to fetch the latest Embabel artifacts.
- The Actuator dependency adds health checks and metrics endpoints for production monitoring.
Step 2: Configure Application Properties
Next, let’s configure our application settings in application.yml:
spring:
  application:
    name: embabel-mongo-mcp-server

embabel:
  models:
    defaultLlm: x-ai/grok-4.1-fast:free

# MongoDB connection string
mongodb:
  uri: mongodb://${MONGO_HOST}:${MONGO_PORT}
📄 Configuration Overview
- spring.application.name: Identifies our application in logs and monitoring tools
- embabel.models.defaultLlm: Specifies which AI model to use (we’re using Grok 4.1 via OpenRouter)
- mongodb.uri: The MongoDB connection URI using environment variables
MONGO_HOST=localhost
MONGO_PORT=27017
OPENAI_API_KEY=your_openrouter_api_key_hereStep 3: Application Entry Point
This is the main class that bootstraps our entire application.
package com.bootcamptoprod;

import com.embabel.agent.config.annotation.EnableAgents;
import org.springframework.boot.SpringApplication;
import org.springframework.boot.autoconfigure.SpringBootApplication;

@EnableAgents
@SpringBootApplication
public class EmbabelMongoMcpServerApplication {

    public static void main(String[] args) {
        SpringApplication.run(EmbabelMongoMcpServerApplication.class, args);
    }

}
Explanation:
- This is our Spring Boot application entry point. This class bootstraps both Spring Boot and Embabel frameworks simultaneously.
- It scans for
@Agentclasses, exposes them via MCP protocol, sets up SSE endpoints, and also configures tool discovery
Step 4: Create Data Transfer Object (DTOs)
Our DTOs define the structure of data flowing through the application.
package com.bootcamptoprod.dto;

public record DbNameRequest(String dbName) { }
Purpose: A simple record holding just the database name, used for operations like listing collections.
package com.bootcamptoprod.dto;

public record CollectionRequest(String dbName, String collectionName) { }
Purpose: Contains both database and collection names, used for operations targeting a specific collection like listing indexes.
package com.bootcamptoprod.dto;

public record SimpleQueryRequest(String dbName, String collectionName,
String field, Object value) { }Purpose: Represents a simple query (field = value). The value is typed as Object to support strings, numbers, booleans, and other types.
package com.bootcamptoprod.dto;

public record ComplexQueryRequest(String dbName, String collectionName,
String jsonQuery) { }Purpose: For advanced MongoDB queries, this accepts a JSON string representing the complete query document (e.g., {"age": {"$gt": 30}}).
package com.bootcamptoprod.dto;

public record CreateCollectionRequest(String dbName, String collectionName) { }
Purpose: Used when creating new collections, specifying which database to create the collection in.
package com.bootcamptoprod.dto;

public record InsertDocumentRequest(String dbName, String collectionName,
String jsonDocument) { }Purpose: Handles document insertion, accepting a JSON string representing the document to insert.
package com.bootcamptoprod.dto;

public record MongoResponse<T>(T data) { }
Purpose: A generic wrapper for all responses from the MCP agent. The type parameter T can be List, List, String, or any other return type, providing a consistent response structure.
Step 5: Configuring LLM Models
This configuration class sets up multiple LLM models via OpenRouter, a unified API gateway for various AI models. Here’s what’s happening:
package com.bootcamptoprod.config;

import com.embabel.agent.openai.OpenAiCompatibleModelFactory;
import com.embabel.common.ai.model.Llm;
import com.embabel.common.ai.model.PerTokenPricingModel;
import io.micrometer.observation.ObservationRegistry;
import org.jetbrains.annotations.NotNull;
import org.springframework.beans.factory.annotation.Value;
import org.springframework.context.annotation.Bean;
import org.springframework.context.annotation.Configuration;

import java.time.LocalDate;

@Configuration
public class ConfigureOpenRouterModels extends OpenAiCompatibleModelFactory {

    public ConfigureOpenRouterModels(@NotNull ObservationRegistry observationRegistry,
                                     @Value("${OPENAI_API_KEY}") String apiKey) {
        super(
                "https://openrouter.ai",
                apiKey,
                "/api/v1/chat/completions",
                null,
                observationRegistry
        );
    }

    @Bean
    public Llm mistral7b_free() {
        return openAiCompatibleLlm(
                "mistralai/mistral-7b-instruct:free",
                new PerTokenPricingModel(0.0, 0.0),
                "OpenRouter",
                LocalDate.of(2024, 10, 1)
        );
    }

    @Bean
    public Llm deepseek_r1_t2() {
        return openAiCompatibleLlm(
                "tngtech/deepseek-r1t2-chimera:free",
                new PerTokenPricingModel(0.0, 0.0),
                "OpenRouter",
                LocalDate.of(2025, 5, 28)
        );
    }

    @Bean
    public Llm glm_4_5_air() {
        return openAiCompatibleLlm(
                "z-ai/glm-4.5-air:free",
                new PerTokenPricingModel(0.0, 0.0),
                "OpenRouter",
                LocalDate.of(2025, 5, 28)
        );
    }

    @Bean
    public Llm grok_4_1_free() {
        return openAiCompatibleLlm(
                "x-ai/grok-4.1-fast:free",
                new PerTokenPricingModel(0.0, 0.0),
                "OpenRouter",
                LocalDate.of(2025, 11, 28)
        );
    }
}Explanation:
- This configuration class registers OpenRouter as an AI model provider.
- By extending
OpenAiCompatibleModelFactory, we leverage OpenRouter’s OpenAI-compatible API. - The constructor configures the base URL and endpoint for OpenRouter API.
- The
@Value("${OPENAI_API_KEY}")annotation injects your API key, which you must provide as an environment variable when running the application. - The LLM beans methods create different model instances with zero pricing (useful for free tier or internal tracking) and metadata about the model.
- The
PerTokenPricingModel(0.0, 0.0)indicates these are free-tier models with no cost per token. - The
ObservationRegistryintegration enables automatic metrics collection for model usage.
Why Multiple Models? Having multiple models configured gives you flexibility to switch between them without code changes
Step 6: Building the MongoDB Service Layer
This service class handles all direct interactions with MongoDB:
package com.bootcamptoprod.service;

import com.mongodb.client.MongoClient;
import com.mongodb.client.MongoClients;
import com.mongodb.client.MongoCollection;
import com.mongodb.client.MongoDatabase;
import org.bson.Document;
import org.slf4j.Logger;
import org.slf4j.LoggerFactory;
import org.springframework.beans.factory.annotation.Value;
import org.springframework.stereotype.Service;

import java.util.ArrayList;
import java.util.List;

@Service
public class MongoServiceClient {

    private static final Logger logger = LoggerFactory.getLogger(MongoServiceClient.class);
    private final MongoClient mongoClient;

    /**
     * Initializes the MongoDB client with the given URI.
     */
    public MongoServiceClient(@Value("${mongodb.uri}") String mongoUri) {
        logger.info("Initializing MongoServiceClient with URI: {}", mongoUri);
        this.mongoClient = MongoClients.create(mongoUri);
    }

    /**
     * Lists all databases in MongoDB.
     */
    public List<String> listDatabases() {
        logger.info("Fetching list of databases.");
        List<String> databaseNames = new ArrayList<>();
        for (Document db : mongoClient.listDatabases()) {
            databaseNames.add(db.getString("name"));
        }
        logger.info("Databases found: {}", databaseNames);
        return databaseNames;
    }

    /**
     * Lists all collections in the specified database.
     */
    public List<String> listCollections(String dbName) {
        logger.info("Fetching collections for database: {}", dbName);
        List<String> collectionNames = new ArrayList<>();
        MongoDatabase database = mongoClient.getDatabase(dbName);
        for (String name : database.listCollectionNames()) {
            collectionNames.add(name);
        }
        logger.info("Collections found in {}: {}", dbName, collectionNames);
        return collectionNames;
    }

    /**
     * Executes a simple query on a collection.
     */
    public List<Document> simpleQuery(String dbName, String collectionName, String field, Object value) {
        logger.info("Executing simple query on {}.{} where {} = {}", dbName, collectionName, field, value);
        MongoCollection<Document> collection = mongoClient.getDatabase(dbName).getCollection(collectionName);
        List<Document> results = new ArrayList<>();
        collection.find(new Document(field, value)).into(results);
        logger.info("Query returned {} results.", results.size());
        return results;
    }

    /**
     * Executes a complex query on a collection.
     */
    public List<Document> complexQuery(String dbName, String collectionName, String jsonQuery) {
        logger.info("Executing complex query on {}.{} with query: {}", dbName, collectionName, jsonQuery);
        MongoCollection<Document> collection = mongoClient.getDatabase(dbName).getCollection(collectionName);
        Document query = Document.parse(jsonQuery);
        List<Document> results = new ArrayList<>();
        collection.find(query).into(results);
        logger.info("Complex query returned {} results.", results.size());
        return results;
    }

    /**
     * Lists all indexes for a specific collection.
     */
    public List<Document> listIndexes(String dbName, String collectionName) {
        logger.info("Fetching indexes for {}.{}", dbName, collectionName);
        MongoCollection<Document> collection = mongoClient.getDatabase(dbName).getCollection(collectionName);
        List<Document> indexes = new ArrayList<>();
        collection.listIndexes().into(indexes);
        logger.info("Indexes found: {}", indexes);
        return indexes;
    }

    /**
     * Creates a new collection in the specified database.
     */
    public String createCollection(String dbName, String collectionName) {
        logger.info("Creating collection '{}' in database '{}'", collectionName, dbName);
        MongoDatabase database = mongoClient.getDatabase(dbName);
        database.createCollection(collectionName);
        logger.info("Collection '{}' created successfully.", collectionName);
        return "Collection '" + collectionName + "' created successfully in database '" + dbName + "'.";
    }

    /**
     * Inserts a document into a collection.
     */
    public String insertDocument(String dbName, String collectionName, String jsonDocument) {
        logger.info("Inserting document into {}.{}: {}", dbName, collectionName, jsonDocument);
        MongoCollection<Document> collection = mongoClient.getDatabase(dbName).getCollection(collectionName);
        Document document = Document.parse(jsonDocument);
        collection.insertOne(document);
        logger.info("Document inserted successfully into {}.{}", dbName, collectionName);
        return "Document inserted successfully into collection '" + collectionName + "'.";
    }
}
Notice that there is no AI code in this class. It’s just pure Java logic using the standard MongoDB driver.
Key Features of MongoServiceClient:
- MongoClient Configuration: We initialize the
MongoClientin the constructor using the connection URI defined in ourapplication.yml. This creates the actual connection pool to the database server. - JSON to BSON Parsing: The methods
complexQueryandinsertDocumenthandle the critical task of converting raw JSON strings (provided by the AI) intoBSON Documentobjects that MongoDB understands usingDocument.parse(). - Logging: Comprehensive logging is included in every operation. This helps us track exactly what
dbNameorcollectionNamethe agent is accessing and how many results were found. - Operation Mapping: Each method maps to a specific MongoDB driver command:
- listDatabases → mongoClient.listDatabases() (Get all DB names)
- listCollections → database.listCollectionNames() (Get collections in a DB)
- simpleQuery → collection.find(new Document(field, value)) (Find exact matches)
- complexQuery → collection.find(Document.parse(jsonQuery)) (Run advanced searches)
- listIndexes → collection.listIndexes() (View index configurations)
- createCollection → database.createCollection(name) (Make a new collection)
- insertDocument → collection.insertOne(doc) (Save new data)
Real-World Example: When the AI assistant asks to add a new record for a user named “Alice,” the insertDocument() method receives the target database and collection names along with the JSON payload. It parses that JSON into a BSON Document and commits it to the database, abstracting all the driver complexity away from the AI agent.
Step 7: Building the MCP Server (The Heart of Our Tutorial!)
Now comes the most important part – the MCP agent that exposes MongoDB operations through the Model Context Protocol:
package com.bootcamptoprod.mcp;

import com.bootcamptoprod.dto.CollectionRequest;
import com.bootcamptoprod.dto.ComplexQueryRequest;
import com.bootcamptoprod.dto.CreateCollectionRequest;
import com.bootcamptoprod.dto.DbNameRequest;
import com.bootcamptoprod.dto.InsertDocumentRequest;
import com.bootcamptoprod.dto.MongoResponse;
import com.bootcamptoprod.dto.SimpleQueryRequest;
import com.bootcamptoprod.service.MongoServiceClient;
import com.embabel.agent.api.annotation.AchievesGoal;
import com.embabel.agent.api.annotation.Action;
import com.embabel.agent.api.annotation.Agent;
import com.embabel.agent.api.annotation.Export;
import com.embabel.agent.domain.io.UserInput;
import org.bson.Document;
import org.slf4j.Logger;
import org.slf4j.LoggerFactory;

import java.util.List;

@Agent(description = "An MCP agent supporting various MongoDB operations")
public class MongoMcpAgent {

    private static final Logger logger = LoggerFactory.getLogger(MongoMcpAgent.class);

    private final MongoServiceClient mongoServiceClient;

    public MongoMcpAgent(MongoServiceClient mongoServiceClient) {
        this.mongoServiceClient = mongoServiceClient;
        logger.info("MongoMcpAgent initialized");
    }

    /**
     * List all databases in MongoDB.
     */
    @Action
    @AchievesGoal(
            description = "List all databases in MongoDB.",
            export = @Export(remote = true, name = "listDatabases", startingInputTypes = UserInput.class)
    )
    public MongoResponse<List<String>> listDatabases() {
        logger.info("Agent action: listDatabases");
        List<String> dbs = mongoServiceClient.listDatabases();
        return new MongoResponse<>(dbs);
    }

    /**
     * List all collections in a database.
     */
    @Action
    @AchievesGoal(
            description = "List collections in a MongoDB database.",
            export = @Export(remote = true, name = "listCollections", startingInputTypes = DbNameRequest.class)
    )
    public MongoResponse<List<String>> listCollections(DbNameRequest req) {
        logger.info("Agent action: listCollections for db='{}'", req.dbName());
        List<String> collections = mongoServiceClient.listCollections(req.dbName());
        return new MongoResponse<>(collections);
    }

    /**
     * Execute a simple query (field = value) on a collection.
     */
    @Action
    @AchievesGoal(
            description = "Execute a simple query on a collection.",
            export = @Export(remote = true, name = "simpleQuery", startingInputTypes = SimpleQueryRequest.class)
    )
    public MongoResponse<List<Document>> simpleQuery(SimpleQueryRequest req) {
        logger.info("Agent action: simpleQuery on {}.{} where {} = {}", req.dbName(), req.collectionName(), req.field(), req.value());
        List<Document> results = mongoServiceClient.simpleQuery(req.dbName(), req.collectionName(), req.field(), req.value());
        return new MongoResponse<>(results);
    }

    /**
     * Execute a complex JSON query on a collection.
     */
    @Action
    @AchievesGoal(
            description = "Execute a complex JSON query on a collection.",
            export = @Export(remote = true, name = "complexQuery", startingInputTypes = ComplexQueryRequest.class)
    )
    public MongoResponse<List<Document>> complexQuery(ComplexQueryRequest req) {
        logger.info("Agent action: complexQuery on {}.{} with query={}", req.dbName(), req.collectionName(), req.jsonQuery());
        List<Document> results = mongoServiceClient.complexQuery(req.dbName(), req.collectionName(), req.jsonQuery());
        return new MongoResponse<>(results);
    }

    /**
     * List indexes for a collection.
     */
    @Action
    @AchievesGoal(
            description = "List indexes for a MongoDB collection.",
            export = @Export(remote = true, name = "listIndexes", startingInputTypes = CollectionRequest.class)
    )
    public MongoResponse<List<Document>> listIndexes(CollectionRequest req) {
        logger.info("Agent action: listIndexes on {}.{}", req.dbName(), req.collectionName());
        List<Document> indexes = mongoServiceClient.listIndexes(req.dbName(), req.collectionName());
        return new MongoResponse<>(indexes);
    }

    /**
     * Create a new collection.
     */
    @Action
    @AchievesGoal(
            description = "Create a new collection in a MongoDB database.",
            export = @Export(remote = true, name = "createCollection", startingInputTypes = CreateCollectionRequest.class)
    )
    public MongoResponse<String> createCollection(CreateCollectionRequest req) {
        logger.info("Agent action: createCollection '{}' in db='{}'", req.collectionName(), req.dbName());
        String result = mongoServiceClient.createCollection(req.dbName(), req.collectionName());
        return new MongoResponse<>(result);
    }

    /**
     * Insert a JSON document into a collection.
     */
    @Action
    @AchievesGoal(
            description = "Insert a JSON document into a collection.",
            export = @Export(remote = true, name = "insertDocument", startingInputTypes = InsertDocumentRequest.class)
    )
    public MongoResponse<String> insertDocument(InsertDocumentRequest req) {
        logger.info("Agent action: insertDocument into {}.{} document={}", req.dbName(), req.collectionName(), req.jsonDocument());
        String result = mongoServiceClient.insertDocument(req.dbName(), req.collectionName(), req.jsonDocument());
        return new MongoResponse<>(result);
    }
}
Explanation:
This is the heart of our application – the Mongo MCP Agent. Unlike a chatbot that simply generates text, this agent exposes specific “Tools” that an external AI (like Claude or ChatGPT) can remotely control to interact with your MongoDB instance.
- @Agent: This annotation marks the class as an Embabel agent. The description (“An MCP agent supporting various MongoDB operations”) is crucial here because the connecting AI client reads this description to understand the high-level purpose of this server.
- @Action: This annotation denotes the specific actions (capabilities) that the agent can perform.
- @AchievesGoal: This is the most important annotation for building an MCP server. It wraps the logic with metadata.
- description: A human-readable explanation of what the tool does (e.g., “Execute a complex JSON query…”). The AI uses this description to decide which tool to call based on the user’s request.
- @Export(remote = true, …): This is the magic switch. By setting remote = true, we tell Embabel to expose this method over the Model Context Protocol so external clients can see it.
- name: This sets the specific tool name (e.g., “complexQuery”) that the AI will see in its tool list.
- startingInputTypes: This parameter specifies the input types required to achieve the goal. By listing our DTOs here (like ComplexQueryRequest.class), we tell Embabel to inspect these classes and generate a strict schema. This ensures the AI understands exactly what parameters it must provide—effectively “prompting” the AI to fill in the necessary blanks (like dbName or jsonQuery) before the tool can be executed.
- listDatabases, simpleQuery, insertDocument: These are the actual tool implementations. When the AI decides to “add a user,” it sends a structured request that triggers the corresponding Java method. Notice that these methods are deterministic—they delegate the work to our MongoServiceClient to execute the actual database commands. This ensures that the action happens exactly as requested without hallucination.
- Service Delegation: Instead of putting complex database driver logic inside the Agent, we inject the MongoServiceClient. The Agent acts as a clean interface, accepting instructions from the AI and passing them to the Service layer to execute the queries.
Mongo MCP Server using Embabel Framework
5. How to Test Your MCP Server
Now let’s test the MongoDB MCP server! We’ll cover two methods: MCP Inspector and Claude Desktop.
Start the MongoDB MCP Server
Step 1: Start MongoDB
Make sure your MongoDB instance is running. For local MongoDB:
# Using Docker
docker run -d -p 27017:27017 --name mongodb mongo:latest

# Or if you have MongoDB installed locally
mongodStep 2: Build and Run the Application
# Build the project
mvn clean install

# Set your OpenRouter API key
export OPENAI_API_KEY=your_openrouter_api_key_here

# Set MongoDB Host & Port
export MONGO_HOST=localhost
export MONGO_PORT=27017

# Run the application
mvn spring-boot:runNow that your application is started, we can test it using any of the methods mentioned below
Method 1: Using MCP Inspector (Web Based)
The MCP Inspector is a developer tool created by the Model Context Protocol team to test servers.
Step 1: Install Node.js Make sure Node.js is installed on your system (version 22.7.5 or higher recommended).
Step 2: Launch MCP Inspector Open a new terminal and run:
npx @modelcontextprotocol/inspector
Step 3: Connect to Your Server
- A browser window will open automatically
- Configure the connection:
- Transport Type: SSE
- URL:
http://localhost:8080/sse - Connection Type: Via Proxy
- Click Connect
Step 5: Test Operations
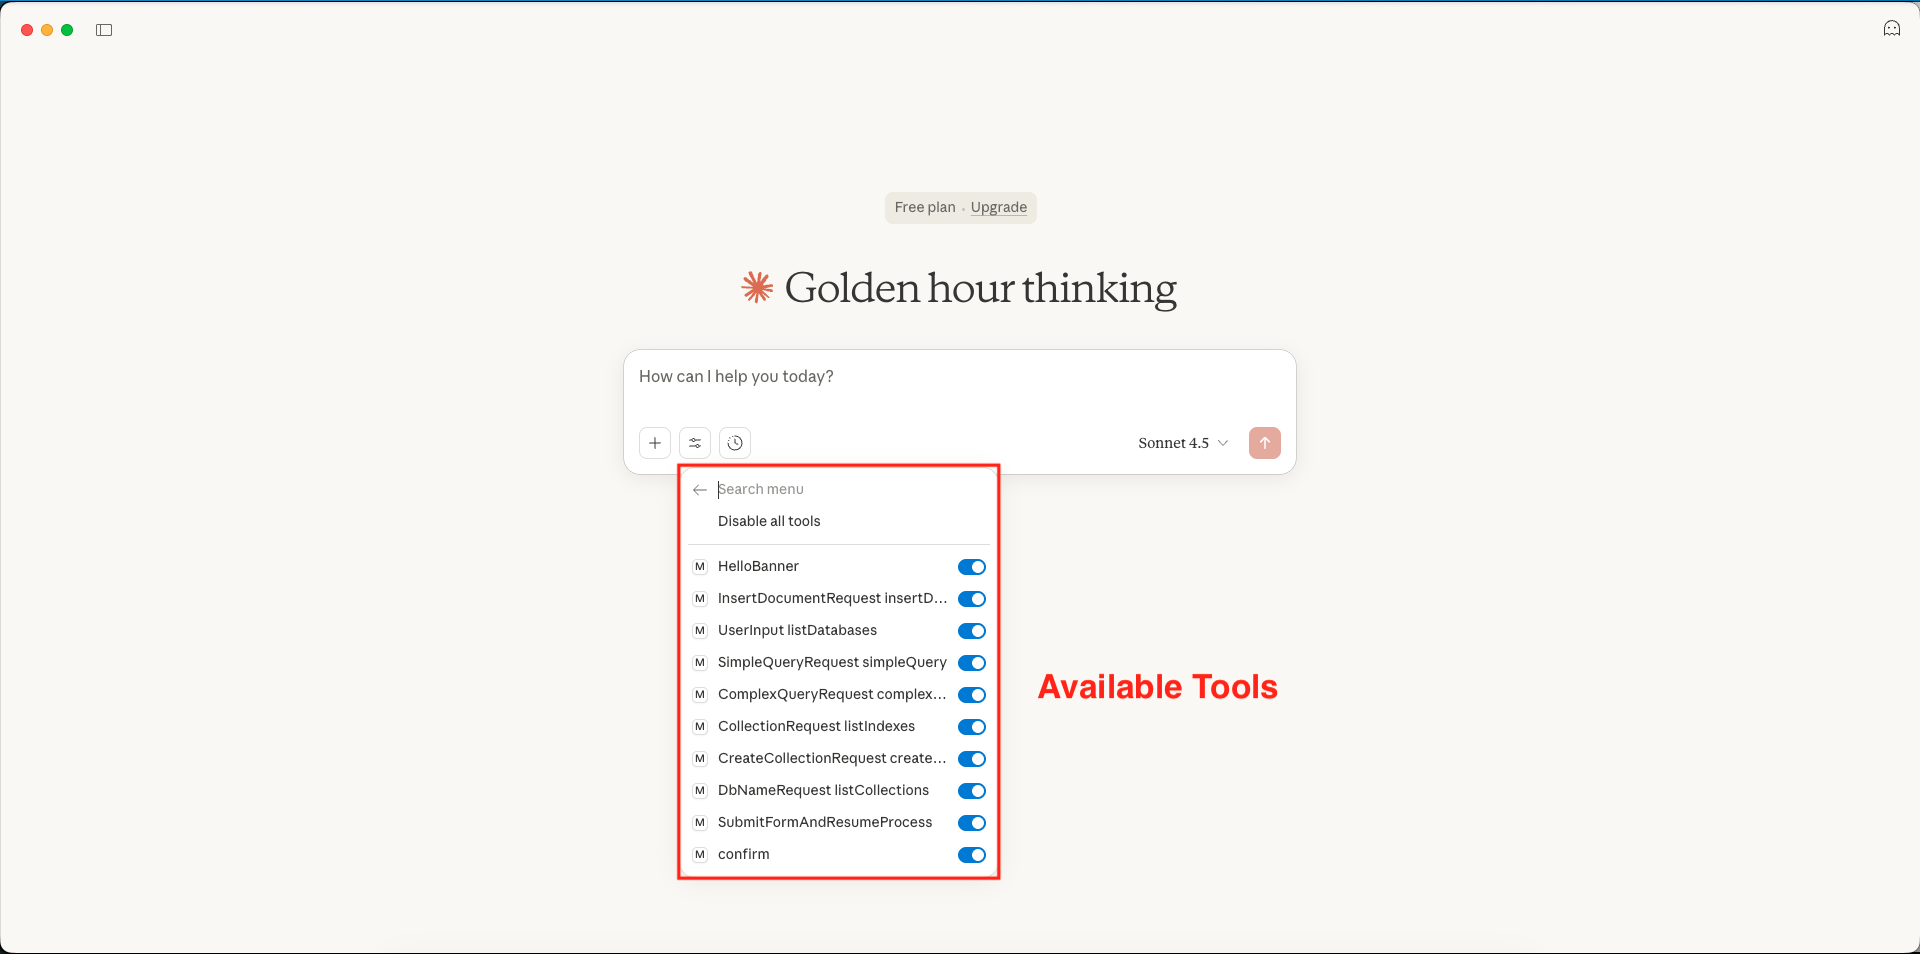
Navigate to the Tools section and click List Tools. You should see seven tools:
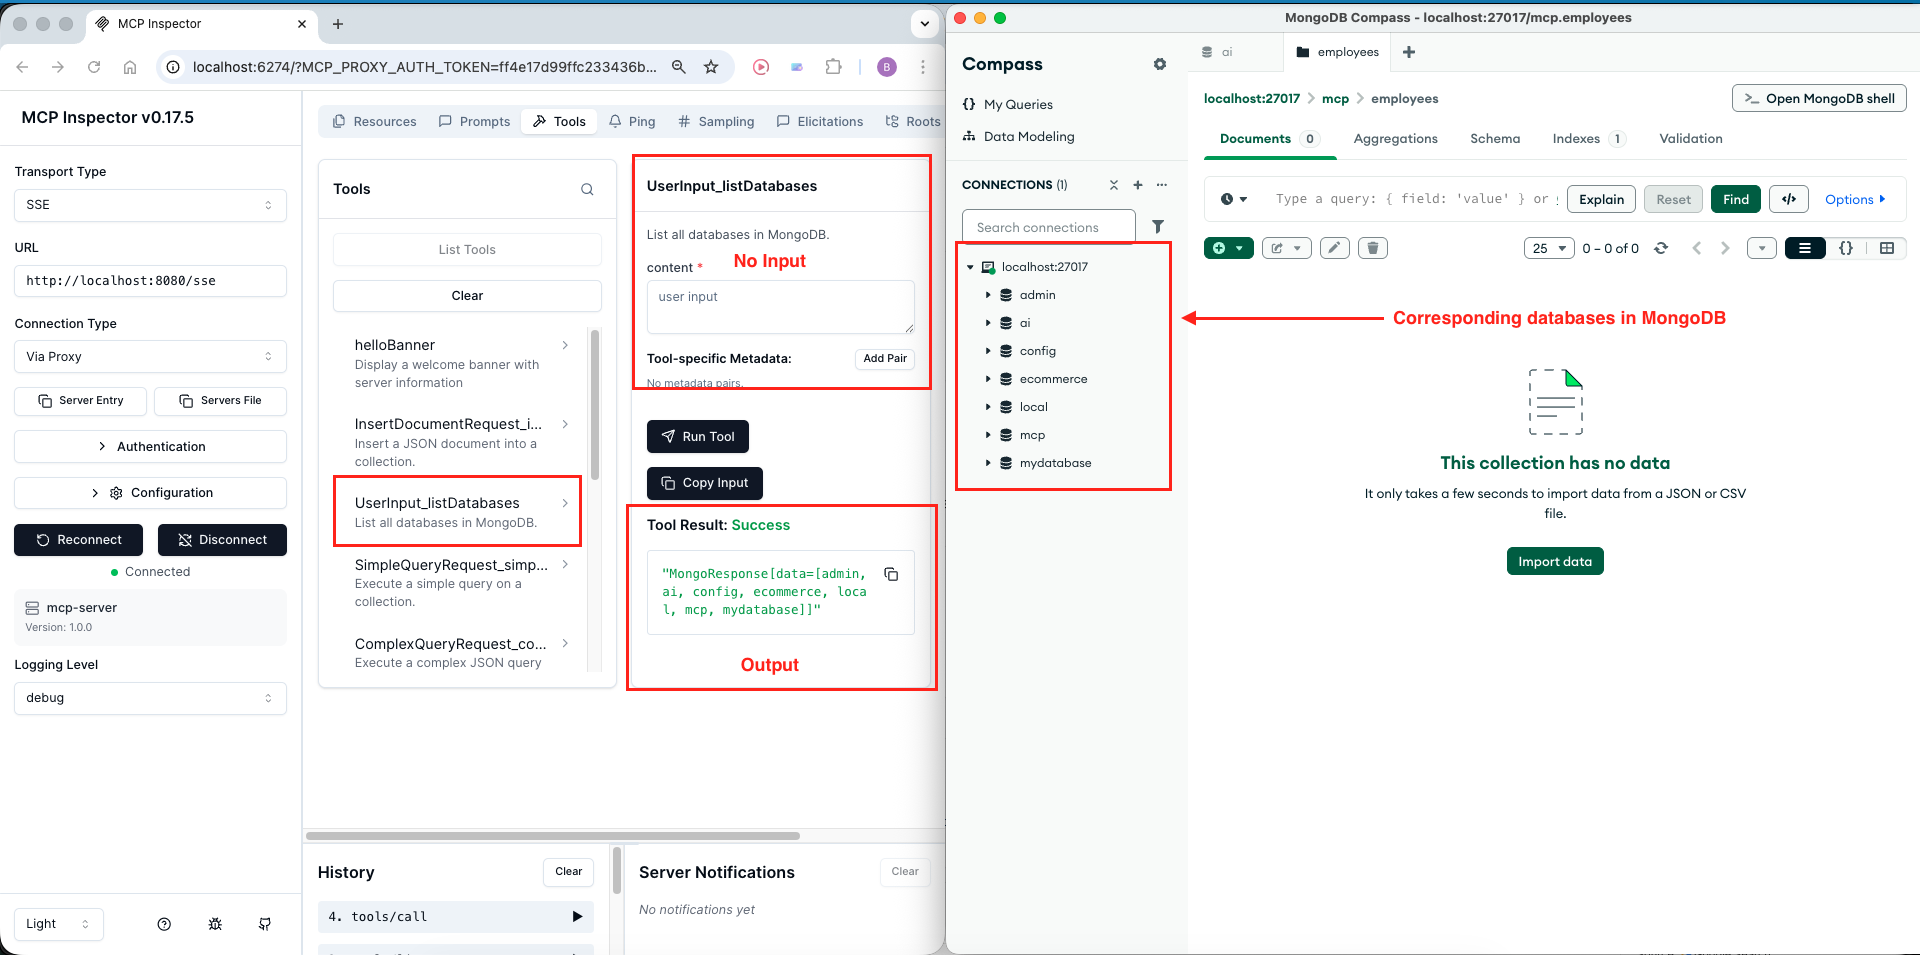
- listDatabases
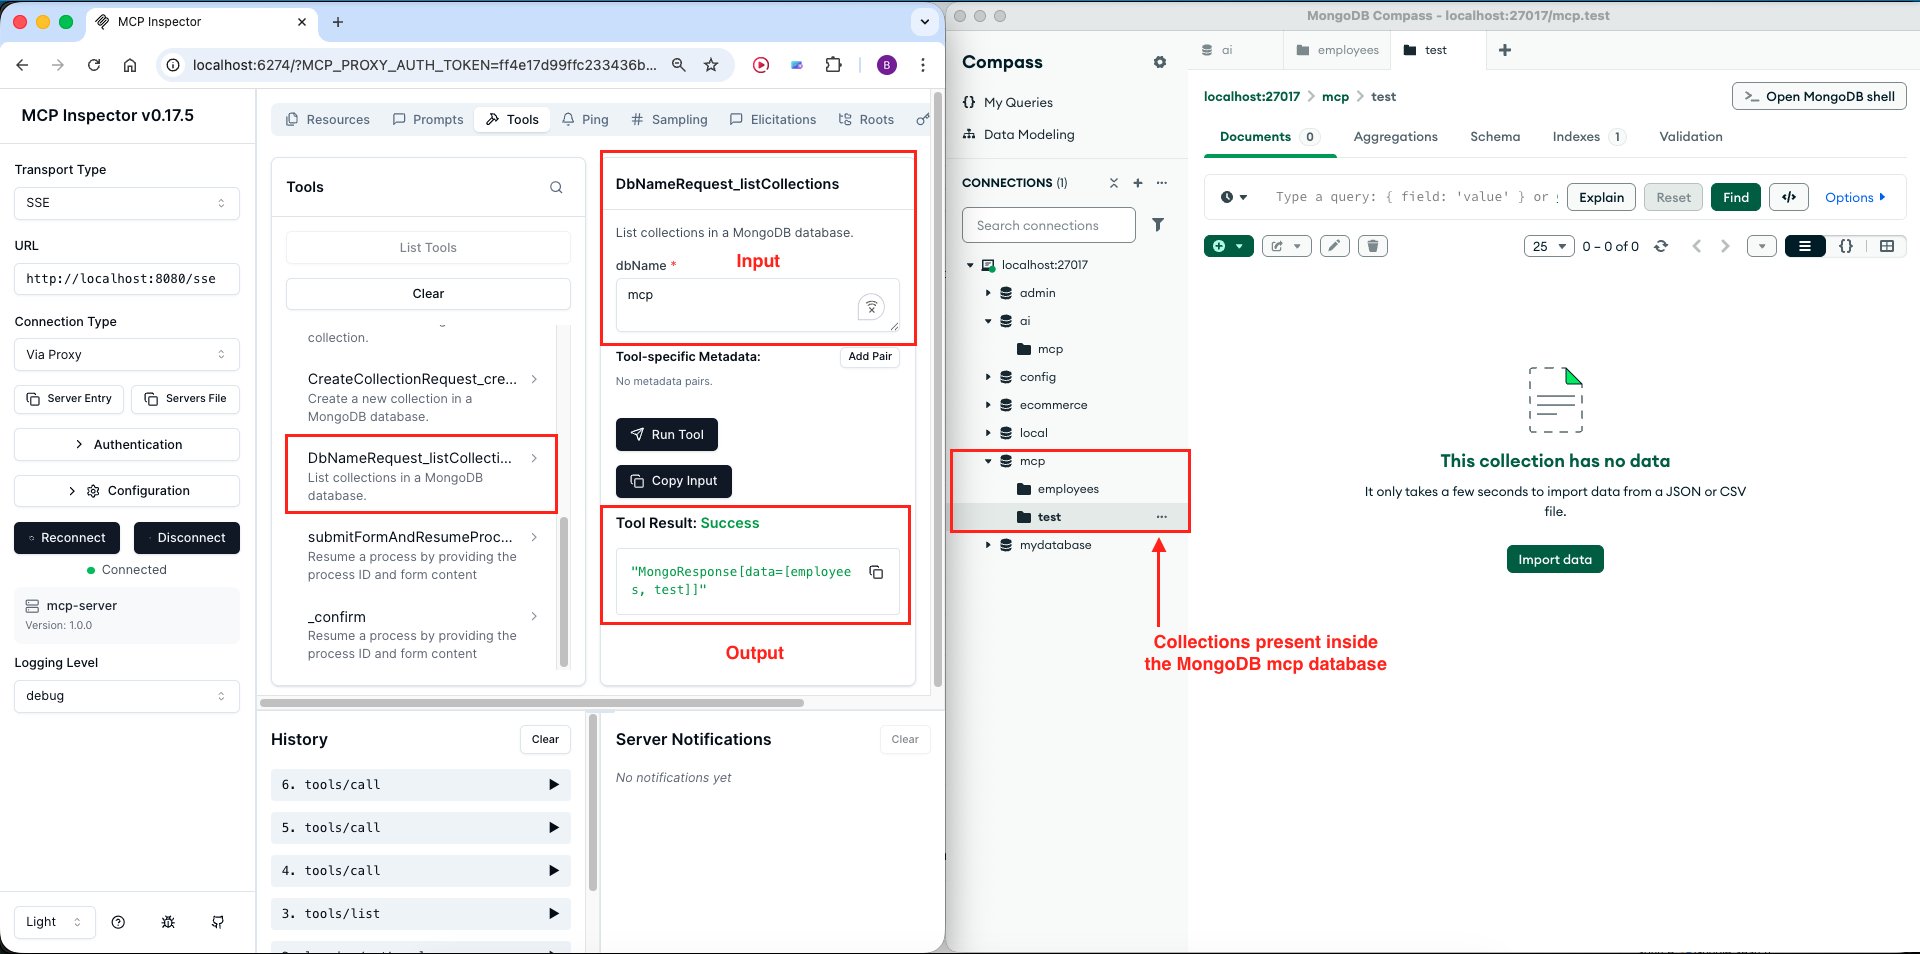
- listCollections
- simpleQuery
- complexQuery
- listIndexes
- createCollection
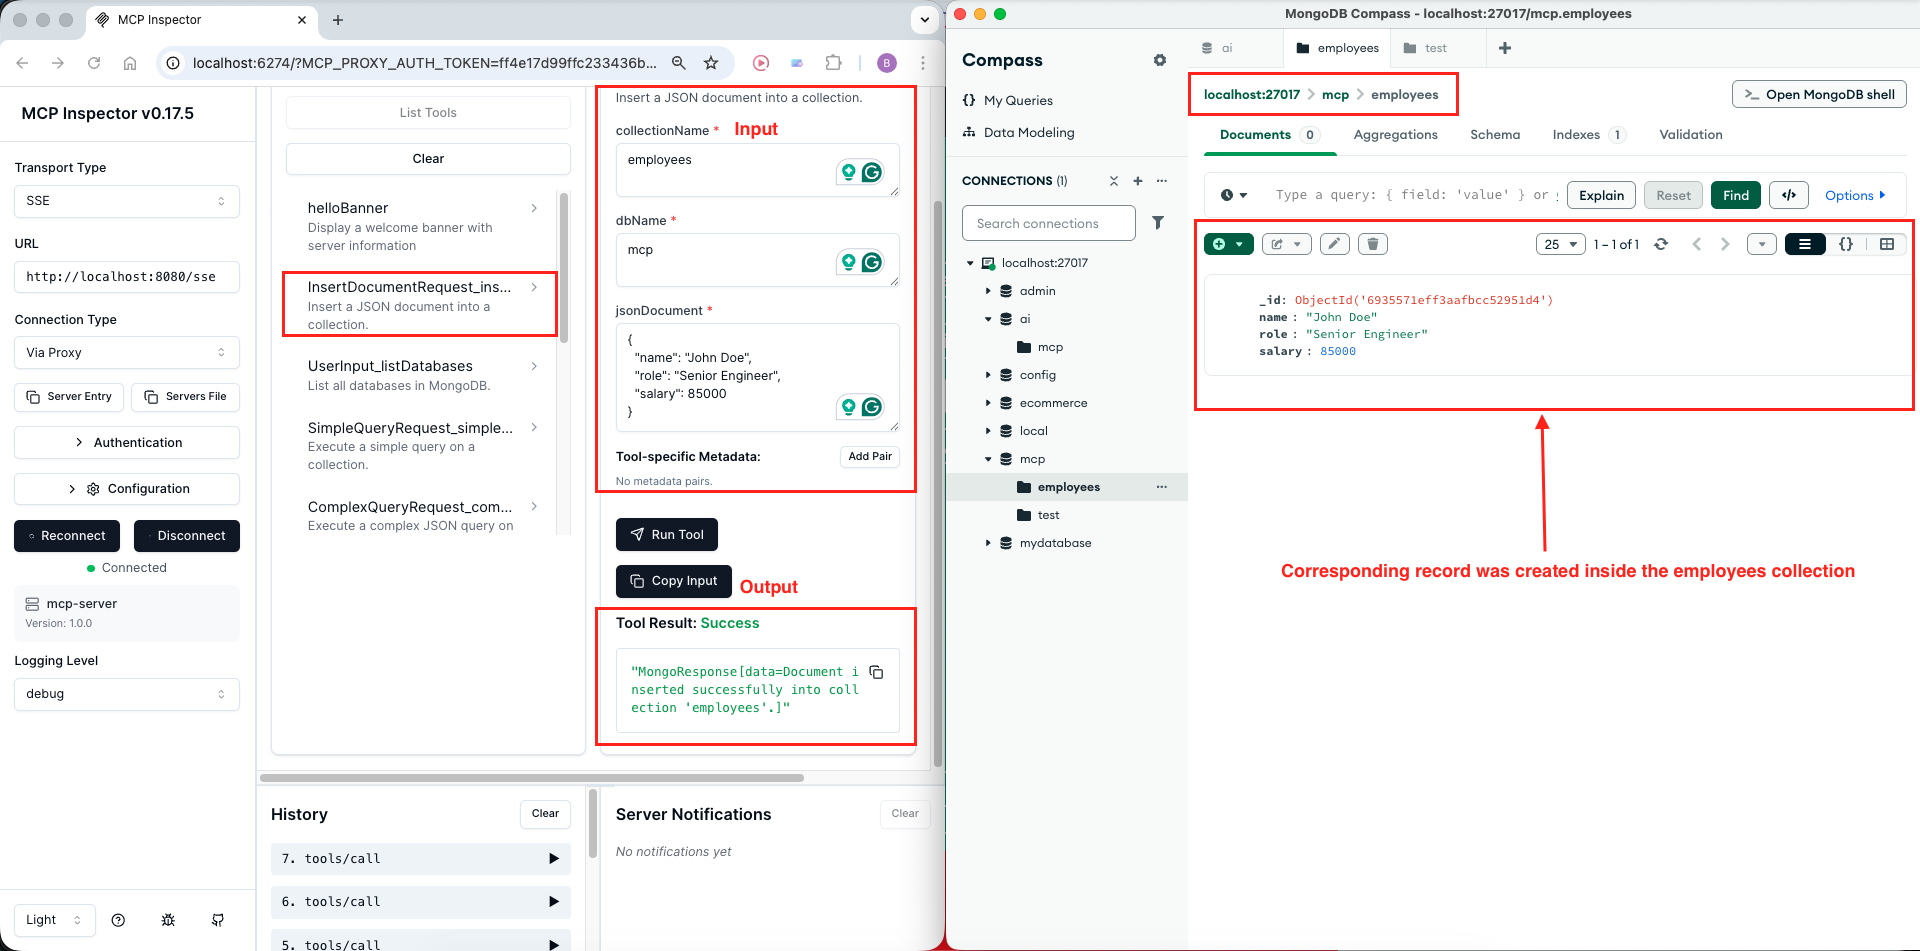
- insertDocument


Method 2: Using Claude Desktop
Now let’s integrate our MCP server with Claude Desktop for a real AI assistant experience!
Step 1: Locate Claude Desktop Config
Find your claude_desktop_config.json file:
- macOS:
~/Library/Application Support/Claude/claude_desktop_config.json - Windows:
%APPDATA%\Claude\claude_desktop_config.json
Step 2: Add MCP Server Configuration
Edit the file to add our server:
{
  "mcpServers": {
    "mongo-mcp-server": {
      "command": "npx",
      "args": [
        "-y",
        "mcp-remote",
        "http://localhost:8080/sse"
      ]
    }
  }
}Configuration Explained:
- mongo-mcp-server: Friendly name for your server
- command: Uses npx to run the mcp-remote package
- mcp-remote: Bridge that connects Claude Desktop to SSE-based MCP servers
- URL: Points to your local server’s SSE endpoint
Step 3: Restart Claude Desktop
Close and reopen Claude Desktop completely for the configuration to take effect.
Step 4: Verify Connection
Look for “Search and tools” option in Claude Desktop’s interface. Click it to see available tools. You should see: listDatabases – listCollections – simpleQuery – complexQuery – listIndexes – createCollection – insertDocument

Step 5: Test with Natural Language
Now you can interact with your Confluence MCP server using natural language!
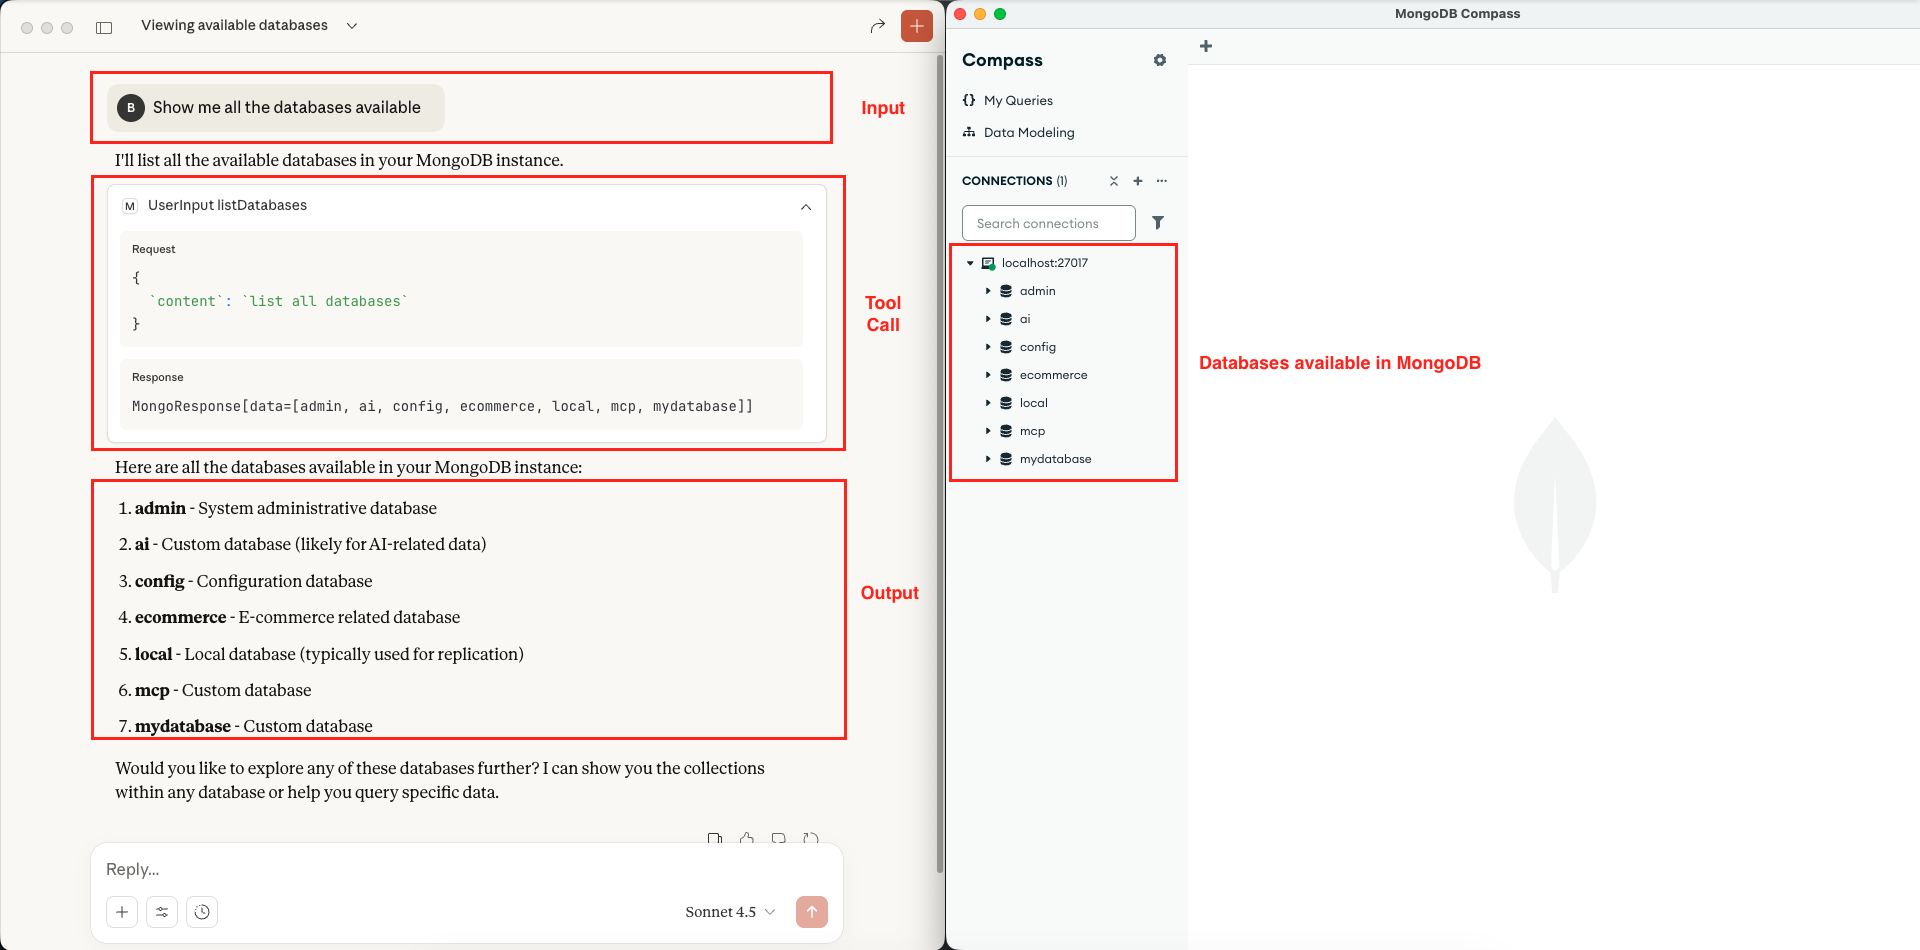 Mongo MCP Server – List Databases – Claude Desktop
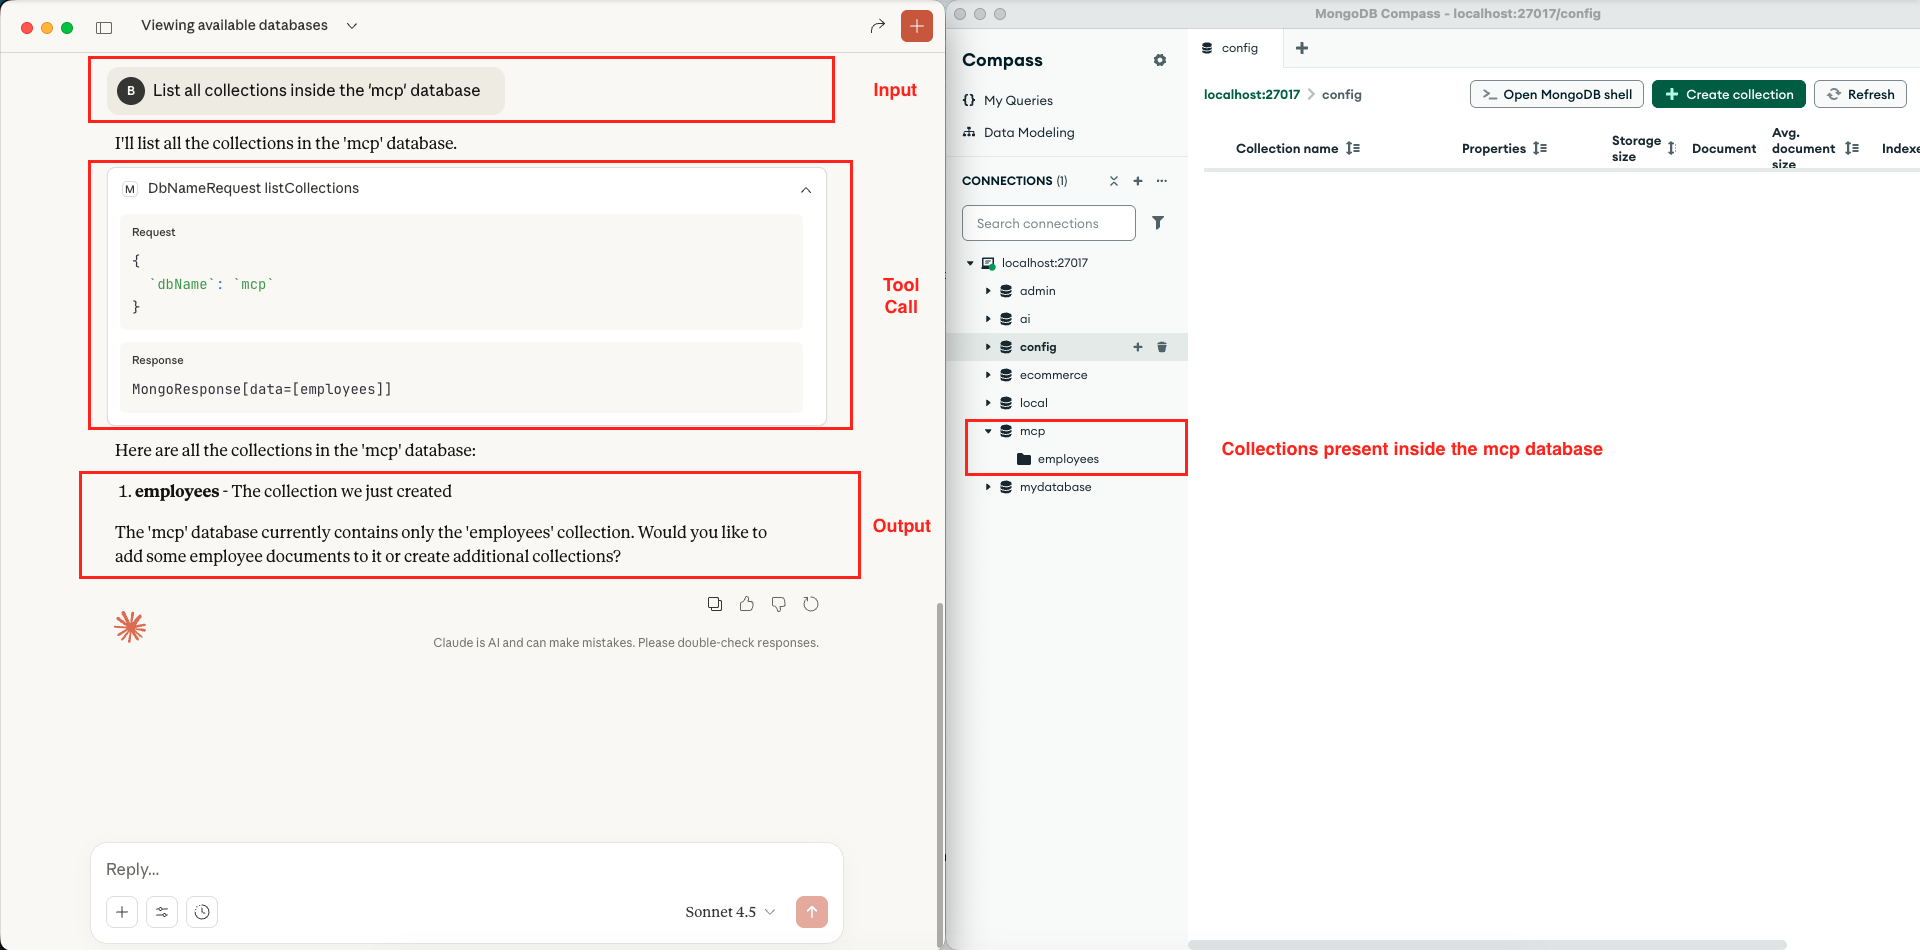 Mongo MCP Server – List Collections – Claude Desktop
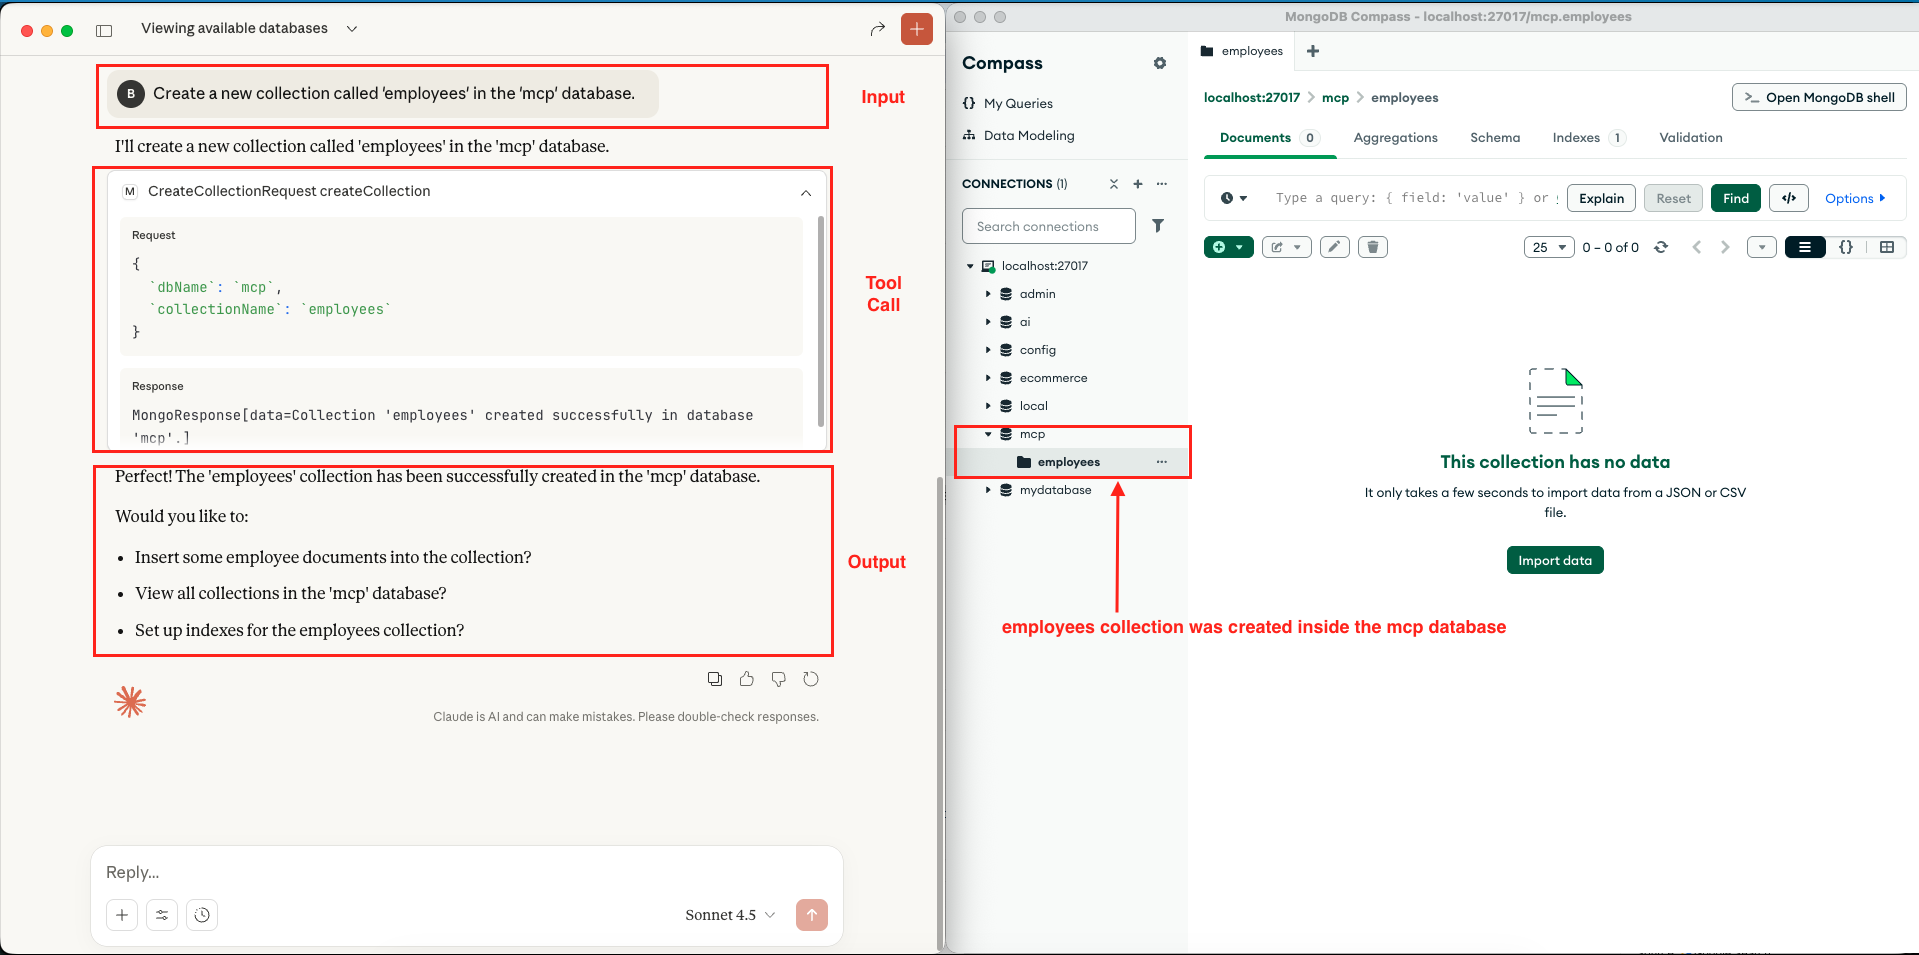 Mongo MCP Server – Create Collection – Claude Desktop
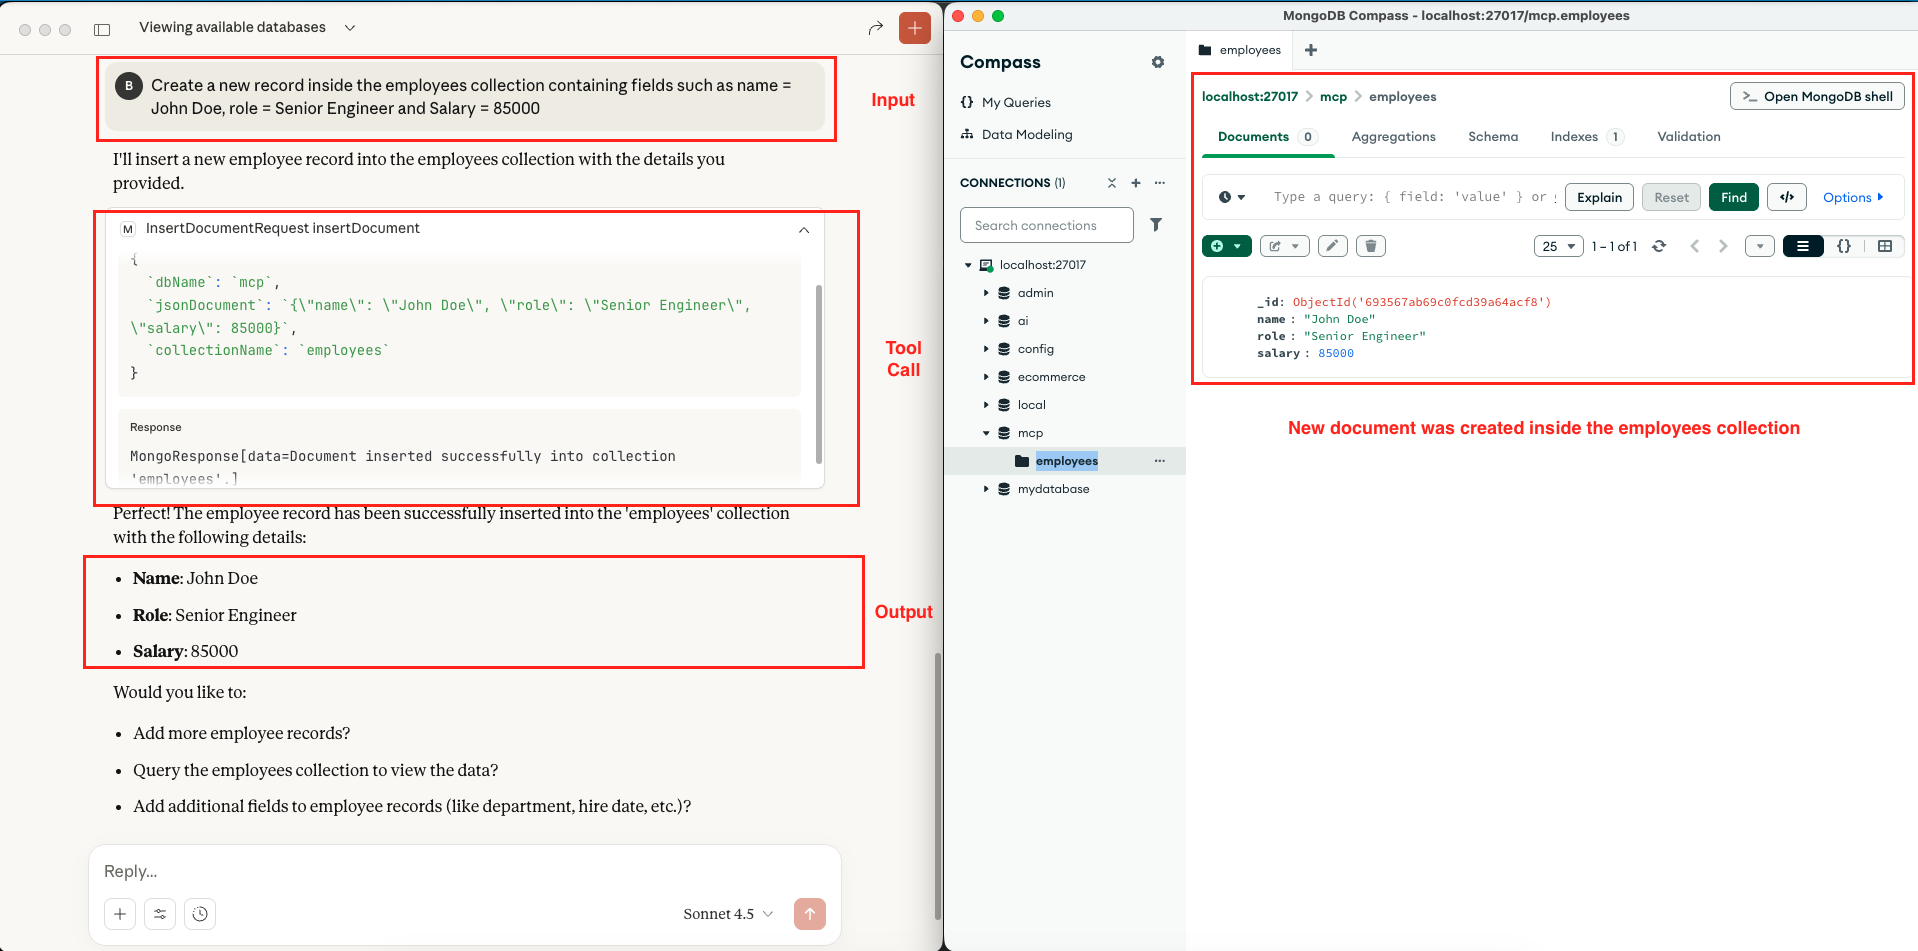 Mongo MCP Server – Insert JSON Document – Claude Desktop
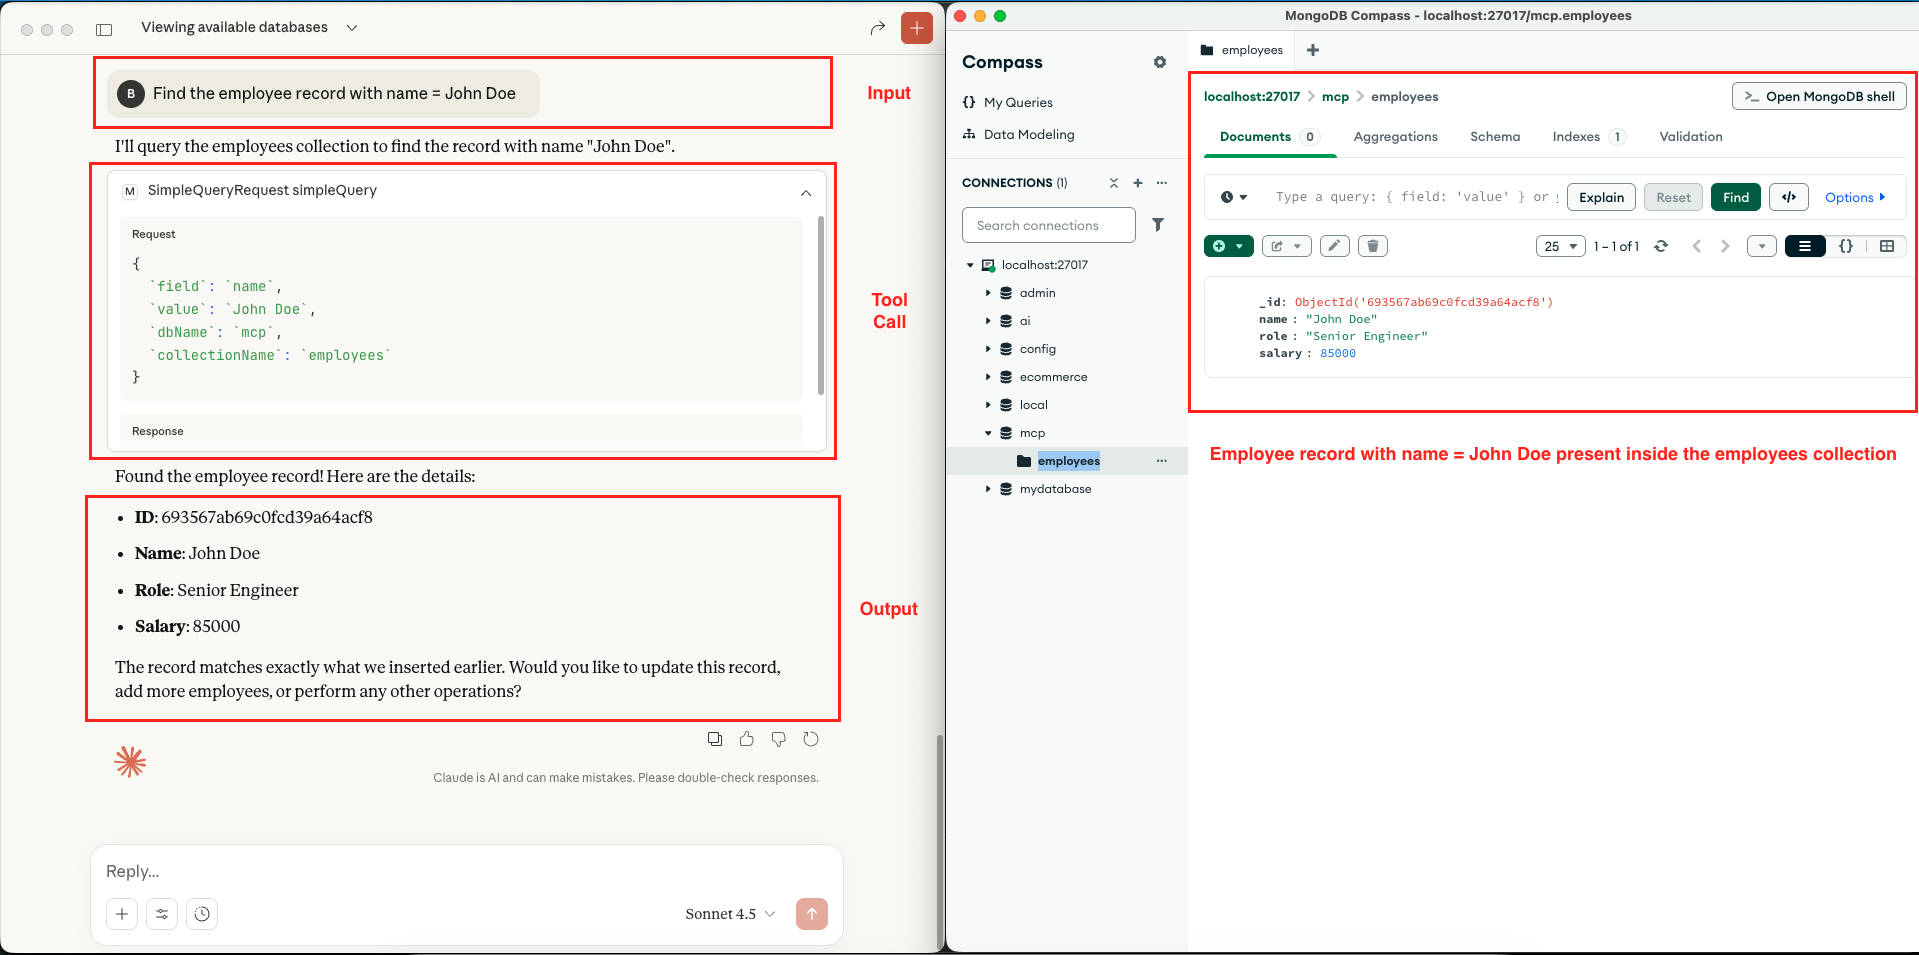 Mongo MCP Server – Execute Simple Query – Claude Desktop
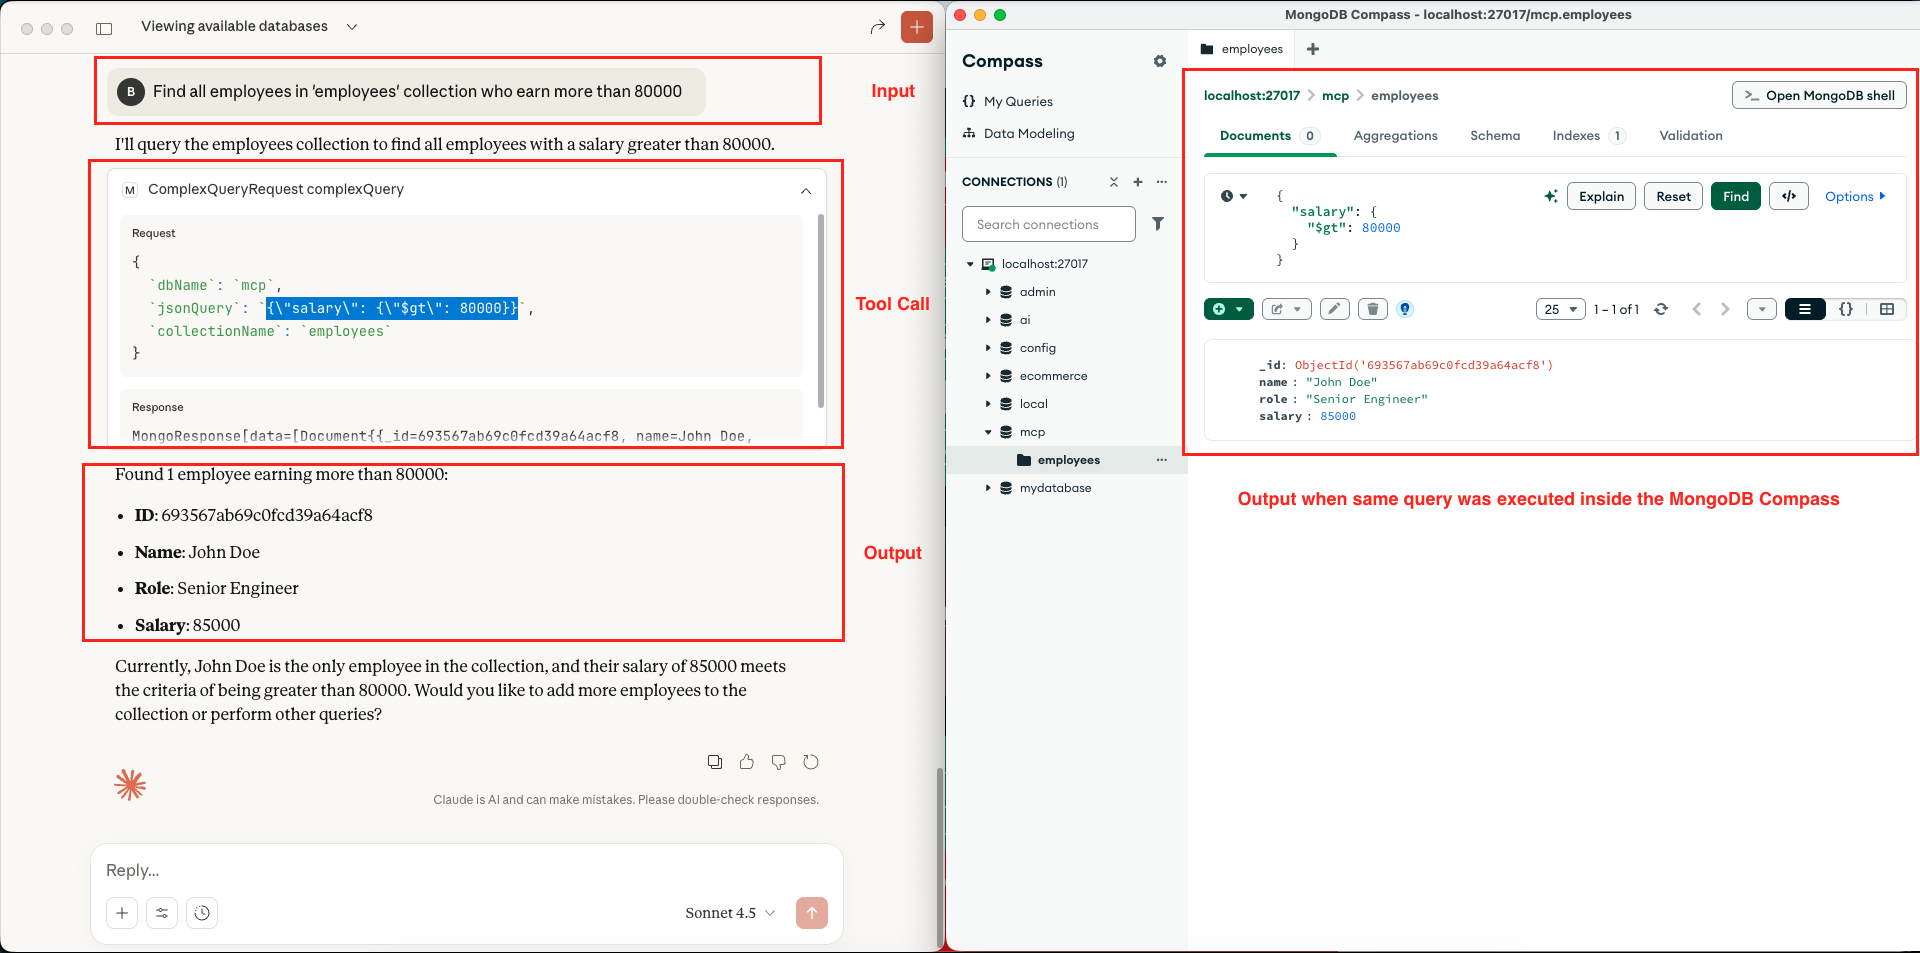 Mongo MCP Server – Execute Complex Query – Claude Desktop
 Mongo MCP Server – List Indexes – Claude Desktop
6. Video Tutorial
For a complete walkthrough, check out our video tutorial. We build the MongoDB MCP Server from the ground up, providing a live demonstration of how to verify your tools using the MCP Inspector and how to fully integrate them with Claude Desktop. You will see the AI running live queries and managing data in real-time!
📺 Watch on YouTube:
7. Source Code
The full source code for our MongoDB MCP Server is available on our GitHub repository. The best way to learn is by doing, so we encourage you to clone the repo, set your OPENAI_API_KEY along with your database credentials (MONGO_HOST and MONGO_PORT) as environment variables, and launch the Spring Boot application. This will let you connect the server to Claude Desktop or the MCP Inspector and start experimenting with AI-driven database operations.
🔗 Embabel Mongo MCP Server: https://github.com/BootcampToProd/embabel-mongo-mcp-server
8. Things to Consider
As you build mcp server keep these best practices in mind:
- Security: Never expose your MongoDB MCP server to the public internet without proper authentication and authorization.
- Schema Validation: MongoDB is schemaless, but your application might expect specific fields. Since the AI generates the JSON, ensure your application code handles potential parsing errors gracefully.
- Read-Only Mode: For production environments, consider creating a read-only version that only supports query operations (listDatabases, listCollections, simpleQuery, complexQuery, listIndexes) and removes write operations (createCollection, insertDocument).
- Connection Pooling: The MongoDB Java driver handles connection pooling automatically, but ensure your MongoDB instance can handle the expected number of concurrent connections.
- Error Handling: Add comprehensive error handling and validation to handle cases like non-existent databases, invalid queries, or connection failures gracefully.
- Logging: Our implementation includes detailed logging, which is crucial for debugging and monitoring. Make sure to configure appropriate log levels for production.
- Data Privacy: Be cautious about what data you expose through the MCP server. Implement field-level security if needed to prevent sensitive data exposure.
- Performance: The listDatabases or query operations could return massive amounts of data. In a production environment, you should implement pagination to prevent overloading the context window of the LLM.
9. FAQs
Can I use this with MongoDB Atlas?
Yes! Just update the mongodb.uri in your application.yml with your Atlas connection string.
Why do we need DTOs like SimpleQueryRequest?
These DTOs define the JSON Schema for the MCP tools. It ensures the LLM knows exactly which arguments (dbName, collectionName, etc.) are required to perform an action.
Can I use this MCP server with databases other than MongoDB?
While this implementation is specifically for MongoDB, you can follow the same pattern to build MCP servers for other databases like PostgreSQL, MySQL, Redis, or even Elasticsearch. Just replace the MongoServiceClient with a service client for your target database.
Can I add custom MongoDB operations?
Yes! Just add new methods to MongoServiceClient for your custom operations, create corresponding DTOs if needed, and expose them through MongoMcpAgent with the appropriate annotations. The Embabel framework will automatically make them available through MCP.
What’s the performance impact of using MCP vs direct database queries?
There is a small overhead due to the MCP protocol layer and LLM processing, typically adding 1–2 seconds per operation. For human-interactive scenarios, this is generally acceptable especially because MCP enables natural-language queries, which often make exploring and understanding data much easier than writing complex database queries manually. However, for high-frequency or automated workloads where speed is critical, direct database access remains more efficient.
10. Conclusion
In this article, we successfully built a MongoDB MCP Server using the Embabel framework. We demonstrated how to expose database operations like querying and inserting documents as tools that AI agents can utilize. This opens up incredible possibilities for building “Chat with your Data” applications without writing complex SQL or query parsers manually.
11. Learn More
Interested in learning more?
Build Confluence MCP Server Using Embabel Framework
Add a Comment