Learn to build an intelligent MCP client using Embabel Framework that understands natural language commands. Create, read, edit, and delete files using conversational AI.
1. Introduction
Hello developers! Welcome back to our journey with the Embabel framework. If you’ve been following this series, you’ve already learned how to build intelligent agents and even how to create your own MCP (Model Context Protocol) servers.
In our previous articles, we’ve laid a solid foundation:
- Embabel Framework: Create Goal-Driven AI Agents for the JVM: We covered the basics and built a shell-based meeting summarizer.:
- Embabel Framework: Build a REST API Based AI Agent: We learned how to expose agents over web endpoints.
- Embabel Framework Condition Annotation: Building Decision Making AI Agents: We added logic to our agents.
- Embabel Framework: How to Build MCP Server: We built a server that performs file operations.
- Build Confluence MCP Server Using Embabel Framework: We connected AI to the Confluence Cloud.
- Build MongoDB MCP Server Using Embabel Framework: We gave our agents database access.
Today, we’re going to complete the circle by building an intelligent MCP client using Embabel Framework that understands natural language! Instead of calling separate endpoints for create, read, edit, and delete operations, you’ll simply tell the AI what you want in plain English, and it will figure out which file operation to perform.
This demonstrates the true power of AI agents – they can understand human language, make intelligent decisions, and orchestrate complex operations without you having to specify every detail. By the end of this tutorial, you’ll have a conversational file operations system that feels like talking to a smart assistant.
2. What is an MCP Client?
Before we dive into the code, let’s quickly understand what an MCP client is. The Model Context Protocol (MCP) is a standardized way for AI applications to connect to external tools and data sources. An MCP client is an application that:
- Connects to MCP Servers: Establishes connections with one or more MCP servers
- Discovers Available Tools: Fetches the list of tools (functions) that the server provides
- Invokes Tools: Calls these tools with appropriate parameters
- Processes Results: Handles the responses from the server
In simple terms, if the MCP Server is a “Toolbox,” the MCP Client is the “Hand” that picks up a tool and uses it. Our Embabel agent will act as the brain, deciding which file tool to use based on what the user asks.
3. Prerequisites
Before we begin, make sure you have:
- Java 21 or higher installed
- Maven for dependency management
- Spring Boot knowledge (basic understanding is sufficient)
- The File Operations MCP Server running (from our fourth article)
- An OpenRouter API key (for accessing free AI models)
4. Build File Operations MCP Client
We’ll build an MCP client using the Embabel framework that connects to our previously built File Operations MCP server. We will develop an AI-powered agent capable of performing file system tasks including:
- Creating new files with specific content.
- Reading and retrieving content from existing files.
- Overwriting existing file contents.
- Deleting files from the local file system.
Our intelligent MCP client has just one endpoint that accepts natural language commands. The AI agent:
- Analyzes your command to understand your intent
- Extracts necessary information like file names and content
- Determines which operation to perform (create, read, edit, or delete)
- Calls the appropriate MCP tool automatically
- Returns the result in a structured format
This is what we call a truly agentic system – the AI makes decisions and takes actions based on natural language input, just like a human assistant would!
While we are demonstrating this using our own file operations server, the best part about the Model Context Protocol (MCP) is that once you build this client, you can use the same approach to connect your AI agent to any other MCP server out there!
⚙️ Project Structure & Setup
Before we dive into the code, let’s understand how our project is organized:
embabel-mcp-client-file-operations
├── src
│   └── main
│       ├── java
│       │   └── com
│       │       └── bootcamptoprod
│       │               ├── agents
│       │               │   └── SmartFileOperationsAgent.java          # AI Agent that interprets natural language
│       │               ├── config
│       │               │   ├── ConfigureOpenRouterModels.java         # Connects Embabel to LLMs via OpenRouter
│       │               │   └── FileOpsToolsConfig.java                # Connects to MCP Server and groups tools
│       │               ├── controller
│       │               │   └── FileOperationsController.java          # REST API to interact with the AI Agent
│       │               ├── dto                                        # Data Transfer Objects (Request/Response)
│       │               │   ├── FileOperationRequest.java              # Natural language command input
│       │               │   ├── FileOperationResponse.java             # Final result of the AI action
│       │               │   └── FileMetadata.java                      # Shared file details (size, path, etc.)
│       │               └── EmbabelMcpClientFileOperationsApplication.java # The main Spring Boot application class
│       └── resources
│           └── application.yml                                        # MCP server URL and LLM configurations
└── pom.xml # Project dependencies and Embabel startersUnderstanding the Project Structure
Here’s a quick breakdown of what each key file and package does:
- SmartFileOperationsAgent.java: This is the “Brain.” It analyzes your text command and uses the LLM to decide which file tool to call.
- ConfigureOpenRouterModels.java: Handles the connection to the LLM (Large Language Model). We use OpenRouter to access models like DeepSeek to provide the “reasoning” for our agent.
- FileOpsToolsConfig.java: This class acts as a bridge. It connects to the MCP server and registers its tools so the AI Agent can see and use them.
- FileOperationsController.java: A standard Spring RestController. It takes your HTTP request and hands it over to the Embabel agent to process.
- dto package: These are simple Java Records that define the “Contracts” for data moving between the AI and the server.
- application.yml: The configuration hub. Here, we define the MCP server’s URL (localhost:8080/sse) and set the default LLM.
- pom.xml: Manages the project dependencies, specifically the embabel-agent-starter and the OpenAI compatibility libraries.
Diving Into the Code
Let’s break down each component of our application.
Step 1: Setting Up Maven Dependencies
First, let’s set up our Maven project with all necessary dependencies. The pom.xml file defines our project configuration and required libraries:
<properties>
	<java.version>21</java.version>
	<embabel-agent.version>0.3.1-SNAPSHOT</embabel-agent.version>
</properties>

<dependencies>
	<!-- Spring Boot Web for REST endpoints -->
	<dependency>
		<groupId>org.springframework.boot</groupId>
		<artifactId>spring-boot-starter-web</artifactId>
	</dependency>
	<!-- Spring Boot Actuator for health checks -->
	<dependency>
		<groupId>org.springframework.boot</groupId>
		<artifactId>spring-boot-starter-actuator</artifactId>
	</dependency>
	<!-- Embabel Agent Starter - Core framework -->
  <dependency>
    <groupId>com.embabel.agent</groupId>
    <artifactId>embabel-agent-starter</artifactId>
  </dependency>
  <!-- OpenAI Compatible Model Support -->
  <dependency>
    <groupId>com.embabel.agent</groupId>
    <artifactId>embabel-agent-starter-openai</artifactId>
  </dependency>
</dependencies>

<dependencyManagement>
	<dependencies>
		<dependency>
			<groupId>com.embabel.agent</groupId>
			<artifactId>embabel-agent-dependencies</artifactId>
			<version>${embabel-agent.version}</version>
			<type>pom</type>
			<scope>import</scope>
		</dependency>
	</dependencies>
</dependencyManagement>

<repositories>
	<repository>
		<id>embabel-releases</id>
		<url>https://repo.embabel.com/artifactory/libs-release</url>
		<releases>
			<enabled>true</enabled>
		</releases>
		<snapshots>
			<enabled>false</enabled>
		</snapshots>
	</repository>
	<repository>
		<id>embabel-snapshots</id>
		<url>https://repo.embabel.com/artifactory/libs-snapshot</url>
		<releases>
			<enabled>false</enabled>
		</releases>
		<snapshots>
			<enabled>true</enabled>
		</snapshots>
	</repository>
</repositories>
What’s Important Here:
- This Maven configuration sets up our Spring Boot project with Java 21, ensuring we can use the latest Java features for our AI agent.
- The core dependency is embabel-agent-starter. This is the engine that provides the framework for building goal-driven AI agents. It handles the internal logic of how an agent plans tasks and executes actions based on the tools it has available.
- We have included embabel-agent-starter-openai. Since this is an MCP Client, we need a “brain” (the LLM) to do the reasoning. This dependency allows our agent to communicate with OpenAI-compatible providers like OpenRouter. The LLM will analyze your natural language request (e.g., “Create a file named notes.txt”) and decide which specific MCP tool to call to get the job done.
- The spring-boot-starter-web dependency is essential here because it allows us to expose our AI agent through REST endpoints. This way, we can trigger file operations from external tools like Postman or a frontend application.
- We also included custom repositories. These are necessary to fetch the Embabel framework artifacts, as they are hosted on Embabel’s own repository.
- Finally, the Actuator dependency is included for production-readiness, providing built-in endpoints to monitor the health and metrics of our client application.
Step 2: Configure Application Properties
Next, let’s configure our application settings in application.yml:
spring:
  application:
    name: embabel-mcp-client-file-operations
  ai:
    mcp:
      client:
        enabled: true
        name: embabel-mcp-client-file-operations
        version: 1.0.0
        type: SYNC
        sse:
          connections:
            embabel-mcp-file-server:
              url: http://localhost:8080/sse

server:
  port: 8081

embabel:
  models:
defaultLlm: nex-agi/deepseek-v3.1-nex-n1:free📄 Configuration Overview
- spring.ai.mcp.client.enabled: Enables MCP client functionality in our application
- spring.ai.mcp.client.type: Set to SYNC for synchronous communication with MCP servers
- sse.connections: Defines the MCP server connection details
- embabel-mcp-file-server: A unique identifier for our file operations server
- url: The SSE (Server-Sent Events) endpoint of our MCP server running on port 8080
- server.port: Our client runs on port 8081 to avoid conflicts with the MCP server
- embabel.models.defaultLlm: The AI model we’ll use (a free DeepSeek model via OpenRouter)
Step 3: Application Entry Point
This is the main class that bootstraps our entire application.
package com.bootcamptoprod;

import com.embabel.agent.config.annotation.EnableAgents;
import org.springframework.boot.SpringApplication;
import org.springframework.boot.autoconfigure.SpringBootApplication;

@EnableAgents
@SpringBootApplication
public class EmbabelMcpClientFileOperationsApplication {

    public static void main(String[] args) {
        SpringApplication.run(EmbabelMcpClientFileOperationsApplication.class, args);
    }

}
Explanation:
- This is our Spring Boot application entry point. This class bootstraps both Spring Boot and Embabel frameworks simultaneously.
Step 4: Configuring LLM Models
This configuration class sets up multiple LLM models via OpenRouter, a unified API gateway for various AI models. Here’s what’s happening:
package com.bootcamptoprod.config;

import com.embabel.agent.openai.OpenAiCompatibleModelFactory;
import com.embabel.common.ai.model.Llm;
import com.embabel.common.ai.model.PerTokenPricingModel;
import io.micrometer.observation.ObservationRegistry;
import org.jetbrains.annotations.NotNull;
import org.springframework.beans.factory.annotation.Value;
import org.springframework.context.annotation.Bean;
import org.springframework.context.annotation.Configuration;

import java.time.LocalDate;

@Configuration
public class ConfigureOpenRouterModels extends OpenAiCompatibleModelFactory {

    public ConfigureOpenRouterModels(@NotNull ObservationRegistry observationRegistry,
                                     @Value("${OPENAI_API_KEY}") String apiKey) {
        super(
                "https://openrouter.ai",
                apiKey,
                "/api/v1/chat/completions",
                null,
                observationRegistry
        );
    }

    @Bean
    public Llm mistral7b_free() {
        return openAiCompatibleLlm(
                "mistralai/mistral-7b-instruct:free",
                new PerTokenPricingModel(0.0, 0.0),
                "OpenRouter",
                LocalDate.of(2024, 10, 1)
        );
    }

    @Bean
    public Llm deepseek_r1_t2() {
        return openAiCompatibleLlm(
                "tngtech/deepseek-r1t2-chimera:free",
                new PerTokenPricingModel(0.0, 0.0),
                "OpenRouter",
                LocalDate.of(2025, 5, 28)
        );
    }

    @Bean
    public Llm deepseek_3_1() {
        return openAiCompatibleLlm(
                "nex-agi/deepseek-v3.1-nex-n1:free",
                new PerTokenPricingModel(0.0, 0.0),
                "OpenRouter",
                LocalDate.of(2025, 1, 28)
        );
    }

    @Bean
    public Llm glm_4_5_air() {
        return openAiCompatibleLlm(
                "z-ai/glm-4.5-air:free",
                new PerTokenPricingModel(0.0, 0.0),
                "OpenRouter",
                LocalDate.of(2025, 5, 28)
        );
    }
}Explanation:
- This configuration class registers OpenRouter as an AI model provider.
- By extending
OpenAiCompatibleModelFactory, we leverage OpenRouter’s OpenAI-compatible API. - The constructor configures the base URL and endpoint for OpenRouter API.
- The
@Value("${OPENAI_API_KEY}")annotation injects your API key, which you must provide as an environment variable when running the application. - The LLM beans methods create different model instances with zero pricing (useful for free tier or internal tracking) and metadata about the model.
- The
PerTokenPricingModel(0.0, 0.0)indicates these are free-tier models with no cost per token. - The
ObservationRegistryintegration enables automatic metrics collection for model usage.
Why Multiple Models? Having multiple models configured gives you flexibility to switch between them without code changes
Step 5: Configuring MCP Tool Groups
This is where the magic happens! We need to tell our application which tools from the MCP server our agents can use.
package com.bootcamptoprod.config;

import com.embabel.agent.core.ToolGroup;
import com.embabel.agent.core.ToolGroupDescription;
import com.embabel.agent.core.ToolGroupPermission;
import com.embabel.agent.tools.mcp.McpToolGroup;
import io.modelcontextprotocol.client.McpSyncClient;
import org.springframework.beans.factory.annotation.Autowired;
import org.springframework.context.annotation.Bean;
import org.springframework.context.annotation.Configuration;
import org.springframework.context.annotation.Lazy;
import org.springframework.util.Assert;

import java.util.List;
import java.util.Set;

@Configuration
public class FileOpsToolsConfig {

    private final List<McpSyncClient> mcpSyncClients;

    @Autowired
    public FileOpsToolsConfig(@Lazy List<McpSyncClient> mcpSyncClients) {
        Assert.notNull(mcpSyncClients, "McpSyncClients must not be null");
        this.mcpSyncClients = mcpSyncClients;
    }

    @Bean
    public ToolGroup fileOperationsMcpToolGroup() {
        return new McpToolGroup(
                ToolGroupDescription.Companion.invoke(
                        "File system operations including create, read, edit, and delete via MCP",
                        "file-operations-mcp-tool-group"  // ← MUST match toolGroups = {"file-operations-mcp-tool-group"} in agent
                ),
                "File Operations Provider",
                "file-ops-tool-group",
                Set.of(ToolGroupPermission.HOST_ACCESS),
                mcpSyncClients,
                toolCallback -> {
                    String toolName = toolCallback.getToolDefinition().name();
                    return toolName.contains("File") ||
                            toolName.contains("file") ||
                            toolName.equals("createFile") ||
                            toolName.equals("readFile") ||
                            toolName.equals("editFile") ||
                            toolName.equals("deleteFile");
                }
        );
    }
}What’s Important Here:
- This class acts as the “Bridge” between the external MCP server and our Embabel AI Agent. It is responsible for discovering the tools provided by the server and organizing them into a group that the agent can understand and use.
- We are injecting a list of McpSyncClient objects. These clients are created based on the connection details we provided in our application.yml.
- The star of this class is the fileOperationsMcpToolGroup bean. This creates an McpToolGroup, which is essentially a collection of tools. There are three critical parts to this configuration:
- The Identifier: We gave this group the ID “file-operations-mcp-tool-group”. This is extremely important because it must exactly match the toolGroups name used in our FileOperationsAgent.java. If these don’t match, the agent won’t know where to find its tools!
- Permissions: We set the permission to HOST_ACCESS. This tells the framework that these tools are allowed to interact with the system hosting the MCP server (in this case, our local file system).
- The Tool Filter (The Predicate): This is the most clever part. Since an MCP server might provide dozens of tools, we use a filter to ensure this specific group only contains the ones we want. Our logic looks for tools that contain the word “file” or match specific names like createFile and deleteFile. This prevents the agent from getting confused by irrelevant tools.
Step 6: Create Data Transfer Object (DTOs)
Our DTOs define the structure of data flowing through the application.
package com.bootcamptoprod.dto;

public record FileOperationRequest(
        String command
) {}
Purpose: A simple record that holds the user’s natural language command (e.g., “Create a file named notes.txt with content ‘Hello'”). This is the only input our smart agent needs to start its work.code
package com.bootcamptoprod.dto;

public record FileOperationResponse(
        FileMetadata fileMetadata,
        String message,
        boolean success,
        String operationType
) {
}Purpose: This record captures the final result of the AI’s action. It includes a success flag, a descriptive message, the specific type of operation performed (like CREATE or DELETE), and the metadata of the file involved.
package com.bootcamptoprod.dto;

import java.time.Instant;

public record FileMetadata(
        String fileName,
        String exactPath,
        long fileSize,
        Instant createdAt,
        Instant updatedAt,
        String content,
        boolean isDeleted,
        String error
) {}
Purpose: A comprehensive record that stores detailed information about a file, such as its size, exact storage path, timestamps, and actual content. It also tracks if a file was deleted or if an error occurred during the process.
Step 7: Building the File Operations Agent
Now comes the most exciting part – creating our AI agent that understands natural language! This agent will orchestrate all file operations through the MCP server:
package com.bootcamptoprod.agents;

import com.bootcamptoprod.dto.FileOperationRequest;
import com.bootcamptoprod.dto.FileOperationResponse;
import com.embabel.agent.api.annotation.AchievesGoal;
import com.embabel.agent.api.annotation.Action;
import com.embabel.agent.api.annotation.Agent;
import com.embabel.agent.api.common.OperationContext;
import org.slf4j.Logger;
import org.slf4j.LoggerFactory;

@Agent(
        name = "smart-file-operations-agent",
        description = "Intelligent agent that understands natural language commands and performs file operations",
        version = "1.0.0"
)
public class SmartFileOperationsAgent {

    private static final Logger log = LoggerFactory.getLogger(SmartFileOperationsAgent.class);

    @Action(
            description = "Process natural language file operation requests and execute appropriate file operations",
            toolGroups = {"file-operations-mcp-tool-group"}
    )
    @AchievesGoal(description = "Understand user's natural language command and execute the appropriate file operation")
    public FileOperationResponse processFileOperation(FileOperationRequest request, OperationContext context) {
        log.info("[ACTION] processFileOperation START - user command: {}", request.command());

        String prompt = String.format("""
                You are a file operations assistant. The user has given you a command in natural language.
                Analyze the command and perform the appropriate file operation using the available tools.

                User Command: "%s"

                Based on this command:
                1. Determine if the user wants to CREATE, READ, EDIT, or DELETE a file
                2. Extract the file name from the command
                3. If creating or editing, extract the file content
                4. Use the appropriate file operation tool (createFile, readFile, editFile, or deleteFile)
                5. Return the result with proper metadata

                Execute the file operation now.
                """, request.command());

        FileOperationResponse response = context.ai()
                .withDefaultLlm()
                .createObjectIfPossible(prompt, FileOperationResponse.class);

        log.info("[ACTION] processFileOperation END - operation completed");
        return response;
    }
}What’s Important Here:
This class represents the “Brain” of our application. While the MCP server has the “hands” to move files, this Agent has the “intelligence” to decide how to use those tools based on the user’s intent.
- @Agent annotation: Declares this as a “smart” agent that understands natural language
- Single Action: Unlike traditional approaches with multiple actions (create, read, edit, delete), we have just one action that handles everything!
- @Action with toolGroups: Links this action to our MCP tool group, giving the agent access to all file operation tools
- @AchievesGoal: Clearly states the agent’s purpose – understanding natural language and executing the right operation
- The Magic Prompt: The prompt is structured as a task description that:
- Explains the agent’s role as a “file operations assistant”
- Provides the user’s natural language command
- Lists the steps the AI should follow
- Instructs it to analyze, extract information, and execute
- context.ai().withDefaultLlm(): Uses our configured AI model (DeepSeek)
- createObjectIfPossible(): This is where the intelligence happens! The AI:
- Analyzes the natural language command
- Determines which operation is needed (CREATE/READ/EDIT/DELETE)
- Extracts the file name and content (if applicable)
- Calls the appropriate MCP tool automatically
- Parses the MCP response
- Returns a structured
FileOperationResponse
The beauty of this approach: You write natural language, and the AI figures out everything else – which tool to call, what parameters to pass, and how to structure the response!
Step 8: Creating the REST Controller
Finally, let’s expose our agent’s capabilities through REST API:
package com.bootcamptoprod.controller;

import com.bootcamptoprod.dto.FileOperationRequest;
import com.bootcamptoprod.dto.FileOperationResponse;
import com.embabel.agent.api.invocation.AgentInvocation;
import com.embabel.agent.core.AgentPlatform;
import com.embabel.agent.core.ProcessOptions;
import com.embabel.agent.core.Verbosity;
import org.slf4j.Logger;
import org.slf4j.LoggerFactory;
import org.springframework.web.bind.annotation.PostMapping;
import org.springframework.web.bind.annotation.RequestBody;
import org.springframework.web.bind.annotation.RequestMapping;
import org.springframework.web.bind.annotation.RestController;

@RestController
@RequestMapping("/api/v1/files")
public class FileOperationsController {

    private static final Logger log = LoggerFactory.getLogger(FileOperationsController.class);

    private final AgentPlatform agentPlatform;
    private final ProcessOptions processOptions;

    public FileOperationsController(AgentPlatform agentPlatform) {
        this.agentPlatform = agentPlatform;

        Verbosity verbosity = Verbosity.DEFAULT
                .showLlmResponses()
                .showPrompts()
                .showPlanning();

        this.processOptions = ProcessOptions.DEFAULT.withVerbosity(verbosity);
    }

    @PostMapping
    public FileOperationResponse executeFileOperation(@RequestBody FileOperationRequest request) {
        log.info("Natural language file operation request received: {}", request.command());

        var agentInvocation = AgentInvocation
                .builder(agentPlatform)
                .options(processOptions)
                .build(FileOperationResponse.class);

        FileOperationResponse response = agentInvocation.invoke(request);

        log.info("File operation result - success: {}, message: {}",
                response.success(), response.message());

        return response;
    }
}Explanation:
This class acts as the “Front Door” or entry point of our application. While the Agent contains the intelligence and the MCP Server contains the tools, the Controller provides the REST API endpoint that allow us (or our frontend) to actually trigger the AI.
- Single Endpoint: We have just one endpoint (
POST /api/v1/files) that handles all file operations. The AI figures out what operation to perform. - AgentPlatform: Injected by Spring, provides access to all registered agents. It keeps track of all our registered agents, tools, and connections.
- Verbosity settings: Configure detailed logging to see LLM responses, prompts, and planning steps – very useful for debugging
- AgentInvocation: Think of this as the “Mission Launcher.” For every incoming web request, we build an AgentInvocation. The fluent API for invoking agents:
builder(agentPlatform): Initialize with the platform.options(processOptions): Configure execution options.build(FileOperationResponse.class): Specify the expected response type.invoke(request): Execute the agent with the request
This controller acts as a thin layer between HTTP requests and our intelligent agent, making it incredibly easy to integrate with any frontend application!
5. Testing the Application
Now let’s test our MCP client! Follow these steps carefully:
Step 1: Start the File Operations MCP Server
First, you need to have your File Operations MCP Server running on port 8080:
cd /path/to/embabel-mcp-server-file-operations
mvn clean install
export OPENAI_API_KEY=your_openrouter_api_key_here
mvn spring-boot:runWait until you see logs indicating the server is running successfully on port 8080.
Step 2: Start the MCP Client Application
In a new terminal window, navigate to your MCP client project, set your OpenRouter API key, and run:
cd /path/to/embabel-mcp-client-file-operations
mvn clean install
export OPENAI_API_KEY=your_openrouter_api_key_here
mvn spring-boot:runYour MCP client should start on port 8081. You’ll see logs showing the MCP connection being established.
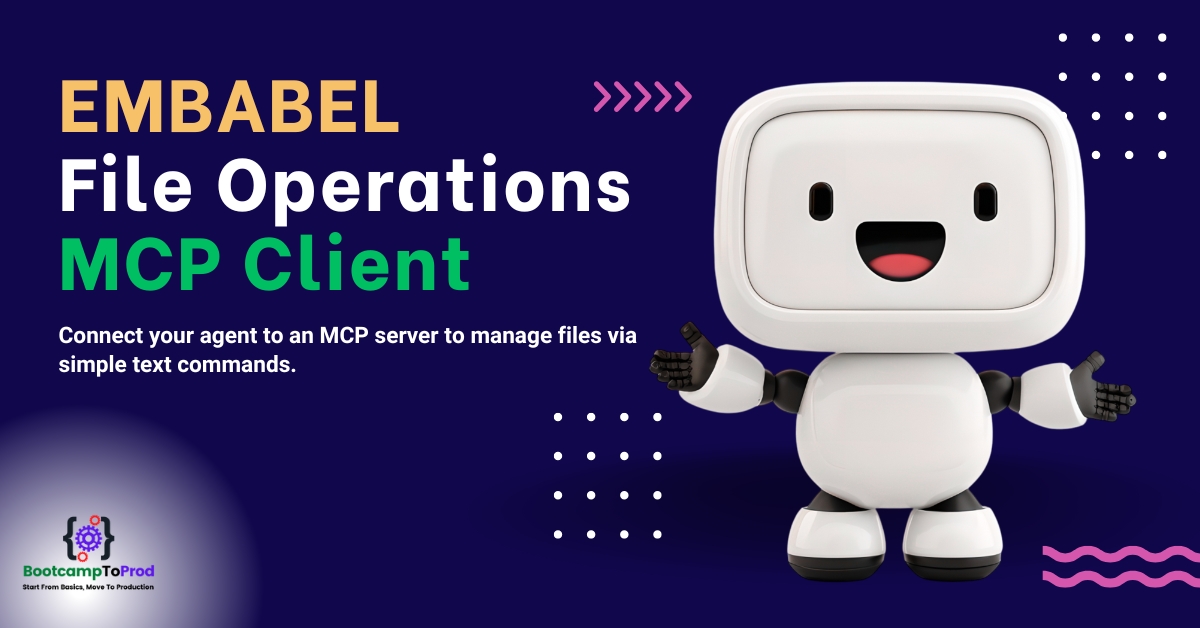
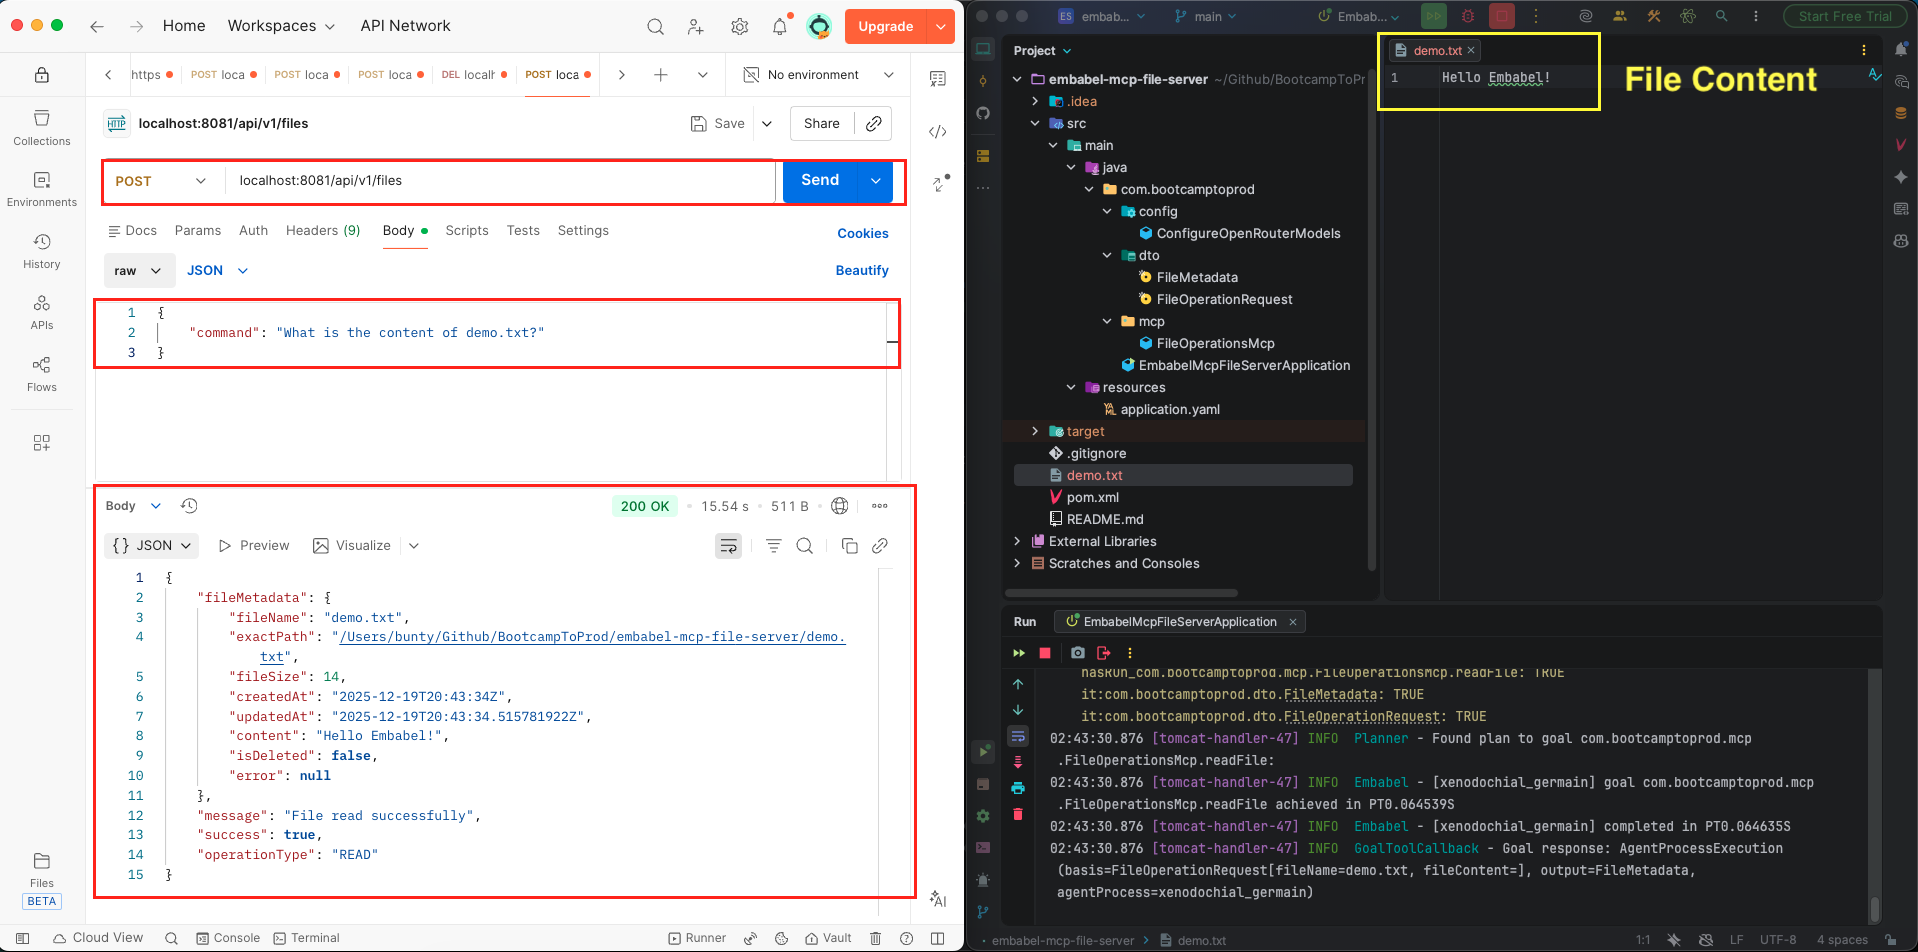
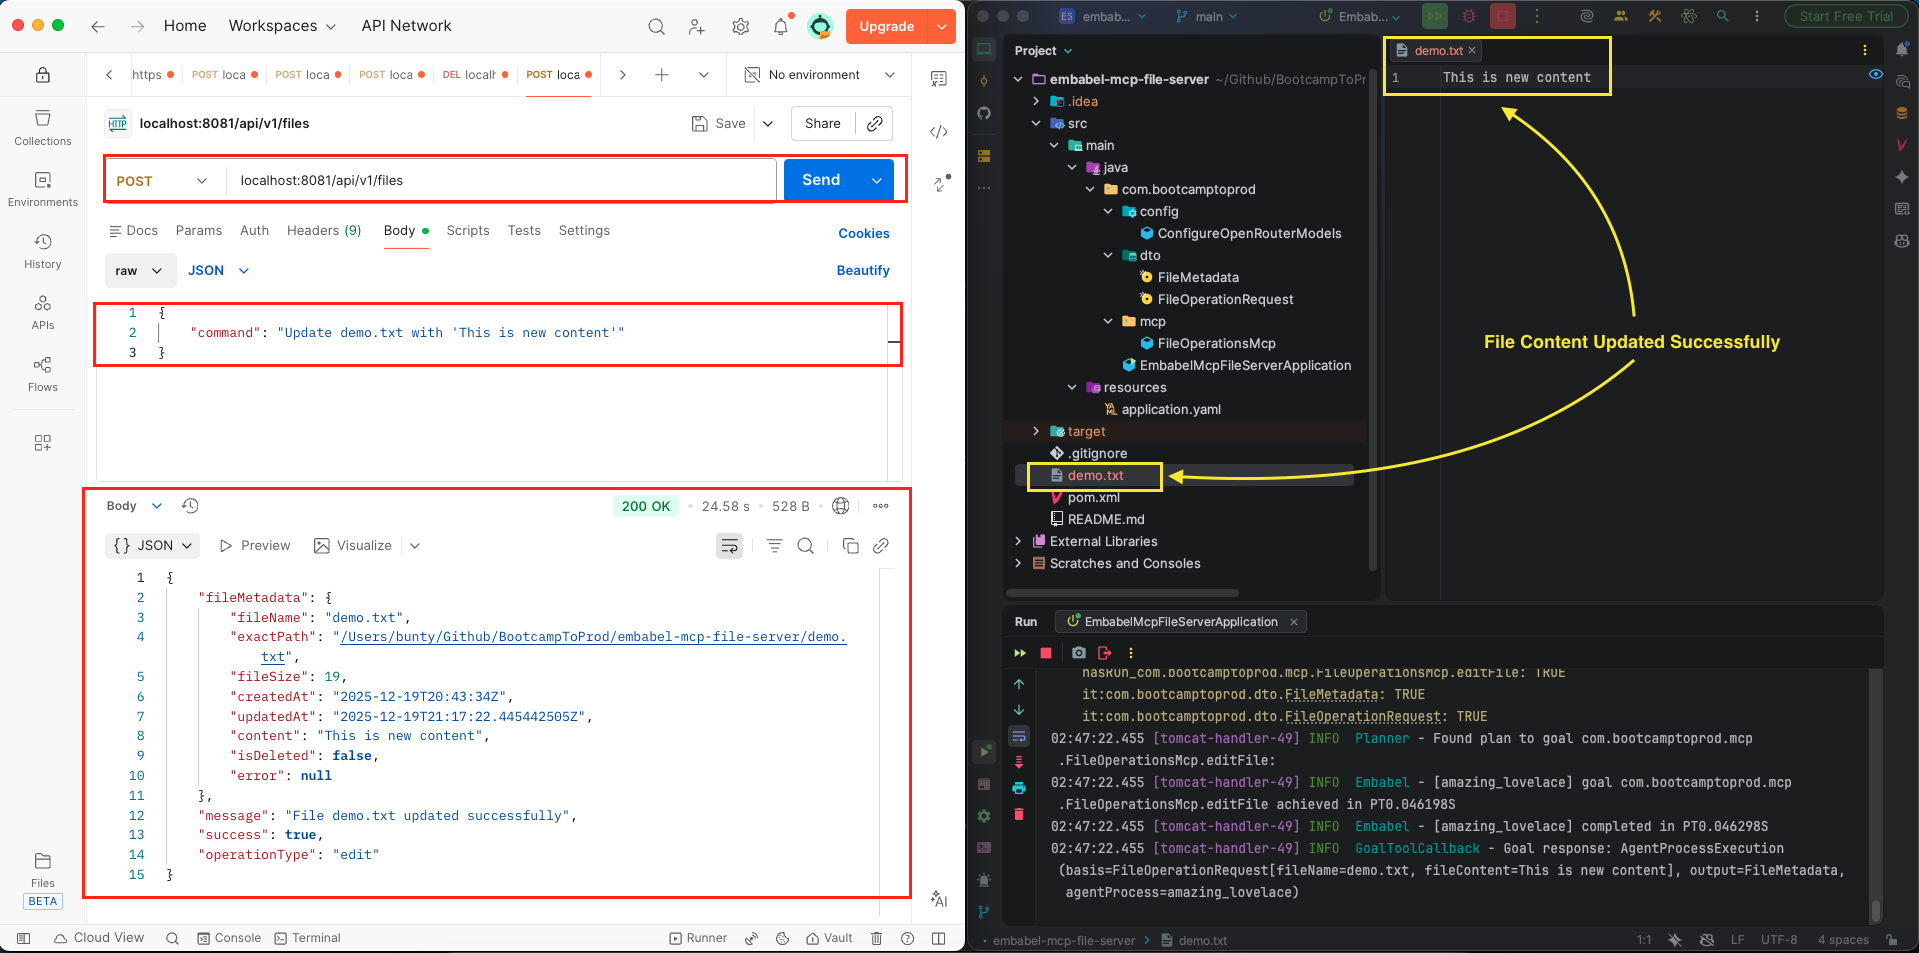
Step 3: Test the application using a tool like Postman, Insomnia, or curl by sending a POST request to http://localhost:8081/api/v1/files:
- Create:
{"command": "Create a file named demo.txt with content 'Hello Embabel!'"} - Read:
{"command": "What is the content of demo.txt?"} - Edit:
{"command": "Update demo.txt with 'This is new content'"} - Delete:
{"command": "Please delete the file demo.txt"}

6. Video Tutorial
For a complete step-by-step walkthrough, check out our video tutorial. We build the Smart MCP Client from scratch, demonstrating how a natural language input can control your file system through the power of Embabel and MCP!
📺 Watch on YouTube:
7. Source Code
The full source code for our Smart File Operations MCP Client is available on our GitHub repository. The best way to learn is by doing, so we encourage you to clone the repo, set your OPENAI_API_KEY as an environment variable, and launch the Spring Boot application.
Remember to have your File Operations MCP Server (from article #4) running on port 8080 before starting this client. This setup will allow you to interact with your AI agent using natural language and watch it manage your local file system through the power of the Embabel framework and the Model Context Protocol.
🔗 Embabel MCP Client File Operations: https://github.com/BootcampToProd/embabel-mcp-client-file-operations
8. Things to Consider
When building and deploying intelligent MCP clients with natural language understanding, keep these important points in mind:
- Sequential Startup: Always start the MCP Server before the Client so the tools can be discovered during the handshake.
- LLM Connection: Ensure your OPENAI_API_KEY for OpenRouter is correctly set in your environment variables.
- Port Management: Ensure the server (8080) and client (8081) ports do not conflict.
- AI Model Selection: The quality and accuracy of your agent’s natural language understanding depend heavily on the AI model you use. For a smooth experience, ensure you choose a model that explicitly supports Tool/Function Calling functionality. This is the “magic” that allows the AI to translate your text commands into actual tool executions on the MCP server.
- Prompt Engineering: The prompt we give to the AI is crucial. It guides how the AI interprets commands and calls tools. You might need to refine your prompts based on real-world usage.
- Ambiguity Handling: Natural language can be ambiguous. For example, “update my file” doesn’t specify which file. Consider adding validation or asking for clarification.
- MCP Server Availability: Your intelligent client still depends on the MCP server. Implement proper error handling and fallbacks.
- Testing: Natural language systems are harder to test than traditional APIs. Create a comprehensive test suite with various phrasings for each operation.
- Security: Natural language commands could potentially be exploited (e.g., “delete files”). Implement proper validation, authentication, and authorization.
9. FAQs
Can I connect to an MCP server written in Python or Javascript?
Yes! MCP is a standard protocol. Your Java Embabel client can talk to any MCP server regardless of the language it was built in.
Can the AI understand commands in different languages?
Yes! Modern AI models like DeepSeek support multiple languages. However, for best results, stick to English as it has the most training data. You can experiment with other languages by simply using them in your commands.
What happens if I give an unclear or ambiguous command?
The AI will do its best to interpret the command based on context. If it can’t determine the operation or extract necessary information, it may return an error or make an assumption. In production, you might want to add validation to ask for clarification.
Can I add more operations beyond create, read, edit, and delete?
Yes! As long as your MCP server provides the tools, your agent can use them. Just update your tool group configuration to include the new tools, and the AI will automatically be able to use them based on natural language commands.
Can I connect to multiple MCP servers simultaneously?
Yes! Configure multiple connections in your application.yml and create separate tool groups for each server. The AI can use tools from all connected servers based on your commands.
Can I customize how the AI interprets commands?
Yes! Modify the prompt in your agent’s processFileOperation method. You can add examples, specify formatting rules, or provide additional context to guide the AI’s interpretation.
10. Conclusion
Congratulations! You’ve successfully built an intelligent MCP client that understands natural language using Embabel Framework. This is a significant achievement – you’ve created a system that feels more like interacting with a smart assistant than making traditional API calls. You now understand how to leverage AI for natural language understanding, connect to MCP servers, configure tool groups, and build agents that can make intelligent decisions based on conversational input. The power of this approach is immense: users don’t need to know specific API structures, they can express their intent naturally, and the AI handles all the complexity of parsing commands, extracting information, and executing the right operations. This approach marks a significant step toward a more natural and powerful future for human-computer interaction, where the focus remains on the user’s goals rather than the underlying technical details.
11. Learn More
Interested in learning more?
Build MongoDB MCP Server Using Embabel Framework
Add a Comment