Learn how to implement LangChain4j Streaming Response with Anthropic Claude. Step-by-step guide covering StreamingChatModel, WebFlux, and how to cancel streams.
1. Introduction
Have you ever used ChatGPT and noticed how the response appears word by word instead of all at once? That effect is called streaming, and it makes AI applications feel much faster and more responsive.
In this article, we are going to learn how to implement streaming responses in a Spring Boot application using LangChain4j and Anthropic’s Claude Sonnet model.
By the end of this article, you will know:
- What streaming is and why it matters
- How
StreamingChatModelworks in LangChain4j - How to set up a Spring Boot project with WebFlux and Server-Sent Events (SSE)
- How to handle partial responses, thinking tokens, tool calls, errors, and completion
- How to cancel a streaming response mid-way
- How to test it using Postman and a simple Chat UI
2. What Is Streaming and Why Does It Matter?
With a normal (blocking) chat call, the application sends a request to the LLM and then waits for the model to generate the complete response. Once the response is fully generated, it is returned to the client all at once.
With streaming, the model sends back the response token by token (a token is roughly a word or part of a word) as it generates them. Your application forwards each chunk to the client in real time.
Why is this better?
- Users see output immediately instead of staring at a blank screen
- It feels more natural and interactive, like a real conversation
- Perceived performance is dramatically better even if total generation time is the same
3. Understanding the Key Concepts
Before we write any code or look at the project structure, it is incredibly important to clear up a few core concepts. Understanding how streaming works under the hood makes writing the code much easier.
3.1. ChatModel vs StreamingChatModel
| Feature | ChatModel | StreamingChatModel |
|---|---|---|
| Response delivery | All at once when done | Token by token as generated |
| Blocking? | Yes | No |
| Suitable for | Simple scripts, batch jobs | Web apps, real-time UIs |
| Return type | String / ChatResponse | void (uses callbacks) |
In simple terms: With ChatModel, you call .chat() and it returns a String / ChatResponse but your application thread is completely blocked (frozen) until the entire response is ready.
With StreamingChatModel, .chat() returns immediately. Instead of making you wait, the model delivers the AI’s response token-by-token (word-by-word) through callbacks. This is what creates that engaging, real-time typing effect!
3.2. The StreamingChatResponseHandler
So, if .chat() returns immediately, how do we catch the words as they are generated? We use a callback interface called StreamingChatResponseHandler. We pass this handler to the .chat() method, and LangChain4j triggers its methods as data arrives.
Here are the key methods inside this handler and what they do:
| Method | When is it called? | Common Use Case |
| onPartialResponse(String) | For every chunk of the main reply text. | Forward to the client and append to the UI. |
| onPartialThinking(PartialThinking) | For every chunk of the AI’s “thinking” process (like Claude’s reasoning). | Show in a collapsible “Thought Process” section. |
| onPartialToolCall(PartialToolCall) | While a tool/function call name is being streamed. | Useful for showing “Calling tool…” indicators. |
| onCompleteToolCall(CompleteToolCall) | When a full tool call has been completely assembled. | Execute the tool, and pass the result back to the model. |
| onCompleteResponse(ChatResponse) | Once, after all chunks have successfully arrived. | Log usage stats and send a [DONE] signal to the UI. |
| onError(Throwable) | If the network breaks or the API throws an error. | Log the error and notify the client gracefully. |
3.3. Bridging the Gap: What are Sinks and Flux?
LangChain4j gives us tokens via callbacks, but Spring WebFlux (our web framework) expects a reactive stream (Flux) to send data over HTTP via Server-Sent Events. How do we connect the two? We use a Sink.
Think of a Flux as a conveyor belt moving data from your server to the user’s browser. A Sink is the funnel you use to manually drop items onto that conveyor belt.
In our code, we will use this specific sink: Sinks.many().unicast().onBackpressureBuffer().
- many(): We have many chunks of text to send.
- unicast(): We are sending this stream to exactly one subscriber (the specific user making the HTTP request).
- onBackpressureBuffer(): If the AI generates text faster than the user’s network can download it, keep it in a temporary buffer instead of dropping the data.
We interact with the Sink using three simple methods:
- sink.tryEmitNext(data): Drops a new chunk of text onto the conveyor belt.
- sink.tryEmitComplete(): Tells the conveyor belt, “We are done, no more data.”
- sink.tryEmitError(error): Tells the conveyor belt to stop because something went wrong.
4. Building LangChain4j Streaming Response Chat App
Now that the core concepts are clear, let’s talk about the application we are building. We are creating a Reactive Spring Boot Application that acts as a real-time AI assistant.
Here is what our application will do:
- Expose a REST API endpoint (/api/v1/chat) that accepts a user’s question.
- Pass the question to Anthropic’s Claude Sonnet 4.6 model using LangChain4j StreamingChatModel.
- Catch the AI’s thoughts and responses using the StreamingChatResponseHandler.
- Use a Sink to funnel those chunks into a Flux stream, sending them to the frontend via Server-Sent Events (SSE).
- Provide a simple HTML UI that listens to this stream and displays the text with a real-time blinking cursor effect!
4.1. Project Structure Overview
Here is the structure of our Spring Boot application for easier understanding:
langchain4j-chatmodel-lmstudio-demo
├── src
│   └── main
│       ├── java
│       │   └── com
│       │       └── bootcamptoprod
│       │           ├── controller
│       │           │   └── ChatController.java           # REST Controller for our streaming API
│       │           └── Langchain4jStreamingChatmodelDemoApplication.java
│       └── resources
│           ├── application.yml                           # Configuration file for API keys and models
│           └── static
│               └── index.html                            # Simple Chat UI to visualize the stream
└── pom.xml                                               # Dependency management
Key Components:
- pom.xml: Defines our project dependencies, specifically including
spring-boot-starter-webfluxfor reactive streaming and thelangchain4j-anthropic-spring-boot-starterto connect to Anthropic’s Claude models. - application.yml: Serves as the central configuration hub where we define our Anthropic API key, base URL, target model (claude-sonnet-4.6), and enable streaming features like return-thinking.
- Main Application Class: Bootstraps our Spring Boot application and triggers the auto-configuration for the LangChain4j StreamingChatModel.
- ChatController: Exposes a reactive REST API endpoint to accept user prompts and streams the AI’s response (and thought process) back to the client token-by-token using Flux and Server-Sent Events (SSE).
- index.html: A simple frontend UI that connects to our streaming API and visually renders the AI’s thought process and response with a real-time typing effect.
4.2. Diving Into the Code
Let’s walk through each file in detail, understanding what each component does.
Step 1: Setting Up Maven Dependencies
First, let’s set up our Maven project with all necessary dependencies. The pom.xml file defines our project configuration and required libraries:
<properties>
	<java.version>21</java.version>
	<langchain4j.version>1.12.1</langchain4j.version>
</properties>

<dependencies>
	<!-- WebFlux is required for reactive streaming (SSE support) -->
	<dependency>
		<groupId>org.springframework.boot</groupId>
		<artifactId>spring-boot-starter-webflux</artifactId>
	</dependency>
  <!-- LangChain4j Anthropic Spring Boot Starter for Claude models -->
	<dependency>
		<groupId>dev.langchain4j</groupId>
		<artifactId>langchain4j-anthropic-spring-boot-starter</artifactId>
	</dependency>
</dependencies>

<dependencyManagement>
	<dependencies>
	  <!-- BOM ensures consistent LangChain4j versions across all modules -->
		<dependency>
			<groupId>dev.langchain4j</groupId>
			<artifactId>langchain4j-bom</artifactId>
			<version>${langchain4j.version}</version>
			<type>pom</type>
			<scope>import</scope>
		</dependency>
	</dependencies>
</dependencyManagement>
What’s Important Here:
- spring-boot-starter-webflux: This is our foundation for building a reactive web application. Unlike the traditional Spring Web, WebFlux brings in the embedded Netty server and the tools needed to create asynchronous, non-blocking REST API endpoints. This is exactly what we need to stream the AI’s response back to the client continuously using Server-Sent Events (SSE).
- langchain4j-anthropic-spring-boot-starter: This is a crucial dependency for our project. It provides the necessary components to seamlessly connect and interact with Anthropic’s Claude models (like Claude Sonnet 4.6). It helps Spring Boot auto-configure a StreamingChatModel bean based on the properties defined in our application.yml.
- langchain4j-bom: A Bill of Materials (BOM) that acts as a central manager for all LangChain4j library versions. Using this ensures that all LangChain4j dependencies are compatible with each other out of the box, preventing tricky versioning conflicts.
Step 2: Configure Application Properties
Next, we configure our application to connect to the API. We configure a streaming-chat-model instead of a standard chat model.
spring:
  application:
    name: langchain4j-streaming-chatmodel-demo

langchain4j:
  anthropic:
    streaming-chat-model:
      api-key: ${ANTHROPIC_API_KEY}                                   # Read API key from environment variable
      base-url: ${ANTHROPIC_BASE_URL:https://api.anthropic.com/v1}    # Anthropic API base URL
      model-name: claude-sonnet-4.6                                   # Claude Sonnet model identifier
      return-thinking: true                                           # Instructs the model to return its thought process
📄 Configuration Overview
- spring.application.name: Simply gives our application a name for identification within the Spring ecosystem.
- langchain4j.anthropic.streaming-chat-model: This section configures the real-time “Streaming” capabilities of our Anthropic AI model.
- api-key: This is your “password” for the Anthropic service. It allows the application to securely authenticate with the AI provider. We use ${ANTHROPIC_API_KEY} to fetch it securely from an environment variable.
- base-url: Tells our application where to send the requests. Here we specify the target API address for the Claude models.
- model-name: Specifies exactly which AI “brain” we want to interact with. In this case, we are pointing it to the claude-sonnet-4.6 model.
- return-thinking: A powerful feature for newer Claude models. When set to true, it instructs the AI to return its internal reasoning or “thought process” stream before delivering the final answer.
Step 3: Application Entry Point
This is the main class that bootstraps our entire application.
package com.bootcamptoprod;

import org.springframework.boot.SpringApplication;
import org.springframework.boot.autoconfigure.SpringBootApplication;

@SpringBootApplication
public class Langchain4jStreamingChatmodelDemoApplication {

    public static void main(String[] args) {
        SpringApplication.run(Langchain4jStreamingChatmodelDemoApplication.class, args);
    }

}
Explanation:
- This is the standard Spring Boot application entry point. The
@SpringBootApplicationannotation enables auto-configuration, component scanning, and configuration properties. LangChain4j’s Spring Boot starter automatically configures theStreamingChatModelbean based on ourapplication.ymlsettings.
Step 4: Creating the Streaming REST Controller
This is where everything comes together! We will create the API endpoint, implement the handler, and use our Sink.
package com.bootcamptoprod.controller;
import dev.langchain4j.model.chat.StreamingChatModel;
import dev.langchain4j.model.chat.response.ChatResponse;
import dev.langchain4j.model.chat.response.CompleteToolCall;
import dev.langchain4j.model.chat.response.PartialThinking;
import dev.langchain4j.model.chat.response.PartialToolCall;
import dev.langchain4j.model.chat.response.StreamingChatResponseHandler;
import org.slf4j.Logger;
import org.slf4j.LoggerFactory;
import org.springframework.http.MediaType;
import org.springframework.web.bind.annotation.CrossOrigin;
import org.springframework.web.bind.annotation.PostMapping;
import org.springframework.web.bind.annotation.RequestBody;
import org.springframework.web.bind.annotation.RequestMapping;
import org.springframework.web.bind.annotation.RestController;
import reactor.core.publisher.Flux;
import reactor.core.publisher.Sinks;
import java.util.Map;
@CrossOrigin(origins = "*") // Allow requests from any origin (useful for local frontend testing)
@RestController
@RequestMapping("/api/v1")
public class ChatController {
private static final Logger log = LoggerFactory.getLogger(ChatController.class);
private final StreamingChatModel streamingChatModel;
public ChatController(StreamingChatModel streamingChatModel) {
this.streamingChatModel = streamingChatModel;
}
// SSE endpoint — produces a continuous stream of text/event-stream data
@PostMapping(value = "/chat", produces = MediaType.TEXT_EVENT_STREAM_VALUE)
public Flux<String> streamChat(@RequestBody Map<String, String> request) {
// Extract the user's message from the incoming JSON body
String userMessage = request.get("message");
// Reactive sink — acts as a bridge between the LangChain4j callback and the Flux stream
Sinks.Many<String> sink = Sinks.many().unicast().onBackpressureBuffer();
// Kick off the streaming call with a handler that reacts to each event
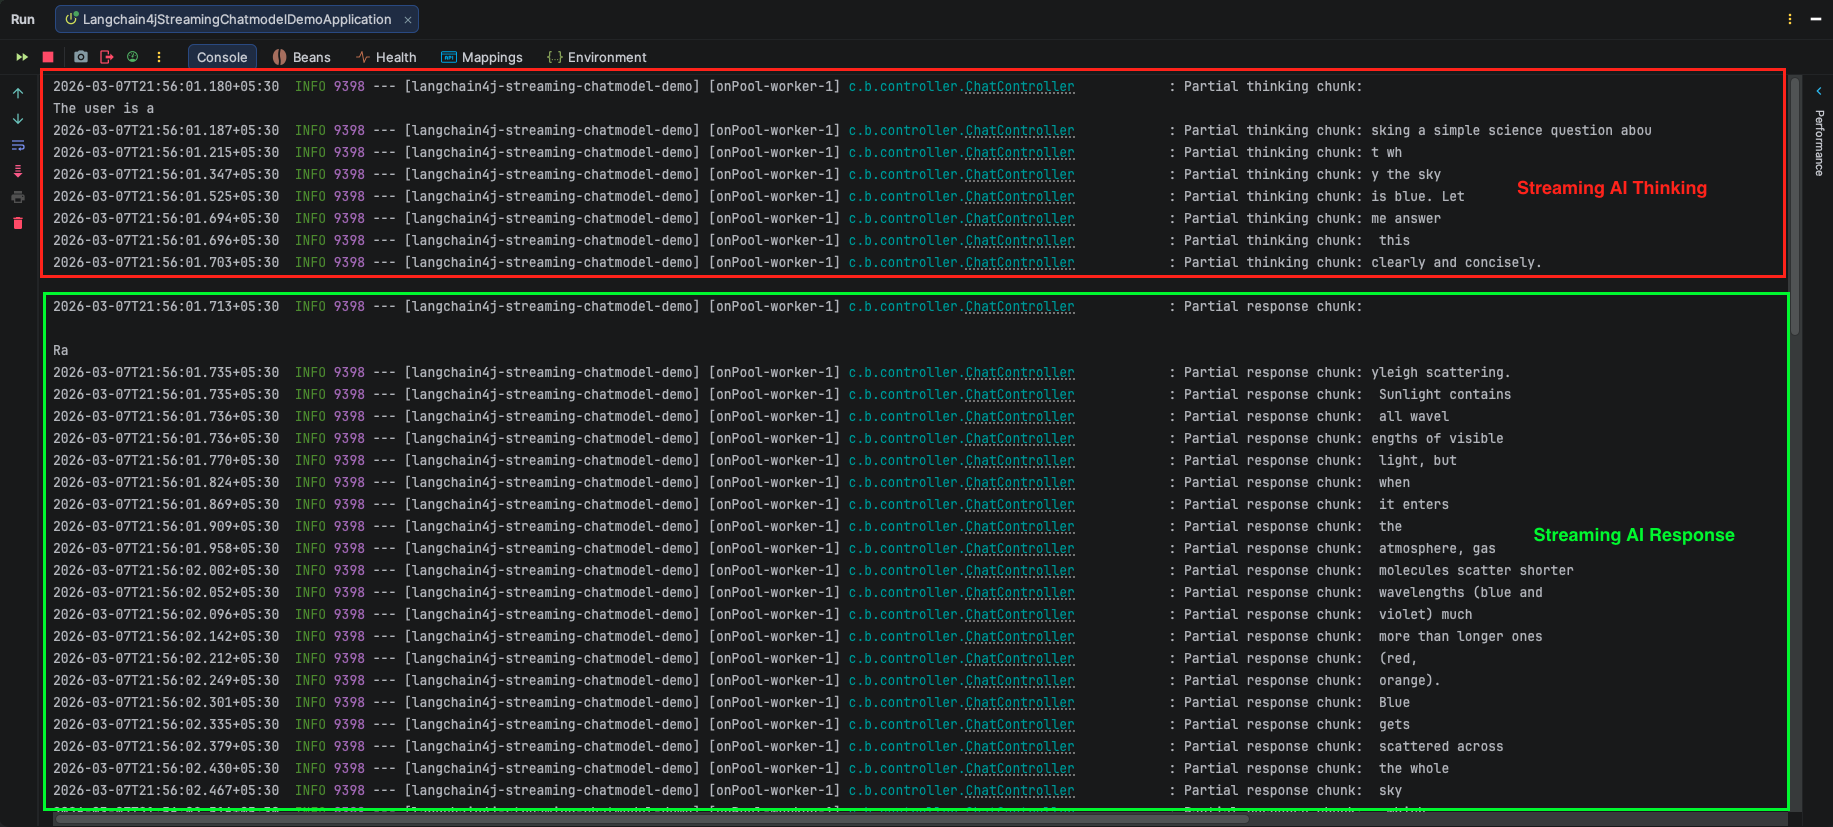
streamingChatModel.chat(userMessage, new StreamingChatResponseHandler() {
@Override
public void onPartialResponse(String partialResponse) {
// Called for each chunk of the main response text
log.info("Partial response chunk: {}", partialResponse);
sink.tryEmitNext("partial-response:" + partialResponse);
}
@Override
public void onPartialThinking(PartialThinking partialThinking) {
// Called for each chunk of Claude's internal thinking (chain-of-thought)
log.info("Partial thinking chunk: {}", partialThinking.text());
sink.tryEmitNext("partial-thinking:" + partialThinking.text());
}
@Override
public void onPartialToolCall(PartialToolCall partialToolCall) {
// Called while a tool/function call is being streamed
log.info("Partial tool call: {}", partialToolCall.name());
sink.tryEmitNext("partial-tool:" + partialToolCall.name());
}
@Override
public void onCompleteToolCall(CompleteToolCall completeToolCall) {
// Called when a tool call is fully assembled and ready
log.info("Complete tool call: {}", completeToolCall.toolExecutionRequest().name());
sink.tryEmitNext("complete-tool:" + completeToolCall.toolExecutionRequest().name());
}
@Override
public void onCompleteResponse(ChatResponse completeResponse) {
// Called once after all chunks have been received
log.info("Stream complete. Token usage: {}", completeResponse.metadata().tokenUsage());
sink.tryEmitNext("[DONE]"); // Signal the client that streaming is finished
sink.tryEmitComplete(); // Complete the reactive stream
}
@Override
public void onError(Throwable error) {
// Called if anything goes wrong during streaming
log.error("Streaming error occurred", error);
sink.tryEmitError(error); // Propagate error downstream to the client
}
});
// Return the Flux — Spring WebFlux will push each emitted item as an SSE event
return sink.asFlux();
}
}Code Summary:
- This REST controller exposes a /api/v1/chat endpoint that accepts POST requests. To handle requests from any local frontend during testing, we have added the @CrossOrigin(origins = “*”) annotation. The StreamingChatModel is injected via constructor injection. This is the auto-configured bean provided by the LangChain4j Anthropic starter, wired up automatically using the properties we defined in our application.yml.
- When a request arrives with a user message, we extract it and pass it to streamingChatModel.chat() along with our custom StreamingChatResponseHandler. Instead of waiting for the AI to finish thinking and typing, we immediately return a Flux<String> to the client.
- Since we are utilizing Spring WebFlux and reactive programming to achieve the streaming effect, let’s briefly recap the core concepts happening inside this controller:
- MediaType.TEXT_EVENT_STREAM_VALUE: This tells Spring Boot to keep the HTTP connection open and send data back continuously as Server-Sent Events (SSE), rather than waiting to return a single, standard JSON block.
- Flux<String>: Think of this as an active conveyor belt of data. We return this to the client, and Spring WebFlux automatically pushes any new text added to it over the open HTTP connection.
- Sinks.Many: Because LangChain4j’s .chat() method relies on void callbacks and doesn’t natively return a Flux, we use a Sink to bridge the gap. As the AI generates a new word (onPartialResponse) or a new reasoning step (onPartialThinking), we drop it into the sink using tryEmitNext(). The sink acts as a funnel, safely pushing these pieces onto the Flux conveyor belt.
- Finally, once the AI finishes generating the response, the onCompleteResponse method is triggered. We emit a custom [DONE] signal so our frontend UI knows the stream is officially over, and then we safely close the stream using tryEmitComplete(). If the network drops or an API error occurs, onError ensures the application handles it gracefully by pushing the error downstream.
Step 5: The Frontend Chat UI (index.html)
It’s hard to visualize a stream without a UI! We have included a simple HTML file (src/main/resources/static/index.html).
What does this HTML file do?
In a few lines of JavaScript, it sends a POST request to our backend and reads the TEXT_EVENT_STREAM chunks. It looks for the prefixes we added (partial-thinking: and partial-response:). It separates them, displaying the thought process inside a collapsible dropdown and simulating a beautiful real-time typing effect for the final answer!
(Note: The complete HTML code is in the project files. Since our focus is on the backend LangChain4j integration, simply open the file in your browser to see the UI in action!)
5. The SSE Message Format and Prefixes
Notice that each sink.tryEmitNext() call includes a prefix like partial-response: or partial-thinking:. This is a simple convention we use so the frontend knows what kind of data it received and can route it to the right part of the UI.
data: partial-thinking:Let me think about this step by step...

data: partial-response:The answer is 42.

data: [DONE]
The client splits on the prefix and handles each type differently. Thinking chunks go into a collapsible panel and response chunks appear as the main reply.
6. Understanding MediaType.TEXT_EVENT_STREAM_VALUE
Setting produces = MediaType.TEXT_EVENT_STREAM_VALUE on the endpoint tells Spring to send the response as Server-Sent Events (SSE). SSE is a standard HTTP mechanism where:
- The connection stays open after the initial request
- The server can push multiple events over time
- Each event is a line starting with
data:followed by a newline - The connection closes when the server sends the stream end signal
This is exactly what we need for token-by-token streaming.
7. Testing the Application
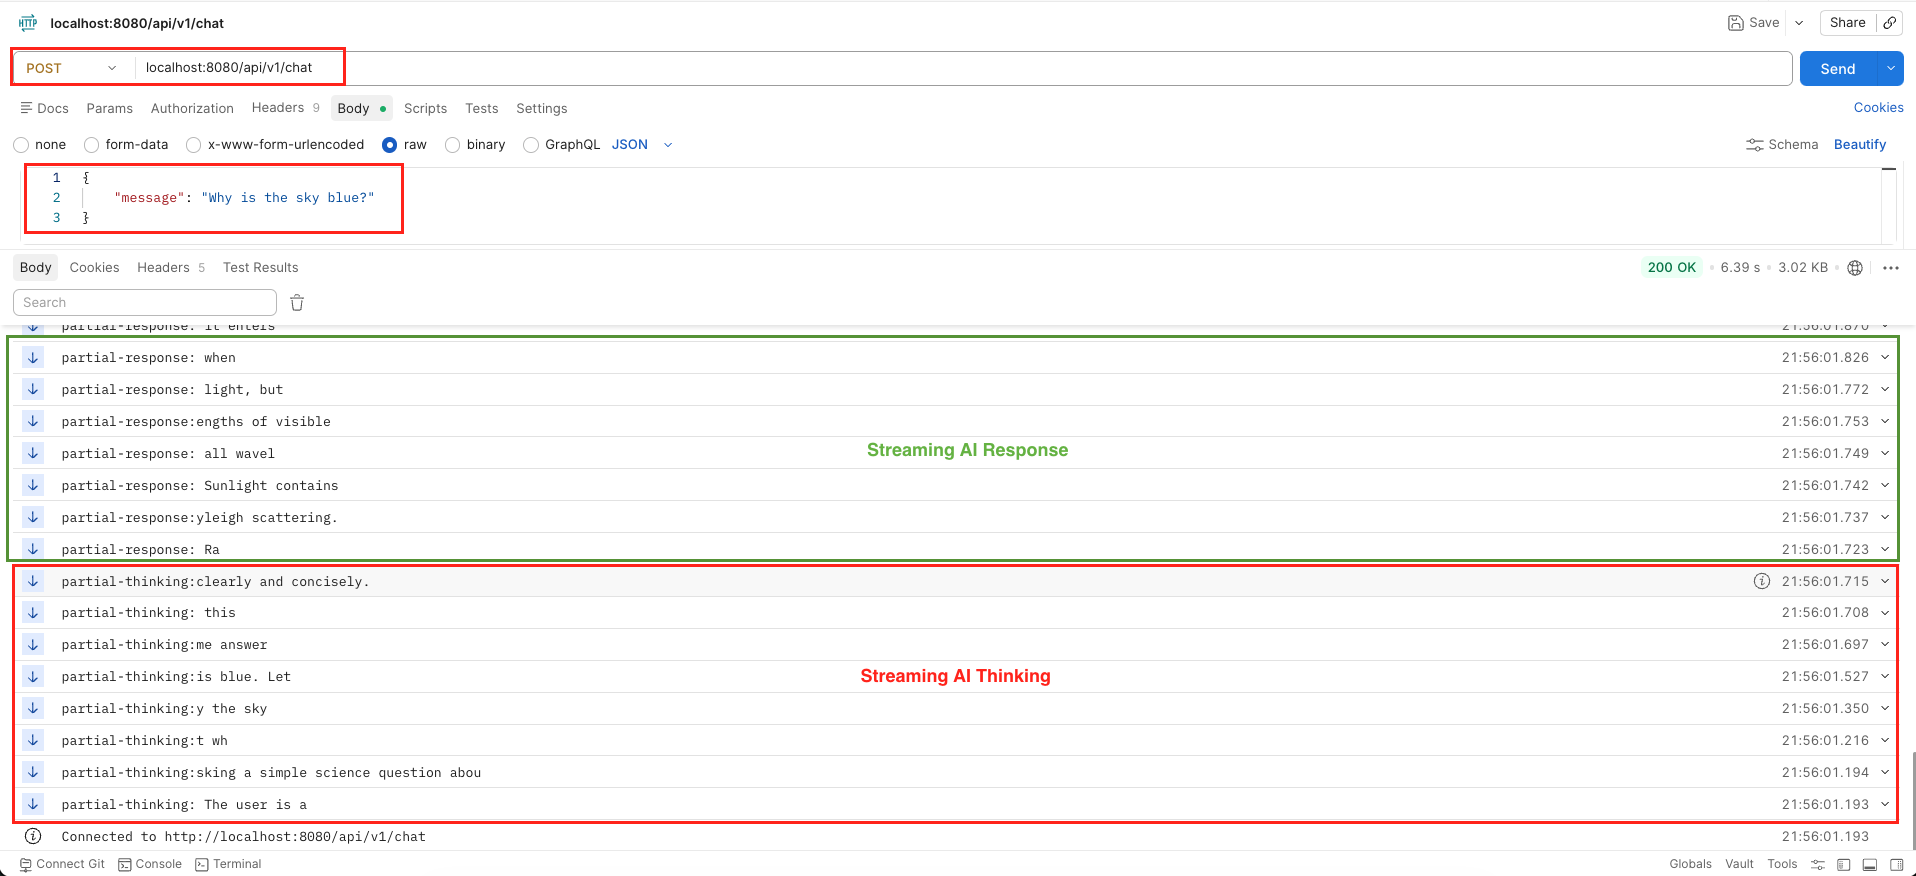
7.1. Testing with Postman
Testing an SSE endpoint in Postman is incredibly straightforward:
- Open Postman and create a new POST request.
- Enter the URL:
http://localhost:8080/api/v1/chat. - Go to the Body tab, select raw and choose JSON.
- Enter
{"message": "Why is the sky blue?"}. - Hit Send. Instead of waiting for a final JSON block, Postman will immediately start appending text to the response window chunk by chunk, prefixing them with our sink tags like data: partial-response:!
curl --location 'localhost:8080/api/v1/chat' \
--header 'Content-Type: application/json' \
--data '{
    "message": "Why is the sky blue?"
}'The key thing to notice is that the response panel updates in real time as chunks arrive, not all at once at the end. This is exactly the streaming effect you see in ChatGPT and similar apps.
Output:
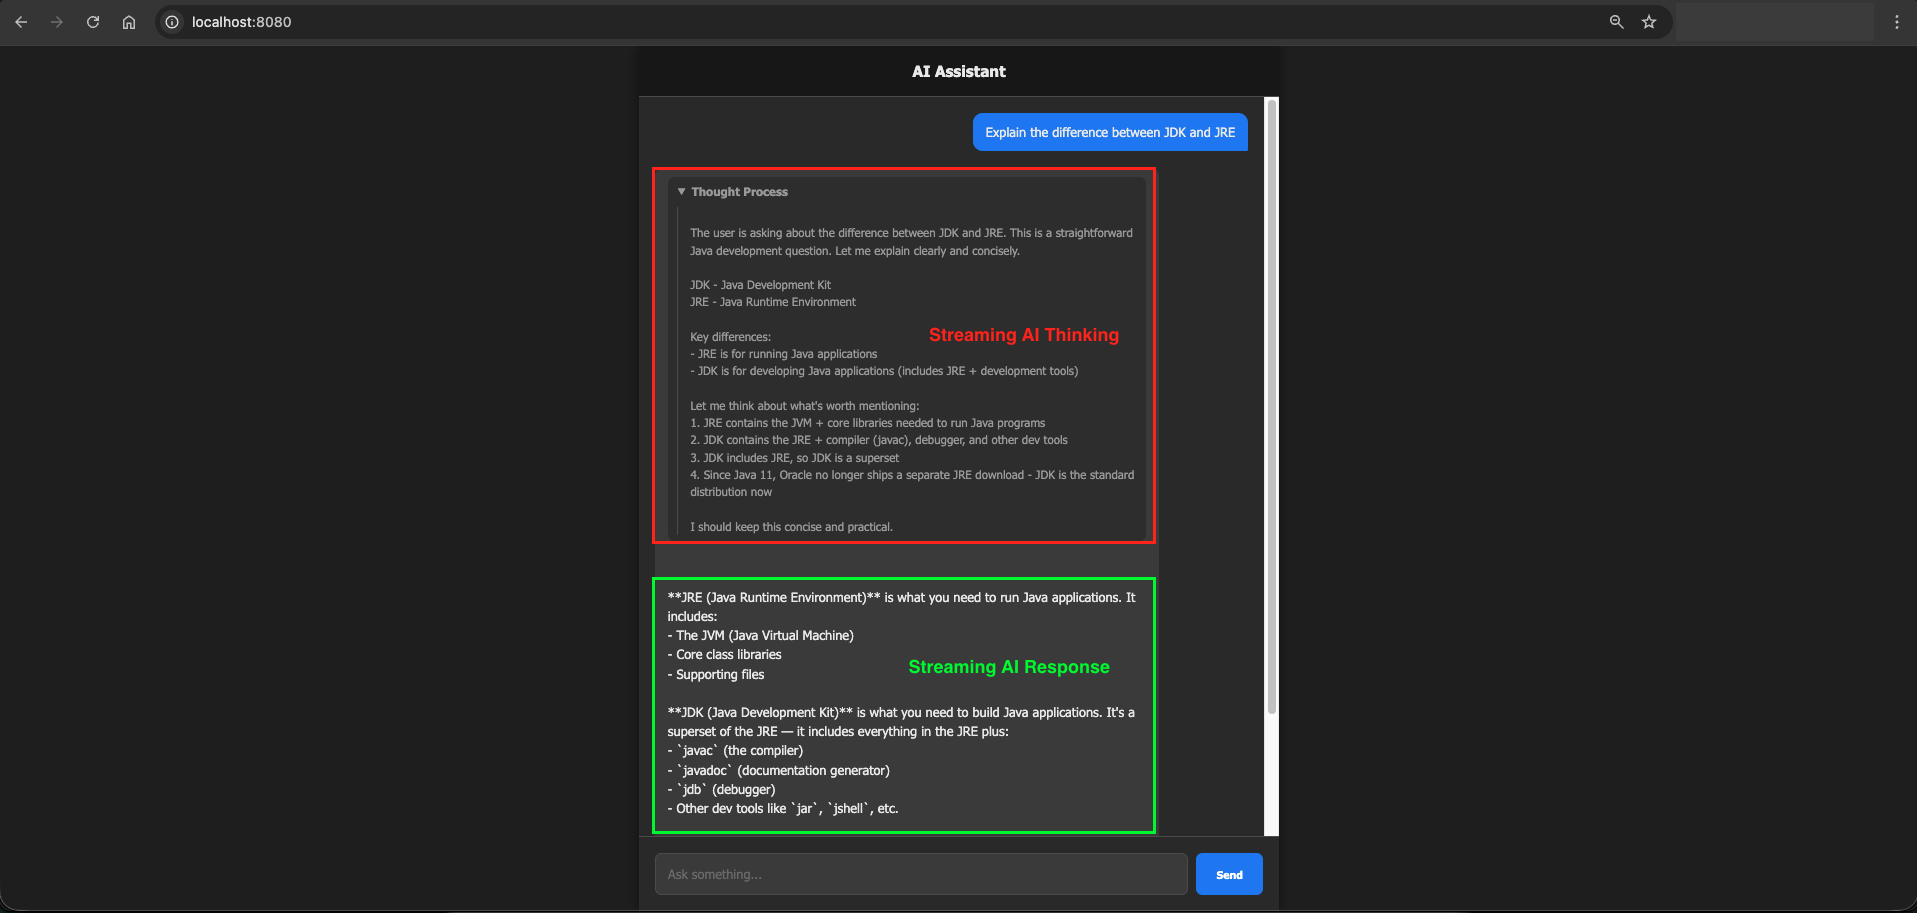
7.2. Testing with our HTML UI
If you open the provided index.html in your browser, you will see a sleek, dark-themed Chat UI. When you send a message, a collapsible “Thinking…” box appears first (showing the model’s inner reasoning). Moments later, the actual response begins typing out on the screen with a blinking cursor, mimicking human typing perfectly!
Output:
8. Cancelling a Streaming Response
Sometimes you want to stop a streaming response mid-way — for example, if the user clicks a “Stop” button in your UI, or if your application logic detects that the response has gone off-track.
LangChain4j provides a clean way to do this through the PartialResponseContext object available in an overloaded version of onPartialResponse.
Here’s how it works:
streamingChatModel.chat(userMessage, new StreamingChatResponseHandler() {

    @Override
    public void onPartialResponse(PartialResponse partialResponse, PartialResponseContext context) {
        log.info("Received chunk: {}", partialResponse.text());

        // Check some condition — maybe user clicked Stop, or response looks wrong
        if (shouldCancelStreaming()) {
            log.info("Cancellation requested — stopping stream");
            context.streamingHandle().cancel(); // Close the connection and stop streaming
        }
    }

    @Override
    public void onCompleteResponse(ChatResponse completeResponse) {
        // OnComplete handling Logic
    }

    @Override
    public void onError(Throwable error) {
        // onError handling Logic
    }
});How cancellation works:
- The
contextparameter carries aStreamingHandleobject. - Calling
context.streamingHandle().cancel()tells LangChain4j to immediately close the connection to the LLM provider. - Once cancelled, no further callbacks (
onPartialResponse,onCompleteResponse, etc.) will fire. - The
Fluxon the server side will also stop emitting, so the SSE connection to the browser closes cleanly.
A practical use case: You could expose a separate /api/v1/chat/cancel endpoint that sets a shared flag. Your onPartialResponse handler checks this flag on every chunk and calls cancel() when it’s set. This gives users a real-time stop button in the UI.
9. Video Tutorial
If you prefer a visual guide, check out our complete step-by-step video tutorial where we build this LangChain4j Streaming Response integration from scratch. We demonstrate exactly how to configure Spring WebFlux, work with the StreamingChatModel, handle Server-Sent Events (SSE), and build a real-time chat UI that streams the Anthropic Claude Sonnet 4.6 model’s thought process and response!
📺 Watch on YouTube: Coming Soon!!
10. Source Code
The full source code for this LangChain4j Streaming Response Demo is available on our GitHub repository. You can clone the project, ensure your Anthropic API key is configured in your environment variables, and launch the Spring Boot application to start interacting with the real-time AI stream immediately.
🔗 LangChain4j Streaming ChatModel Demo: https://github.com/BootcampToProd/langchain4j-streaming-chatmodel-demo
11. Things to Consider
When implementing streaming responses in production, keep these points in mind:
- Use WebFlux, not the standard Web starter: Streaming requires non-blocking I/O. If you try to use
spring-boot-starter-web(Tomcat), long-lived SSE connections will consume a thread per connection and won’t scale. WebFlux uses an event loop model that handles thousands of concurrent streams efficiently. - Handle
onErrorproperly: Network drops, API rate limits, and model errors all surface throughonError. Always emit an error signal to the sink so the frontend knows something went wrong instead of hanging forever. - Thinking tokens increase latency:
return-thinking: truemakes Claude reason before responding, which adds a few seconds before the first response token appears. This is great for complex questions but may feel slow for simple ones. Consider making it configurable. - CORS in production:
@CrossOrigin(origins = "*")is fine for local development but should be locked down to your actual frontend domain in production. - Token usage is only available in
onCompleteResponse: Partial chunks don’t carry token counts. If you need to log usage or enforce limits, do it insideonCompleteResponse.
12. FAQs
How do I track token usage and costs when streaming?
When you use a standard ChatModel, the token usage is returned immediately. In a StreamingChatModel, you won’t know the final token count until the AI stops generating. You can access the final token usage inside the onCompleteResponse(ChatResponse completeResponse) method by calling completeResponse.metadata().tokenUsage(). You can log this to your database for billing or analytics.
Can I use standard Spring Web (MVC) instead of WebFlux for streaming?
Yes, you can! If you don’t want to switch to Spring WebFlux, standard Spring MVC provides a class called SseEmitter which allows you to send Server-Sent Events. However, Spring WebFlux (using Flux and Sinks) is the modern, recommended approach for streaming data because it is built from the ground up to handle thousands of open connections simultaneously without crashing your server.
What is Time-To-First-Token (TTFT) and why does it matter?
TTFT is the amount of time it takes for the AI to generate the very first word of its response. Even with streaming, the AI needs a moment to process your prompt. A lower TTFT means the UI feels snappier because the typing effect starts almost immediately. If you notice a long delay before the stream begins, it is usually because the prompt is very long or the AI model is heavily loaded.
What happens if the AI generates text too fast for the user’s connection?
That is why we used onBackpressureBuffer() when creating our Sink. It temporarily stores the chunks in memory and feeds them to the user at the speed their network can handle, preventing data loss.
Can I use streaming with Local LLMs via Ollama or LM Studio?
Yes! LangChain4j’s StreamingChatModel interface works seamlessly across providers. Whether you are using OpenAI, Anthropic, Ollama, or LM Studio, the implementation logic and the handler methods in your Java code remain exactly the same.
What is the difference between onPartialResponse(String) and onPartialResponse(PartialResponse, PartialResponseContext)?
The first is the simpler form, it just gives you the text. The second gives you the full PartialResponse object plus the context which contains the StreamingHandle for cancellation.
Why does the response start with thinking tokens first?
Because return-thinking: true instructs Claude to reason step by step before formulating the final answer. Thinking tokens stream first, then response tokens follow.
13. Conclusion
Seeing an AI type out its thoughts in real-time completely transforms a clunky, slow application into a highly engaging and conversational experience. Because users are no longer left staring at a blank screen or a spinning loading wheel while the model thinks, they instantly feel connected to a fast and responsive assistant. The true beauty of this setup is how effortlessly Spring WebFlux and LangChain4j work together. Your backend smoothly catches every generated word and pushes it directly to the browser without breaking a sweat. Grab the complete source code from our GitHub repository, fire up the application, and enjoy watching your Spring Boot AI stream its answers right before your eyes.
14. Learn More
Interested in learning more?
LangChain4j with LM Studio: Connect to Local LLMs
Add a Comment