Learn how to use LangChain4j with Ollama to run and connect local LLMs, including step-by-step setup and examples for building local AI apps.
1. Introduction
Welcome back to our LangChain4j tutorial series! In our previous articles, we explored the basics of LangChain4j, understood the ChatModel interface, learned how to get structured outputs, implemented ChatModel listeners to monitor our AI interactions, and demonstrated running local LLMs in Docker.
Today, we’re taking another exciting step by learning how to connect LangChain4j to local Large Language Models (LLMs) running in Ollama. This approach gives you complete control over your AI infrastructure, ensures data privacy, eliminates API costs, and allows you to work offline. Whether you’re building a chatbot, creating an intelligent assistant, or experimenting with AI, this tutorial will guide you through every step of integrating LangChain4j with Ollama in a Spring Boot application.
2. What is Ollama?
Ollama is a lightweight, open-source tool that makes it incredibly easy to run Large Language Models (LLMs) locally on your machine. Think of it as a simple server that hosts AI models right on your computer, similar to how you might run a database locally. Ollama supports popular models like Llama, Gemma, Mistral, Phi, and many others. The best part? You don’t need expensive cloud services or worry about sending your data to external servers. Everything runs on your local hardware, giving you complete privacy and control.
3. Why Use LangChain4j with Ollama?
Integrating LangChain4j with Ollama offers several compelling advantages:
- Privacy and Security: Your data never leaves your machine, making it perfect for sensitive applications or industries with strict compliance requirements.
- Cost-Effective: No API bills, no token limits, and no usage charges. Once you have the hardware, it’s completely free to use.
- Offline Capability: Work without an internet connection, which is ideal for environments with limited connectivity or air-gapped systems.
- Experimentation Freedom: Test different models, experiment with prompts, and iterate rapidly without worrying about API costs.
- Low Latency: Since everything runs locally, you get faster response times compared to making network calls to remote APIs.
- Full Control: Choose exactly which model to use, configure parameters, and customize the setup to your specific needs.
4. Installing and Setting Up Ollama
Step 1: Download Ollama
Visit the official Ollama website at https://ollama.ai/download, download the installer for your operating system, and run it.
- Windows: Download the
.exeinstaller - macOS: Download the
.dmgfile - Linux: Use the installation script
Step 2: Verify Installation
Once Ollama is installed, open your terminal or command prompt and run:
ollama --version
You should see the version number printed, confirming that Ollama is successfully installed.
5. Managing Models in Ollama
Ollama provides simple command-line tools to manage AI models. Let’s explore the most commonly used commands:
5.1. Pulling Models (Downloading)
To download a model from the Ollama registry, use the ollama pull command:
# Download the Gemma 3 1B model
ollama pull gemma3:1b

# Download the Llama 3.2 1B model
ollama pull llama3.2:1b

# Download the Mistral 7B model
ollama pull mistral:7b
The download progress will be displayed in your terminal. Models are stored in Ollama’s local cache and only need to be downloaded once.
5.2. Running Models Interactively (Chat)
To start an interactive chat session with a model, use the ollama run command:
# Start chatting with Gemma 3 1B
ollama run gemma3:1b
This opens an interactive prompt where you can type messages and get responses directly in your terminal. Type /bye to exit the interactive session.
5.3. Listing Downloaded Models
To see all models you’ve downloaded locally, use:
ollama list

# Example output
NAME              ID              SIZE      MODIFIED
gemma3:1b 8648f39daa8f 815 MB 2 hours agoThis will display a table with model names, IDs, and sizes.
5.4. Removing Downloaded Models
To free up disk space by removing a model you no longer need:
ollama rm gemma3:1b
Note: You can always re-download the model later using ollama pull.
5.5. Checking Running Models (PS)
To list the models that are currently loaded into memory and running, use the ollama ps command:
# Show currently running models
ollama ps

# Example output
NAME         ID              SIZE      PROCESSOR    CONTEXT    UNTIL
gemma3:1b    8648f39daa8f    1.2 GB    100% GPU     4096       4 minutes from now
This command provides details such as the model name, ID, size, and how long it will remain in memory. It can also show whether a model is loaded on the CPU or GPU.
5.6. Stopping a Model (Stop)
To unload a model from memory and stop it from running, use the ollama stop command followed by the model name:
# Stop the Gemma 3 model
ollama stop gemma3:1b
This command is useful for freeing up system resources, especially RAM and VRAM, when you are finished using a particular model.
5.7. Starting the Server (Serve)
To start the Ollama server that listens for API requests, use the ollama serve command. This is useful when you want to interact with your models through applications and not the command line directly
# Start the Ollama server
ollama serve
By default, the server runs on http://localhost:11434. You can verify it’s running by visiting this URL in a browser, which will display “Ollama is running.”. This confirms that the Ollama server is active and ready to accept requests.
6. Interacting with Ollama Using REST API
Ollama exposes a REST API that allows applications to interact with the models programmatically. Let’s explore how to send requests directly to Ollama.
Generating Responses (Chat Endpoint)
The primary endpoint for generating responses is /api/chat. Here’s how to use it:
Request Format:
curl http://localhost:11434/api/chat -d '{
  "model": "gemma3:1b",
  "messages": [
    {
      "role": "user",
      "content": "What is the capital of France?"
    }
  ],
  "stream": false
}'
Response Format:
{
  "model": "gemma3:1b",
  "created_at": "2026-02-13T21:49:11.527655Z",
  "message": {
    "role": "assistant",
    "content": "The capital of France is **Paris**."
  },
  "done": true,
  "done_reason": "stop",
  "total_duration": 2238100375,
  "load_duration": 1478681500,
  "prompt_eval_count": 16,
  "prompt_eval_duration": 214279958,
  "eval_count": 35,
  "eval_duration": 499571794
}
7. Building LangChain4j with Ollama Demo Application
We are building a Simple Local Chat Application that demonstrates the core capability of running AI entirely offline using LangChain4j.
The application serves a single, specific purpose: Bridging LangChain4j to a Local Model Running Inside Ollama. The application has a straightforward flow:
- LangChain4j Client: It takes the user’s message and sends it to the local Ollama instance instead of an external cloud provider.
- Ollama Server: It listens on port 11434, receives the message, and uses the locally downloaded AI model (like gemma3) to generate a response.
The result is a clean, private chat loop where LangChain4j sends a user’s prompt directly to the local Ollama server and retrieves the generated response instantly.
7.1. Project Structure Overview
Here’s our complete project structure for better understanding:
langchain4j-chatmodel-ollama-demo
├── src
│   └── main
│       ├── java
│       │   └── com
│       │       └── bootcamptoprod
│       │           ├── controller
│       │           │   └── ChatController.java          #  REST Endpoint
│       │           └── Langchain4jChatmodelOllamaDemoApplication.java
│       └── resources
│           └── application.yml                           # Model configuration
└── pom.xml                                               # Dependency management
Key Components:
- pom.xml: Defines our project dependencies including Spring Boot and LangChain4j
- application.properties: Contains all configuration for connecting to our local Ollama instance and selecting the specific model (e.g., gemma3:1b).
- Main Application Class: Bootstraps our Spring Boot application
- ChatController: Exposes a REST API endpoint to accept user prompts and interact with the local LLM served by Ollama.
7.2. Diving Into the Code
Let’s walk through each file in detail, understanding what each component does.
Step 1: Setting Up Maven Dependencies
First, let’s set up our Maven project with all necessary dependencies. The pom.xml file defines our project configuration and required libraries:
<properties>
	<java.version>21</java.version>
	<langchain4j.version>1.11.0</langchain4j.version>
</properties>

<dependencies>
	<!-- Spring Boot Web for REST endpoints -->
	<dependency>
		<groupId>org.springframework.boot</groupId>
		<artifactId>spring-boot-starter-web</artifactId>
	</dependency>
  <!-- LangChain4j Ollama Spring Boot Starter -->
	<dependency>
		<groupId>dev.langchain4j</groupId>
		<artifactId>langchain4j-ollama-spring-boot-starter</artifactId>
	</dependency>
</dependencies>

<dependencyManagement>
	<dependencies>
	  <!-- LangChain4j BOM for version management -->
		<dependency>
			<groupId>dev.langchain4j</groupId>
			<artifactId>langchain4j-bom</artifactId>
			<version>${langchain4j.version}</version>
			<type>pom</type>
			<scope>import</scope>
		</dependency>
	</dependencies>
</dependencyManagement>
What’s Important Here:
- spring-boot-starter-web: Provides all the essential components for building REST APIs, including embedded Tomcat server and web MVC capabilities.
- langchain4j-ollama-spring-boot-starter: The key dependency that enables LangChain4j to communicate with the Ollama API. It triggers Spring Boot’s auto-configuration to create a ChatModel bean, utilizing the specific connection details (like base URL and model name) that we define in our application properties.
- langchain4j-bom: A Bill of Materials (BOM) that manages all LangChain4j dependency versions consistently, preventing version conflicts.
Step 2: Configure Application Properties
Next, let’s configure our application settings in application.yml. Also, we will configure the AI model connection:
spring:
  application:
    name: langchain4j-chatmodel-ollama-demo

langchain4j:
  ollama:
    chat-model:
      base-url: http://localhost:11434    # Points to the local Ollama server endpoint
      model-name: gemma3:1b               # Target model identifier (must be a model pulled in Ollama)
      log-requests: true                  # Enable logging to see requests (useful for debugging)
      log-responses: true                 # Enable logging to see responses (useful for debugging)
📄 Configuration Overview
- spring.application.name: Simply gives our application a name for identification within the Spring ecosystem.
- langchain4j:
- ollama.chat-model: This section configures the “Chat” capabilities of our AI specifically for the Ollama integration.
- base-url: This is the connection point! We are pointing to our local Ollama server running at http://localhost:11434. This URL is where Ollama listens for incoming API requests from our application. Unlike cloud services, this traffic never leaves your local machine.
- model-name: Specifies which model to use. This must exactly match the model identifier you downloaded via the CLI (e.g., gemma3:1b). When your application sends a request, Ollama checks if this model is available locally and loads it into memory to generate the response.
- log-requests: When set to true, this shows the exact JSON payload and prompt we send to the AI in our console, which is very helpful for learning and debugging.
- log-responses: This displays the full response we get back from the AI in the console, allowing us to inspect the raw text and any associated metadata.
- ollama.chat-model: This section configures the “Chat” capabilities of our AI specifically for the Ollama integration.
Step 3: Application Entry Point
This is the main class that bootstraps our entire application.
package com.bootcamptoprod;

import org.springframework.boot.SpringApplication;
import org.springframework.boot.autoconfigure.SpringBootApplication;

@SpringBootApplication
public class Langchain4jChatmodelOllamaDemoApplication {

    public static void main(String[] args) {
        SpringApplication.run(Langchain4jChatmodelOllamaDemoApplication.class, args);
    }

}
Explanation:
- This is a standard Spring Boot application class annotated with
@SpringBootApplication. This single annotation enables component scanning, auto-configuration, and property support. When you run this class, Spring Boot starts the embedded web server, scans for components (like our ChatController), and automatically configures the LangChain4j ChatModel bean based on our application.yml properties. No manual configuration needed, Spring Boot handles everything!
Step 4: The controller
package com.bootcamptoprod.controller;

import dev.langchain4j.model.chat.ChatModel;
import org.springframework.beans.factory.annotation.Autowired;
import org.springframework.http.ResponseEntity;
import org.springframework.web.bind.annotation.PostMapping;
import org.springframework.web.bind.annotation.RequestBody;
import org.springframework.web.bind.annotation.RequestMapping;
import org.springframework.web.bind.annotation.RestController;

import java.util.LinkedHashMap;
import java.util.Map;

@RestController
@RequestMapping("/api/v1")
public class ChatController {

    // LangChain4j automatically injects the ChatModel bean configured to connect to Ollama
    @Autowired
    private ChatModel chatModel;

    @PostMapping("/chat")
    public ResponseEntity<Map<String, Object>> simpleChat(@RequestBody Map<String, String> request) {

        // Extract user message from the incoming request
        String userMessage = request.get("message");

        // Sends the prompt to the local model served by Ollama and gets the string response
        String response = chatModel.chat(userMessage);

        // Wrap response in a simple JSON structure
        Map<String, Object> result = new LinkedHashMap<>();
        result.put("aiResponse", response);

        return ResponseEntity.ok(result);
    }
}Code Summary:
- This REST controller exposes a /api/v1/chat endpoint that accepts POST requests. The @Autowired ChatModel is automatically injected by Spring Boot based on our configuration.
- When a request arrives with a message, we simply extract it, pass it to chatModel.chat(), and return the AI’s response wrapped in JSON.
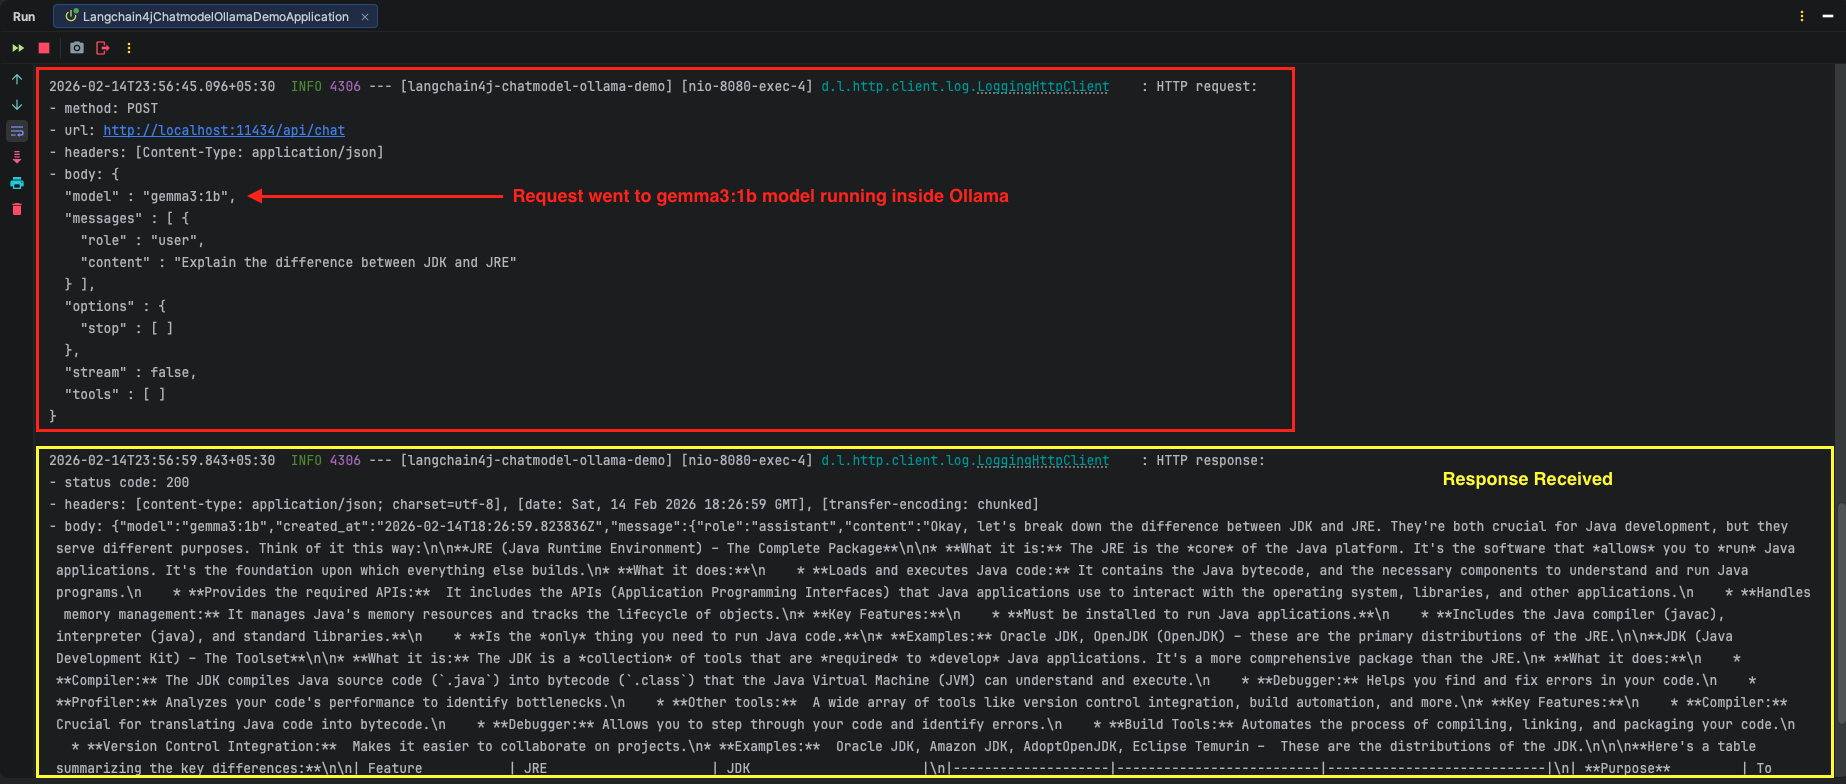
- The beauty here is that we’re using the exact same ChatModel interface we learned about in our second article. The only difference is that instead of calling OpenAI’s cloud servers, our requests go directly to the local Ollama server on port 11434. The abstraction remains consistent, making it incredibly easy to switch between local and cloud models by just changing configuration!
- The LinkedHashMap ensures our JSON response maintains property order, making the API output predictable and easier to read.
8. Testing the Application
- Pre-flight Check: Before running the Java code, confirm that your local Ollama instance is up and running on port 11434. You should also verify that your target model (e.g., gemma3:1b) is listed when you run ollama list in your terminal.
- Start Your Application: Run your Spring Boot application using Maven
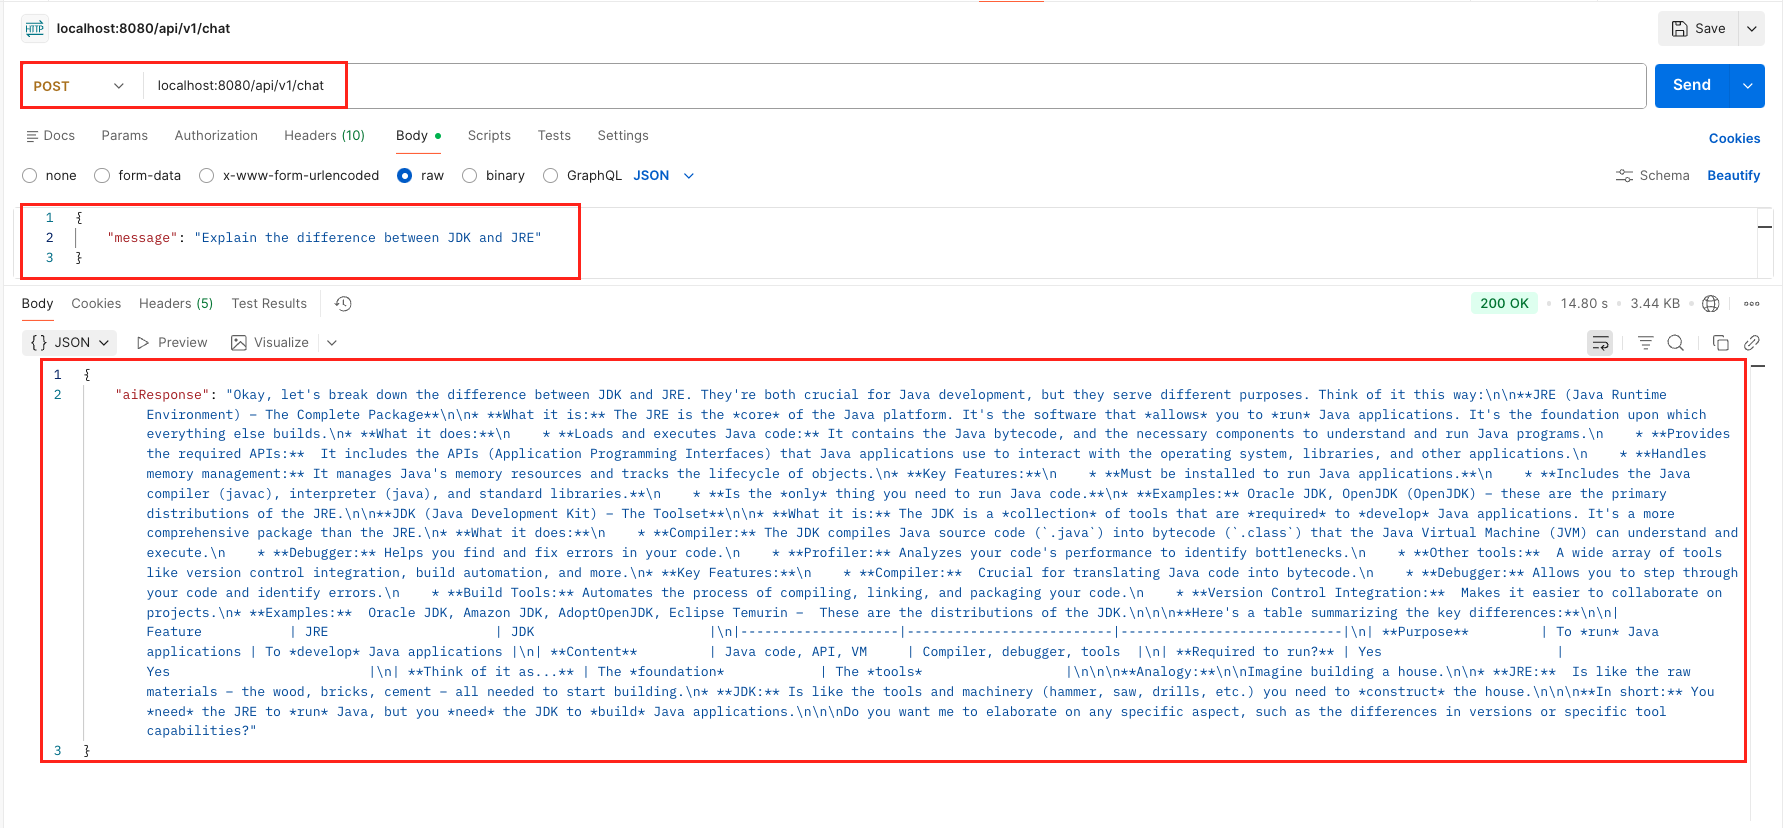
mvn spring-boot:run - Send a Request: Once the application is live, issue a POST request using cURL or Postman to see the local LLM in action:
curl -X POST http://localhost:8080/api/v1/chat \
  -H "Content-Type: application/json" \
  -d '{
    "message": "Explain the difference between JDK and JRE"
  }'
Output:
9. Video Tutorial
If you prefer a visual guide, check out our complete step-by-step video tutorial where we build this LangChain4j with Ollama integration from scratch. We demonstrate exactly how to run the gemma3 model inside ollama, and configure Spring Boot to communicate with your local llms instead of external cloud APIs!
📺 Watch on YouTube:
10. Source Code
The full source code for this LangChain4j with Ollama Demo is available on our GitHub repository. You can clone the project, ensure your local Ollama server is running on port 11434, and launch the application to start chatting with your private AI immediately.
🔗 LangChain4j ChatModel Ollama Demo: https://github.com/BootcampToProd/langchain4j-chatmodel-ollama-demo
11. Things to Consider
When connecting LangChain4j to a local LLM running in ollama, keep these important points in mind:
- Hardware Requirements: Running LLMs locally is resource-intensive. While lightweight models like gemma3:1b work well on standard laptops (8GB RAM), larger models like mistral or llama3 typically require more resources for optimal performance.
- Model Selection Strategy: Not all models are created equal. Start with smaller parameters (1B-3B) for fast development and testing, then upgrade to larger models (7B+) if your specific use case requires higher reasoning capabilities or better quality responses.
- Latency and Performance: Local inference eliminates network latency, often making it faster than cloud APIs. However, generation speed depends heavily on your hardware; smaller models generate text quickly, while larger ones trade speed for higher accuracy.
- Security Best Practices: Local execution doesn’t mean you can ignore security. Always validate and sanitize user inputs to prevent injection attacks, and ensure your Spring Boot API endpoints are protected with authentication and rate limiting.
- System Monitoring: Keep a close eye on your application’s health by tracking response times and CPU/memory usage. Setting up alerts for exceptions or unusual resource spikes is crucial for maintaining a stable local AI service.
- Managing Context Windows: Each model has a maximum context window (the amount of text it can process at once). Be aware of these limits when sending long prompts or maintaining conversation history. Refer to the model documentation for specific limits.
- Reliability and Fallbacks: Local servers can go down. It is smart to implement a fallback mechanism, such as switching to a cloud provider or returning a graceful error message, to ensure your application remains responsive even if Ollama becomes unavailable.
12. FAQs
Can I use multiple models in the same application?
Yes! You can configure multiple ChatModel beans with different model names and inject them where needed using qualifiers or named beans. However, the Spring Boot starter creates a single default bean based on your configuration.
How do I switch to a different model?
Simply change the model-name property in application.yml to the desired model (e.g., llama3.2:1b or mistral:7b), make sure you’ve pulled that model using ollama pull, then restart your application.
Do I need a GPU to run Ollama?
A GPU is recommended for better performance, especially with larger models, but it is not strictly required. Ollama can run in a CPU-only mode.
Can I stream responses with Ollama and LangChain4j?
Yes, LangChain4j supports streaming responses. You would use the StreamingChatModel interface instead of ChatModel to get responses as they are generated, token by token.
My application crashes with a “I/O error” error. What’s wrong?
This usually means the Ollama server isn’t running. Open your terminal and type ollama serve or check your taskbar to ensure the Ollama application is active. Also, verify that port 11434 isn’t blocked by a firewall.
Does this setup remember my chat history?
No, the ChatModel used in this demo is stateless. If you ask a follow-up question, the model won’t remember the previous context. To add memory, you need to implement memory in LangChain4j, which we will cover in future articles.
13. Conclusion
By connecting LangChain4j with Ollama, you’ve successfully built a powerful, private AI development environment right on your own machine. This setup allows you to build and test intelligent Java applications freely, without worrying about API bills or needing an internet connection. The best part is that your code is flexible. Thanks to LangChain4j’s design, the application you built today to talk to a local model can be pointed to a powerful cloud service like OpenAI in the future with just a few configuration changes. You now have the perfect combination: a fast and free setup for development, with a clear path to scale your application for production.
14. Learn More
Interested in learning more?
LangChain4j with Docker: Connect to Local LLMs
Add a Comment