Learn Spring AI Parallelization Workflow pattern for concurrent LLM processing. Complete guide with code examples, best practices, and real-world implementation for efficient AI applications.
1. Introduction
In our previous article, Spring AI Chain Workflow Pattern, we introduced Agentic Design Patterns, explained the difference between workflows and agents, and dove into the Spring AI Chain Workflow Pattern. If you haven’t read it yet, we highly recommend starting there, because it lays the foundation for understanding how Spring AI structures multi-step LLM (Large Language Model) interactions.
In this second installment of our Spring AI Agentic Workflow Patterns series, we will explore the Parallelization Workflow Pattern. Much like the Chain Workflow breaks a single complex task into sequential steps, the Parallelization Workflow tackles many independent tasks at the same time.
2. What is the Parallelization Workflow Pattern?
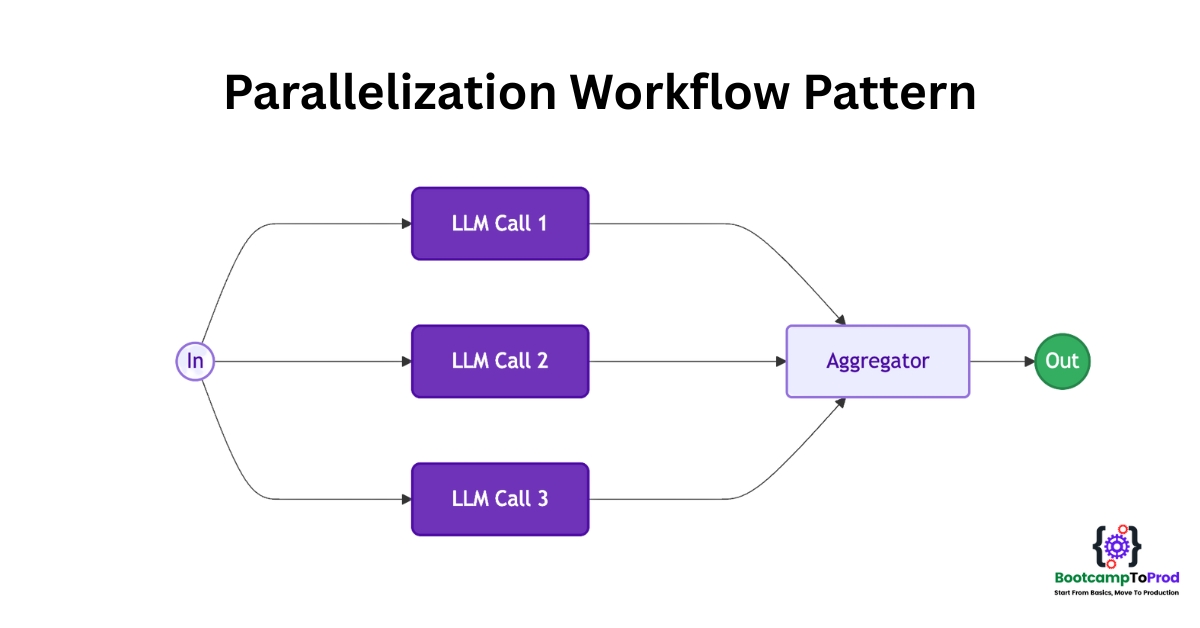
In Spring AI, the Parallelization Workflow pattern enables you to run multiple independent LLM calls concurrently and then aggregate all of their outputs in a single place. In other words, instead of waiting for one LLM call to finish before starting the next, you spin up several LLM requests at the same time. Once all requests complete, you collect and process the results.
3. Key Variations of Parallelization Workflow
There are two main variations of this pattern:
1️⃣ Sectioning (Task Decomposition):
- Break up a large task into independent subtasks
- Send each subtask to an LLM in parallel.
- Aggregate each LLM’s output into a final, cohesive result.
- Example: Analyzing different chapters of a book simultaneously for summaries, or processing different sections of a long financial report.
2️⃣ Voting (Consensus or Validation):
- For a single prompt, run multiple LLM instances in parallel to gather independent “opinions.”
- Compare or “vote” on the outputs to determine consensus or the most reliable answer.
- Useful in scenarios where quality or correctness is critical (e.g., translation validation).
- Example: Asking multiple LLM instances to answer the same complex question and then choosing the most common answer or a synthesized best answer.
4. Benefits of Parallelization Workflow
- Improved Throughput: Process multiple tasks simultaneously
- Better Resource Utilization: Maximize LLM API capacity usage
- Reduced Processing Time: Significant time savings for batch operations
- Enhanced Result Quality: Multiple perspectives in voting scenarios
- Scalability: Handle larger workloads efficiently
5. When Should You Use Parallelization Workflow?
Consider using Parallelization Workflow when:
- You have large volumes of similar but independent items to process (e.g., summarizing hundreds of customer reviews).
- You need multiple independent perspectives on the same prompt (e.g., running a “voting” mechanism to validate facts).
- Processing time is critical, and your tasks do not depend on each other’s outputs.
- You can decompose a complex operation into independent subtasks.
6. Real-World Example: Building a News Summarization System
Let’s build a simple news aggregation application that summarizes news articles from different categories simultaneously. This is perfect for parallelization because each news category can be processed independently and concurrently.
Imagine you’re building a system for a news website that needs to:
- Generate quick summaries for different news categories
- Process multiple news articles efficiently
- Provide users with digestible content across various topics
⚙️ Project Structure & Setup
Below is the folder structure of our Spring Boot application:
spring-ai-parallelization-workflow
├── src
│   └── main
│       ├── java
│       │   └── com
│       │       └──bootcamptoprod
│       │               ├── controller
│       │               │   └── NewsController.java
│       │               ├── service
│       │               │   └── NewsService.java
│       │               ├── workflow
│       │               │   └── ParallelizationWorkflow.java
│       │               ├── SpringAiParallelizationWorkflowApplication.java
│       └── resources
│           └── application.yml
└── pom.xml
Explanation:
SpringAiParallelizationWorkflowApplication.java: The Spring Boot entry pointNewsController.java: REST controller exposing our news summarization endpointNewsService.java: Business logic for news summarization using parallelizationParallelizationWorkflow.java: Class containing parallelization workflow logicapplication.yml: Spring AI configurationpom.xml: Maven dependencies
Let’s set up our project with the necessary dependencies and configurations.
Step 1: Add Maven Dependencies
Add these dependencies to pom.xml file:
<dependencies>
    <!-- Spring Boot Web for building RESTful web services -->
    <dependency>
        <groupId>org.springframework.boot</groupId>
        <artifactId>spring-boot-starter-web</artifactId>
    </dependency>

    <!-- OpenAI Model Support – configureable for various AI providers (e.g. OpenAI, Google Gemini) -->
    <dependency>
        <groupId>org.springframework.ai</groupId>
        <artifactId>spring-ai-starter-model-openai</artifactId>
    </dependency>

    <!-- Logbook Integration – useful for logging Spring AI request and response details -->
    <dependency>
        <groupId>org.zalando</groupId>
        <artifactId>logbook-spring-boot-starter</artifactId>
        <version>3.12.1</version>
    </dependency>
</dependencies>

<dependencyManagement>
    <dependencies>
        <!-- Spring AI bill of materials to align all spring-ai versions -->
        <dependency>
            <groupId>org.springframework.ai</groupId>
            <artifactId>spring-ai-bom</artifactId>
            <version>${spring-ai.version}</version>
            <type>pom</type>
            <scope>import</scope>
        </dependency>
    </dependencies>
</dependencyManagement>
In this configuration:
spring-boot-starter-web:Enables us to build a web application with REST endpointsspring-ai-starter-model-openai:Provides integration with OpenAI’s API (though we’ll configure it for Google Gemini). It includes the ChatClient for making AI calls and auto-configuration for easy setup.logbook-spring-boot-starter:Adds logging for all HTTP requests and responses. In our example, it helps us see that multiple AI calls are made in parallel by showing each request and its response.spring-ai-bom:ThedependencyManagementsection uses Spring AI’s Bill of Materials (BOM) to ensure compatibility between Spring AI components. By importing the BOM, you don’t need to manually specify versions for each Spring AI artifact—it ensures compatibility and prevents version conflicts automatically.
Step 2: Configure Application Properties
Now, let’s configure our application and add configuration related to AI using application.yml:
spring:
  application:
    name: spring-ai-parallelization-workflow

  # AI configurations
  ai:
    openai:
      api-key: ${GEMINI_API_KEY}
      base-url: https://generativelanguage.googleapis.com/v1beta/openai
      chat:
        completions-path: /chat/completions
        options:
          model: gemini-2.0-flash-exp

logging:
  level:
org.zalando.logbook.Logbook: TRACE📄 Configuration Overview
This configuration focuses on AI integration with Google’s Gemini model via the Spring AI OpenAI starter:
👉 AI (OpenAI Starter) Settings
- api‑key: Your secret key for authenticating with the AI service. Keep this safe and out of source control.
- base‑url: Overrides the default OpenAI endpoint so requests go to Google’s Gemini API instead.
- completions‑path: The REST path for chat-based completions—appended to the base URL when making requests.
- model: Chooses which AI model to call (e.g.
gemini-2.0-flash-exp). This determines the capabilities and response style you’ll get back.
Make sure to set the GEMINI_API_KEY environment variable with your actual Google Gemini API key before running the application.
👉 Logging Configuration
- Logbook Trace Level: Sets Logbook to the TRACE level, which logs full details of every HTTP request and response.
🤖 Google Gemini APIs are great for proof-of-concept (POC) projects since they offer limited usage without requiring payment. For more details, check out our blog, where we dive into how Google Gemini works with OpenAI and how to configure it in case of our Spring AI application.
Step 3: Core Parallelization Workflow Implementation
Now let’s create our main parallelization class. This is where the magic of parallel processing happens:
import org.springframework.ai.chat.client.ChatClient;
import org.springframework.stereotype.Component;

import java.util.List;
import java.util.concurrent.CompletableFuture;
import java.util.concurrent.ExecutorService;
import java.util.concurrent.Executors;

@Component
public class ParallelizationWorkflow {

    private final ChatClient chatClient;

    public ParallelizationWorkflow(ChatClient.Builder chatClientBuilder) {
        this.chatClient = chatClientBuilder.build();
    }

    public List<String> parallel(String prompt, List<String> inputs, int nWorkers) {

        try (ExecutorService executor = Executors.newFixedThreadPool(nWorkers)) {
            // Create CompletableFuture for each input
            List<CompletableFuture<String>> futures = inputs.stream()
                    .map(input -> CompletableFuture.supplyAsync(() -> {
                        return chatClient.prompt(prompt + "\n\nContent: " + input)
                                .call()
                                .content();
                    }, executor))
                    .toList();

            // Collect results in order
            return futures.stream()
                    .map(CompletableFuture::join)
                    .toList();
        }
    }
}
Explanation
- Overall Purpose & Core Component:
TheParallelizationWorkflowcomponent is designed to speed up AI prompt processing by running multiple inputs in parallel. It leverages Spring AI’sChatClientto send prompts to an LLM and retrieve responses efficiently. - Constructor: Client and Prompt Setup:
The constructor receives aChatClient.Builder(injected by Spring) and uses it to build a reusableChatClientinstance. This client is then used throughout the class to handle prompt interactions. - Core Logic (
parallelmethod): Parallel AI Processing:
Theparallel(String prompt, List<String> inputs, int nWorkers)method is the main logic that processes a batch of inputs concurrently.- Thread Pool Creation: Uses a fixed-size thread pool with
nWorkersto handle simultaneous tasks. - Parallel Execution: Each input is sent to the LLM as an async task using
CompletableFuture.supplyAsync(). - Prompt Construction: For each input, the method combines the shared prompt with the specific content using string concatenation.
- LLM Interaction: The constructed prompt is sent to the LLM via
chatClient.prompt(...).call().content(). - Ordered Result Collection: Once all tasks complete, the results are gathered in the same order as inputs using
.map(CompletableFuture::join).
- Thread Pool Creation: Uses a fixed-size thread pool with
Step 4: Create Service Class
Now, let’s create a service class to summarize news articles by category using Spring AI and our parallel workflow logic.
import com.bootcamptoprod.workflow.ParallelizationWorkflow;
import org.springframework.stereotype.Service;

import java.util.HashMap;
import java.util.List;
import java.util.Map;

@Service
public class NewsService {
    private final ParallelizationWorkflow parallelizationWorkflow;

    public NewsService(ParallelizationWorkflow parallelizationWorkflow) {
        this.parallelizationWorkflow = parallelizationWorkflow;
    }

    public Map<String, Object> summarizeNews() {

        String summarizationPrompt = getSummarizationPrompt();

        // Sample news content for different categories
        Map<String, String> newsContent = getNewsContent();

        List<String> categories = List.copyOf(newsContent.keySet());
        List<String> articles = categories.stream()
                .map(newsContent::get)
                .toList();

        long startTime = System.currentTimeMillis();

        // Execute parallel summarization with 4 concurrent workers
        List<String> summaries = parallelizationWorkflow.parallel(summarizationPrompt, articles, 4);

        long processingTime = System.currentTimeMillis() - startTime;

        // Combine categories with their summaries
        Map<String, String> categorizedSummaries = new HashMap<>();
        for (int i = 0; i < categories.size(); i++) {
            categorizedSummaries.put(categories.get(i), summaries.get(i));
        }

        return Map.of(
                "summaries", categorizedSummaries,
                "processingTimeInMillis", processingTime,
                "categoriesProcessed", categories.size()
        );
    }

    private String getSummarizationPrompt() {
        return """
                Summarize the following news content in 2-3 sentences.
                Focus on the key facts and main points.
                Make it clear and easy to understand.
                """;
    }

    private Map<String, String> getNewsContent() {
        return Map.of(
                // Dummy articles
                "Technology",
                """
                        Apple announced its latest iPhone 15 series with significant upgrades including
                        a new titanium design, improved camera system with 5x optical zoom, and USB-C
                        connectivity replacing the Lightning port. The new phones also feature the A17
                        Pro chip built on 3nm technology, offering better performance and battery life.
                        Pre-orders start next Friday with prices starting at $799 for the base model.
                        """,

                "Sports",
                """
                        The World Cup final between Argentina and France delivered one of the most
                        thrilling matches in football history. Lionel Messi scored twice in regular
                        time and once in the penalty shootout, leading Argentina to victory after
                        a 3-3 draw. The match went to extra time with Kylian Mbappe scoring a
                        hat-trick for France. This victory marks Messi's first World Cup win.
                        """,

                "Business",
                """
                        Tesla reported record quarterly earnings with revenue reaching $25.2 billion,
                        up 37% from the previous year. The company delivered over 466,000 vehicles
                        in the quarter, exceeding analyst expectations. CEO Elon Musk announced
                        plans to reduce vehicle prices further while maintaining profitability
                        through improved manufacturing efficiency and cost reductions.
                        """,

                "Health",
                """
                        Scientists at Stanford University have developed a new blood test that can
                        detect Alzheimer's disease up to 20 years before symptoms appear. The test
                        measures specific proteins in the blood that indicate early brain changes.
                        Clinical trials involving 1,000 participants showed 95% accuracy in
                        identifying patients who would later develop the disease.
                        """
        );
    }
}
Explanation
- Service Overview:
NewsServiceis a Spring service that summarizes news articles from multiple categories efficiently using parallel processing. - Dependency Injection:
The service gets an instance ofParallelizationWorkflowwhich manages running AI summarization tasks concurrently. - Summarization Process:
It defines a shared prompt for summarization, loads sample news articles by category, and sends the articles to be summarized in parallel using 4 worker threads. - Result Assembly:
After processing, it pairs each summary with its category and returns a map containing summaries, total processing time, and the number of categories processed. - Business Logic Encapsulation:
The service contains:- Prompt Definition: Clear instruction for the AI model
- Sample Data: Dummy news content from different categories
- Workflow Orchestration: Calling the parallel workflow with appropriate parameters
- Performance Tracking: Measuring processing time to demonstrate efficiency
- Result Formatting: Organizing results into a structured response
Step 5: Create Controller
Now, let’s create a REST controller to expose an endpoint that returns summarized news by category using our service.
import com.bootcamptoprod.service.NewsService;
import org.springframework.http.ResponseEntity;
import org.springframework.web.bind.annotation.GetMapping;
import org.springframework.web.bind.annotation.RequestMapping;
import org.springframework.web.bind.annotation.RestController;

import java.util.Map;

@RestController
@RequestMapping("/api/news")
public class NewsController {

    private final NewsService newsService;

    public NewsController(NewsService newsService) {
        this.newsService = newsService;
    }

    @GetMapping("/summarize")
    public ResponseEntity<Map<String, Object>> summarizeNews() {
        Map<String, Object> result = newsService.summarizeNews();
        return ResponseEntity.ok(result);
    }
}
Explanation
- Handles Incoming Requests and Returns Results:
Its main job is to listen for GET requests at/api/news/summarize. When a request comes in, the controller calls theNewsServiceto summarize news articles and then sends back the summarized results as the HTTP response. - API Gateway for News Summarization:
ThisNewsControlleracts as the web entry point for news summarization. It exposes an API endpoint that external clients—like a frontend app or another service—can call to get summarized news by category. - Delegates to the News Service:
The controller itself does not perform any summarization logic. Instead, it receives an instance ofNewsService(via constructor injection) and uses it to handle the actual summarization work.
Step 6: Application Entry Point and Logging Setup
Now, let’s define the main class that boots our Spring Boot app and sets up API call logging for all LLM interactions.
import org.springframework.boot.SpringApplication;
import org.springframework.boot.autoconfigure.SpringBootApplication;
import org.springframework.boot.web.client.RestClientCustomizer;
import org.springframework.context.annotation.Bean;
import org.zalando.logbook.Logbook;
import org.zalando.logbook.spring.LogbookClientHttpRequestInterceptor;

@SpringBootApplication
public class SpringAiParallelizationWorkflowApplication {

    public static void main(String[] args) {
        SpringApplication.run(SpringAiParallelizationWorkflowApplication.class, args);
    }

    @Bean
    public RestClientCustomizer restClientCustomizer(Logbook logbook) {
        return restClientBuilder -> restClientBuilder.requestInterceptor(new LogbookClientHttpRequestInterceptor(logbook));
    }

}Explanation
- Main Class to Run the Application:
SpringAiParallelizationWorkflowApplicationis the starting point of our application. When you run this class, Spring Boot initializes all components and starts the embedded server. - RestClient Customizer for Logging:
We define aRestClientCustomizerbean that registersLogbookClientHttpRequestInterceptor. This enables automatic logging of all outbound API calls made through Spring’s ChatClient. - Why It Matters:
This is especially useful for observing interactions with your configured LLM (like Google Gemini). For example, when the summarization endpoint processes 4 articles in parallel, your application logs will clearly show 4 separate calls being made—thanks to Logbook.
7. How Our Parallelization Workflow Works Step-by-Step
Let’s trace through exactly what happens when the controller endpoint is called:
- Request Initiation: Client calls the
/api/news/summarizeendpoint - Service Orchestration:
NewsServiceprepares news content and calls the parallelization workflow - Parallel Processing: The workflow creates 4 concurrent threads to process different news categories
- AI Summarization: Each thread makes independent calls to ChatClient with category-specific content
- Result Aggregation: All summaries are collected and returned in the original order to client
🖥️ Verify the output
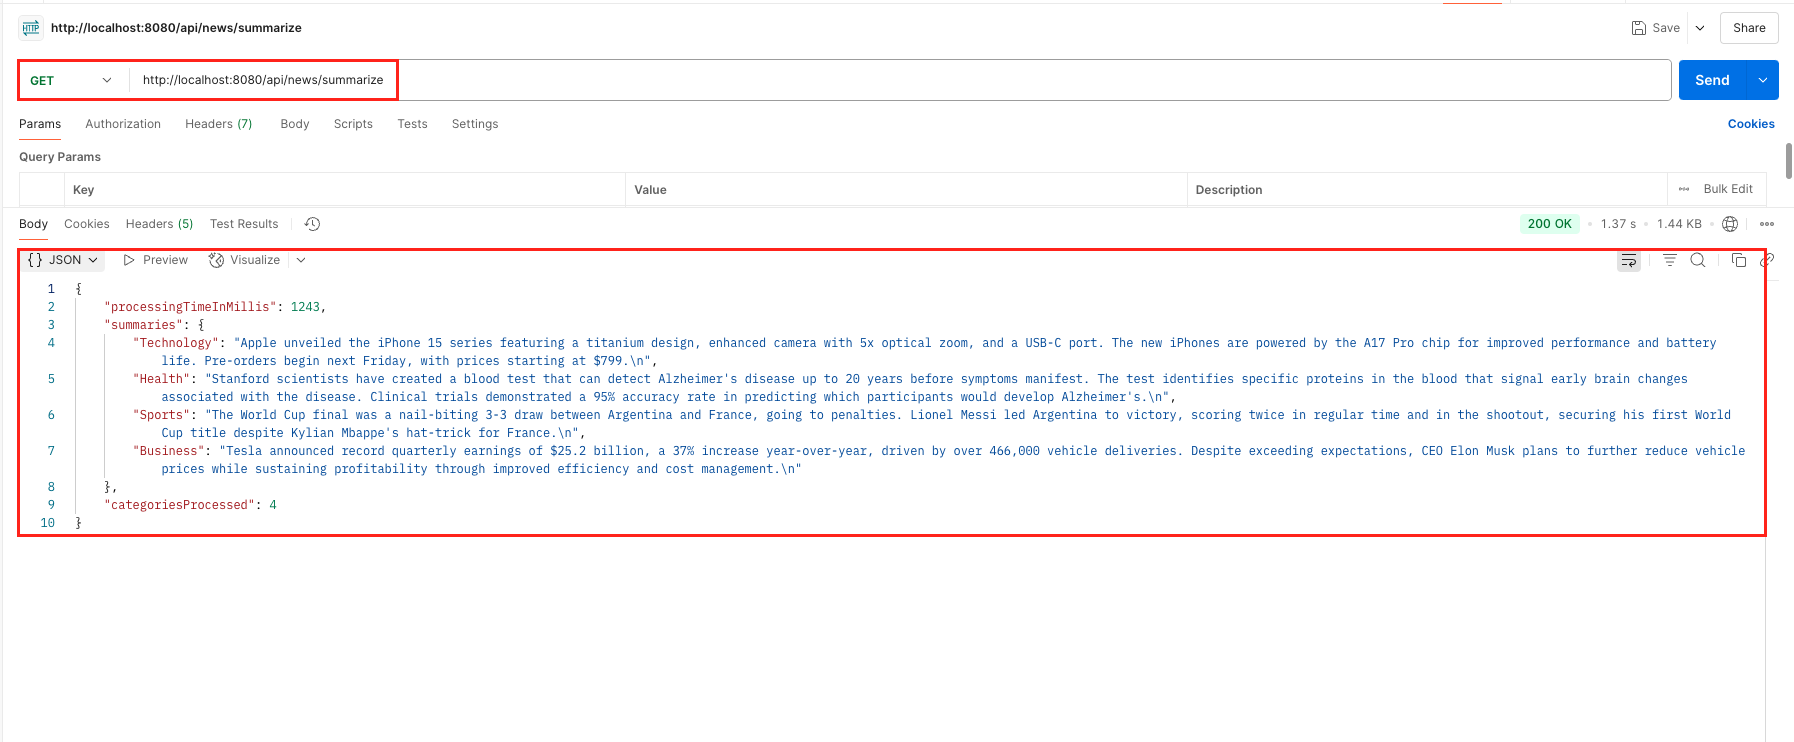
Once your application is running, you can test the parallel news summarization by making a GET request to GET http://localhost:8080/api/news/summarize
The response includes summarized news categorized by topic along with processing details. Since the Logbook dependency was also added in the application, you can verify in your application logs that 4 parallel calls were made to Google Gemini (or your configured LLM) to summarize the 4 news articles concurrently.
8. Video Tutorial
If you prefer visual learning, check out our step-by-step video tutorial demonstrating the Spring AI Parallelization Workflow implementation in action.
📺 Watch on YouTube:
9. Source Code
The complete source code for this Spring AI Parallelization Workflow example is available on GitHub. You can clone the repository and run it locally to see the parallelization workflow pattern in action.
🔗 Spring AI Parallelization Workflow Demo App: https://github.com/BootcampToProd/spring-ai-parallelization-workflow
10. Things to Consider
When implementing the parallelization workflow pattern, keep these important considerations in mind:
- Task Independence: Ensure the tasks you’re parallelizing are truly independent. If one task depends on the output of another, this pattern may not be suitable without adjustments (such as combining it with a chaining pattern).
- API Rate Limits: Many LLM providers enforce rate limits on the number of requests per second or minute. Setting a high number of parallel workers could result in throttled or rejected requests. Always configure the worker count thoughtfully.
- Resource Management (CPU, Memory): Each parallel task uses system resources. Even though LLM calls are mostly I/O-bound, managing multiple threads introduces overhead. Be mindful of CPU and memory usage, and monitor performance.
- Error Handling: Some parallel tasks might fail. Implement solid error handling to decide whether one failure should halt the entire process or if partial results can still be used.
- Concurrency Control (Worker Count): Choosing the right number of workers is critical. Too few won’t offer much speed-up; too many might overwhelm your system or breach LLM rate limits. Tuning this based on your workload and provider is often necessary.
- Cost Implications: Each parallel task typically results in a separate API call. While this can reduce execution time, it may increase overall API usage and cost, as token usage and calls scale linearly with the number of tasks.
- Result Aggregation: Think about how you want to combine results from parallel tasks. In simple use cases, collecting them into a list may suffice. For more advanced workflows (e.g., voting mechanisms), more complex aggregation logic might be required.
11. FAQs
What’s the difference between sequential and parallel processing workflows?
In a sequential workflow, tasks are executed one after the other, and the result of one step is often used as the input for the next. In contrast, a parallel workflow runs multiple tasks at the same time. These tasks are typically independent or smaller pieces of a larger goal.
How should I decide the number of worker threads to use?
Keep in mind the API rate limits imposed by your LLM provider. Monitor CPU and memory usage to avoid overloading your system. Start with a small number of workers (e.g., 2 to 5), and gradually increase while keeping an eye on performance and any throttling or errors.
What happens if one of the parallel tasks encounters an error?
Each task can handle its own exceptions individually. You can choose to log the error and proceed, return a default message for that task, or retry it. This provides flexibility in how failures are managed during execution.
Can I use different prompts for each task when running them in parallel?
Absolutely. While a shared prompt can be used, you’re free to construct unique prompts for each input. This is helpful when the nature of each task varies and needs customized instruction.
Is this approach limited to a specific LLM provider?
The parallel execution logic is based on standard Java concurrency features, which work independently of any specific LLM. So, yes, you can use this pattern with any LLM supported by Spring AI
12. Conclusion
The parallelization workflow in Spring AI helps in boosting performance when interacting with LLMs. By executing multiple tasks concurrently, you can dramatically cut down on total processing time, especially in use cases like summarization, classification, or content generation at scale. However, to use this pattern effectively, it’s important to consider factors like task independence, API rate limits, system resource usage, and proper error handling. With the right balance, parallelization can bring both speed and efficiency to your AI-powered applications.
13. Learn More
Interested in learning more?
Spring AI Chain Workflow Pattern: Complete Guide with Example
Add a Comment